Table of Contents
Advertisement
Quick Links
Omnia-6
Broadcast Audio Processor
Installation and Operation Manual
Version 1.1L / April 2004
Applicable to Omnia-6 FM / HDFM / EX Models
With v7.0.1 Release Software and Higher
Omnia ● 2101 Superior Avenue Cleveland, Ohio 44114 USA
TEL: +1 216.241.7225 ● FAX: +1 216.241.4103 ● Email:
Omnia Europe ● Johannistrabe 6 D-85354 Freising Germany
TEL: +49 8161 42467 ● FAX +49 8161 42402 ● Email:
EX
HD + FM
info@omniaaudio.com
europe@omniaaudio.com
www.omniaaudio.com
www.omniaaudio.com
Advertisement
Table of Contents

Related Manuals for Omnia 6EX


Summary of Contents for Omnia 6EX
- Page 1 Broadcast Audio Processor Installation and Operation Manual Version 1.1L / April 2004 Applicable to Omnia-6 FM / HDFM / EX Models With v7.0.1 Release Software and Higher Omnia ● 2101 Superior Avenue Cleveland, Ohio 44114 USA TEL: +1 216.241.7225 ● FAX: +1 216.241.4103 ● Email: info@omniaaudio.com...
-
Page 2: Greetings
Sharing Telos’ ingenuity for DSP design has been tremendously beneficial to our work on Omnia. If you thought the original Omnia made noise on the dial, all I can say is look out! It’s like one of the top-of-the hour station ID’s that Scott Shannon used to jam on Z-100 “Lock It In And Rip The Knob Off!”... -
Page 3: Safety Instructions
14. Object and Liquid Entry. Never push objects of any kind into this product through openings as they may touch dangerous voltage points or short out parts that Omnia-6ex Use and Operation Manual – V:1.00... -
Page 4: Hazard / Warning Labels
Radio Interference Regulations of the Canadian Department of Communications. Le present appareil numerique n'emet pas de bruits radioelectriques depassant les limits applicables aux brouillage radioelectrique edicte par le ministere des Communications de Canada. Omnia-6ex Use and Operation Manual – V: 1.10... - Page 5 For analog and digital connections, the cable shield MUST be connected to the XLR-type connector shell, which is at chassis ground potential! Omnia-6ex Use and Operation Manual – V: 1.10...
-
Page 6: Notices
Tech Bulletins and Papers http://www.omniaaudio.com/support/default.htm Tech Support – Software Upgrades http://www.omniaaudio.com/support/warranty.htm Warranty Thank you for selecting the incredible Omnia-6EX Audio Processor. Your continued patronage and support are appreciated. Sincerely, Team Omnia Omnia-6ex Use and Operation Manual – V: 1.10... -
Page 7: Specifications
24-bit Crystal Semiconductor CS5360 A/D Converter, which has a specified Dynamic Range of 105 dB. The dynamic range of the Omnia 6 digital signal processing chain is 144 dB. Typical SNR using the “FactTest2” preset is greater than –80dB referenced to 100% modulation. - Page 8 Output Level (100% peak modulation): Adjustable from -6 dBu to +24 dBu peak, into 600 ohms or greater load, software-adjustable. Crystal Semiconductor CS4390 24 bit, 128x over-sampled. D/A Conversion: Two, EMI-suppressed XLR-male. Pin 1 chassis ground, Pin 2 “Hot”. Connectors: Omnia-6ex Use and Operation Manual – V: 1.10...
- Page 9 Baud rates of 9,600, 19,200, and 57,600 supported. TCP/IP Ethernet: Emulates a Telnet session on Port 23. Connectors: RS-232 port, EMI-suppressed DB-25 female connector. Industry standard EMI suppressed RJ-45 connector for Ethernet. Omnia-6ex Use and Operation Manual – V: 1.10...
- Page 10 35 lbs. / 15.876 kg Shipping Weight: Telos/Omnia Research and Development is constantly working to improve the quality of our products. Actual specifications are subject to change or improvement without notice. Omnia-6ex Use and Operation Manual – V: 1.10...
-
Page 11: Warranty
Omnia, 2101 Superior Avenue, Cleveland, Ohio 44114. Omnia, at its option will either repair or replace the Products and such action shall be the full extent of Omnia’s obligation under this Warranty. After the Products are repaired or replaced Omnia will return them to the party that sent the Products, and Omnia will pay for the cost of shipping. -
Page 12: Table Of Contents
User Interface Tutorial Save To Card Current State Menu Overview Menu Items System Preset Port Baud Process Security Lev(el) Input & Output Submenus Backlight Encode Menu Selections, continued Set Time Menu Overview, continued Omnia-6ex Use and Operation Manual – V: 1.10... - Page 13 Thunder Bass Studio Microphone Processing Processor Latency / Time Delay Operating Levels 6 - REMOTE CONTROL SOFTWARE Omnia-6EX Connections Software Installation Output Connection Options (FM Mode) Setup and Configuration Omnia-6EX Connections, continued Omnia-6ex Use and Operation Manual – V: 1.10...
-
Page 14: Troubleshooting
Omnia-6EX Parameter Worksheet Creating a Trigger Script Example: Switch to Mono Appendix D Example: Switch to Stereo Using the Script Editor, continued Software Upgrade Procedures Interface Connector Appendix E GNU General Public License Omnia-6ex Use and Operation Manual – V: 1.10... -
Page 15: Quick Start Setup Guide
Omnia-6EX Quick-Start Setup Guide We know that you’re probably in a hurry to get on the air with your new Omnia 6. If you have technical expertise and previous knowledge of audio processor fundamentals, using the following Eight-Point Quick-Start Checklist will get you up and running as quickly as possible. -
Page 16: Omnia-6Ex Pre-Installation Tasks
Chapter-1: Pre-Installation Even though we believe the Omnia-6EX is the easiest processor to install in its class, please take a few minutes to read through this chapter before proceeding with the installation. This section offers common procedures for installing your new Omnia-6EX processor. Note that there are additional installation and operation tips presented in Chapter 4 that may pertain to your specific installation. -
Page 17: Ac Environment Considerations
The Omnia-6EX also contains a third PC Memory Card slot that is used to load software for the Front Panel. The slot is located under the top cover on the right-hand side of the Front Panel circuit board and is normally un- occupied. -
Page 18: Installation And Connections
The Omnia-6EX requires 3RU (5.25” [37 mm]) of rack space. Rack mount the unit using four rack screws. If only two screws are going to be used, they should be in the bottom holes in the Omnia front panel. No other two-screw... -
Page 19: Audio Inputs
During system power-up, the front panel LCD screens display several status screens while the operating software and DSP code is loaded. Once the main Omnia-6EX Main Menu is shown on the right screen, and the Meter Screen is shown on the left display, the unit is ready for use. -
Page 20: 19 Khz Sync Output
SCA Input (BNC) (FM Mode Only) Any SCA signal above 53 kHz can be added to the composite outputs of the Omnia-6EX by connecting the SCA signal to the SCA INPUT connector. The SCA signal is mixed in the analog domain directly into both composite outputs. -
Page 21: Interface Connection
Interface Connection (DB-9M) This connector is the interface to the Omnia's internal trigger script function. Eight of the pins are “trigger” inputs and the remaining pin is the ground reference. The trigger inputs can be used to dynamically alter the Omnia-6fm’s operation in response to logic signal transitions at the interface connection. -
Page 22: Powering Up
Powering Up When the Omnia-6EX is first turned on, there is a few seconds of delay as the system starts up. You should notice revolving Omnia logos on the screens, and then the main screens should appear. After approximately ten seconds, audio will be present from the analog, composite and headphone outputs. The AES/EBU outputs also become usable at this time. -
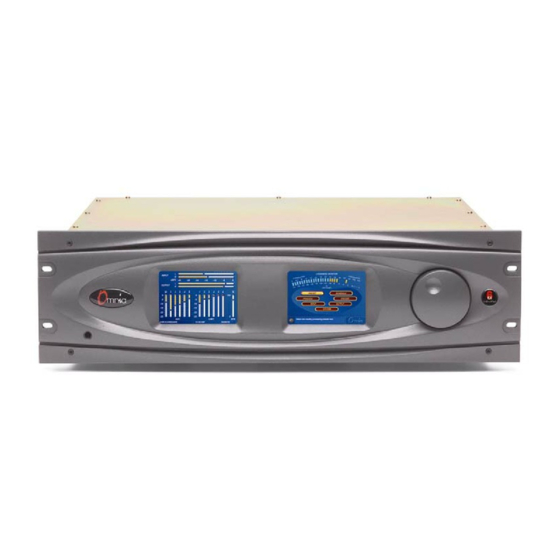
Page 23: The Omnia-6 User Interface
Chapter-2: The Omnia 6 User Interface Now that your Omnia-6EX is rack-mounted, connected to a program audio source, and turned on, you’re ready to learn how to operate it! This chapter covers the Graphical User Interface, your window into the Omnia-6EX processor. -
Page 24: Using The Jog Wheel
Using the Jog Wheel The main user control for the Omnia-6EX is the large, easy to use jog wheel with its integral push-switch. Using the control is both intuitive, and efficient, making it easy to navigate the menu structure of the Omnia-6EX. Processing changes and system adjustments can be quickly made with ease without having to remember multiple controls, their positions, and what they do in each menu. -
Page 25: Level Meters And Processing Bargraphs
The thirteen vertical bargraphs in the lower half of the Meter Display show the processing activity in real time within the Omnia-6EX. The first vertical meter (labeled W) represents the processing activity in the Wideband AGC section. The five vertical “AGC” meters show the processing activity of each of the AGCs in the multi-band AGC section. -
Page 26: Main Menu Display
Main Menu Display The Omnia-6EX Main Menu is displayed on the right hand LCD screen, and offers seven menu selections: Preset, Schedule, Process, Encode, Input, Output and System. Below the Main Menu in the lower left corner of the display is a multipurpose “Help Text”... -
Page 27: X" Close Window Icon
To cancel a control change, return the jog-wheel to the control’s original value. To apply a new level or value and return to Highlight Mode, just click the jog-wheel. Omnia-6ex Use and Operation Manual – V: 1.10... -
Page 28: Remote Control Via Network Indicator
Note: The headphone amplifiers are fed from the same high quality, 24-bit D to A converter as the analog XLR outputs. Therefore, the overall Headphone volume will also be affected by the setting of the Peak Output Level controls in the Output Menu. Omnia-6ex Use and Operation Manual – V: 1.10... -
Page 29: User Interface Tutorial
Main Menu. 5. Note that as you adjust the Input Source selection in this menu, the wording above the Input level bargraph on the Meter Screen changes to follow the selected source name. Omnia-6ex Use and Operation Manual – V: 1.10... - Page 30 6. Rotate the jog-wheel until the “H”ome icon is highlighted. Click to return to the main menu. All of the Omnia-6EX’s software parameters are set in a similar fashion using the jog-wheel in Highlight Mode to scroll through menu items and parameters. Clicking a highlighted item selects it; when that item is a control, the jog- wheel adjusts the value or level.
-
Page 31: Menu Overview
Highlighting Preset and clicking the jog wheel will open the Preset submenu. Appearing here is a list of all of the presets stored on the Omnia PC Card. Highlighting a Preset and clicking “Choose” allows that preset to be loaded into the Omnia-6fm, instantly setting the various processing parameters. You may also compare and modify settings between presets, save the current processor settings to an existing or new user preset, rename or delete user presets and password protect user presets using options found on this submenu. -
Page 32: Input & Output Submenus
Like the Input and Output menu choices, these menu items are typically adjusted during installation, and are saved as a System Configuration (see above). See Page 42 for full details. Encode Submenu Omnia-6ex Use and Operation Manual – V: 1.10... -
Page 33: Schedule
(which will be the factory defaults if you don’t use Save to Card!). For this reason, Omnia suggests that you backup the system using the System/Save to Card function after any custom parameter editing has been completed. -
Page 34: Menu Selections
To load a preset, highlight the Choose option to move the highlighting to the Preset List, then rotate the jog wheel to highlight the desired preset name and click. The processing algorithms will be updated to the new values almost instantly. Omnia-6ex Use and Operation Manual – V: 1.10... -
Page 35: Modify (Preset)
Opens up a window so a new preset name can be entered. Preset names can be up to 12 characters in length. The number of presets that can be saved to the PCMCIA card is limited by the Omnia operating system to 50 total presets (including the factory presets). -
Page 36: Protect
Please understand that it is impossible for the factory (or anyone else for that matter) to gain access to an Omnia preset that has been encrypted by the Protect Preset utility. Unless the correct... -
Page 37: Process
6fm. Each block-diagram icon, when highlighted and clicked, opens up a parameter window that pertains to that part of the Omnia-6EX processing circuitry. See Chapter 5, “Fine Tuning Your Sound” starting on Page 60 for an in-depth discussion of using this submenu to edit presets. -
Page 38: Master Drive
A message will appear on the screen to warn you that you have selected the Auto mode, and what behavior to expect. If the Hunt feature is also selected, the Omnia audio inputs will be alternately tried at the interval that is set under the “Hunt”... -
Page 39: High Pass Filter
3. Audio must have actually been ‘detected’ first on an input before the Hunt process can function. Said another way, if the Omnia is sitting on the workbench with no audio applied and the Auto and Hunt options are enabled, nothing will happen. The Omnia needs to see valid audio FIRST before it can detect the absence of audio and begin the Auto switch phase. -
Page 40: Output
The control range is from –2.0 dBu (-24 dBFS) to +22 dBu (0dBFS) peak output level in precise 0.1 dB steps. Since the Omnia defines the absolute peak levels prior to this control, this level control is normally set to the maximum acceptable input level, or just below it, of the device that Omnia-6 is driving (STL, transmitter, etc). -
Page 41: Multiplex Power Limiting
In certain parts of the world, the average multiplex signal power must be controlled to reduce adjacent channel interference. The currently enforced standard falls under the ITU BS-412 regulations. The Omnia-6EX has a very effective Multiplex Power Limiter that may be enabled to comply with these regulations. -
Page 42: Encode
Clipping control before adjusting the composite outputs. Note that reference line-up tones applied at the Omnia-5EX input cannot be used since the RMS level of a steady state tone does not crest at 100% modulation. -
Page 43: Separation
The Omnia-6 defaults to a setting of Stereo, using the full L-R signal. We suggest that you leave it in that mode, but the other settings are available for those who wish to experiment, including a setting of Mono. -
Page 44: Save To Card
Save to Card Stores the Schedule and daypart information on the Omnia PC Card. You might do this for safety or even for sharing the data with other Omnia-6 processors. It saves all of the currently defined dayparts and the daypart state to the Omnia PC card. -
Page 45: Backlight
To maintain accurate dayparting, you should periodically reset the internal clock to your external reference. The Real Time Clock IC used in the Omnia-6EX typically has an accuracy of better than +/- 0.5 minutes per month. -
Page 46: Lock Unit
Reset Passwords If front panel passwords for levels 1 and / or 2 are lost or forgotten, it is possible to reset the Omnia’s passwords back to their factory defaults. When the Reset Passwords box is clicked, you will be prompted for the current level 3 password. -
Page 47: Security Config
Security Config Submenu The Omnia now has the NTP (Network Time Protocol) function built in to enable it to retrieve the time of day from an external source and keep the Omnia’s clock set very accurately over the long term. Both long and short term timekeeping are enhanced by this feature. -
Page 48: Network
The factory assigned, twelve-digit, hexadecimal hardware address of the Omnia 6 Ethernet interface. IP Address The customer assigned TCP/IP address of the Omnia 6 Ethernet interface. See your IT department if you aren't certain how to configure this parameter. Gateway The gateway setting must match your network gateway. -
Page 49: The Omnia-6Ex: Audio Processing Overview
Chapter-3: The Omnia-6EX: Audio Processing Overview This section presents an overview of the Omnia-6EX processor. Refer to the block diagram shown on the Process submenu to provide a functional order to the various processing sections. Full details about all of the individual controls in the Process submenu can be found in Chapter 5: “Fine Tuning Your Sound”... -
Page 50: Wideband Agc
Wideband AGC: A very flexible wideband leveler section provides smooth, transparent control of the input program. This is achieved through two significant Omnia innovations, a dual referenced release gate and a hidden, intelligent “makeup” gain algorithm. The dual gate reference is a unique process that correlates the dynamics of the audio input signal to a “rolling”... -
Page 51: Phat Bass Eq
(or “phatter”) with the illusion of added loudness. The pleasing low frequency harmonics generated by the Omnia's Phat Bass algorithm helps your station sound bigger and fuller on radios with smaller speakers, such as portable or desktop radios. This gives your listeners the illusion of deeper bass response from their radios than they're actually capable of. -
Page 52: Look Ahead Limiter
New in Omnia-6EX is a pilot notch filter to protect the pilot region from clipper artifacts. The wide, deep notch helps the stereo pilot region stay immaculately clean, reducing multipath, and keeping receiver's stereo decoders firmly locked to your signal. -
Page 53: Processor Interfacing
These sections can add significant distortion and modulation overshoot if not set up properly. If a composite STL is used, the multiplexed output of the Omnia-6EX can be connected directly to the STL. At the transmitter location, the composite receiver can be directly connected to the exciter. -
Page 54: Digital Stl Use
However, the Omnia- 6EX can be placed at the studio if you follow a few guidelines and are willing to accept some limitations. (See “Interfacing with a Digital STL and/or Exciter” below.) In this scenario, there also must be a provision for a stereo generator/encoder at the transmitter (most digital exciters provide this function);... -
Page 55: Processor Latency / Time Delay
We have measured the propagation time delay, the amount of time it takes for the audio signal to travel from the input of Omnia-6EX to the output at approximately 9ms at 1khz. This is enough for a slight voice- character coloration to be audible to the person speaking, but usually not enough to be a problem for talent monitoring off the air. -
Page 56: Omnia-6Ex Connections
In the Omnia-6EX Input menu set the Pre-emphasis “ON” at the correct value for your country. In the Output Menu, set the De-emphasis option to “OFF”. -
Page 57: Pre-Emphasis: Where To Insert
When using the AES/EBU outputs to drive a digital STL or exciter, your Omnia-6EX’s sampling rates must be set to match the lowest internal operating sampling rate used in any device which follows the Omnia-6 in the audio chain. You will find these options in the Output Menu; available selections are 32kHz, 44.1kHz, 48kHz, and 96kHz. -
Page 58: Output Connection Options (Hd Mode)
HD Mode (Digital Channel) Output Connection Options The Output Menu contains a virtual patch bay for assigning the Omnia’s three different outputs to its two main processing chains. Note that the two Composite MPX Outputs are always connected to the conventional FM processing blocks. -
Page 59: Output Sample Rate Settings
48 KHz A - B B - C B - C 96 KHz A - B A - B B - C AES-2 Slaved to AES-1 Don’t care Don’t care A - B Omnia-6ex Use and Operation Manual – V: 1.10... -
Page 60: Fine Tuning Your Sound
Be careful. Having said all of this, we firmly believe that Omnia-6EX will get you closer to your ideal than any other processor or combination of processors available today. It is definitely capable of generating moment-to-moment loudness; it has the muscle. -
Page 61: Adjustment Procedure
+0.5 dB or - 1 dB, or in 1 or 2 step increments. Try turning different functions on and off. Working this way, you will be able to get a better feel for the sound that the Omnia-6EX is capable of producing on your station and with your programming. -
Page 62: Meter Displays
“rest” with the main bargraph. This action will be easily noticed on material that is very dynamic in texture. It is partly due to this very special behavior that the Omnia-6EX has the musicality and clarity that other processors lack. -
Page 63: Interpreting The Meters
Conversely, audio signals with a wide dynamic range possess a higher peak to average ratio. The Omnia-6EX adapts differently to each case. -
Page 64: About Factory Presets
6EX’s processing. Omnia/Telos does not warrant in any way that these presets are de facto standards for the format names that we used when we designed them. The factory presets were created as starting points, typical of the on-air sound that might be typical with such format names, but they are not engraved in stone! For instance, the technical sound of CHR stations usually varies from market to market, even though the overall playlist doesn't. -
Page 65: Loading A Preset
Once you have highlighted the desired preset name, just click once to load that preset into the Omnia-6EX. To exit the preset selection list, rotate the jog wheel counter-clockwise until the <Exit> option is highlighted. Then click once. -
Page 66: Parameter Editing
Omnia-6 jog wheel and click functions work. If so, you’re ready to tackle Omnia-6’s more sophisticated adjustments. To edit a preset it must first be loaded into the Omnia-6. Once loaded, it can be modified as required to suite your tastes and processing goals. -
Page 67: Adjusting The Wideband Agc
How quickly the target gain reduction level is reached, is set by the remaining RTP Speed settings (Slow, Medium or Fast). If no RTP gain reduction is desired, use the RTP Speed setting Freeze. Omnia-6ex Use and Operation Manual – V: 1.10... -
Page 68: Adjusting Agc Crossovers
Simply use the “-15” setting in this case to have the gain return to –10 dB when gated. Note that ratios are critical to the open and musical sound of the Omnia-6EX, and therefore we do not offer them as user adjustments. -
Page 69: Adjusting Multiband Agc's
(less gain = more gain reduction) than might be achieved if the control was set to Freeze. This will reduce hiss and other high frequency noise. The RTP levels can be tailored for each individual AGC band as desired. Omnia-6ex Use and Operation Manual – V: 1.10... -
Page 70: Adjusting The Agc Mixer
Simply use the “-15” setting in this case to have the gain return to about –10 dB when gated. Note that ratios are critical to the open and musical sound of the Omnia- 6EX, and therefore we do not offer them as user adjustments. -
Page 71: Adjusting The Enhancers
Enhance Submenu Deep Bass EQ: For those who demand thunderous bass, the Omnia-6 has it! Up to 12 dB of “thunder” can be added to shake your listener’s walls! This is not a simple bass boost, but a rather sophisticated concept that takes into consideration the time alignment of the low frequencies as they pass through the entire Omnia system. -
Page 72: Adjusting The Limiters Crossover
If you are familiar with the limiter section in the Omnia Classic, you'll remember that significant gain reduction was necessary in order to achieve extreme loudness. That is NOT the case with Omnia-6EX! The limiters are true limiters, and therefore don't need to do much work after the multiband AGC section to create a huge signal on the dial. -
Page 73: Adjusting The Multiband Limiters
Usually, the limiter thresholds are adjusted as a “fine polish” on the final sound. If you are unsure about how to use the Limiter Thresholds, then we recommend that they be left at their well-researched factory settings. Omnia-6ex Use and Operation Manual – V: 1.10... -
Page 74: Adjusting The Final Mixer (Lim Mix)
AGC or Limiter X-Over menus instead of the limiter mixer controls. Like the limiter threshold controls, the final limiter mixer is mainly for minor “fine polish” to the overall sound. Adjustments in this section must be done with care. Omnia-6ex Use and Operation Manual – V: 1.10... - Page 75 The action of either of these can be further tailored using the Bass Clip Tune that was previously explained. Clipper Drive: Here is where the Omnia-6EX's loudness versus quality advantage is most evident! The main clipper is a very powerful algorithm, is highly over-sampled, and is fully anti-aliased. This clipper control’s adjustment range is +/-6 dB, in 0.1dB steps.
- Page 76 Look Ahead Limiter (HD Mode Only) Look Ahead Limiter Submenu Omnia-6EX employs a Look Ahead limiter to provide absolute precision peak control for the HD Digital Channel. This limiter has been designed to minimize processing side-affects like IMD, which are usually associated with limiters of this type.
- Page 77 0.0dB to start with, and only adjusted after careful comparison to the conventional channel. Bandlimiting: Omnia-6.HDFM is capable of delivering 20kHz audio response to the HD Radio/DAB encoder. If there is a desire to reduce the audio bandwidth, it is possible to reduce the spectrum in 2kHz increments from 20kHz down to 12kHz.
-
Page 78: Saving, Naming, Deleting And Protecting Presets
The Omnia-6EX PC Card has the capacity to store up to 50 total presets. This means there is room for 25 User Presets in addition to the 25 permanent Factory Presets. -
Page 79: Renaming And Deleting Presets
Meter Screen as TEST33[L]. The “L” next to the preset means that it is Locked and your preset is now secure. 6. Please see the next section for how to access a protected preset. Omnia-6ex Use and Operation Manual – V: 1.10... -
Page 80: Passcode
Please understand that it is impossible for the factory (or anyone else for that matter) to gain access to an Omnia preset that has been encrypted by the Protect Preset utility. -
Page 81: Getting The Sound You Want
Omnia-6EX has changed all of that! It's been designed to look at the incoming audio, and know how to make your station consistently loud on the dial, and without the artifacts or grunge created by your current processor. Omnia- 6EX makes loudness an effortless exercise for all formats. -
Page 82: Increasing Loudness
Loudness at all costs is usually the reason for moving the processing in a direction like this. Using larger amounts of drive to the multiband limiters, along with faster release times will Omnia-6ex Use and Operation Manual – V: 1.10... -
Page 83: Adding More "Detail" To The Sound
. . . a wall of sound. The drawback is that the density can cause listener fatigue and have a negative effect on time spent listening. While Omnia-6 is designed to minimize listener fatigue, it is capable of generating large amounts of density that could eventually lead to fatigue. -
Page 84: Thunder Bass
Thunder Bass Omnia-6EX has the power to shake the walls with low end! If your source material has it, Omnia-6 will put it on the air, and with muscle! Making changes to this characteristic is done using the following parameters, and for maximum effectiveness, in the order listed: 1. -
Page 85: Remote Control Software
The Omnia 6 Remote Control application looks very similar to the actual front panel of the Omnia 6. Before it connects to the Omnia, the words “OFF LINE” will be displayed where the Preset Name and System Time will be displayed once the remote connection is made. -
Page 86: Setup And Configuration
The Remote Control Program for the Omnia-6EX is specific to the Omnia-6EX. As stated earlier, Omnia Remote Control programs designed for our other Omnia family of products will not work with Omnia 6. The latest versions of all Omnia remote control programs are always available free of charge through the “Support” page of our web site: www.omniaaudio.com... -
Page 87: Edit Connection Dialog Box
Omnia by Network”, etc. In the password box, enter the login password for the Omnia-6 that you wish to make a connection to. The factory default password for serial port and modem connections (only) is “tomtom” (all lower case). For Ethernet remote connections, the passwords are the same as the Omnia-6’s front panel passwords. -
Page 88: Using The Optional Modem Card
Then, only the TCP/IP address of the Omnia that you wish to connect to must be entered. Note: If you are connecting via Direct Serial or Modem, you should not check the “Connect over Ethernet” box! If connecting via Direct Serial or Modem, then select the COM port that you wish to use on your PC. -
Page 89: Using A Direct Serial Connection
Using a Direct RS-232 Connection for Local Communications When a computer can be located near the Omnia-6EX, it may be convenient to use a direct serial cable connection rather than dial up. Use a standard, straight-through serial cable - null-modem cables will not work! A typical serial cable will need a DB-25 male connector for the Omnia-6EX end, and probably a DB-9 female connector on the computer end. -
Page 90: Custom Modem Initialization Strings
Where “X0” tells the modem to ignore busy and dial tone detection, and. Where “x” is the number to dial to reach an outside line (if required), and; Where “,” is a pause, and; Omnia-6ex Use and Operation Manual – V: 1.10... - Page 91 There are many resources on the World Wide Web pertaining to the possible Hayes command set initialization string options. You can locate such resources by using the search text “Hayes Command Set” in your Internet browser. Two such sites with resources that have been helpful are: http://www.modemhelp.net/basicatcommand.shtml http://www.modemexpress.com/ Omnia-6ex Use and Operation Manual – V: 1.10...
-
Page 92: Using An Ethernet Based Connection
Using an Ethernet Network Based Connection For Network connections, check the Connect over Ethernet box and enter the IP address of the Omnia-6EX in the box provided. The TCP/IP address entry format is: xxx.xxx.xxx.xxx. The default TCP/IP address of the Omnia6 is 192.168.0.191. -
Page 93: Establishing A Remote Session
Terminating a Connection From the Options Menu, select Disconnect. Closing the program will also terminate any connections. Operation The Remote Control Program for Omnia-6EX looks very similar to the actual Front Panel and works similarly with some added enhancements: •... -
Page 94: Terminal Programs/Direct Connection
NOTE: Even if the optional HD mode features on your Omnia-6 FM unit have not been activated, you will be able to access the Look Ahead Limiter screen from the Omnia-6 remote application’s Process Menu. If, however, any of the Output router settings in the Output Menu are changed to the HD position, they will be reset back to the FM position within sixty seconds. -
Page 95: Trigger Script Editor
“Edit Trigger Scripts” dialog box as opened under “Options”, “Edit Trigger Scripts” Using Trigger Scripts, you can make the Omnia 6 do things with contact closures that would normally need to be done either by manual intervention at the front panel, or via Omnia 6 remote control. There are EIGHT Trigger Inputs available, and they respond to voltage levels on the rear-panel “Interface”... -
Page 96: Use Of Trigger Scripts
“syspara” value associated with it. A complete list of Omnia 6 HDFM 'syspara' values can be found on Page 99. -
Page 97: Script Command Definitions
Presets Note: After a preset is saved to the system, the Omnia knows them by their Index Number, not by their Preset Name. Therefore, when selecting a preset, you use its index number. When saving presets, you use its name! presets Lists all the currently available factory and user presets by index #. -
Page 98: Non-System Parameters (Paras)
Example: delete 21 <enter> commands the Omnia-6 to remove preset number 21 from the index list. rename <preset index #><name> Renames the preset by its index number. Example: rename 21 BOOGY <enter> commands the Omnia-6 to rename preset number 2. -
Page 99: System Parameters (Sysparas)
Omnia-6EX System Parameters A 'syspara' is an Omnia 6 System parameter. The System Parameters are assigned to controls which govern overall operation, such as Input and Output Gains, Pre-emphasis/De-emphasis, etc. These parameters would NOT be saved with individual presets, but instead are saved using the Save To Card option in the System menu. -
Page 100: Creating A Trigger Script
This procedure can of course be done by manually using the Omnia-6EX front panel controls to turn off the 19 kHz pilot tone and to switch the input from stereo to mono left. But a far easier method is to use the Trigger Script Editor to create two scripts that can be loaded into the processor to run in response to a single relay contact closure or open. -
Page 101: Example: Switch To Stereo
Omnia-6EX. And the eight relays or switches do not have to be switched locally: Commands can even be initiated by a network satellite when a receiver with contact closures is being used. -
Page 102: One Way" Scripts
Let's review what we created for the example we showed you under “Using the Script Editor”. Whenever pin 1 is held low (the contact or switch is in a closed state), the Omnia-6EX will switch to and stay in mono mode (no Pilot and only the left input channel is used). -
Page 103: Scripting Via Daypart Scheduler
Another possible use of the one way Trigger Script script capability (although not strongly recommended) is the remote 're-booting' of the Omnia. In that special case, there would be no Go High script entry. The Go Low script for that function would simply read:... -
Page 104: Rear Panel Serial Port Setup
Once these parameters have been entered and saved as a connection profile, they can be used to capture and display (and print) the output of the Omnia 6's RS-232 serial port during boot up. See the next page for an example of a normal Omnia 6 boot up... -
Page 105: Normal Boot Up Message
Normal Boot-up Message A healthy Omnia-6EX will transmit the following text on the rear panel serial port during boot up: Omnia BIOS Software 1.13 Work : BIOS v1.13... Work: Downloading OS... Work: Downloading OS... Work: Downloading OS... Work: Downloading OS... -
Page 106: Audio Failure Alarm
Audio Failure Alarm If no audio is applied to the Omnia, the following messages will be transmitted next on the RS-232 port, approximately twenty seconds after boot up: Flr : Audio failure: left input Flr : Audio failure: right input... -
Page 107: Diagnostic & Error Messages
Cause: This error may show up when the Omnia is booted up for the first time with a new rear-panel software card or when the Omnia booted up for the first time after the non-volatile memory (NVRAM) has been cleared, such as after replacement of the battery. - Page 108 Timed out loading DSP. Failed DSP #x Bootstrap, contact CE. Description: The operating system was not able to initialize one of the Omnia’s DSP cards or one of the two DSP IC's on the card. Cause: One of the DSP cards or DSP chips may have failed.
-
Page 109: Safety Note
Electrical and mechanical safety note! When the Omnia is operated with its chassis top cover removed, you are exposed to potentially lethal voltages and high speed rotating fan blades. Before attempting to make voltage measurements, be forewarned that the power supply heat sinks are connected to the AC power line. - Page 110 Motherboard related. Turn the power off and make sure that the rear-panel PCMCIA software card is fully inserted into the top card slot with the large Omnia label facing up and the version number sticker facing down. The PC Card is keyed to prevent improper insertion.
-
Page 111: Obtaining Service
Via the World Wide Web The Omnia Web site has a wide variety of information that may be useful for product support, applications information, software updates, etc. The URL is: http://www.omniaaudio.com. -
Page 112: Ce Declaration Of Conformity
Omnia-6 Omnia-6ex Use and Operation Manual – V: 1.10... - Page 113 Omnia-6ex Use and Operation Manual – V: 1.10 Omnia-6ex Use and Operation Manual – V: 1.10...
-
Page 114: Audio Processing Faq (Includes Factory Preset Descriptions)
Intermodulation (IMD) distortion. This is why Omnia-6EX has AGC algorithms that are designed to carry quite a bit of the load for loudness processing. You can always drive the limiters harder if you wish, but it will be at the expense of that added busy sound due to the harder work that the limiters are doing. - Page 115 I make sure that the high-end is truly “silky-soft?” Omnia-6EX naturally offers a silky-smooth high end, but there are a few areas when you can further tame the high frequencies if desired. Before explaining this, we wish to say that the rumor that women listeners don’t like a bright high end may not be true! What they don’t like is a distorted high end.
- Page 116 10 and 11 o’clock) works extremely well. As of this writing, the only processing function that we don’t yet offer for the Omnia-6 is reverb. So, unless you desire that Boss Jock feel for a CHR station, where you need to operate a reverb in front of the Omnia, we feel that it should run barefoot.
- Page 117 It is designed to keep the on-air sound as close as possible to the source material. • Classical2: In this preset, we have re-tuned the Multi-Band AGC sections, resulting in less audible processing but more loudness and consistency than Classical1. Omnia-6ex Use and Operation Manual – V: 1.10...
- Page 118 • Hot! This preset emulates the sound of the original Omnia-FM with the Hot! Plug-In. • Jazz: Jazz music is perceived to have a sound that desires a smooth and open presentation, along with small amounts of dynamic equalization.
- Page 119 When would I use both? If I used both, what would be the amounts of each? The new Main Clipper in Omnia.6 is quite powerful!! All of the presets operate with a moderate amount of Main Clipping and the Composite Clipper is defaulted to the 0.0 or OFF position. In most cases, you will not need the Composite Clipper.
-
Page 120: Omnia-6Ex Parameter Worksheet
RTP Speed Limit Thresh RTP Level HI-Limiter Attack AGC Mixer Low Band Release Mid-Low Band Hold Thresh Mid-High Band Limit Thresh High Band Super High Band SH-Limiter Attack Release Hold Thresh Limit Thresh Omnia-6ex Use and Operation Manual – V: 1.10... -
Page 121: Software Upgrade Procedures
2. Configure Omnia Remote Control for connection to the Omnia over a network. Note that if you don’t have a network, you can still use Ethernet if you use a crossover cable between the PC and Omnia. Such cables can be obtained from many computer products stores. -
Page 122: Gnu General Public License
License. (Exception: if the Program itself is interactive but does not normally print such an announcement, your work based on the Program is not required to print an announcement.) Omnia-6ex Use and Operation Manual – V: 1.10... - Page 123 The Free Software Foundation may publish revised and/or new versions of the General Public License from time to time. Such new versions will be similar in spirit to the present version, but may differ in detail to address new problems or concerns. Omnia-6ex Use and Operation Manual – V: 1.10...
- Page 124 If this is what you want to do, use the GNU Library General Public License instead of this License. Omnia-6ex Use and Operation Manual – V: 1.10...
Need help?
Do you have a question about the 6EX and is the answer not in the manual?
Questions and answers