Harvia AV-4 Instructions For Installation Manual
Electric sauna heater
Hide thumbs
Also See for AV-4:
- Instructions for installation and use manual (18 pages) ,
- Lnstructions for installation and use (21 pages)

Subscribe to Our Youtube Channel
Related Manuals for Harvia AV-4


Summary of Contents for Harvia AV-4
- Page 1 AV-4, AV-6 Instructions for installation and use of Electric Sauna Heater Finlandia Sauna Products, Inc. 14010-B S.W. 72nd Ave., Portland, OR 97224-0088 1-800-354-3342 503-684-8289 Fax: 503-684-1120 01/2001H...
-
Page 2: Table Of Contents
Purpose of the electric heater: NOTE! These instructions for installation and use are intended for the owner or the person in charge of the The AV electric heater is intended for use in a well sauna, as well as for the electrician in charge of the heat-insulated family sauna. -
Page 3: Instructions For Use
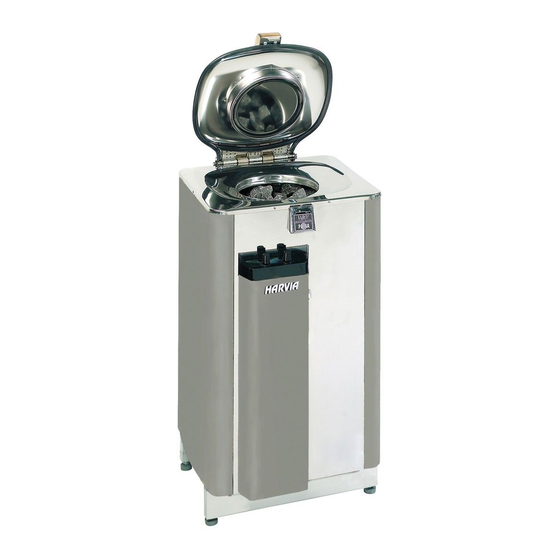
1. INSTRUCTIONS FOR USE 4. Use the air circulation valve regulator to open and close the air valve on the bottom of the heater. This heater shall not be operated unless the rock The air flowing through the heater enables the compartment is filled with the rocks. -
Page 4: Scale Lights Of Control Box
1.2.1 Scale Lights of Control Box Rock dust should be washed off before piling the rocks. DIM LIGHT: The rocks are piled on the bottom of the heater’s rock standby power of 250 W is switched on space and the grate in between the heating elements •... -
Page 5: Repositioning And Replacing Of Rocks
1.4.1. Repositioning and Replacing of Rocks 1.7. Throwing Water on Heated Stones It is recommended that the rocks be repositioned every When the sauna room air warms up, it becomes dry time the rock level has stopped descending or no less and, therefore, it is necessary to throw water on the than once a year. -
Page 6: After Bathing
1.8. After Bathing Use only clean tap water on the rocks - Do not use • When you have stopped bathing, make sure that the pool or spa water, as chlorine gas can be produced rocks are dry and the timer is turned to zero before and the heating elements can be damaged! closing the heater lid. -
Page 7: The Sauna Room
2.1.1. Room construction – general information Note! The pin of rotatable fuses does not always fly off when the fuse blows. The only way to make sure FRAMING 2" x 4" dry Douglas Fir, that the fuses used for the heater have not blown is to 16"... -
Page 8: Sauna Room Floor
2.2. Sauna Room Floor 3. INSTRUCTIONS FOR INSTALLATION Due to a large variation in temperature, the sauna stones 3.1. Prior to Installation disintegrate in use. Small pieces of stone are washed down on the sauna Prior to installing the heater, study the instructions room floor along with the water thrown on the rocks. -
Page 9: Installation Place And Floor-Attachment Of Heater
Do not connect the power feed for the heater through the fault current switch! 240 PHASE AV- SAUNA HEATER WITH BUILT IN CONTROLS Heater Input Voltage Phase Amperage Min. 90°C Copper supply Model wire A.W.G. No. AV-4-1 18,3 AV-6-1 27,0 Table 2. Supply wires... -
Page 10: Testing Of Sauna Heater
3. Check high limit reset button in heater (reset is powered. under the heater to see if it has been released). 7. Harvia Sauna strongly recommends a floor that can 4. Call your electrician or service person for further be easily cleaned (concrete, ceramic tile, or a poured help. -
Page 11: Guarantee
3.10. Guarantee This HARVIA SAUNA heater is guaranteed for one be poured over the hot stones at one time. This year date of purchase, and includes all heater parts guarantee will be void if a shower has been installed in such as heating elements, controls, contactors, etc. -
Page 12: Spare Parts
4. SPARE PARTS 1. Heating element 240V ZSA-430 11. Lexan plate ZSA-670 2. Standby heating element 240V ZSA-420 12. On/Off switch for standby power ZSK-684 3. Lid spring ZSA-460 13. Control box cover ZSA-220S 4. Lid 14. Thermostat/overheating limiter ZSK-520 5.
Need help?
Do you have a question about the AV-4 and is the answer not in the manual?
Questions and answers