Advertisement
Quick Links
Advertisement

Related Manuals for Iwata STUDIO SMART JET IS-850


Summary of Contents for Iwata STUDIO SMART JET IS-850
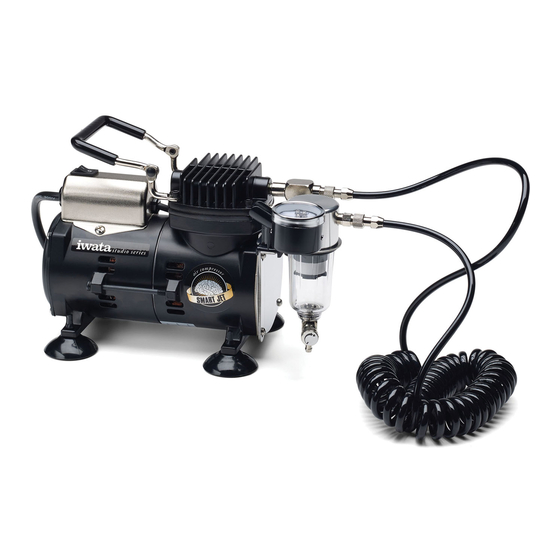
- Page 1 A I R C O M P R E S S O R IWATA STUDIO SERIES SMART JET AIR COMPRESSOR — IS-850 Congratulations on your new purchase! The Iwata Smart Jet Air Compressor delivers quiet, clean, pulse free air along with superb moisture separation and precise air pressure adjustment.
- Page 3 ASSEMBLY INSTRUCTIONS...
-
Page 4: Getting Started
GETTING STARTED 1. Unpack the compressor and all packaged components. Enclosed you’ll find: a. Smart Jet Compressor (#IS 850) b. Coiled Air Hose (#IS 130) c. Straight Airhose (#DT I 10) d. Moisture Trap Assembly (#IS 135) e. Adapter Kit (for other brands of airbrush) f. Airbrush Holder g. Smart Jet Manual h. Smart Jet Parts Diagram 2. Screw the coiled airhose onto the compressor 3. Screw the other end of the coiled airhose onto the moisture trap’s small screw 4. Screw the straight air hose’s big end onto the moisture trap’s big screw. 5. Screw the straight air hose’s small end onto the airbrush a. Note: If you’re using a brand of airbrush other than Iwata, use the appropriate adapter from the adapter kit. You might have to try them out to see which one is right. - Page 5 GETTING STARTED (CONTINUED) 6. Place the moisture trap into the compressor’s front-mounted metal ring. The moisture trap should snap into place. By snapping into place it will not rattle when the unit is running. 7. The airbrush should fit into the black airbrush holder by placing the front end of the airbrush into the holder. If using a bottle feed airbrush with the bottle attached, put the back end of the airbrush into the holder. 8. Plug the compressor into a grounded wall outlet. (Avoid using an extension cord.) 9. Turn the compressor ON by pressing down the switch on top of the unit. The unit will run for a couple seconds then stop. This is OK! When you push down the trigger on your airbrush, the compressor will come on and when you release the trigger the unit will stop. This is the Auto Shut-Off feature effect. This feature will prolong the life of your motor since the unit doesn’t run the whole time it’s turned on. 10. As the unit is being used, water may collect in the moisture trap’s clear, plastic bowl. 11. Release the water by twisting the dial toward the – sign. a. This will open the bleed valve and drain off the collected moisture. b. Do not let excess water build up in the moisture trap. c. Hold a paper towel under the open valve to collect the water. d. Once water is drained, close the bleed valve before using the compressor again.
- Page 6 REGULATING THE PRESSURE 1. When you first hook up your airbrush to your compressor and depress the trigger of your airbrush, the pressure that registers on your gauge is called your “working pressure. ” Your working pressure can vary depending on the size of your airbrush’s nozzle. The smaller the nozzle size, the higher your working pressure. An average nozzle size of 0.3mm will expend a working pressure of approximately 25-28 psi with the Smart Jet. 2. You cannot increase your working pressure, but you can decrease your working pressure by using the air adjustment knob to open the bleed valve. 3. Adjust the air pressure by turning the air adjustment knob toward the + or – while spraying air from the airbrush. 4. When you open the bleed valve with the air adjustment knob, the Smart Jet’s Auto Shut-Off will disengage and cause your Smart Jet to run continuously. This only happens when you regulate the pressure to lower than the working pressure. 5. When you twist the air adjustment knob all the way back toward the +, it closes the bleed valve and re-engages your Auto Shut-Off feature.
-
Page 7: Maintenance
MAINTENANCE Releasing Built Up Moisture • Release the water by twisting the dial toward the – sign. • This will open the bleed valve and drain off the collected moisture. • Hold a paper towel under the open valve to collect the water. • Do not let excess water build up in the moisture trap. Changing The Air Filter The filter only needs to be changed if it’s significantly dirty or dirty enough to cut air flow into the compressor. • Use your finger to pull the black tab out • Pull out the sponge-like air-filter • Replace with new air filter (Part # IS 030 – 10 pack) • Please inspect your air filter once per week with heavy compressor use. DO NOT use oil in/on the compressor. ENDING A SESSION 1. Release any built up moisture. 2. Turn off the compressor. 3. Release any leftover air. - Page 8 Compressor turns on and off while airbrush is not spraying air. The compressor has an air leak somewhere. When this happens, try the following steps: 1. Spray all connections with Windex or soap and water solution. 2. Bubbles indicate an air leak. 3. Tighten connection. 4. If bubbling doesn’t stop, try wrapping threads with Thread Sealant Tape (max 3 wraps only) or applying beeswax to the threads. Both methods provide an airtight seal. 5. If the air leak is in the middle of a hose the hose will need to be replaced. For all other problems or issues call or contact Iwata-Medea at (503) 253-7308 or email us at: info@iwata-medea.com.
- Page 9 FEATURES Oil-Less Piston Compressor Oil-less means oil-less! The compressor uses PTFE gaskets to seal the compression chamber. This allows the compressor to be quiet without atomizing oil into the air stream, which makes the compressor virtually maintenance free. Air Pressure Adjustment Knob Though not a full regulator, the air pressure adjustment knob allows control of the air pressure. It also doubles as the moisture release valve. Moisture Trap Assembly The moisture trap filters out the water and debris down to 5 microns. Air Pressure Gauge Don’t guess what pressure you’re spraying at! Know it! Your “working pressure” (or “working psi”) is what the gauge shows while you have your trigger pressed down. Airbrush Holder Built-in, hands-free device! It’s always best to keep your airbrush upright when it’s full of paint and you need to set it down for a moment – otherwise, paint can flow into areas inside the brush where it shouldn’t. Keep your airbrush upright with the airbrush holder. Coiled Air Hose The coiled airhose allows hot, compressed air to circulate and cool down a bit before reaching the moisture trap – and cooler air means less moisture. Power Switch Yes, it’s a feature! You don’t have to unplug the compressor when you want it to stop, just flip the switch. Auto-Shut off This is the Smart part of the Smart Jet. It turns the compressor off when you’re not spraying and turns it on when you start to spray. Thermal Overload Switch If the compressor ever decides to overheat, the Thermal Overload Switch will turn off your compressor. If this switch cuts in it’s saving your compressor. Let it cool down. The switch will automatically reset itself. Voltage If you bought the compressor in the country you’re going to use it, it’s completely ready to go. If you’re going to transfer the compressor to another country with a different voltage, you’ll need a plug adapter and the appropriate power converter. These items typically are found at hardware stores or electronic stores.
-
Page 10: Warranty
Iwata Studio Series Compressor to/from these service facilities. Iwata-Medea, Inc will not be responsible for damage to persons or property, commercial loss or any other incidental or consequential damage caused by a defective compressor. However, some states do not allow the exclusion or limitation of incidental or consequential damages, so the above limitations may not apply to you. - Page 11 — w w w . I W A T A A I R B R U S H . c o m — Iwata-Medea, Inc. • 1336 N. Mason St. • Portland, Oregon 97217 tel: (503) 253-7308 • fax: (503) 253-0721 • info@medea-artool.com rev2...
Need help?
Do you have a question about the STUDIO SMART JET IS-850 and is the answer not in the manual?
Questions and answers