
Subscribe to Our Youtube Channel
Related Manuals for Stanley DRY


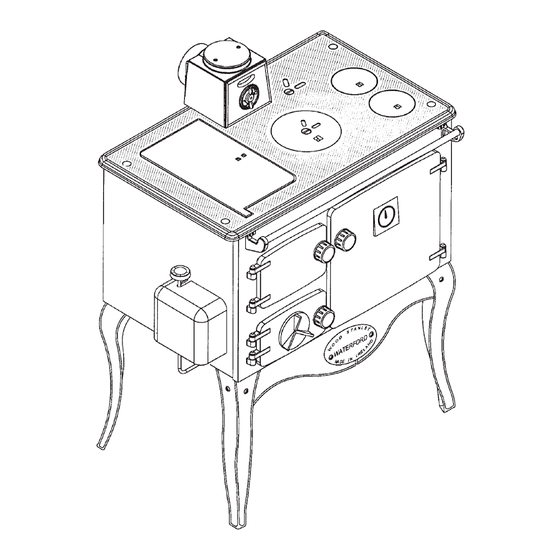
Summary of Contents for Stanley DRY
- Page 1 ERRIGAL OIL FIRED COOKER DRY, DHW & HPB MODELS INSTALLATION & OPERATING INSTRUCTIONS...
-
Page 2: Table Of Contents
Exploded View Dry ........ -
Page 3: Introduction
INTRODUCTION Congratulations on purchasing this fine Irish made Oil Fired cooker which is built to exacting standards and will give you every satisfaction in use. This appliance is hot while in operation and retains its heat for a long period of time after use. Children, aged or infirm persons should be supervised at all times and should not be allowed to touch the hot working surfaces while in use or until the appliance has thoroughly cooled. -
Page 4: Specification
SPECIFICATION Fig.2 NOTE: Dimensions stated below may be subject to a slight +/- variation. DIMENSIONS METRIC 1388 990 665 (millimetre) 5 /8 5 /8 5 /8 1 /4 1 /2 3 /4 3 /4 3 /4 3 /4 1 /8 1 /4 1 /4 IMPERIAL... -
Page 5: Installation
7.14 (24,360) 2.89 (9,864) 0.58 5.67 (19,355) 2.42 (8,290) 0.44 4.30 (14,685) 0.88 (3,005) 0.29 2.84 ( 9,680) 0.70 (2,390) Dry Cooker VALVE SETTING OIL CONSUMPTION BURNER INPUT OVEN TEMP. (L/H) kW (BTU/hr) 0.69 6.75 (23,035) 0.60 5.87 (20,030) 0.51 4.99 (17,025) -
Page 6: Location
LOCATION An isolating valve should be fitted at the tank outlet, When choosing a location for this appliance you in an accessible position so that the oil supply to the must have the following: appliance can be shut off if required. This isolating Sufficient room for installation and servicing. -
Page 7: Clearance To Combustibles
An oil filter (5 - 10 micron) and stop valve must be fit- Fig.5 ted to the fuel feed line and located near the supply tank and facilities should be provided to enable it to be serviced without draining down the oil supply sys- tem. -
Page 8: Flue System
Never obstruct free air circulation from around or may be caused by roof structures, other chimney entering the cooker grills. stacks etc. The venting terminal position should be Where the flue passes through a combustible mate- in accordance with Building Regulations BS 5410: rial a twin wall solid packed insulated chimney con- Part 1. -
Page 9: Flue Liners
The effect of any grills should be allowed for when FLUE LINERS determining the effective free area of any vent. Chimney’s lined with salt glazed earthenware pipes Air vents direct to the outside of the building should are acceptable if the pipes comply with EN 1457 and be located so that any air current produced will not must be 125mm (5”). -
Page 10: Down Draughts
Fig.11 Fig.10 DOWN DRAUGHTS However well designed, constructed and positioned, the satisfactory performance of the flue can be adversely affected by down draught caused by nearby hills, adjacent tall buildings or trees. These can deflect wind to blow directly down the flue to create a zone of high pressure over the terminal. -
Page 11: Heating
Insulated metal chimneys conforming to BS 2871 & BS E.N. 1057 Copper and B.S.4543 (a galvanised finish is not suitable Copper Alloys. for exterior use). INDIRECT DOMESTIC CYLINDER Clay flue linings conforming to B.S. EN 1457. This cooker can only be connected to an in-direct domestic cylinder of 136 litres (30 gallons). -
Page 12: Interlink System
Fig.14 INTERLINK SYSTEM Errigal Oil Cooker Fig. 15 GENERAL MAINTENANCE It is important that the user is familiar with their heat- ing system and that they ensure regular checks and maintenance are carried out, which can limit unnec- essary breakdowns. We recommend that you evaluate the overall insula- tion in your house, i.e. - Page 13 Fig.18 Place cement blocks or other strong sup- ports about 458mm (13”) high behind the cooker. Space the supports behind it and lay the cooker on its back. (See Fig.16) Fit the four legs to the four base corners using the hexagon-head bolts and washers. Note: Ensure that each of the front legs has a screw hole in the front.
-
Page 14: Commissioning
Fig.22 COMMISSIONING Burner Set-up Using a spirit level, check that the control valve is level in all directions. Adjust the locking nuts on the valve legs if levelling is necessary. (See Fig.20). Fig..20 Push the control valve trigger up to set the valve (See Fig.20). -
Page 15: Burner Assembly
Turn the control valve to 6 and after 10 min- Fig.26 utes, light the stove through the lighting port as shown in Fig.25. WARNING: OPEN DIRECT FLUE DAMPER WHEN LIGHTING. SEE FIG.24. Note: Ensure that the lighting port is closed after the stove is lit. -
Page 16: Flame Pattern
LIGHT THE COOKER UNTIL IT IS COMPLETELY on top of the shells. (See Fig.29). COOLED DOWN. (SEE FIG. 24) Note: The angle on the DHW/Dry baffle is directed Turn the control valve to setting 6 (anti-clock towards the oven. See Fig. 29. -
Page 17: Control Valve Rating
Fig.32 Flexible oil lines should be inspected at each and every service visit. There are varying types of line with guarantee periods between 1 and 5 years. It is important in the interest of safety that flexible lines are changed at regular intervals. Inspect for date code stamp and if the line is out of its guarantee period or shows signs of being kinked or damaged, replace immediately. -
Page 18: Vitreous Enamel Cleaning
Wipe over daily with a soapy damp cloth, followed by a polish with a clean dry duster. For stubborn deposits a soap impregnated pad can be carefully used on the vitreous enamel. -
Page 22: Fault Finding
FAULT FINDING If the stove exhibits any of the following conditions, call your Commissioning Engineer. PROBLEM CAUSE REMEDY Stove will not light or goes No Oil in the Tank Fill Tank out when lighting Fire Valves off Reset valves, check for cause of over temperature Control valve trigger down (off) Reset trigger... -
Page 23: Installation Check List
INSTALLATION CHECK LIST √ Tick Flue System Minimum Flue Height of 4.6 metres (15 feet). If connecting to an existing chimney, the chimney should be lined using either a flexible or rigid 125mm (5”) diameter suitable for oil-fired appliances that terminates in excess of 0.6 metres from the nearest point of the roof, measured vertically and in excess of 2.3 metres measured horizontally. - Page 24 Manufactured by Waterford Stanley Ltd., Unit 210, IDA Industrial Estate, Cork Road, Waterford, Ireland. Tel: (051) 302300 Fax (051) 302315 Rev:006 DP 070126 N00184AXX...
Need help?
Do you have a question about the DRY and is the answer not in the manual?
Questions and answers