Table of Contents
Advertisement
Quick Links
Advertisement
Table of Contents

Related Manuals for Strong SRT 6006


Summary of Contents for Strong SRT 6006
- Page 1 Digital Free-To-Air Satellite Receiver SRT 6006 User Manual...
-
Page 4: Safety Instructions
Attachments — For your safety, and to avoid damaging the controls could damage the product and require extensive product, use only accessories recommended by STRONG. repair work by a qualified technician. Water and Moisture — Never use this product around water (near 4. -
Page 5: Table Of Contents
PART 1 • English TAbLE OF CONTENTS 1.0 INTRODUCTION 1.1 Safety Instructions 1.2 Storage 1.3 Equipment Set-up 1.4 Features & Accessories 2.0 YOUR RECEIVER 2.1 Front Panel 2.2 Rear Panel 2.3 Remote Control 3.0 CONNECTIONS 3.1 Connecting to TV & VCR 3.2 Connecting to Digital Audio Amplifier 3.3 Connecting to Satellite Dish 3.4 Connecting to serial cable for downloading software... -
Page 6: Introduction
PART 1 • English 1.0 INTRODUCTION 1.1 Safety Instructions DO NOT INSTALL YOUR RECEIVER: In a closed or poorly ventilated cabinet; directly on top of or under any another equipment; on a surface which might obstruct the ventilation slots DO NOT EXPOSE THE RECEIVER OR ITS ACCESSORIES: To direct sunlight or near any other equipment that generates heat;... -
Page 7: Storage
PART 1 • English 1.2 Storage Your receiver and its accessories are stored and delivered in a packaging designed to protect against electric shocks and moisture. When unpacking it, make sure that all the parts are included and keep the packaging away from children. When transporting the receiver from one place to another or if you are returning it under warranty make sure to repack the receiver in its original packaging with its accessories. -
Page 8: Features & Accessories
PART 1 • English 1.4 Features & Accessories For all digital Free-To-Air TV and Radio programmes via satellite* Set-up support for first time installation & user-friendly menu 4 800 channel memory capacity for 64 satellites 3 seconds replay 4 Favourite lists for TV-and Radio programme Astra and Hotbird channels are pre-programmed Future-proof: Software update via satellite (OTA) Multi-lingual support on screen menu (OSD): English, German, French, Italian, Spanish,... -
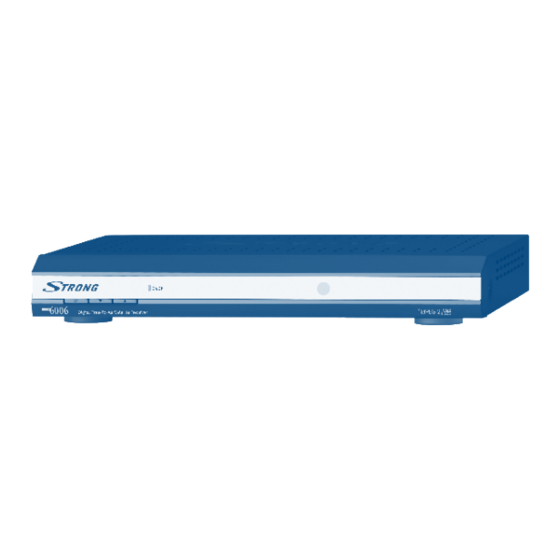
Page 9: Your Receiver
PART 1 • English 2.0 YOUR RECEIVER 2.1 Front Panel see Fig.1 1. Mode indicator The RED light indicates that the receiver is in STAND-BY mode. The GREEN light indicates that the receiver is in AWAKE mode. 2. Power On/Off button 3. -
Page 10: Remote Control
PART 1 • English 2.3 Remote Control Turns the receiver On/Off Mutes audio output of the receiver Toggle between TV and AV mode 0 ~ 9 Changes channel and controls numeric functions Toggle Favourite mode ON/OFF TV/R Toggle between TV or RADIO mode Shows the main menu and exits from any level of menu MENU to view mode... -
Page 11: Connections
PART 1 • English 3.0 CONNECTIONS 3.1 Connecting to TV & VCR Basic connection with a Scart cable (Fig. 3) 1. Connect the satellite signal from the LNB to the LNB IN connector. 2. Connect the TV SCART connector at the back of the receiver to the SCART IN connector on your TV set. -
Page 12: Connecting To Serial Cable For Downloading Software
Ensure your satellite receiver is correctly connected to your television and dish, and that your satellite signal is of good quality. (If you are not sure about this then ask your local STRONG dealer to check your installation or satellite signal.) Confirm that the power plug on the receiver is plugged into the wall outlet. -
Page 13: Main Menu
PART 1 • English b) Dish mounted on DiSEqC 1.2 motor Set Antenna mode to DiSEqC 1.2, choose NEXT and press the OK button. The menu Adjust antenna will appear. Select transponder receivable at your location (choose Transponder field and select transponder by pressing LEFT/RIGHT button). Then choose field Move Dish and adjust position of the dish by pressing the LEFT/RIGHT button. -
Page 14: Installation
PART 1 • English OK, the program name dialog will shown as below. Use the LEFT/RIGHT buttons to move the cursor to the character you wish to edit. Use the UP/ DOWN buttons to change character (scroll alphabet). If you wish to delete character you have to replace it with “space”... -
Page 15: System Setting
PART 1 • English Delete satellite If you want to delete a satellite, press the YELLOW key. Then warning message will appear. Select OK and press the OK key to confirm. 5.2.2 Auto Scan Press the GREEN key to set the scan mode to Free or Free+Scrambled. If mode is Free then only “Free to Air”... -
Page 16: Language Setting
PART 1 • English 5.3.1 Preference 5.3.1.1 Language Setting You can change the language of the OSD, preferred Audio and Subtitles. Use UP/DOWN to select the OSD language, Audio language or Subtitles language. Press OK or Right to enter the language list and Press UP/DOWN to select the language. Press OK to confirm. 5.3.1.2 TV settings You can set the TV mode, Screen mode and Video output. -
Page 17: Channel Lock
PART 1 • English 5.3.3.1 Channel Lock Set the system Channel Lock to ON or OFF. If the channel lock is on, the user has to enter the parental PIN code correctly before watching the locked channel. 5.3.3.2 Menu Lock Press OK to select whether you need the lock or not for the Menu, YES or NO, press OK to confirm. If the menu lock is on, then for some operations such as search program and set factory default, you need to enter your PIN. -
Page 18: Timer
PART 1 • English If your antenna is primed to Hotbird 1, 2, 3, 4 at 13E then enter following parameters: Frequency: 12476; Polarity: H (Horizontal); Symbol rate: 27500 Move menu focus to OK and press OK button on remote control. The receiver will check availability of the software update on air and load the latest software, if available. -
Page 19: Game
PART 1 • English “Power Off”: The receiver powers off at the designated date and time. Cycle: You can set the cycle of the action designated in the timer mode (One time, Daily or Weekly). Start Date: You can set the start date of the timer action. Start Time: You can set the start time of the timer action. -
Page 20: Watching Tv And Listening To The Radio
PART 1 • English 6.0 WATCHING TV AND LISTENING TO THE RADIO 6.1 Program Information In normal operation status (no menu operation), press the INFO button. The program information banner will be displayed at the bottom of screen. From program information banner you can read channel number, channel name, current and next program name (if available from broadcast) and current time. -
Page 21: Selection Audio Language
PART 1 • English move menu focus to selection of group. Use LEFT/RIGHT buttons to select group of your choice. Select group “NO FAV” and press OK if you wish to exit from favourite channel list mode. 6.5 Selection Audio Language Press the AUDIO button on the remote control to select the audio language. -
Page 22: Specifications
PART 1 • English Symptom Cause Remedy Incorrect values of some tuner Set the values of the tuner parameters parameters correctly in the installation menu. Wrong direction of the dish Check the signal strength with a spectrum analyzer and adjust your dish correctly. Message “Antenna Power Receiver detected short cut in Disconnect receiver from main... - Page 23 PART 1 • English 3. System and memory CPU: CT216 32-bit RISC CPU CPU Speed: 108 MHz Flash memory: 16 Mbits SDRAM: 64 Mbits 4. A/V & Data In/Out TV Scart Output: RGB, CVBS, Audio L/R Output with Volume Control VCR Scart Input/Output: Input: CVBS, Audio L/R Output: CVBS, Audio L/R Output with Volume Control...
-
Page 24: Glossary Of Terms
PART 1 • English A.3 GLOSSARY OF TERMS C band 3.7 ~ 4.2 GHz Frequency. DiSEqC Digital Satellite Equipment Control. Fixed Dish A dish antenna that is aimed at one particular satellite. Free-To-Air broadcast Unscrambled broadcast which you can view for free Ku band 11 ~ 13 GHz Frequency. -
Page 25: Environmental Issues
Environmental Issues ENVIRONMENTAL ISSUES STRONG is committed to reducing the impact of its products on the environment. To maximise the benefits of our design enhancements, your co-operation is required. Electronic product recycling Packaging Do not dispose of this product with your When disposing of this domestic rubbish. - Page 26 Environmental Issues...
Need help?
Do you have a question about the SRT 6006 and is the answer not in the manual?
Questions and answers