Table of Contents
Advertisement
Quick Links
Product Guide
Model 12201560
Tools needed for assembly:
2 Adjustable Wrenches
Phillips Screwdriver
CAUTION:
Read and follow all safety statements, assembly
instructions, and use and care directions before
attempting to assemble and cook.
INSTALLER/ASSEMBLER:
Leave this manual with consumer.
CONSUMER:
Keep this manual for future reference.
WARNING:
CARBON MONOXIDE HAZARD
Burning charcoal indoors can kill you. It gives off
carbon monoxide, which has no odor. NEVER burn
charcoal inside homes, vehicles, or tents.
If you have questions or need assistance during assembly, please call
To insure your satisfaction and for follow-up service, register your appliance online at www.charbroil.com/register
© 2012 Char-Broil, LLC
• Columbus, GA 31902 •
FOR OUTDOOR USE ONLY
Printed in China
WARNING:
Failure to follow all manufacturer's instructions could
result in serious personal injury and/or property
damage.
CAUTION:
Some parts may contain sharp edges. Wear
protective gloves if necessary.
CAUTION:
THIS UNIT IS HEAVY! DO NOT attempt to
assemble without a helper.
1-800-241-7548
.
42804928 - 01/13/12
Advertisement
Table of Contents

Related Manuals for Char-Broil Silver Smoker 12201560


Summary of Contents for Char-Broil Silver Smoker 12201560
-
Page 1: Product Record Information
If you have questions or need assistance during assembly, please call 1-800-241-7548 To insure your satisfaction and for follow-up service, register your appliance online at www.charbroil.com/register 42804928 - 01/13/12 © 2012 Char-Broil, LLC • Columbus, GA 31902 • Printed in China... -
Page 2: Table Of Contents
TABLE OF CONTENTS WARNING Product Record Information ......1 FAILURE TO READ AND FOLLOW INSTRUCTIONS FOR For Your Safety . -
Page 3: Preparing To Use Your Smoker
Preparing and Using Your Smoker Before cooking with your Smoker, the following steps should be closely followed to both cure the finish and season the interior steel. Failure to properly follow these steps may damage the finish and/or impart metallic flavors to your first foods. -
Page 4: Cooking Tips
USDA Recommended Internal Cooking Temperatures Ground Meat Beef, Pork, Veal, Lamb........160°F Turkey, Chicken..........165°F Fresh Beef, Veal, Lamb Medium Rare............145°F (let stand 3 minutes before cutting) Medium..............160°F Well Done............170°F Poultry Chicken & Turkey, whole........165°F Poultry Parts............165°F Duck & Goose............165°F Fresh Pork Medium Rare............145 °F (let stand 3 minutes before cutting) -
Page 5: Smoker Maintenance
THE HEAT OF THE COALS seconds you can hold the palm of your hand 4 inches above the coals temperature range (Fº) visual cues HOT COALS 400 to 450 barely covered with gray ash; deep red glow MODERATELY HOT 375 to 450 thin coating of gray TO HOT COALS ash;... -
Page 6: Limited Warranty
LIMITED WARRANTY LIMITED WARRANTY This warranty only applies to units purchased from an authorized retailer. Manufacturer warrants to the original consumer-purchaser only that this product shall be free from defects in workmanship and materials after correct assembly and under normal and reasonable home use for the periods indicated below beginning on the date of purchase*. -
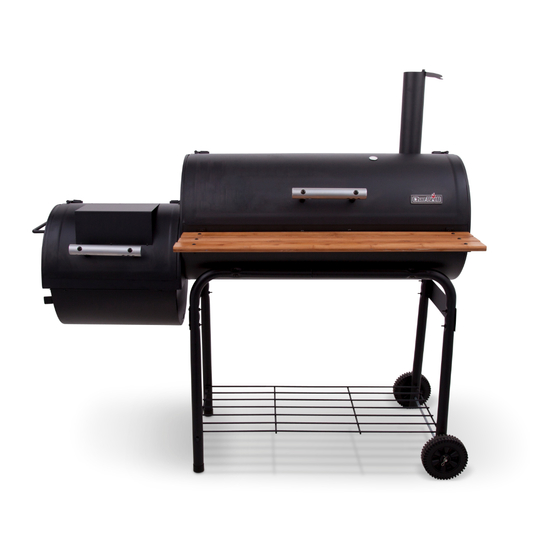
Page 7: Parts List/ Parts Diagram
PARTS LIST Description Description LONG LEG SMOKE CHAMBER KIT HANDLE FIREBOX LID GREASE CAN HOLDER FIREBOX BOTTOM RACK BUTTERFLY DAMPER SMOKESTACK KIT SHELF BRACKET SMOKESTACK DAMPER FIREBOX COVER PLATE SMOKESTACK CAP LEG BRACE LOGO PLATE FIREBOX DOOR LATCH KNOCKOUT PLUG FIRE GRATE COOKING GRATE, 16 ¾”... -
Page 8: Assembly
ASSEMBLY FIRST, GET A HELPER! This unit is heavy and requires a second person for lifting and moving. NEXT, pick a suitable location to work. Open the carton and slit the corners so that the carton lays flat. This will give you a protective work surface during assembly. - Page 9 Lay the leg assembly on its side with legs braces pointing upward. Insert the wood rack hooks into leg holes and swing rack upward, parallel to leg braces. Wood rack With the aid of a helper, place leg holes of remaining leg assembly over wood rack hooks and rotate leg assembly until it meets the leg braces.
- Page 10 Insert a cotter pin into the hole at one end of the axle and bend the ends of the pin back so that it cannot be removed. Slide a wheel onto the axle. Slide the axle through the holes at the ends of the short legs. Slide remaining wheel onto axle and secure with remaining cotter pin.
- Page 11 Attach Firebox Top Assembly to Firebox Bottom Assembly using eight 1/4-20x3/4” hex-head bolts as shown below. Firebox Top Assembly Firebox Bottom Assembly NOTE: Smoker chamber and firebox doors not pictured for clarity. First, locate the cover plate in the hardware box. At the bottom right end of the firebox there is an opening for the Diamond Fire ignitor accessory.
- Page 12 NOTE: Smoker chamber door not pictured for clarity. From inside the smoker chamber, slide the smokestack through the large hole. Align the two holes in the smokestack plate with the holes in the chamber and secure with two 1/4-20x3/4” hex-head bolts outside the chamber and 1/4-20 flange nuts inside.
- Page 13 NOTE: Smoker chamber door not pictured for clarity. Install grate support screws in the four rear holes and two front-center holes in the smoker chamber. Use six #10-24x1” screws and #10 flange nuts. NOTE: Smoker chamber door not pictured for clarity. Attach shelf brackets to outer holes on front of smoker chamber using two 1/4-20x1-1/4”...
- Page 14 NOTE: Smoker chamber door not pictured for clarity. First, attach shelf slats to the two outer holes in shelf brackets using Attach inner slat. Attach two outer two #10-24x1” screws and #10-24 flange nuts per slat. DO NOT Fully tighten all shelf slats.
- Page 15 Hang grease clip from holes on bottom right side of smoker chamber. A 12 oz. soup or vegetable can will fit nicely into clip to collect grease. Grease Clip If logo plate is not already installed, insert logo plate pins into two holes in lower right corner of smoker chamber door. Press logo plate clips onto pins until snug against inside of door.
- Page 16 NOTE: Smoker chamber door not pictured for clarity. If you wish to grill in the smoker chamber, place two of the three wire fire grates into bottom of smoker chamber. Place two large porcelain cooking grates into chamber, resting them on the grate support screws.
- Page 17 Firebox Cooking Grate Installation for Grilling: NOTE: Firebox door not pictured for clarity. Insert small porcelain cooking grate into firebox. Small Porcelain Cooking Grate (1)
- Page 18 HARDWARE LIST Hardware is shown actual size. You may have spare hardware after assembly is complete. Hole Plug Logo Plate Clip Cotter Pin Qty: 1 Qty: 2 Qty: 2 Wood Handle Spacer Qty: 4 Flat Washer 1/4-20 #10-24 #8-32 Fiber Washer Qty: 6 Flange Nut Flange Nut...
Need help?
Do you have a question about the Silver Smoker 12201560 and is the answer not in the manual?
Questions and answers