Chapters
Table of Contents
Troubleshooting

Related Manuals for Char-Broil 12701705


Summary of Contents for Char-Broil 12701705
-
Page 1: Product Record Information
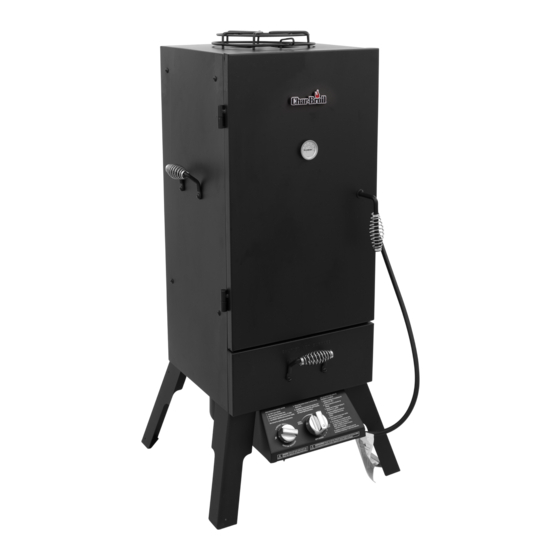
VERTICAL GAS 12701705 SMOKER 595 during assembly, please call 1-800-241-7548. l’assemblage, S’il vous plaît appelez 1-800-241-7548 durante el Ensamblado, llámenos Al 1-800-241-7548 09/03/13 • 42805103... -
Page 2: Table Of Contents
TABLE OF CONTENTS THIS GRILL IS FOR OUTDOOR CAUTION USE ONLY. Product Record Information..........1 Grease Fires For Your Safety..............2 DANGER Safety Symbols ...............2 • Putting out grease fires by closing the lid is not possible. Grills are well ventilated for Installation Safety Precautions.........2 safety reasons. -
Page 3: Food Safety
Food Safety •A disconnected LP cylinder in storage or being Storing Your Appliance Food safety is a very important part of enjoying the transported must have a safety cap installed (as • Store in dry location. outdoor cooking experience. To keep food safe from shown). -
Page 4: Use And Care
5.Hold regulator and insert nipple into USE AND CARE LP cylinder valve. Hand-tighten the coupling nut, holding regulator in a LP Cylinder Exchange straight line with LP cylinder valve so as not to cross-thread the •Many retailers that sell grills offer you the option of connection. -
Page 5: Burner Flame Check
Safety Tips WARNING • Before opening LP cylinder valve, check the coupling nut for tightness. Burner Flame Check • When this appliance is not in use, turn off control knob • Light burner, rotate knob from HIGH to LOW. Looking For Safe Use of Your appliance and to and LP cylinder valve. -
Page 6: Spider Alert
Meats that require more than 4 hours of cooking time to Setup Instructions reach doneness may require additional water. The initial Cleaning the Burner Assembly Using Wood Chips or Chunks amount of hot water added (4 quarts) should last 4-6 hours. Follow these instructions to clean and/or replace parts of •... -
Page 7: Limited Warranty
LIMITED WARRANTY This warranty only applies to units purchased from an authorized retailer. Manufacturer warrants to the original consumer-purchaser only that this product shall be free from defects in workmanship and materials after correct assembly and under normal and reasonable home use for the periods indicated below beginning on the date of purchase*. -
Page 8: Pour Votre Sécurité
TABLE DES MATIÈRES CET APPAREIL EST CONÇU ATTENTION POUR UN USAGE À Information sur l'enregistrement du produit....1 L'EXTÉRIEUR UNIQUEMENT Incendies de Graisse Pour votre sécurité............8 Il n'est pas possible d'éteindre des incendies de graisse en fermant le couvercle. Les grils sont Symboles de sécurité..........8 bien aérés pour des raisons de sécurité. -
Page 9: Sécurité Alimentaire
Un réservoir de gaz qui a été débranché pour le Sécurité alimentaire Rangement de votre appareil transport ou pour l'entreposage doit comporter un La sécurité alimentaire contribue de façon importante à • Ranger dans un endroit sec. capuchon de sécurité (tel qu'illustré). N'entreposez pas assurer une expérience agréable lors d'un barbecue en •... - Page 10 Échange de réservoir de GPL 4. Badigeonnez les raccords suivants de solution N'utilisez pas de bouchon de savonneuse : ou d'autres accessoires sur votre grille. • Plusieurs commerçants qui vendent la unité offrent la transport de produits pétroliers possibilité de souscrire à un service d'échange de (pièce en plastique avec filetage réservoirs vides.
- Page 11 Consignes de sécurité Regard • Avant d'ouvrir la valve du réservoir de GPL, vérifiez Premièrement - First - Open AVERTISSEMENT que l'écrou de raccord est bien serré. Ouvrir la porte the door Match Lighting Orifice • Lorsque vous n'utilisez pas la unité, mettez tous les Hole Firebox d'allumage...
- Page 12 Les viandes qui nécessitent plus de 4 heures de temps Consignes d'installation Niveau d'eau Utilisation de copeaux ou de morceaux de bois de cuisson pour atteindre le degré de cuisson souhaité • Observer le niveau d'eau. Toujours garder de l'eau •...
-
Page 13: Garantie Limitée
GARANTIE LIMITÉE La présente garantie n'est valide que pour les appareils achetés auprès d'un détaillant autorisé. Le fabricant garantit à l'acheteur initial, et uniquement celui-ci, que le produit est exempt de tout défaut de matériel et de main-d'œuvre, dans la mesure où il a été assemblé correctement, qu'il est utilisé de façon normale et raisonnable à... - Page 14 ESTA PARRILLA SOLO SE PELIGRO ADVERTENCIA ÍNDICE DE MATERIAS PUEDE USAR EN EXTERIORES. Información de inscripción de la garantía ....1 Fuego de Grasa • No es posible apagar los fuegos provocados por Por su propia seguridad..........14 PELIGRO la grasa cerrando la tapa. Por razones de seguridad, las parrillas tienen aberturas de Símbolos de seguridad..........14 ventilación.
- Page 15 Para guardar el aparato •Los tanques de gas desconectados, guardados o en Seguridad con los alimentos • Guárdela en un lugar seco. transporte, deben tener instalada la tapa de seguridad • Cuando el tanque de gas esté conectado al aparato, (como se ilustra).
- Page 16 4.Retire la tapa seguridad de la válvula del tanque de ADVERTENCIA USO Y MANTENIMIENTO gas. Use siempre la tapa y la correa que vienen con la válvula. • No use la parrilla sin antes haber verificado que no Cambio del tanque de gas Manilla del tenga fugas.
-
Page 17: Consejos De Seguridad
Consejos de seguridad PELIGRO Viendo el • Verifique que la tuerca de unión esté bien apretada Primero - Abra puerto First - Open antes de abrir la válvula del tanque de gas. the door la puerta Match Lighting • Cuando no use el aparato, cierre la perilla de control y Orificio de Para usar su freidora en forma segura y Hole... - Page 18 Medidas de precaución para cocinar • Las superficies exteriores de su CB600x™ pueden Es posible que para las carnes que requieren de más de 4 Instrucciones de preparación ponerse muy calientes cuando lo usa. Recuerde que Uso de astillas o de trocitos de madera horas para alcanzar el punto de cocción deseado se •...
- Page 19 GARANTÍA LIMITADA Esta garantía es válida únicamente para las unidades adquiridas de los distribuidores autorizados. El fabricante le garantiza únicamente al consumidor- comprador original, que este producto no presentará defectos de mano de obra ni de materiales por el período indicado a continuación, contado desde la fecha de compra*, si se arma correctamente y se usa en el hogar, en condiciones normales y razonables.
-
Page 20: Parts List
PARTS LIST Description SMOKER CHAMBER DOOR, SMOKER CHAMBER SMOKER DRAWER BURNER HOUSING CONTROL PANEL BURNER DAMPER ASSEMBLY, TOP GRATE, COOKING PAN, WATER HOSE, VALVE, REGULATOR HANDLE HANDLE SPRING KNOB, CONTROL IGNITOR, ROTARY KNOB, IGNITOR TEMPERATURE GAUGE LOGO PLATE WIRE RACK, SMOKER CHAMBER WIRE, ELECTRODE TOP GRATE, PORCELAIN HARDWARE PACK... -
Page 21: Liste Des Pièces
LISTE DES PIÈCES Clé Qté Description CHAMBRE DE FUMÉE PORTE, CHAMBRE DE FUMÉE TIROIR DE LA CHAMBRE DE FUMÉE ENSEMBLE LOGEMENT DU BRÛLEUR ENSEMBLE PANNEAU DE COMMANDE PATTE ENSEMBLE BRÛLEUR ASSEMBLAGE DU REGISTRE DE TIRAGE, SUPÉRIEUR GRILLE, CUISSON BAC, EAU FLEXIBLE, ROBINET, RÉGULATEUR POIGNÉE RESSORT DE LA POIGNÉE... - Page 22 UNIDAD DEL ASA PRIMAVERA DE MANGO PERILLA DE CONTROL UNIDAD DEL ENCENDEDOR GIRATORIO PERILLA DEL ENCENDEDOR TERMÓMETRO PLACA DEL LOGOTIPO CHAR-BROIL SOPORTES PARA REJILLAS, CÁMARA DE AHUMADO CABLE DEL ELECTRODO REJILLA SUPERIOR, REVESTIMIENTO DE PORCELANA BOLSA DE HERRAJES — INSTRUCCIONES DE ARMADO, INGLÉS’, FRANCÉS...
-
Page 23: Parts Diagram
DIAGRAMA DE PIEZAS PARTS DIAGRAM SCHÉMA DES PIÈCES... -
Page 24: Assembly
ASSEMBLY STEPS ASSEMBLÉE ÉTAPES ASAMBLEA PASOS • Carefully remove the door from the unit by swinging it opening and lifting it up and away from the smoker chamber. Lay the door aside. • Place the Smoker Chamber on it’s back with the door opening facing up. CAUTION: This unit is heavy! •... - Page 25 • Install Burner Housing to Smoker Chamber using three 1/4-20x1/2” bolts. Install all bolts hand tight, then tighten with a #2 phillips screwdriver. (not provided) • NOTE: The venturi tube MUST face up (towards the door opening). • Installer le logement du brûleur sur la Chambre de fumée en utilisant trois boulons 1/4-20 x 1/2 po. Serrer tous les boulons à la main, puis serrer avec un tournevis Phillipps nº...
- Page 26 • Place Control Panel Assembly onto Smoker Chamber by placing tabs under the front edge of the Smoker Chamber. The Control valve must engage the burner venturi tube as shown A. • From the inside of the Smoker Chamber, Install 2 #10-24x3/8” screws through the smoker chamber and through the Control panel Tabs as shown.
- Page 27 • Be sure the electrode wire exits the hole UNDER the venturi tube hole. DO NOT route the wire through the same hole as the burner venturi tube. • Install Ignitor Wire by pushing the round connector onto the Ignitor as shown. •...
- Page 28 • Install legs by placing 2 - 1/4-20x1/2” Hex Head Bolt through the smoker body and through each leg as shown. Thread the bolts into the 1/4-20 nut welded to the underside of each leg. Tighten bolts by hand. Using an adjustable wrench (not provided), tighten each bolt securely.
- Page 29 • With the assistance of a helper - stand the unit upright on its legs. CAUTION: THIS UNIT IS HEAVY! • Avec l'aide d'un assistant - relever l'appareil. MISE EN GARDE : CET APPAREIL EST LOURD! • Con la ayuda de otra persona, ponga la unidad sobre sus patas. ADVERTENCIA: ¡ESTA UNIDAD ES PESADA! Stand the unit upright on its legs Relever l'appareil...
- Page 30 • Insert 1/4-20x1/2” Hex Head Bolt and flat washer through the top smoker body, in the center of the damper holes as shown.(A) • Insert the damper as shown. (B) • Place the 1/4” flat washer onto bolt and thread the 1/4-20 nut on to the bolt. Tighten the nut sufficiently to allow the damper to move. (B) •...
- Page 31 • Install Drawer Handle using 2 - 1/4-20x 3/4”screws and 2 1/4-20 Keps nuts. Tighten securely. • Place the Water Pan onto the drawer rack as shown. • Slide the Drawer, with Water Pan, into the Smoker body. • Installer la poignée du tiroir en utilisant 2 vis - 1/4-20 x 3/4 po et 2 écrous à rondelle dentée 1/4-20 po. Serrer solidement. •...
- Page 32 • Insert the 3 Cooking Grates into the smoker body. • Slip the edge of the Top Grate under the Damper Handle (A), Then carefully align the grate so that the wire ends fit into the holes in the Smoker Body top.(B) •...
- Page 33 • Remove wingnut from Thermometer, insert Thermometer through the hole in the door from the front, reinstall the wingnut to the Thermometer. • Retirer l'écrou à oreilles du thermomètre, insérer le thermomètre dans le trou de la porte à partir du devant, reposer l'écrou à oreilles sur le Thermomètre.
-
Page 34: Troubleshooting
EMERGENCIES: If a gas leak cannot be stopped, or a fire occurs due to gas leakage, call the fire department. Emergencies Possible Cause Prevention/Solution Gas leaking from •Damaged hose. •Turn off gas at LP cylinder or at source on natural gas systems. Discontinue use of product and replace valve/hose/regulator. -
Page 35: Troubleshooting
Troubleshooting (continued) Possible Cause Problem Prevention/Solution Burner will not light using • Replace knob. • Rotary knob rotates without clicking. ignitor. • Inspect wire insulation and proper connection. Replace wire if insulation is broken. • Sparking between ignitor and electrode. •... -
Page 36: Dépannage
URGENCES : si une fuite de gaz ne peut pas être arrêtée, ou si un incendie se propage en raison d'une fuite de gaz, appelez le service d'incendie. Cause possible Prévention/Solution Urgences • Fermez l'alimentation en gaz au niveau du réservoir ou à la source au Fuite de gaz sur un tuyau •... - Page 37 Dépannage (suite) Problème Cause possible Prévention/Solution Le dispositif d'allumage • Le sélecteur rotatif tourne sans générer de clics. • Remplacez le bouton de réglage du gaz. n'allume pas le brûleur. • Étincelles entre le dispositif d'allumage et l'électrode. • Inspectez l'isolement du fil et tous les raccords. Remplacez les fils si l'isolement est cassé.
- Page 38 EMERGENCIAS: Si no se puede detener una fuga de gas, o si ocurre un incendio debido a una fuga de gas, llame a los bomberos. Emergencias Causas probables Medidas de prevención / solución Fugas de gas de • Manguera dañada. •...
- Page 39 Resolución de problemas (continuación ) Problema Causas probables Medidas de prevención / solución El quemador no se enciende • La perilla giratoria gira sin hacer clic. • Vuelva a colocar la perilla. al usar el encendedor. • Hay chispas entre el encendedor y el electrodo. •...
Need help?
Do you have a question about the 12701705 and is the answer not in the manual?
Questions and answers