Table of Contents
Advertisement
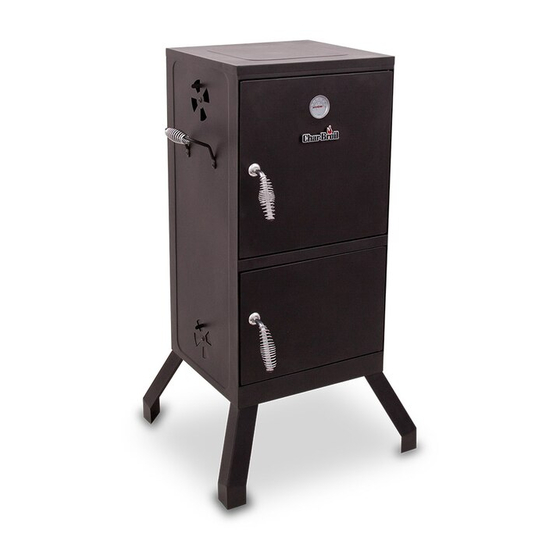
Vertical Charcoal
Smoker 365
Product Guide
Model 13201834
Tools needed for assembly:
Adjustable Wrench
Philips Screwdriver
(Tools not provided)
IMPORTANT: Fill out the product record information below.
Date Purchased
WARNING
CARBON MONOXIDE HAZARD
Burning charcoal inside can kill you. It gives off carbon
monoxide, which has no odor. NEVER burn charcoal
inside homes, vehicles, or tents.
WARNING
Failure to follow all manufacturer's instructions could
result in serious personal injury and/or property
damage.
INSTALLER/ASSEMBLER:
Leave this manual with consumer.
CONSUMER:
Keep this manual for future reference.
If you have questions or need assistance during assembly, please call 1-800-241-7548.
To insure your satisfaction and for follow-up service, register your appliance online at www.charbroil.com/register
FOR OUTDOOR USE ONLY
CAUTION
Read and follow all safety statements, assembly
instructions, and use and care directions before
attempting to assemble and cook.
CAUTION
Some parts may contain sharp edges! Wear
protective gloves if necessary.
CAUTION
THIS UNIT IS HEAVY! DO NOT attempt to assemble
without a helper.
42804842 - 07/18/12
Advertisement
Table of Contents

Related Manuals for Char-Broil 13201834


Summary of Contents for Char-Broil 13201834
- Page 1 Leave this manual with consumer. without a helper. CONSUMER: Keep this manual for future reference. If you have questions or need assistance during assembly, please call 1-800-241-7548. To insure your satisfaction and for follow-up service, register your appliance online at www.charbroil.com/register 42804842 - 07/18/12...
-
Page 2: Table Of Contents
TABLE OF CONTENTS WARNING Safety Symbols ......2 FAILURE TO READ AND FOLLOW INSTRUCTIONS FOR LIGHTING CHARCOAL MAY RESULT IN SERIOUS PERSONAL Seasoning Your Smoker . -
Page 3: Seasoning Your Smoker
Seasoning Your Smoker Before cooking with your smoker, the following steps should be closely followed to both cure the finish and season the interior steel. Failure to properly follow these steps may damage the finish and/or impart metallic flavors to your first foods. Brush all interior surfaces including grills and grates with vegetable cooking oil. -
Page 4: Tending Your Smoker While In Use
Tending Your Smoker While In Use It will be necessary to maintain a constant temperature throughout the cooking process. This can be achieved by adjusting the dampers on each side of the smoker. To increase the temperature, simply open the dampers to allow for greater air circulation inside the chamber. -
Page 5: Maintenance
USDA Recommended Internal Cooking Temperatures Ground Meat Beef, Pork, Veal, Lamb........160°F Turkey, Chicken..........165°F Fresh Beef, Veal, Lamb Medium Rare............145°F (let stand 3 minutes before cutting) Medium..............160°F Well Done............170°F Poultry Chicken & Turkey, whole........165°F Poultry Parts............165°F Duck & Goose............165°F Fresh Pork Medium Rare............145°F (let stand 3 minutes before cutting) Medium..............160°F... -
Page 6: Warranty
LIMITED WARRANTY This warranty only applies to units purchased from an authorized retailer. Manufacturer warrants to the original consumer-purchaser only that this product shall be free from defects in workmanship and materials after correct assembly and under normal and reasonable home use for the periods indicated below beginning on the date of purchase*. -
Page 7: Parts List/Diagram
Description SMOKER CHAMBER UPPER DOOR HINGE HARDWARE, F/ DOOR DAMPER GRATE, COOKING PAN, WATER/CHARCOAL SUPPORT WIRE, F/ PAN SIDE HANDLE BAR HANDLE SPRING LOWER DOOR DOOR HANDLE ASSEMBLY TEMPERATURE GAUGE LOGO PLATE WIRE RACK SUPPORT, COOK GRATE NOT Pictured … HARDWARE PACK …... - Page 8 Step1: Line up the holes in legs with holes in bottom of smoker body and insert (3)1/4-20x1/2" screws per leg. Securely tighten the screws. Step 2: Attach side handle by using two 1/4-20x1/2" screws and two 1/4-20 hex nuts. Securely tighten. Repeat for other handle.
- Page 9 Step 3: Attach the damper to the upper left side panel of smoker body using one #10-24x3/8" screw, one flat washer and one #10-24 lock nut. Repeat for lower left side panel, upper right panel and lower right panel of smoker body. NOTE: Do not over tighten nut or damper will not be adjustable.
- Page 10 Step 5: Locate the door handle/ latch assemblies. Remove the hardware included with the assemblies. Mount the door handle on the upper door using one flat washer on outside, door latch (inside of door), one flat washer, one lock washer, and one 1/4-20 hex nut on the inside (as shown).
- Page 11 Step 6: Insert (8 pcs) wire rack supports into the mounting holes inside the smoker body. Step 7: Insert the 2 cooking grates into wire rack supports. Cooking grates should be level.
- Page 12 Step 8: Place the 2 support wires in the bottom of smoker body to hold the water pan and charcoal pan. Step 9: Place the water pan and charcoal pan into the support wires. Water pan Charcoal pan...
-
Page 13: Hardware
HARDWARE DESCRIPTION 1/4-20 X 1/2” screw 1/4-20 nut Flat washer #10-24 X 3/8” screw #10-24 lock nut...
Need help?
Do you have a question about the 13201834 and is the answer not in the manual?
Questions and answers