Table of Contents
Advertisement
User's manual
Cintiq 24HD touch
(DTH-2400)
Cintiq 24HD
(DTK-2400)
Setting up
Using the display stand
Using the pen
Customizing the pen
Navigating with multi-touch
Customizing multi-touch
Using the pen display
Customizing the pen display
Using the Radial Menu
Application-specific settings
FAQs
Troubleshooting
Contents
Index
Contents
Index
1
1
Advertisement
Table of Contents
Troubleshooting

Related Manuals for Wacom Cintiq 24HD touch


Summary of Contents for Wacom Cintiq 24HD touch
- Page 1 Contents Index User’s manual Cintiq 24HD touch (DTH-2400) Cintiq 24HD (DTK-2400) Setting up Using the display stand Using the pen Customizing the pen Navigating with multi-touch Customizing multi-touch Using the pen display Customizing the pen display Using the Radial Menu...
- Page 2 Wacom reserves the right to revise this publication without obligation to provide notification of such changes. Wacom does its best to provide current and accurate information in this manual. However, Wacom reserves the right to change any specifications and product configurations at its discretion, without prior notice and without obligation to include such changes in this manual.
-
Page 3: Table Of Contents
System requirements Factory presets, auto-sync, and user settings Step 1: Hardware installation On Screen Display (OSD) settings Step 2: Software installation OSD controls, Cintiq 24HD touch Brightness/Contrast controls GETTING TO KNOW YOUR CINTIQ Auto Adjust (analog input only) Pen display features... - Page 4 Contents Index Customizing the pen Pen tablet troubleshooting Adjusting tip feel and double-click General problems Adjusting eraser feel Pen problems Advanced tip and eraser pressure settings Multi-touch problems Customizing tool buttons Windows-specific problems Customizing tilt sensitivity Mac-specific problems Technical support options Customizing pen display functions Customizing the ExpressKeys Obtaining software updates...
-
Page 5: About The Manual
Contents Index ABOUT THE MANUAL This manual provides quick access to information about your Cintiq 24HD or Cintiq 24HD touch. The information is common to Windows and Mac computers. Windows screen captures are shown unless otherwise noted. • Go directly to... -
Page 6: Unpacking Your Cintiq
Index UNPACKING YOUR CINTIQ Your Cintiq 24HD interactive pen display comes pre-assembled with the pen display mounted on the Cintiq display stand. The product parts and accessories are packed together in the accessories box. To avoid damage, see the instructions on the following pages before setting up and using Cintiq. - Page 7 Contents Index 3. Carefully remove Cintiq from the box. Holding the lower part of the display support arms near the display stand base, lift and move this product while also supporting the base of the stand. Important: Do not attempt to lift Cintiq by yourself. Each person should use both hands to securely grasp the product.
-
Page 8: Box Contents
To personalize your pen, unscrew the tip cone and replace the ring with a different color. Cintiq 24HD interactive pen display & Cintiq display stand, pre-assembled (DVI-D, DisplayPort, and USB cables are pre-installed. DisplayPort cable is stored within the Cintiq display stand.) - Page 9 Contents Index Installation CD Includes the software driver and Important Product Information guide. Spacers, qty 3, for VESA mount DVI-I to VGA cable Screws, qty 6, for VESA mount (DVI-D, DisplayPort, and USB cables are pre-installed. DisplayPort cable is stored within the Cintiq display stand.) Quick Start Guide Pen grip, wide bodied May not be included in some product configurations.
-
Page 10: System Requirements
Contents Index SETTING UP YOUR CINTIQ Your Cintiq 24HD interactive pen display functions as both a display and a pen tablet. Follow the instructions below to complete the hardware and software installation. System requirements Step 1: Hardware installation Step 2: Software installation... -
Page 11: Step 1: Hardware Installation
Contents Index STEP 1: HARDWARE INSTALLATION In this step, install the video, USB, and power cables. Important: Never connect or disconnect the video or power cables while your computer or pen display are powered on. This can damage the display or video card. 1. - Page 12 Contents Index Cintiq cabling diagram Connection cables are pre-installed. DVI-D. Connector located at display stand base. • • DisplayPort. Remove cover to access cable. See cable replacement. • VGA. Requires removal of DVI-D cable and replacement with the provided DVI-I to VGA cable. See cable replacement.
- Page 13 Each LCD panel is produced under very stringent quality standards. Production techniques cannot guarantee an absolutely perfect display. Wacom does not allow any pixel to be always white. A small number of subpixels are allowed to show a wrong color for some parts of the color spectrum.
-
Page 14: Step 2: Software Installation
User-specific preferences are supported. After logging on, each user can customize their personal settings in the Wacom Tablet control panel. Switching to another user (either by logging on or fast user switching methods) will automatically load the settings for that user. -
Page 15: Getting To Know Your Cintiq
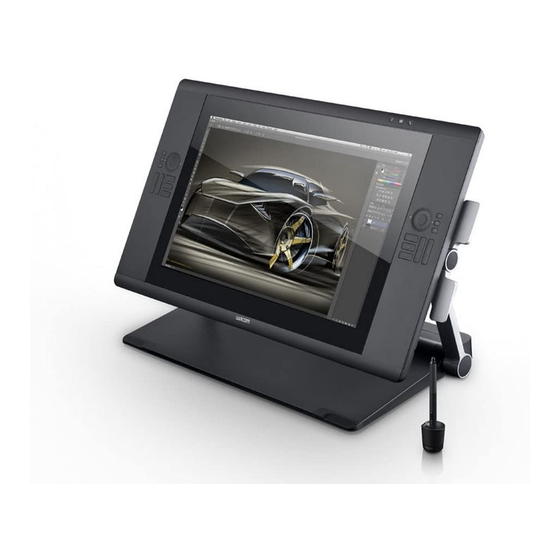
Index GETTING TO KNOW YOUR CINTIQ The Cintiq 24HD interactive pen display combines the benefits of a Liquid Crystal Display (LCD) with the control, comfort, and productivity of Wacom’s cordless, battery-free pen technology. This gives you a direct pen-on-screen interface for your computer. Cintiq 24HD touch also supports multi-touch. -
Page 16: Front View, Cintiq 24Hd Touch
Contents Index FRONT VIEW, CINTIQ 24HD TOUCH Status LED Power LED • When using pen in active area of the pen • Lights blue when power has been supplied to display, lights blue when the pen tip, eraser, Cintiq and a video signal is present. -
Page 17: Rear View
Support legs Pen tether attachment point using a keyboard with Cintiq. One on each side. See also front view, Cintiq 24HD touch Cintiq 24HD. Next steps: • Review the pen features and learn about the Cintiq display stand. -
Page 18: Front View, Cintiq 24Hd
Contents Index FRONT VIEW, CINTIQ 24HD Status LED Power LED • When using pen in active area of the pen • Lights blue when power has been supplied to display, lights blue when the pen tip, eraser, Cintiq and a video signal is present. -
Page 19: Pen Features
Important: • Use only the pen that came with your product, or a Wacom accessory pen specified for use with Cintiq. Other pens may not function properly. See available parts and accessories. Also, the Cintiq pen tip is specifically designed for use with the Cintiq pen display. -
Page 20: Using The Cintiq Display Stand
Contents Index USING THE CINTIQ DISPLAY STAND The Cintiq display stand is designed to support the weight of your Cintiq interactive pen display. • Cintiq can accommodate a variety of uses and working styles. Use the stand to adjust the working position of Cintiq so as to best meet your needs throughout the day. -
Page 21: Display Stand Features
Contents Index DISPLAY STAND FEATURES Locate Cintiq on your desktop or other stable work surface. Select a level display stand location where Cintiq will not tip or fall. Take some time to familiarize yourself with the display stand components. Incline levers One on each side. -
Page 22: Display Stand Location
Contents Index DISPLAY STAND LOCATION Select a location on your desktop or other work surface that is level and stable. This product weighs approximately 29 kg (64 lbs). Any table or platform on which this product is installed must be able to support the combined weight of the Cintiq interactive pen display and Cintiq display stand. - Page 23 Contents Index After placing Cintiq in its primary location, you can shift the unit to different positions. Slide the display stand on your desktop. Turn from side to side. For those who prefer a more immersive environment, Cintiq has been designed so that you can work with the pen display overhanging your desktop.
- Page 24 Contents Index 3. Readjust the pen display height and incline as needed. Readjust height and incline. Important: Push Cintiq fully back onto desktop when done working. 4. When you are done working, use the incline levers to raise the pen display and then push Cintiq back onto your desktop.
-
Page 25: Adjusting Display Height And Incline
Contents Index ADJUSTING DISPLAY HEIGHT AND INCLINE You can adjust the pen display height and incline to best meet your needs throughout the day. To change incline or viewing angle, face the front of the pen display and grasp it on the left and right side at approximately the same height as the incline levers. - Page 26 Contents Index When repositioning Cintiq, face the front of the pen display and grasp it on both sides. • Use the incline levers to adjust height and viewing angle. • The viewing angle will change as the pen display moves through an arc created by the support arms. •...
-
Page 27: Using A Keyboard With Cintiq
Contents Index USING A KEYBOARD WITH CINTIQ Extend the pen display support legs to allow for placement of a keyboard or other input tools beneath the pen display. • The support legs are located beneath the pen display, one at each lower corner. Flip out and then push up slightly on each leg until it clicks into place. -
Page 28: Cable Replacement
Contents Index CABLE REPLACEMENT The connection cables (DVI-D, DisplayPort, USB, and power) come pre-installed on your Cintiq. If using a DisplayPort connection, access the DisplayPort cable by removing the back cover from the display stand. 1. Remove the screws (qty 4, Phillips) from the back cover of the display stand. Remove the back cover. 2. - Page 29 Contents Index There may be times when you will need to remove or replace a connection cable. For example: • When using a VGA connection, you must remove the DVI-D cable and replace it with the provided DVI-I to VGA cable. •...
- Page 30 Contents Index 3. Remove the screws (qty 2, Phillips) from the support arm cover which houses the cable you wish to remove. 4. Raise the display support arms to the vertical locked position. Adjust the pen display incline as needed for adequate clearance.
-
Page 31: Working With Your Cintiq
Index WORKING WITH YOUR CINTIQ The Cintiq 24HD interactive pen display and Cintiq display stand were designed for a wide range of flexibility and ergonomic work approach. The design allows you to quickly adjust Cintiq to a different height and position whenever the need arises. Experiment by adjusting display height and incline determine which best fits your particular working style and tasks. -
Page 32: Setting Up Your Work Area
Note regarding Repetitive Stress Injury (RSI): Wacom makes no representation, promise or guarantee that Wacom products will cure or prevent, in whole or in part, mouse-induced repetitive stress symptoms, injuries or conditions. Individual results may vary. Always obtain competent medical advice to determine the most appropriate treatment for your specific situation. -
Page 33: Configuring Cintiq For Handedness
The configuration you chose was used to determine the default settings for the ExpressKeys and Touch Rings. However, you can use the Wacom Tablet control panel to easily reconfigure Cintiq for left- or right-handed users at any time. The ExpressKey and Touch Ring settings are automatically reconfigured when you change the handedness setting. -
Page 34: Using The Grip Pen
T . See customizing pen display functions. When done working with OUCH the pen, press the ExpressKey to enable touch. You can also use the Wacom Tablet control panel to disable multi-touch. Holding the pen Positioning... -
Page 35: Holding The Pen
The stand allows for vertical or horizontal placement of the pen. Unscrew the base of the pen stand to access the nib removal tool and assorted replacement nibs. Nib removal tool Replacement nibs Cintiq 24HD touch 10 standard nibs Cintiq 24HD 6 standard nibs 3 hard felt nibs... - Page 36 Contents Index POSITIONING To position the screen cursor, move the pen slightly above the Cintiq display screen without touching the screen surface. Press the pen tip on the display screen to make a selection. Note: Calibrating the pen display ensures correct alignment of the screen cursor with the pen tip.
-
Page 37: Using The Side Switch
Press gently for thin lines or softer color. Some applications require that you first select a pressure- sensitive tool from the application tool palette. To adjust tip feel, see adjusting tip feel and double-click. Visit the Wacom web site to learn about applications that support pressure. See product information. Contents Index... -
Page 38: Drawing With Tilt
The pen display recognizes when you tilt the pen from vertical to incline positions. Tilt can be used to control line shape and thickness in supporting applications. Visit the Wacom web site to learn about applications that support tilt. See product information. -
Page 39: Pen Display Controls
Wacom tablet where the cursor can be moved across the entire desktop or any display on your system. - Page 40 Contents Index Depending on your product model, Cintiq can accept pen input or both pen and multi-touch input. Pen input Wherever you place the pen on the display screen surface, the screen pointer will jump to the corresponding point. Learn about using the Grip Pen.
-
Page 41: Using The Hardware Control Buttons
Press a button to: • Toggle multi-touch on or off. • Launch the Wacom Tablet control panel or an on-screen keyboard. • Display a diagram of your current Cintiq settings. Press the button again to toggle off the function. Cintiq 24HD touch: Toggles touch on or off. -
Page 42: Using The Expresskeys
Contents Index USING THE EXPRESSKEYS Press individual keys to perform frequently used functions or keystrokes. ExpressKeys can also be used to modify your pen, touch, or other input tool properties as you work. If your product supports multi-touch, you can also use gestures to perform many of these functions. Default settings are shown by ExpressKey number below. - Page 43 Important: Some applications can override and control the ExpressKey functions. For details, see using applications integrated for tablet control. Use the Wacom Tablet control panel to customize the ExpressKey options. Manage your control panel settings Control panel overview Customizing the ExpressKeys...
-
Page 44: Using The Touch Rings
Important: Some applications can override and control the Touch Ring functions. For details, see using applications integrated for tablet control. Use the Wacom Tablet control panel to customize the Touch Ring options. Manage your control panel settings Control panel overview... -
Page 45: Working With Multiple Monitors
Display Toggle enables you to use Cintiq as a standard Wacom tablet where the screen cursor can be moved across the entire desktop or additional displays. • Set a pen side switch or an ExpressKey to M . -
Page 46: Adjusting The Display
ADJUSTING THE DISPLAY Use the Cintiq controls to adjust a variety of display settings. Factory presets, auto-sync, and user settings On Screen Display (OSD) settings OSD controls, Cintiq 24HD touch OSD controls, Cintiq 24HD Power saving FACTORY PRESETS, AUTO-SYNC, AND USER SETTINGS Factory presets: For optimal display quality, set your video card to a resolution of 1920x1200. -
Page 47: On Screen Display (Osd) Settings
If you make changes to the display appearance and cannot return to the original settings, use the option to return the pen display to its original factory defaults. RESET OSD controls, Cintiq 24HD touch OSD controls, Cintiq 24HD Contents Index... -
Page 48: Osd Controls
Contents Index OSD CONTROLS, CINTIQ 24HD TOUCH Menu and other control options are available when you open the On Screen Display. Brightness/Contrast controls Auto Adjust (analog input only) Image controls Color control systems Tools Menu tools ECO Information Information OSD Warning... -
Page 49: Auto Adjust (Analog Input Only)
Contents Index ECO M . Decreases the amount of power consumed by reducing the brightness level. : No function. 1: Decreases the brightness range up to 200 cd/m 2: Decreases the brightness range up to 100 cd/m . Adjusts the black luminance. When low settings are selected that cannot be displayed, the LACK indicator on the OSD will turn magenta. - Page 50 Contents Index (analog input only). Improves focus, clarity, and image stability by increasing or decreasing this setting. If the A function and the H.S function do not give you a satisfactory picture setting, a fine DJUST tuning can be performed using the F function.
-
Page 51: Color Control Systems
Contents Index COLOR CONTROL SYSTEMS . Change the picture mode that is most suitable for the type of content that is shown. ICTURE You can change up to 5 types. See advanced OSD Tag1 P using the Picture Mode ICTURE function for more information. - Page 52 Contents Index TOOLS PIP M . Select PIP M /PIP/P . You can ICTURE BY ICTURE SPECT ICTURE BY ICTURE select an individual P in each screen. This unit can display 2 inputs at a time. ICTURE ICTURE BY ICTURE SPECT ICTURE BY ICTURE...
-
Page 53: Menu Tools
Contents Index . Display will automatically power-down when you have selected a pre-determined amount of IMER time. Before powering off, a message will appear on the screen asking if you want to delay the turn off time by 60 minutes. Press any OSD button to delay the power-down time. . -
Page 54: Eco Information
Contents Index . This optimal resolution is 1920 x 1200. If O is selected, a message will appear on ESOLUTION OTIFIER the screen after 30 seconds, notifying you that the resolution is not at 1920 x 1200. . You can adjust the brightness directly. When this function is set to O , you can adjust the brightness with the left or right buttons while the OSD menu is off. -
Page 55: Contents Index
Contents Index INFORMATION Provides information about the current resolution display (main picture), current input setting and technical data including the preset timing being used and the horizontal and vertical frequencies. Indicates the model and serial numbers of your display. OSD WARNING OSD warning menus disappear with use of the M button. -
Page 56: Contents Index
Adobe ® RGB color profile. You may experience inaccurate color reproduction. REF: PRINTER (CMYK) Color Calibration Software, developed by Wacom, is highly GREEN recommended to provide extended color management features such as ICC profile Emulation and Printer Emulation. Contact your supplier for more information about this software. -
Page 57: Advanced Osd
Contents Index ADVANCED OSD If you need detailed information about the controls, use the advanced menu. There are two ways to use the advanced menu. Way 1: Using the advanced menu • Press the M button to access the OSD menu. Use the OSD buttons to move the cursor to the in Color control systems. - Page 58 Contents Index Tag1 Allows you to manually select the brightness level of grayscale. AMMA (cont.) There are four selections: sRGB, L Star, DICOM, and C . We recommend USTOM you show grayscale image data on screen. sRGB: G setting for sRGB. AMMA L Star: G for Lab color space.
- Page 59 Contents Index Tag1 Adjusts color gamut. Magenta warns of color saturation when outside of LCD (cont.) gamut. REEN Emulates color visions for difference color sense. P, D, T is for dicromats and OLOR ISION Grayscale is for contrast regibility checking. This function electronically compensates for slight variations in the white NIFORMITY uniformity level as well as for deviations in color that may occur throughout the...
- Page 60 Contents Index Tag2 Improves color matching with other monitors. Mostly affects whites. ETAMERISM (cont.) 6 - A DJUST Adjusts the hue of each color . The change in color will appear on screen and the menu color bars will show the amount of adjustment. : Adjusts the color depth of each color .
- Page 61 Contents Index Tag3 Adjusts the sharpness of the R component of the image. HARPNESS (cont.) (analog input only) Adjusts the sharpness of the G component of the image. HARPNESS REEN (analog input only) Adjusts the sharpness of the B component of the image. HARPNESS (analog input only) DVI L...
- Page 62 Contents Index Tag4 A-NTAA SW The Advanced No Touch Auto Adjust function is able to recognize new signals (cont.) (analog input only) even when neither the resolution nor the refresh rate has changed. If several PCs are connected to the monitor, and each transmit very similar (or even the same) signals in terms of resolution and refresh rates, the monitor recognizes there is a new signal and automatically optimizes the picture without the need for any action on your part.
- Page 63 Contents Index Tag5 Adjusts the vertical size by increasing or decreasing the setting. Press the right ESOLUTION (cont.) button to expand the height of the image on the screen. Press the left button to narrow the height of the image on the screen. Sets the zoom method.
- Page 64 Contents Index Tag6 The Intelligent Power Manager allows the display to enter into a power saving (cont.) mode after a period of inactivity. The O has three settings. : Display does not go into power save mode when the input signal is lost. : Display enters power save mode automatically when the input TANDARD signal is lost.
- Page 65 Contents Index Tag7 OSD T Adjusts the transparency of the OSD menu. RANSPARENCY (cont.) Signal information can be displayed in the corner of the screen. IGNAL NFORMATION is either On/Off. IGNAL INFORMATION The optimal resolution is 1920 x 1200. If O is selected, a message will appear ESOLUTION OTIFIER...
- Page 66 Contents Index Tag8 DDC/CI DDC/CI E : Turns on or off the two-way communication and NABLE ISABLE (cont.) control with the connected PC by video cable. Use the S to reduce the risk of image persistence. CREEN AVER CREEN AVER (default O ): Screen image moves periodically in 4 directions in order OTION...
-
Page 67: Osd Controls, Cintiq 24Hd
Contents Index OSD CONTROLS, CINTIQ 24HD Menu options are available when you open the On Screen Display. options allow you to choose the language in which to display the OSD menu. ANGUAGE OSD P options include: OSITION • . Adjusts the vertical position of the OSD menu window. - Page 68 Contents Index options include: THER • . (VGA only.) Synchronizes the signal timing of the pen display to that of your graphics card. HASE Use when you experience an unstable or flickering image, or horizontal distortion lines. • . (VGA only.) Changes the display data frequency to match that of your graphics card. Use when ITCH you experience an unstable or flickering image, or vertical distortion lines.
-
Page 69: Power Saving
Contents Index POWER SAVING Cintiq conforms to VESA power saving guidelines. When used with a Display Power Management Signaling (DPMS) compliant computer or video card, the display will automatically comply with the power saving parameters shown below. When power-saving functions are in effect, the screen display is darker than usual. COMPUTER MODE H-SYNC V-SYNC... -
Page 70: The Multi-Touch Experience With Cintiq
Index THE MULTI-TOUCH EXPERIENCE WITH CINTIQ The Cintiq 24HD interactive pen display is designed to enhance the way you work. Multi-touch enables you to interact with a computer using only your fingertips on the Cintiq display screen surface. You can use touch on Cintiq as you would on any other Mac or Windows device, such as phones, trackpads, and notebooks. -
Page 71: Navigating With Multi-Touch
The multi-touch feature of your Cintiq interactive pen display enables you to control a computer using only your fingertips on the display screen surface. Touch options can be individually enabled or disabled within the Wacom Tablet control panel. Touch is on when selected in the T , or M tab. - Page 72 Note: In the following descriptions, two-finger actions and gestures apply primarily to Mac. Although some gestures may be similar, Windows systems use the Windows standard two-finger gestures by default. For a consistent experience across applications, select the U ACOM gestures option in the Wacom Tablet control panel T tab. OUCH PTIONS BASIC FUNCTIONS Navigate.
- Page 73 Contents Index DD TAP TO RIGHT CLICK Using a single finger, select an item. Then with a second finger touch and release to the right of that finger. Releasing your finger issues a right-click and brings up a context menu at the screen cursor position. You can then select an option in the menu with the touch of a finger.
- Page 74 Contents Index First place two fingers on the display screen surface. • Zoom-in by moving (expanding) your fingers away from one another. • Zoom-out by moving (pinching) your fingers toward one another. Note: If zoom functions do not operate correctly within Adobe ®...
- Page 75 Contents Index OTATE Two finger rotate. Place two fingers diagonally on the display screen surface and then rotate them clockwise or counter-clockwise. For best recognition of this gesture, start with your fingers positioned diagonally on the display screen and keep them at least 25 mm (1 inch) apart.
- Page 76 Contents Index WIPE LEFT RIGHT TO SWITCH APPLICATIONS Using four fingers spaced slightly apart, move your fingers left or right to open the application switcher. Then use a single finger to select an application. Mac OS 10.7.x. Using four fingers, swipe them left or right to switch between full-screen apps.
- Page 77 Contents Index for F 3D/E WIPE DOWN XPOSÉ XPOSÉ Using four fingers spaced slightly apart, swipe down. • Flip 3D (Windows): Your first swipe opens Flip 3D. Swipe down again to close Flip 3D. Swipe left or right to move through the open windows. Use a single finger tap to select.
- Page 78 Express Key Preferences Click on a section of the diagram to open the appropriate Wacom Tablet control panel tab. You can then adjust settings as needed. Swipe down again to dismiss the diagram, or click anywhere outside of the diagram.
-
Page 79: Customizing Multi-Touch
Contents Index CUSTOMIZING MULTI-TOUCH Use the Wacom Tablet control panel to customize your product for the way you like to interact with multi- touch on your Cintiq and computer. Select the T icon in the T list. Then select an appropriate tab OUCH to customize, and change settings using the available options. -
Page 80: Setting Multi-Touch Options
OUCH PTIONS For Windows 7 or later, only. Choose an option to use Windows standard gestures or Wacom gestures. The default is to use Windows gestures. This is a global option and will apply to all of your applications. Tip:... -
Page 81: Choosing Standard Multi-Touch Functions
Contents Index CHOOSING STANDARD MULTI-TOUCH FUNCTIONS To customize Cintiq for your touch preferences, select the S tab. TANDARD ESTURES Note: This tab is not available for Windows systems. The Windows standard two-finger actions and gestures are always available. Multi-touch actions and gestures are available when selected. -
Page 82: Choosing Custom Multi-Touch Functions
Contents Index CHOOSING CUSTOM MULTI-TOUCH FUNCTIONS To create custom touch gestures, select the M tab. ESTURES Multi-touch gestures are modified based on your selection from the drop-down menus, and are available when selected. Position the screen cursor over a touch option to see a static image of that function. -
Page 83: Disabling Multi-Touch
Press an ExpressKey or other tool button configured for the option to display an interactive ETTINGS diagram of the current Cintiq settings on your display screen. Click T OUCH ROPERTIES to access your touch settings in the Wacom Tablet control panel. Contents Index... -
Page 84: Testing Multi-Touch
Touch to select an item. The status LED should brighten when you touch the display screen surface. See also testing Cintiq. 2. Open the Wacom Tablet control panel and click on the A button. In the dialog box that appears, BOUT click D .. -
Page 85: Customizing Your Cintiq
Index CUSTOMIZING YOUR CINTIQ After mastering the basics of using your pen and Cintiq 24HD interactive pen display, you may want to customize the way Cintiq works. This chapter describes how to adjust your pen display and input tool settings. -
Page 86: Manage Your Control Panel Settings
You can begin customizing Cintiq after opening the control panel. See control panel overview. Note: User-specific preferences are supported. After logging on, each user can customize their personal settings in the Wacom Tablet control panel. Switching to another user will automatically load the settings for that user. Tips: •... -
Page 87: Control Panel Overview
Contents Index CONTROL PANEL OVERVIEW Use the Wacom Tablet control panel to customize your Cintiq or Grip Pen. When you open the control list. A T icon is also panel, an icon for the Grip Pen or other input tool is displayed in the T OUCH displayed for product models that support multi-touch. - Page 88 Contents Index Control panel lists and tabs: The control panel T , and A lists allow you to select the ABLET PPLICATION pen display or tablet, tool, or application for which you want to change settings. The T list displays an icon for any ABLET supported pen display or tablet that has been installed on your system and is currently...
-
Page 89: Calibrating The Pen Display
ESET display. See On Screen Display (OSD) settings. 1. Open the Wacom Tablet control panel. If more than one pen display is installed on your system, select the pen display you are working with from the T list. ABLET 2. -
Page 90: Pen Features
Adjusting tip feel and double-click Advanced tip and eraser pressure settings Application-specific settings Wacom offers a number of optional pens, such as the Art Pen and Airbrush, that are compatible for use with Cintiq. • The Art Pen features a pressure-sensitive tip and eraser, as well as sensitivity to tilt and rotation. -
Page 91: Adjusting Tip Feel And Double-Click
Contents Index ADJUSTING TIP FEEL AND DOUBLE-CLICK To adjust the tip sensitivity of your pen, select the P tab. Customizes the amount of pressure needed to click, draw, or ink. To create broad brush strokes or to click with a light touch, use a S tip setting. -
Page 92: Adjusting Eraser Feel
Contents Index ADJUSTING ERASER FEEL To adjust the eraser sensitivity of your pen, select the E tab. RASER Select the function to perform when using the eraser. Customizes the amount of pressure needed to erase. Click to further customize the eraser sensitivity. With your screen cursor positioned over an empty area of the control panel, press down on the pen display screen with your pen... -
Page 93: Customizing Tool Buttons
Contents Index CUSTOMIZING TOOL BUTTONS Select the P tab to change the functions assigned to the side switches and tip of your pen. Select the function to perform when pressing the upper or lower side switch. The selected function occurs when you bring the pen tip within 5 mm (0.20 inch) of the display screen surface without touching the screen and then press the upper or... -
Page 94: Customizing Tilt Sensitivity
Tilt is direction sensitive and can be used in some applications to control brush orientation or other characteristics. Visit the Wacom web site to learn about applications that currently support tilt. See product information. CUSTOMIZING PEN DISPLAY FUNCTIONS... -
Page 95: Customizing The Expresskeys
Contents Index CUSTOMIZING THE EXPRESSKEYS To customize the ExpressKeys, select the E tab. Each key can be customized to perform a XPRESS Display Toggle, modifier, keystroke, or other function. Choose a function to perform when the key is pressed. ExpressKey functions can be defined for use with specific applications. -
Page 96: Customizing The Touch Rings
Contents Index CUSTOMIZING THE TOUCH RINGS To customize the Touch Rings, select the T tab. Touch Ring functions can be modified to OUCH perform various zooming, scrolling, or custom keystroke actions. For example, you might set a Touch Ring function to cycle layers when working in Adobe Photoshop. Choose a function to perform when using... -
Page 97: Button Functions
Index BUTTON FUNCTIONS Customize Cintiq for the way you like to work. Simply use the Wacom Tablet control panel to change the button function that is assigned to a pen button, ExpressKey, Touch Ring, or Radial Menu setting. Button function options may vary, depending on your pen display model. Not all options are available for all controls or pen display models. - Page 98 Contents Index FUNCTION NAME DESCRIPTION Enables you to simulate keystrokes Select this option to display the D EYSTROKE EFINE dialog box. EYSTROKE Enter a keystroke or keystroke combination in the K entry box. Keystroke combinations can include letters, numbers, function keys (such as F3) and modifier keys (such as S , or C for Windows, or...
- Page 99 Contents Index FUNCTION NAME DESCRIPTION Displays the Radial Menu on your screen. Each level of the hierarchical menu ADIAL consists of eight menu slices which may contain various features and options to choose from. Simulates the B command in browser applications. Simulates the F command in browser applications.
-
Page 100: Cintiq 24Hd
Simply press the pen button to launch the assigned option. If your selection is for the Radial Menu, it will be displayed there. Available only for Cintiq 24HD touch models. T is useful when OUCH OUCH you are working with an input tool and want to exclusively use pen mode. - Page 101 Display Toggle enables you to cycle between pen control for Cintiq and your other displays. This is like using Cintiq as a standard Wacom tablet where the screen cursor can be moved across the entire desktop or additional displays. Contents...
- Page 102 The mouse mode settings are independent of system settings. Changes you make to these settings in the Wacom Tablet control panel do not affect similar system settings. However, changes made to similar system settings may affect your pen display settings.
- Page 103 ExpressKey, Touch Ring, pen, and multi-touch settings. The current functions for each control are shown. Click on any section of the diagram to open the appropriate Wacom Tablet control panel tab. You can then adjust settings as needed. Dismiss the diagram by again pressing the ExpressKey or other tool button to which this function is assigned, or by clicking anywhere outside of the diagram.
-
Page 104: Cintiq 24Hd
Set a tool button or ExpressKey to the R ADIAL function. Press the button to display the Radial Menu. • Cintiq 24HD touch: You can also use the appropriate Top menu multi-touch gesture to open the Radial Menu. • The hierarchical Radial Menu appears in circular format. -
Page 105: Working With Display Toggle
For example, Cintiq can be used as a pen display where the cursor is positioned at the pen tip location, or toggled for use as a standard Wacom tablet where the cursor can be moved across the entire desktop or any display on your system. -
Page 106: Application-Specific Settings
Contents Index APPLICATION-SPECIFIC SETTINGS You can customize your tools for use with a particular application. For example, you may prefer a firm pen list enables tip pressure setting in one application and a soft pressure setting in another. The A PPLICATION you to add an individual application to the list and then customize your tool settings for that application. -
Page 107: Creating An Application-Specific Setting
Contents Index CREATING AN APPLICATION-SPECIFIC SETTING First choose the pen display and input tool for which you want to create an application-specific setting. Click on the A list [ + ] button. PPLICATION Choose a method to select an application: •... -
Page 108: Changing Application-Specific Settings
Contents Index CHANGING APPLICATION-SPECIFIC SETTINGS To change tool settings for a specific application, select the tool and the application. Then customize the tab settings. REMOVING APPLICATION-SPECIFIC SETTINGS To remove an application-specific setting: 1. In the T list, select the tool from which you want to remove the application-specific setting. Then, in the A list select the application you want to remove from the list. -
Page 109: Cintiq 24Hd
WORKING WITH MULTIPLE TOOLS The Wacom Tablet control panel is designed to help you customize and keep track of the settings for your Cintiq tools. The tool you use to open the control panel is automatically selected, and the appropriate tabs for that tool are displayed. -
Page 110: Renaming The Tablet In The Tablet List
Contents Index RENAMING THE TABLET IN THE TABLET LIST Within the control panel T list, double-click on the pen display icon. ABLET If desired, enter a new name to be used for the pen display icon. Contents Index... -
Page 111: Troubleshooting
If you are having trouble, Wacom recommends you do the following: 1. If the Wacom driver failed to load properly, first perform the recommended action in any error message that may appear on your screen. If that does not solve the problem, review the troubleshooting procedures in this chapter. -
Page 112: Testing Cintiq
Contents Index TESTING CINTIQ 1. If the interactive pen display power LED does not light, check the following: • First verify that the light on the power adapter is on. If the light is not on, check that the power cable is properly connected between the power adapter and an active AC outlet. - Page 113 If you are still having problems, you may have a defective pen or pen display. After testing, use the Wacom Tablet control panel to reconfigure your tablet and tools for any custom settings you may originally have been using.
-
Page 114: Testing Controls And Input Tools
The pen will be added back to the T list with its default settings. • Open the Wacom Tablet control panel and click on the A button. In the dialog box that appears, BOUT click D .. -
Page 115: Testing The Hardware Control Buttons
LOSE Important: Some applications can override and control the Touch Ring functions. Consider closing any open applications except the Wacom Tablet control panel when testing the Touch Ring. For details, see using applications integrated for tablet control. -
Page 116: Testing A Pen
Contents Index TESTING A PEN 1. With the D dialog box open, and while observing the P column, bring IAGNOSTICS OINTING EVICE your pen within 5 mm (0.2 inch) of the display screen. A value for P , the D ROXIMITY EVICE EVICE... -
Page 117: Cintiq 24Hd
Ensure that a supported video mode has been selected on your display card or computer system. See the display card or system manual for information about changing the graphics mode. • Cintiq 24HD touch: Open the OSD menu and check the EDID setting. XTENSION The power LED is lit orange. -
Page 118: Cintiq 24Hd
Check the color profile settings that you are using with Cintiq. • Any changes to the contrast setting should be made in small increments as changes in contrast may affect color accuracy. • Cintiq 24HD touch: Ensure S EMU is set to O OLOR ISION Color irregularities appear on •... -
Page 119: Cintiq 24Hd
When the LCD detects a problem, the LED flashes in a of long and short blinks. pattern of long and short blinks depending on the type of problem detected. If this occurs, contact Wacom for Technical Support. See the technical support options and the Read Me file for information on where to obtain support for your region. -
Page 120: Vga Problems
Contents Index VGA PROBLEMS The display ripples or flickers. • Open the OSD menu and select the A option. DJUST Then, if necessary, manually adjust pitch and phase. • Verify that the display adapter or video card matches the specifications for the interactive pen display. •... -
Page 121: Pen Tablet Troubleshooting
If you encounter problems with the tablet portion of the interactive pen display, see the following tables. Your problem may be described here, and you can try the solution offered. See the pen display Read Me file for the latest information updates. For additional information, visit the Wacom web site at http://www.wacom.com. General problems Pen problems... -
Page 122: Positioning
If using application-specific settings, be sure you have updated the different function than what is settings for the application you are working with. set in the Wacom Tablet control panel. The ExpressKeys and Touch Check to be sure that Cintiq is correctly configured for your preferred Rings do not perform the handedness. -
Page 123: Clicking
Verify also that your application supports pressure sensitivity. Clicking is difficult. Open the Wacom Tablet control panel and go to the P tab. Try using a lighter T The pen selects everything or Open the Wacom Tablet control panel and go to the P tab. - Page 124 The pen tip does not function. Be sure you are using only the pen that came with your product, or a Wacom accessory pen specified for use with Cintiq. Other pens may not function properly on the pen display. Check the control panel P...
- Page 125 (0.2 inch) of the pen display active area. Do this without pressing down on the pen tip. In the Wacom Tablet control panel, verify that the side switch is set to the proper function you are expecting to occur for the application and tool you are using.
-
Page 126: Multi-Touch Problems
MULTI-TOUCH PROBLEMS Multi-touch does not work. Enable touch by pressing an ExpressKey that is set to T OUCH Otherwise, open the Wacom Tablet control panel, click on the T OUCH icon, and go to the S , or T TANDARD... -
Page 127: Windows-Specific Problems
Contents Index WINDOWS-SPECIFIC PROBLEMS You suspect the pen display Use the Wacom Tablet Preference File Utility to work with preferences. preferences may be Close any open applications. Click the icon and select A START corrupted, or want to make . Then select W... -
Page 128: Mac-Specific Problems
If this does not help, contact Wacom for Technical Support. technical support options. You suspect the pen display Use the Wacom Tablet Utility to work with preferences. Close any open preferences may be applications. Open the main A folder. Then open the... - Page 129 YSTEM REFERENCES handwriting recognition. 4. Test the Ink function using your Wacom pen display and pen. If this procedure does not resolve your problem with Ink, contact Apple Support for further assistance. Wacom is not the software manufacturer for Ink and we are limited in our abilities to support a third party software application.
-
Page 130: Technical Support Options
Check the Customer Care options on the Wacom web site for your region. You may find answers to your questions without having to make a phone call. If you cannot solve the problem and you think your Wacom product is not working properly, contact the Wacom support staff for the area where your product was purchased. -
Page 131: Obtaining Software Updates
Cintiq and a new hardware or software product, it may be helpful to download a new software driver (when available) from the Internet. Visit the Wacom web site at www.wacom.com for Customer Care and product drivers or other software updates. -
Page 132: Frequently Asked Questions
Can I have Cintiq and a mouse connected to my computer at the same time? Yes. You can use your system mouse in conjunction with your Wacom product. Only one device at a time can control the screen cursor. You can change back and forth between your Cintiq input tools and a system mouse at your convenience. -
Page 133: Cintiq 24Hd
Base for details. Do I need to install the software driver to work with multi-touch? Yes. You must install the software driver before you can use multi-touch gestures on your Cintiq 24HD touch. The installer is asking for a password. What is the password? The computer is looking for a password that is either your personal password or the administrative password to log into the computer. -
Page 134: Cintiq 24Hd
Contents Index CARE AND MAINTENANCE This section provides tips for the care and maintenance of your Cintiq 24HD interactive pen display. Caring for Cintiq Replacing the pen nib CARING FOR CINTIQ Keep the Grip Pen and the Cintiq LCD screen surface clean. Dust and dirt particles can stick to the pen and cause excessive wear to the display screen surface. -
Page 135: Cintiq 24Hd
Replace the nib when it gets too short or develops a flat point. 1. Unscrew the pen stand base to access the nib removal tool and replacement nibs. Nib removal tool Replacement nibs Cintiq 24HD touch 10 standard nibs Cintiq 24HD 6 standard nibs 3 hard felt nibs 1 stroke nib 2. - Page 136 Contents Index 3. Slide the end of the new nib straight into the barrel of the pen. Firmly push the nib until it stops. Replace when 1 mm (0.04 inch) or less. Warning Choking hazard. Prevent children from swallowing the pen nib or side switch. The pen nib or side switch may accidentally be pulled out if children are biting on them.
-
Page 137: Other Useful Information
Contents Index OTHER USEFUL INFORMATION This section includes instructions on how to manage your Cintiq preferences, uninstall the product software, and more. Removing Cintiq from the display stand Mounting Cintiq on the display stand Using an alternate mount or stand Uninstalling Cintiq Managing preferences Installing multiple tablets... -
Page 138: Removing Cintiq From The Display Stand
Contents Index REMOVING CINTIQ FROM THE DISPLAY STAND The Cintiq interactive pen display has been specifically designed for use when mounted on the Cintiq display stand. However, there may be times when it will be necessary to remove the pen display from the stand. - Page 139 Contents Index 2. Prepare the pen display. Adjust height and incline so that both display support arms are in their upright, locked position. The pen display incline should be approximately 45 degrees to the stand base. As a unit, carefully pivot Cintiq and the display stand on the stand base edge so the display can be placed face down on a soft cloth or other protective surface.
- Page 140 Contents Index 4. If using the connection cables in a different mounting configuration, properly remove them from the display stand. See cable replacement. 5. Remove the screws that secure the support arm brackets to the pen display. There are 4 Phillips screws per bracket.
-
Page 141: Mounting Cintiq On The Display Stand
Contents Index MOUNTING CINTIQ ON THE DISPLAY STAND Follow the below procedure to mount the interactive pen display on the display stand. For example, Cintiq may have been mounted in a specialized location using a suitable VESA mounting arm and you now wish to return the pen display to the display stand. - Page 142 Contents Index 5. Adjust the incline levers as needed for a proper, flush fit on both arm brackets. Use the appropriate mounting screws that came with your product to secure the support arm brackets to the pen display. There are 4 Phillips screws per support arm bracket. Do not overtighten or strip the screw threads. Warning Do not operate the incline levers unless the display support arms are roughly located within their mounting brackets and you are placing some amount of leverage on the support arms to hold them in place.
- Page 143 Contents Index 7. After you have ensured the pen display is properly mounted and that the stand operates smoothly, then move Cintiq to your desired work location. • Adjust height and incline so the display stand support arms are locked upright, with Cintiq positioned horizontally.
-
Page 144: Using An Alternate Mount Or Stand
Contents Index USING AN ALTERNATE MOUNT OR STAND If using Cintiq in an installation that requires the use of an alternate mounting platform, you can remove the Cintiq display stand from the pen display and mount the display onto any stand or mounting platform conforming to the VESA MIS-E 100/200 (6 screw) standard. -
Page 145: Cintiq 24Hd
4. When the driver has been removed, shut down your system, power off your computer, and turn off the pen display. When your computer and pen display are off, disconnect the pen display from your computer. Note: The Cintiq 24HD touch does not support operation on Windows Vista or XP systems. Mac: 1. From the G... -
Page 146: Managing Preferences
Contents Index MANAGING PREFERENCES Use the Wacom tablet preferences utility to manage your pen display preferences for single or multiple users. Windows: First close any open applications. Then open the utility by clicking the icon and selecting START . Select W... -
Page 147: Installing Multiple Tablets
Contents Index INSTALLING MULTIPLE TABLETS Any pen display or tablet that has been detected on your system will appear as an icon within the Wacom list. Tablet control panel T ABLET Select a pen display or tablet icon for which to customize tool and application settings. -
Page 148: Using Applications Integrated For Tablet Control
Applications that have been integrated in this manner will typically provide you with the opportunity to opt-out or disable this functionality when first using your Wacom product with the application. See the documentation provided with your application for any specific details on functionality and how to customize or disable this feature. -
Page 149: Importing Expert Settings
Some software developers may create custom settings files which are specifically designed to provide optimum performance when using your Wacom product with their applications. • Visit the Wacom web site for your region to choose from a variety of custom settings files that may be available for your product. •... -
Page 150: Cintiq 24Hd
Windows 7 and Vista except Windows 7 Starter and Home Basic, and Windows Vista Home Basic. Use Cintiq and your Wacom pen for quick, intuitive results. Note: The Cintiq 24HD touch does not support operation on Windows Vista systems. •... -
Page 151: Product Information
EVICES PRODUCT INFORMATION To learn more about your Cintiq, visit the Wacom web site for your region. You can also discover which software applications are currently tablet enhanced to support the pressure sensitivity and other special functionality of your pen display by searching software applications. -
Page 152: Ordering Parts And Accessories
In other countries, please contact your local dealer or distributor. Some parts and accessories may not be available in all regions. AVAILABLE PARTS AND ACCESSORIES For a list of available parts and accessories, visit the Wacom web site for your region. See ordering parts accessories. - Page 153 Journal includes a variety of pen, marker, and highlighter tools, plus an eraser that is easily activated by the eraser end of your Wacom pen. Additionally, your handwritten content is searchable within Journal.
- Page 154 Pixel. The smallest unit of measure on your display screen. Pressure sensitive. A quality of the Wacom pen tip and eraser that senses the amount of pressure being applied. This is used to create natural-looking pen, brush, and eraser strokes in applications that are pressure sensitive.
-
Page 155: Cintiq 24Hd
Tablet PC Input Panel (TIP). The Microsoft Windows Tablet PC Input Panel enables you to use your Wacom pen to create handwritten notes or work with an on-screen keyboard. The Input Panel dynamically converts your handwriting to text. - Page 156 Contents Index INDEX About the manual Clicking, with pen Control panel Accessories lists available ordering manage settings Adding a new tool opening Adjusting, pen display overview Applications, integrated for tablet control tabs Application-specific settings Controls, testing changing settings Customizing creating eraser feel ExpressKeys removing...
-
Page 157: Cintiq 24Hd
Navigation, customizing for multi-touch New tool, adding pen display On Screen Display (OSD) Front view controls, Cintiq 24HD Cintiq 24HD controls, Cintiq 24HD touch Cintiq 24HD touch Ordering, parts and accessories OSD controls Functions, button General problems, troubleshooting advanced OSD... -
Page 158: Osd Controls, Cintiq 24Hd Touch
On Screen Display (OSD) testing input tools OSD controls, Cintiq 24HD Windows-specific problems OSD controls, Cintiq 24HD touch Uninstalling removing Unpacking box contents user Side switch, using User settings... - Page 159 Contents Index Using ExpressKeys hardware control buttons multi-touch Radial Menu Touch Rings VGA problems Windows-specific problems, troubleshooting Work area, setting up Working, with Cintiq Contents Index...
-
Page 160: Information
NSW 2116 Australia Singapore 038985 Telephone: +61.2.9422.6700 Telephone: +65.6258.8640 Fax: +61.2.9420.2272 Fax: +65.6258.8697 WACOM TAIWAN INFORMATION CO., LTD. WACOM HONG KONG LIMITED 9F.-1, No.237, Songjiang Rd., Room 1201, Tai Tung Building Zhongshan Dist., Taipei City 104, 8 Fleming Road Taiwan (R.O.C.) Wanchai, Hong Kong Internet: www.wacom.asia/tw...
Need help?
Do you have a question about the Cintiq 24HD touch and is the answer not in the manual?
Questions and answers