Advertisement
Overview
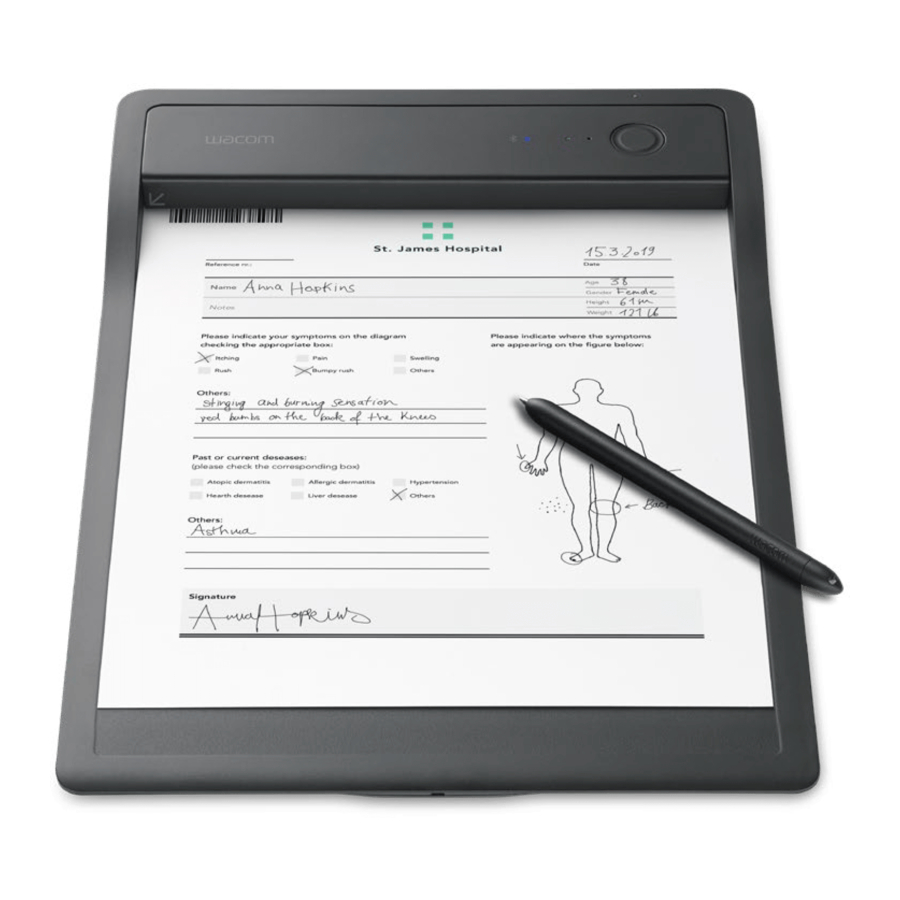
CLB Paper is the application you use when filling out a paper form on a Wacom Clipboard (PHU-111). While you write on the paper form the pen trace is reproduced in real time in CLB Paper. When you save the completed form the pen trace is saved in a PDF document with field contents converted to the specified format of text, biometric signature or freehand drawing. The field definitions are made using the companion application CLB Create which produces the document template PDF files used by CLB Paper. The barcode printed on a form links the paper copy to the electronic PDF document template.
In normal operation follows these steps:
- Start CLB Paper
- Connect a Wacom Clipboard
- Insert a printed paper form – CLB Paper displays the corresponding PDF template document identified by a barcode
- Fill out the form on the Wacom Clipboard using the pen supplied – pen ink is reproduced in real time on the CLB Paper display
- On completion save the form
Icons displayed in the status area have this meaning:
![]() Wacom Clipboard connected
Wacom Clipboard connected![]() OneDrive is connected and synchronized
OneDrive is connected and synchronized![]() Filter the display of digital PDF template documents (signed/unsigned)
Filter the display of digital PDF template documents (signed/unsigned)![]() Save the filled out form
Save the filled out form![]() Select the digital certificate
Select the digital certificate![]() Change Settings
Change Settings
 Save the filled out form
 Select the digital certificate
 Change Settings
To quit a process in CLB Paper such as form filling, use the close icon: ![]()
Start CLB Paper
The first time you start CLB Paper follow on-screen instructions to complete these steps:
- Connect a Wacom Clipboard See the description below.
- Log in to your OneDrive account and select your working folders
The synchronized Cloud drive is used to share forms with CLB Create. Both the signed and unsigned PDF documents are saved in your OneDrive folders. See Settings for more details. - Create a digital certificate used to seal completed forms - enter a password needed to use the certificate
Use Settings to return to any of these steps at a later time.
Connect a Wacom Clipboard

The image shows the position of controls and indicators on the Wacom Clipboard:
- the power switch is on the rear edge of the tablet
- a blue LED indicates the Bluetooth® connection status:
- flashing while pairing
- solid when successfully paired and connected
- a green LED indicates that CLB Paper is ready to accept Wacom Clipboard pen data
- the speaker will sound when Bluetooth® is connected but CLB Paper is not ready to accept pen data and the user writes on the paper in the clipboard i.e. blue LED on with green LED off
- an orange LED indicates power is on. The LED flashes when battery is low or the tablet is charging
- the large Process button is used in the Bluetooth® pairing operation, it can also be used to seal a document when form filling has been completed.
- the slide-switch on the side of the tablet must be in the Bluetooth® position:
![]()
CLB Paper uses Bluetooth® for connection to the Wacom Clipboard and shows the status:
![]() a Wacom Clipboard is connected
a Wacom Clipboard is connected![]() a Wacom Clipboard is not connected
a Wacom Clipboard is not connected
 a Wacom Clipboard is connected
 a Wacom Clipboard is not connected
Follow on-screen instructions to connect a Wacom Clipboard – the Bluetooth® device must be paired with CLB Paper. If you have more than one Wacom Clipboard you can pair with one from a list.
 To save battery charge the Wacom Clipboard automatically powers off when not in use.
If the Clipboard is not connected turn on the device then use the Settings...Pair Clipboard operation. A solid blue LED on the device indicates a successful connection.
Insert a printed form
The printed form is first prepared by the companion application CLB Create. During this process fields requiring pen input are identified as active fields and a unique barcode is added to the page header for identification, for example:

Press down on the clip bar then fully insert the page in the leftmost position. When the clip is released the barcode, now beneath the clip bar, is scanned and transmitted to CLB Paper for identification.
CLB Paper searches for the same barcode in the document templates. When the corresponding document has been found the green LED on the Clipboard is turned on and the PDF template is displayed showing the active fields, for example:

Fill out the form
Fields which require pen input are highlighted with a grey background.
Those fields which must be completed are starred: 
As you write on the form, pen ink is displayed in real time in CLB Paper.
To abandon the form, use the close icon ![]() then select Abandon Changes.
then select Abandon Changes.
Save the form
![]()
Press and hold the icon for 2 seconds to seal the document.
Alternatively press the Process button on the Wacom Clipboard.
Follow on-screen prompts to seal the form with your digital certificate. You will be prompted if any required fields have not been completed and you can choose to continue or return to form filling.
The original document template PDF is saved as a sealed document, signed with your digital certificate and containing the addition of pen data converted to the specified field type of text, signature or freehand drawing.
Avoid holding the Wacom Clipboard Process button since this will activate the Bluetooth® pairing operation.
Settings
![]()
Click the icon to access Settings:

Wacom Clipboard
Use the settings to view the name of the connected Wacom Clipboard and the battery status.
Select Wacom Clipboard... Pair Clipboard to start the Bluetooth® pairing operation, following on-screen instructions. During this procedure you can enter a name for the selected device.
OneDrive - Working online/offline
Use a OneDrive connection for normal online operation. Document templates and sealed documents are synchronised automatically as they are created in the OneDrive folders.
When you log in to OneDrive you will select two OneDrive folders:
- Location for template storage - the folder contains the template documents generated by the companion application CLB Create and read by CLB Paper. The templates contain the identifying barcodes and the active field definitions.
- Location for documents storage – the folder is used by CLB Paper to save documents filled out and sealed by the application.
Select one of the available folders, for example:

The cloud icon displays the status as follows:
![]() OneDrive is connected and synchronized
OneDrive is connected and synchronized![]() OneDrive is synchronizing
OneDrive is synchronizing![]() OneDrive is not synchronized
OneDrive is not synchronized![]() OneDrive is logged out – CLB Paper is offline
OneDrive is logged out – CLB Paper is offline
To work offline, for example when an internet connection is not available, use settings to Log out from OneDrive.
When offline operation is selected the application continues to use its internal copy of OneDrive files. When OneDrive is again connected the files will be synchronised automatically with the cloud. If required, the template and document files can be accessed using the iTunes app on a Mac.
Manage Certificates
When you first run CLB Paper, on-screen prompts guide you to create a digital certificate which is used to seal new documents.
Use the settings to change the way the certificates are handled:

Click Default to add a new certificate and choose the default used by CLB Paper.
Deselect the option 'Use default certificate for all signatures' to use different certificates when signing signature fields.
![]()
Use the certificate icon to select the required certificate when form filling.
Manage Subscriptions
Select 'Demo Version' to run a fully functional version of CLB Paper. The only limitation is that the watermark 'Demo Version' will be displayed in documents.

To remove watermarks, select Manage Subscriptions and follow on-screen instructions to purchase an option.
Documents / ResourcesDownload manual
Here you can download full pdf version of manual, it may contain additional safety instructions, warranty information, FCC rules, etc.
Advertisement


Need help?
Do you have a question about the CLB Paper and is the answer not in the manual?
Questions and answers