Table of Contents
Advertisement
Quick Links
Advertisement
Table of Contents

Related Manuals for Audiovox AVDBR1


Summary of Contents for Audiovox AVDBR1
- Page 1 Owner’s Manual AVDBR1 AUTOMOTIVE BLU-RAY PLAYER...
-
Page 2: Table Of Contents
Table of Contents Warnings and Cautions ....................4 Introduction ........................7 Features ................................. 7 Accessories ........................7 Installation ........................8 Installing the Player........................... 8 Powering Your Blu-Ray Player ........................ 9 Connecting to Your Monitor ........................10 Connecting the External Remote IR Receiver .................. 11 Controls and Indicators .................... - Page 3 Table of Contents Reference ........................39 Blu-Ray Region Codes ..........................39 DVD Region Codes ............................ 40 Compatible Formats ..........................41 Specifications ........................43 Troubleshooting ......................44 Notes ..........................45 - 3 -...
-
Page 4: Warnings And Cautions
Warnings and Cautions THE LIGHTNING FLASH AND ARROWHEAD WITHIN THE TRIANGLE IS A WARNING SIGN ALERTING YOU OF “DANGEROUS VOLTAGE” INSIDE THE PRODUCT. THE EXCLAMATION POINT WITHIN THE TRIANGLE IS A WARNING SIGN ALERTING YOU OF IMPORTANT INSTRUCTIONS SEE MARKING ON BOTTOM OF PRODUCT ACCOMPANYING THE PRODUCT. - Page 5 Warning and Cautions WARNING • Connect the equipment into an outlet on a circuit different from that to which the Changes or modifications to this unit not receiver is connected expressly approved by the party responsible • Consult the dealer or an experienced for compliance could void the user’s radio TV technician for help.
- Page 6 Warnings and Cautions Additional Precautions • Avoid installing the unit in locations where it would be subjected to dust, dirt • If your unit has been stored in a cool place or excessive vibration. for any length of time, wait for about 2 hours before using it.
-
Page 7: Introduction
Introduction Thank you for choosing the AVDBR1 Blu-ray player. The AVDBR1 is designed to optimize the enjoyment of your favorite Blu-ray/DVD discs in a mobile environment. This Blu-ray player is designed to provide years of reliable, trouble-free service. Please read this manual thoroughly prior to operating the Blu-ray player. Save this manual for future reference. -
Page 8: Installation
Installation Before installing the player: • Choose a mounting location where the Blu-ray player does not get in the driver’s way and cannot injure the passenger in the event of an emergency stop. • Connect the wiring temporarily. Make sure the Blu-ray player is connected correctly and the Blu-ray player and the system work properly. -
Page 9: Powering Your Blu-Ray Player
Installation HDMI CONNECTOR 12 VDC INPUT 4 PIN POWER AUDIO & VIDEO IR SENSOR CONNECTOR OUPUT RCA JACK INPUT JACK 3 PLACES Rear Panel Powering Your Blu-ray Player 1. Connect the long black wire (-) to the vehicle ground. 2. Connect the long red wire (+) to a switched (Accessory) 12 VDC source. -
Page 10: Connecting To Your Monitor
Installation Connecting to Your Monitor HDMI Jack LINE OUTPUT Jacks (Audio and Video) Audio and video connections to a monitor Audio and video connections to a can be done with a HDMI cable (not monitor can be done with RCA-type video supplied) if your monitor has a HDMI input. -
Page 11: Connecting The External Remote Ir Receiver
Installation Connecting to Your Monitor Connecting the External (Continued) Remote IR Receiver 1. Plug the 1/8” plug on the External Remote IR Receiver cable into the IR EXT Note jack on the back of the Blu-ray player. • The RCA video connection only 2. -
Page 12: Controls And Indicators
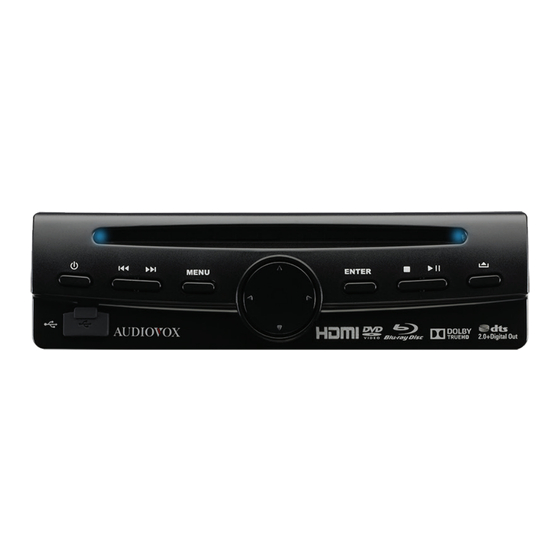
Controls and Indicators Front Panel 7 8 9 1. Power ( ) Button 7. Infrared Remote Sensor Press this button to turn on your player. Detects signals from the remote control. Press this button again to turn off your , , , Buttons player. -
Page 13: Remote Control Operation
Remote Control Operation Using the Remote Control Battery Replacement • Point the remote control at the Infrared When the batteries become weak, the Remote Sensor located on the player operating distance of the remote control or the REMOTE SENSOR located on the is greatly reduced and you will need to External Remote IR Receiver. - Page 14 Remote Control Operation 1. STANDBY/ON ( ) Button Remote Control Press this button to turn on your player. Press this button again to turn off your player (standby mode). The player will turn off after five seconds. STANDBY/ON EJECT 2. R (red), G (green), B (blue), Y (yellow) Buttons When playing a Blu-ray Disc that has a Java application, press R, G, B or Y to...
- Page 15 Remote Control Operation 12. INFO Button 21. Fast Forward ( ) Button Press this button to access the Press this button repeatedly for fast Information Menu. forward playback. The available speeds are 2X, 4X, 8X, 16X, and 32X. 13. REPEAT Button 22.
-
Page 16: Playing A Blu-Ray Disc Or Dvd
Playing a Blu-ray Disc or DVD Basic Playback (Blu-ray Disc or DVD) To Play a BD/DVD: Stop 1. Turn on your monitor. • Press the button to stop playback. 2. Press the STANDBY/ON ( ) button on • The player stores the point where the remote control or the playback was interrupted. -
Page 17: Displaying Disc Information
Playing a Blu-ray Disc or DVD Changing the Chapter/Title as type of disc, title number, chapter number, audio format, elapsed time of • Press the Previous ( ) button to skip to the current title, and subtitle language. the start of the current chapter or skip to previous chapters. -
Page 18: Special Functions
Playing a Blu-ray Disc or DVD Special Functions Repeating a Title or Chapter Selecting the Audio Mode • Press the REPEAT button one or more 1. Press the AUDIO button. Your player times to select a repeat mode. This displays the disc’s audio channel information, such as 1/3 English Dolby function may not be available on some Blu-ray discs. - Page 19 Playing a Blu-ray Disc or DVD Locating a Desired Section Locating a specific time in a DVD or Locating a specific title in a DVD or Blu-ray Disc Blu-ray Disc 1. Press the GOTO button. 1. Press the GOTO button. 2.
-
Page 20: Playing An Audio Cd
Playing an Audio CD Basic Playback (Audio CD) Accelerated Play To Play an Audio CD: 1. Press the STANDBY/ON ( ) button on • To fast-forward, press the button. the remote control or the • To fast-reverse, press the button. POWER ( ) button located on the • Each time you press one of these buttons,... -
Page 21: Playing Music Files
Playing Music Files This unit can play music (MP3) files that have been recorded on a USB flash drive or disc. To Play Music (MP3) Files from a USB Flash Drive: 1. Insert a USB drive containing MP3 files into the USB port. 2. - Page 22 Playing Music Files To Play Music (MP3) Files from a Disc: 1. Insert a CD label-side up into the disc slot. The Home screen appears. 2. Press the button to select Music. 3. Press the OK or button. The Media Center screen appears.
-
Page 23: Playing Picture Files
Playing Picture Files Basic Playback (Picture Files) 7. Press the button to select a file (or a folder) and press the OK or This unit can play picture files stored on Blu- button to start playback. ray Disc (BD), USB flash drives, CD-R/CD-RW, If you selected a folder, the files in this DVD+R/-R or DVD+RW/-RW discs. -
Page 24: Viewing Files
Playing Picture Files Viewing Files To Play Picture (JPEG) Files from a Disc: 1. Insert a CD label-side up into the disc Play / Pause: slot. The Home screen appears. • Press the STEP ( ) button to pause playback. Press the button to resume playback. -
Page 25: Playing Video Files
Playing Video Files This unit can play video (AVI) files that have been recorded on a a USB flash drive or disc. To Play Video (AVI) Files from a USB Flash Drive: 1. Insert a USB drive containing AVI files into the USB port. - Page 26 Playing Video Files To Play Video (AVI) Files from a Disc: 1. Insert a CD (with AVI files) label-side up into the disc slot. The Home screen appears. 2. Press the button to select Video. 3. Press the button. The Media Center screen appears.
-
Page 27: Initial Setup
Press the button to select the 1. Turn on your monitor and Blu-ray player. resolution. The AVDBR1 Player Set Up Wizard Options: Auto, 480i, 480p, 720p, 1080i appears. or 1080p. 5. Press the OK button. The Aspect Ratio screen appears. - Page 28 Initial Setup 8. Press the OK button to exit the wizard. The Home screen appears. Note • When the player is turned on for the first time or after resetting it to the factory default, the ADVBR1 Player Set Up Wizard will pop up. Please follow above steps to finish the setup.
-
Page 29: The Settings Menu
The Settings Menu The Settings Menu allows you to personalize the player’s settings to your preference. Once the initial settings are set, they are retained in the player’s memory until modified. Settings Menu 1. Press the SETUP button. The Settings Menu appears. -
Page 30: Language Sub-Menu
The Settings Menu Language Sub-Menu Settings 1. In the Settings menu, press the button to select Language. This setting allows you to select the preferred on-screen display language. Options: English, French or Spanish. Menu This setting allows you to select the preferred disc menu language. -
Page 31: Security Sub-Menu
The Settings Menu Security Sub-Menu Settings Change Password 1. In the Settings menu, press the button to select Security. A new password can be set to replace the default password. The default password is 3308. 1. Select Change Password as described above. -
Page 32: Information Sub-Menu
The Settings Menu Information Sub-Menu Parental Control 1. In the Settings Menu, press the This player has a built-in parental control button to select Information. lock feature to prevent unauthorized persons from viewing restricted disc content. Parental controls allow you to limit the content of movie playback from Kid Safe to Adult. -
Page 33: Playback Sub-Menu
The Settings Menu Playback Sub-Menu Secondary Audio 1. In the Settings Menu, press the This setting is available if your Blu-ray disc button to select Playback. supports secondary audio. Options: On or Off. Last Memory During playback or in a paused status, the Last Memory function will memorize the last playback time each time you eject the disc. -
Page 34: Display Sub-Menu
The Settings Menu Display Sub-Menu 16 : 9 Normal: The video will be “squeezed” between two 1. In the Settings Menu, press the vertical columns on the TV screen. This will button to select Display. cause standard definition 4:3 video to be displayed correctly on an wide-screen TV, but will distort 16:9 video. - Page 35 The Settings Menu Display Sub-Menu (Continued) Resolution You can define the video output resolution in this option. The options available are: Auto, 480i, 480p, 720p, 1080i, and 1080p. The number indicates the number of lines of video per frame. The i and p indicate interlaced and progressive scan, respectively.
- Page 36 The Settings Menu Display Sub-Menu (Continued) Color Space HDMI 1080 24p This setting allows you to set the color Movies are recorded on film at a rate of 24 space format for HDMI output to match the pictures (frames) per second. Many of the capabilities of the connected monitor.
-
Page 37: Audio Sub-Menu
The Settings Menu Audio Sub-Menu Dolby DRC 1. In the Settings Menu, press the Dolby DRC allows you to make the loud button to select Audio. parts of a movie’s audio track quieter than they would be in the theatre, without making the dialog of the actors any quieter. -
Page 38: System Sub-Menu
3. Press the OK button to view the options player via a disc or USB device. Visit the list. Press the buttons to select Audiovox Web site (www.voxxelectronics. the desired option. com) for information on available upgrades. 4. Press the OK button to confirm your External Memory selection. -
Page 39: Reference
Reference To get the optimum use out of your Blu-ray player, please read this section completely. Blu-Ray Region Codes This player is preset to a region code at the factory depending on where the player is sold. Blu-ray Discs (BDs) are also coded by region. These region codes must match in order for the disc to play. -
Page 40: Dvd Region Codes
Reference DVD Region Codes This player is preset to a region code at the factory depending on where the player is sold. DVDs are also coded by region. These region codes must match in order for the disc to play. If the region codes don’t match, the disc won’t play. -
Page 41: Compatible Formats
Reference Compatible Formats Audio CDs Audio CDs (12 cm). In order to ensure playback, discs must conform with BD, DVD or CD standards. CD-R, CD-RW This unit may not play some recordings or Most CD-R (one recording only) and CD-RW files due to differences in recording formats, discs (rewritable). - Page 42 Reference DVD copy protection “Blu-ray Disc” and are trademarks. This product incorporates copyright protection technology that is protected by Manufactured under U.S. patents and other intellectual property license from Dolby rights. Use of this copyright protection Laboratories. Dolby and technology must be authorized by Rovi the double-D symbol Corporation, and is intended for home are trademarks of Dolby...
-
Page 43: Specifications
15 Watts in use USB 2.0 Compatible Supports flash stick type devices (≤500mA), FAT32/16 file system, max capacity 32GB (Hard Disks and other computer peripherals are not supported.) Dimensions AVDBR1 Mounting Dimensions Chassis Width 7.1” Chassis Height 2.0” Chassis Depth 8.1”... -
Page 44: Troubleshooting
Troubleshooting Problem Solution The player does not switch • Make sure the power wires are properly connected. • Make sure the fuse has not blown. If the fuse has blown, check for short circuits. Replace the fuse with a fuse of the same rating. -
Page 45: Notes
Notes - 45 -... - Page 46 Notes - 46 -...
-
Page 47: Month Limited Warranty
12 MONTH LIMITED WARRANTY Applies to Audiovox Mobile Video Products VOXX ELECTRONICS CORP. (the Company) warrants to the original retail purchaser of this product that should this product or any part thereof, under normal use and conditions, be proven defective in material or workmanship within 12 months from the date of original purchase, such defect(s) will be repaired or replaced with recon- ditioned product (at the Company’s option) without charge for parts and repair labor. - Page 48 www.voxxelectronics.com © 2014 VOXX ELECTRONICS CORPORATION,150 Marcus Blvd. Hauppauge, NY 11788 128-9367...
Need help?
Do you have a question about the AVDBR1 and is the answer not in the manual?
Questions and answers