Advertisement
Sears Item No.
21976
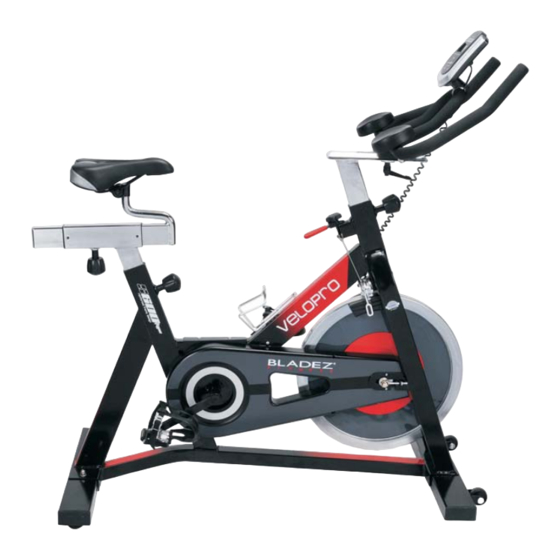
VeloPro
HW3018B
OWNER'S MANUAL
ASSEMBLY OPERATION MAINTENANCE
WARRANTY
PARTS
ORDERING
CAUTION:
Exercise of a strenuous nature, as is customarily done on this equipment, should not be
undertaken without first consulting a physician. No specific health claims are made or implied as they
relate to the equipment.
IMPORTANT:
Read all instructions carefully before using this product. Retain this owner's
manual for future reference.
Advertisement

Related Manuals for BLADEZ VeloPro HW3018B


Summary of Contents for BLADEZ VeloPro HW3018B
- Page 1 Sears Item No. 21976 VeloPro HW3018B OWNER’S MANUAL ASSEMBLY OPERATION MAINTENANCE WARRANTY PARTS ORDERING CAUTION: Exercise of a strenuous nature, as is customarily done on this equipment, should not be undertaken without first consulting a physician. No specific health claims are made or implied as they relate to the equipment.
-
Page 2: Table Of Contents
TABLE OF CONTENTS Safety………………......…..1 Training……………........3 Pre-Assembly Instructions…….....8 Assembly Instructions…………………..9 Monitor Operations………......13 Maintenance…………………………....14 Troubleshooting……..………………………15 Exploded View ………........16 Parts List …………………......17 Warranty……..………………………....18... - Page 3 IMPORTANT SAFETY ADVICE Carefully read through the instructions contained in this manual. It provides you with important information about assembly, safety and use of the machine. 1 This unit has been designed for home use. The weight of the user must not exceed 275 lbs. (125 kg.) 2 Parents and/or those responsible for children should always take their curious nature into account and how this can often lead to hazardous situations and behavior resulting in accidents.
- Page 4 IMPORTANT SAFETY ADVICE 14. Spinning pedals can cause injury. Pedal speed should be reduced in a controlled manner. 15. For safety, a perimeter distance of 3 feet / 1 meter is required before operating the unit. 16. User must adjust the seat and handlebars to the user’s height requirements. Please be sure the adjustment knob is locked tight and seat and handlebars are secure.
-
Page 5: Training
TRAINING GUIDELINES Exercise is one of the most important factors in the overall health of an individual. Listed among its benefits are: · Increased capacity for physical work (strength endurance) · Increased cardiovascular (heart and arteries/veins) and respiratory efficiency · Decreased risk of coronary heart disease ·... - Page 6 TRAINING GUIDELINES (cont’d) increased as the body adapts to the increasing demands. As your fitness level improves, the training threshold should be raised. Working through your program and gradually increasing the overload factor is important. Specifics Different forms of exercise produce different results. The type of exercise that is carried out is specific both to the muscle groups being used and to the energy source involved.
- Page 7 TRAINING GUIDELINES (cont’d) a) Ten seconds are long enough for accuracy, (b) The pulse count is to approximate your BPM rate at the time you are exercising. Since heart rate slows as you recover, a longer count isn’t as accurate. The target is not a magic number, but a general guide.
- Page 8 TRAINING GUIDELINES (cont’d) STRETCHING Stretching should be included in both your warm up and cool down, and should be performed after 3-5 minutes of low intensity aerobic activity or callisthenic type exercise. Movements should be performed slowly and smoothly, with no bouncing or jerking. Move into the stretch until slight tension, not pain, is Felt in the muscle and hold for 20-30 seconds.
- Page 9 TRAINING GUIDELINES (cont’d) Toe Touches Inner Thigh Stretch Slowly bend forward from your waist, Sit with the soles of your feet together with lettingyour back and shoulder relax as your knees pointing outward. Put your feet you stretchtoward your toes. Reach down as close into your groin as possible.
- Page 10 ASSEMBLY Notice: Line sketches used in this section are for reference only. They do not necessarily reflect the actual unit in detail. If you are missing parts or require information on how to operate this product please call 1-800-469-4663...
-
Page 11: Assembly Instructions
ASSEMBLY INSTRUCTIONS Note: Assembly of this unit should take TWO persons about 45 minutes to properly assemble. STEP 1 Attach front stabilizer (2) to main frame (1) and secure it with carriage bolts (26), washers (27), and dome nuts (28). STEP 2 Attach rear stabilizer (3) to main frame (1) and secure it with carriage bolts (26), washers (27), and dome nuts (28). - Page 12 ASSEMBLY INSTRUCTIONS (cont’d) STEP 3 Slide the handlebar post (6) into the main frame (1) and tighten with the spring loaded knob (52) to secure from vibrating and wobbling STEP 4 Attach the handle bar (7) to the main frame (1) and attach it with L-shape bolt (55), washers (54).
- Page 13 Operation of the Monitor Getting familiar with the control panel XLG EXERCISE COMPUTER- 2007 K/M SPECIFICATIONS : TIME………………………………………………….…..…00:00-99:59 MIN:SEC SPEED………………...…….……………………… ..…0.0- 999.9KM/H or ML/H DISTANCE…………………………………………...………..0 - 999.9 KM or ML CALORIES………………………………………………… .…….…0- 999.9KCAL KEY FUNCTIONS: MODE: To select a desired function. Hold the key for 4 seconds to have all function values reset to zero (0) - total reset SET: To input the target value.
- Page 14 ASSEMBLY INSTRUCTIONS (cont’d) STEP 5 Slide the seat post (4) into the main frame (1) and secure it with the spring loaded knob. Securely attach the seat (64) to the seat bar (5). Slide the seat bar (5) into the seat post (4) and tighten the spring loaded knob to secure it STEP 6 Carefully thread the pedals onto the crank arms.
-
Page 15: Maintenance
MAINTENANCE INSTRUCTIONS CLEANING Care has been taken to assure that your bike has been properly adjusted and lubricated at the factory. It is not recommended that the user attempt service on the internal components. Instead, seek service from an authorized service center. However, from time to time, the outer surfaces may appear dull or dirty. -
Page 16: Troubleshooting
TROUBLE SHOOTING RESISTANCE ADJUSTMENT: Pedaling resistance is controlled by the tension knob. Properly adjusting the seat will help reduce the risk of injury and ensure maximum exercise efficiency and comfort. The appropriate position while using this bike is when one pedal is in the bottom position, the other leg is slightly bent at the knee. -
Page 18: Parts List
PARTS LIST Model No. 21976 REF# SIZE REF# SIZE DESCRIPTION DESCRIPTION 2197601 main frame 2197637 flat washer ø10 2197602 front stabilizer 2197638 nylon nut 2197603 2197639 6203 rear stabilizer bearing decoration seat post 2197604 2197640 cover 2197605 seat bar 2197641 bolt st4.2x20 front post... -
Page 19: Warranty
Get it fixed, at your home or ours! Your Home For repair—in your home—of all major brand appliances, lawn and garden equipment, or heating and cooling systems, no matter who made it, no matter who sold it! For the replacement parts, accessories, and user’s manuals that you need to do-it-yourself. For Sears professional installation of home appliances and items like garage door openers and water heaters.
Need help?
Do you have a question about the VeloPro HW3018B and is the answer not in the manual?
Questions and answers