Advertisement
HOW TO USE YOUR SHOWER SPA (SUMMARY)
1. Ensure the electricity and water are turned on to the unit.
2. Press the start / stop button "B".
This will turn the shower on, the water will flow and the
neon indicator light will illuminate. It is recommended that
you do not wholly enter the water flow during this period.
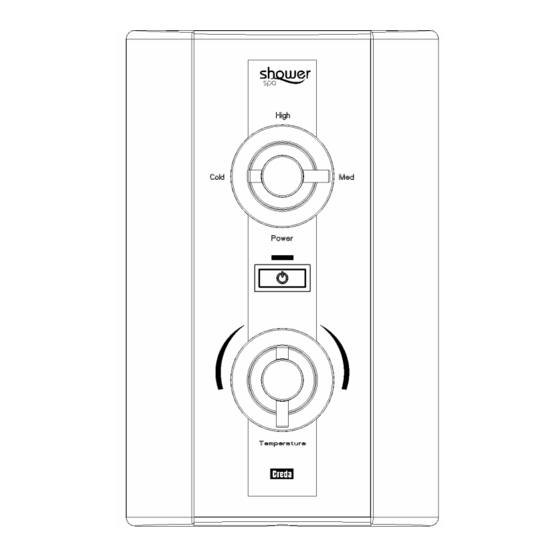
3. Knob "A" controls the power selection.
Select "High", "Med" (Medium) or "Cold"
The "small bar" indicates knob setting.
4. If the water is not at your desired showering
temperature, turn knob "C" a small amount until you
reach the desired showering temperature.
Turn clockwise for cooler.
Turn anti-clockwise for warmer.
5. When you have finished showering, press the start / stop button "B" again.
The neon indicator will go out
6. Switch off the electricity supply at the ceiling switch or local isolator.
Notes
•
Wait 20 seconds for the temperature to stabilise after each adjustment.
•
The neon indicator light illuminates when the heaters are on and, if the shower has
been recently used, it may take up to 20 seconds to come on.
During this time the water may go from very hot to cold before stabilising.
•
The position of knob "C" will be approximately the same each time the shower is
used, varying only with incoming water temperature or pressure changes
(e.g. you will only need to change from summer to winter).
•
During normal operation, if an overheated water temperature is sensed then the
heater will switch off and the neon indicator light will go out.
Water will continue to flow and cool down before the heater switches back on again.
IMPORTANT WARNINGS!
DO NOT SWITCH THE APPLIANCE ON IF YOU SUSPECT IT OF BEING FROZEN.
WAIT UNTIL YOU ARE SURE IT HAS THAWED OUT.
DO NOT OPERATE THE APPLIANCE IF WATER DISCHARGES FROM THE PRESSURE RELIEF
VALVE. MAINTENANCE IS REQUIRED BEFORE THE APPLIANCE CAN BE SAFELY USED.
THIS APPLIANCE IS NOT INTENDED FOR USE BY PERSONS (INCLUDING CHILDREN AND
THE INFIRM) WITH REDUCED PHYSICAL, SENSORY OR MENTAL CAPABILITIES,
OR LACK OF EXPERIENCE AND KNOWLEDGE, UNLESS THEY HAVE BEEN GIVEN
SUPERVISION OR INSTRUCTION CONCERNING USE OF THE APPLIANCE
BY A PERSON RESPONSIBLE FOR THEIR SAFETY.
CHILDREN SHOULD BE SUPERVISED TO ENSURE THAT THEY
DO NOT PLAY WITH THE APPLIANCE.
We offer a technical advisory service on the telephone to installers and
other customers with problems in the field. RING 0844 372 7766 (UK ONLY)
(A3) Leaflet No. 567-2151-03b
16
SHOWER SPA RANGE
ELECTRIC SHOWER
Installation and User Guide
IMPORTANT:
This booklet should be left with the user
after installation and demonstration
Advertisement
Table of Contents

Subscribe to Our Youtube Channel
Related Manuals for Creda Shower SPA


Summary of Contents for Creda Shower SPA
- Page 1 HOW TO USE YOUR SHOWER SPA (SUMMARY) 1. Ensure the electricity and water are turned on to the unit. 2. Press the start / stop button “B”. This will turn the shower on, the water will flow and the neon indicator light will illuminate. It is recommended that you do not wholly enter the water flow during this period.
-
Page 2: Table Of Contents
Creda After Sales Service ........ -
Page 3: Introduction
HOW YOUR SHOWER SPA WORKS 1. Water is heated instantaneously as it flows Thank you for purchasing a quality Creda Shower Spa manufactured in England. over the heating elements in the copper To enjoy your new shower at its best, please take time to read this manual thoroughly to cylinder (Diagram 8). -
Page 4: How To Install Your Shower Spa
HOW TO INSTALL YOUR SHOWER SPA WHAT TO DO IF THINGS GO WRONG (2) WARNING: ALL WIRING AND INSTALLATION MUST BE PROFESSIONAL SERVICE SUPERVISED BY A SUITABLY QUALIFIED PERSON. If the previous “Self Help” checks fail to restore the performance, you should seek professional help. - Page 5 Blockage in the water ways (particularly the handset and solenoid valve) will prevent the heater working properly. Note: You may be charged for a service call if it is due to incorrect installation. 7. The shower is designed to have an open outlet and should only be used with “Creda” recommended fittings.
-
Page 6: Cold Water Inlet Pipe Configuration
Tank Clip Cat No. 93590715 Non-Slip Mat Cat No. 83792811 Handset Cat No. 93597862 Height Adjuster Cat No. 93597861 Additional accessories and spare parts can be supplied against any Credit or Debit cards from Creda Sales Hotline 0844 372 7750... - Page 7 ELECTRICAL HOW TO USE YOUR SHOWER SPA (DETAILED) WARNING: THIS SHOWER MUST BE EARTHED. Ensure the electricity and water are turned on to the unit. The electrical installation must be in accordance with the current BS.7671 (IEE Wiring Regulations) and “Part P”...
-
Page 8: Assembly Of Accessories
5. Re-fit the detachable bottom section with the two screws if it was removed. ASSEMBLY OF ACCESSORIES Diagram 5 - Riser Rail and Soap Dish Fitting Instructions (Refer to the separate fitting instruction sheet packed with the accessories for more details) 1.
Need help?
Do you have a question about the Shower SPA and is the answer not in the manual?
Questions and answers