Advertisement
TROUBLE SHOOTINGS
CAUTION: Disconnect the power supply before servicing.
STATUS
CAUSE AND METHOD OF REPAIRING
The power
If the power supply is damaged,please call the
supply is
technicians to repair.
damaged
a) Remove the vane guard and rotate the vane by
hand,If the vane cannot move smoothly, the core
or bearings of the motor may be damaged. In this
case, replace with a new motor.
The lamp
b) If the motor stops running and has a bad odor
works but the
after a moment of operation, the motor wires may
motor does
be burnout. Replace the motor.
not run
c) If the starting wire (yellow) is disengaged from
the condenser, it needs to be rewired.
d) If the condenser is damaged, replace with a new
one.
a) Take off the filter and check the connection
between air inlet and wind chamber is sealed or
The lamp works
not.
but the motor
b) Check the connection between air exhaust pipe
does not run
and wind chamber leaks oil or not. If"YES, please
fill it up with the varnish or the thinner.
a) If the motors were not firmly screwed, screw tigh
-ten them up.
Machine vibration
b) If the vane is damaged or unbalanced, replace
with a new one.
a) The distance is too far between the Cooker Hood
and the Gas Cooker.
b) There are many windows (doors) cause wind con
-vection is too strong.
Weakness suction
c) Because of the Hood is set upon the win
-dow, the best solution is that put one three-ply
board on the back of the Hood for covering
the hollow of window.
a) Adjust the height of the model where is hang on
the ceiling.
b) If the model tilt forward, lock into the wall with
Installation of
wood screw again (the screw peep out around 0.5
the model is tilt
~1 cm from the wall), or check the screws for fix
-ing the model are loose or not.
Bulb does not
Just screw off the lamp shade and replace with a new
light
bulb,then put the lamp shade back.
PDF 文件使用 "pdfFactory" 试用版本创建
TOOL
"+" type
Screwdriver
Sharp Pincers
"+" type
Screwdriver
"+" type
Screwdriver
"+" type
Screwdriver
"+" type
Screwdriver
"+" type
Screwdriver
"+" type
Screwdriver
10
www.fineprint.cn
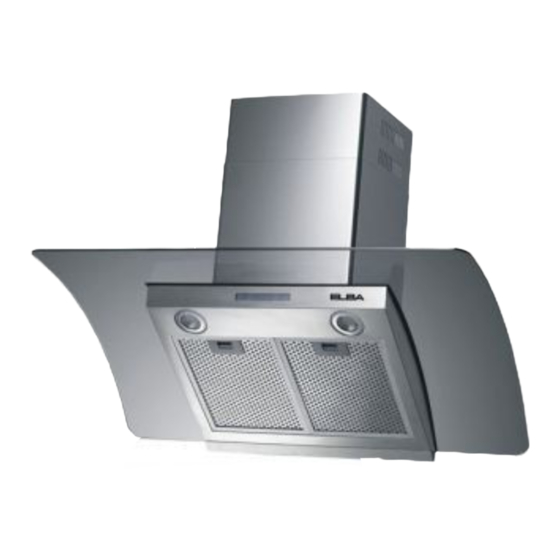
DESIGNER HOOD
Covo 903/90
USER MANUAL
Advertisement
Table of Contents

Related Manuals for Elba Covo 903/90


Summary of Contents for Elba Covo 903/90
- Page 1 (the screw peep out around 0.5 the model is tilt Screwdriver ~1 cm from the wall), or check the screws for fix Covo 903/90 -ing the model are loose or not. Bulb does not Just screw off the lamp shade and replace with a new "+"...
- Page 2 READ AND SAVE THESE INSTRUCTIONS MANUAL Dress the protective glove before you start to clean the hood. Remove the CONTENTS components gently during Glove carrying out the clearance. TECHNICAL CHARACTERISTICS ........1 Never wash the BODY SIZE ..................1 control switch with water or other kind of liquid to avoid the liquid might cause MAIN PARTS NAME ...............2...
-
Page 3: Important Safety Instructions
Do not connect the air outlet to chimney flues or TECHNICAL CHARACTERISTICS combustion gas ducts. Model No.: Covo 903/90 Total power: 254W Speed motor: 250W × ights: 2 2W LED lights ~... -
Page 4: Main Parts Name
MAINTENANCE MAIN PARTS NAME CAUTION: NEVER PUT YOUR HAND INTO THE AREA HOUSING WHILE THE FAN IS OPERATING. FOR THE OPTIMAL LEVEL OF OPERATION,CLEAN THE COOKER HOOD Duct bracket SURFACE, FAN, AND ALUMINIUM FILTER REGULARLY. 1. Use only mild soap pr detergent solutions to clean the cooker hood surface. Dry surface using soft cloth. -
Page 5: Installation Procedures
3. In order to get the optimum performance, do not elongate the exhaust Step 9: Clip pipe too long, and try to make the bend of exhaust pipe less and biggest, Charcoal Filer ② Install: First step, take out the flat filter, ensure the connection is airproof.(Fig. - Page 6 Step 5: Step 1: Bracket Outer duct cover Matching the bracket to the holes Matching the holes of outer duct of the inner duct cover and fix it cover and blower box, fix the outer Inner duct well with M4 screws. cover duct cover to the blower box using Matching the bracket to the holes...
Need help?
Do you have a question about the Covo 903/90 and is the answer not in the manual?
Questions and answers