Table of Contents
Advertisement
Quick Links
Advertisement
Table of Contents

Related Manuals for Elba CCH5191SS


Summary of Contents for Elba CCH5191SS
- Page 1 ﺷﻔﺎط اﻟﻣطﺑﺦ اﻟدﻟﯾل...
- Page 2 ﻣﻌﻠوﻣﺎت أﻣﻧﯾﺔ ﻣﮭﻣﺔ ﯾرﺟﻰ ﻗراءة اﻟدﻟﯾل ﻛﺎﻣﻼ ﺑﻌﻧﺎﯾﺔ ﻗﺑل اﻟﺗرﻛﯾب اﺳﺗﺧدام ﻓﻲ ﻣطﺑﺦ اﻟﺑﯾت ﻓﻘط :اﻟﺗﺣذﯾرات :ﻣﺎ ﯾﻠﻲ ﻻﺣظ ﻟﻠﺣد ﻣن ﻣﺧﺎطر اﻟﺣرﯾﻖ أو اﻟﺻﻌﻖ ﺑﺎﻟﻛﮭرﺑﺎء أو اﻹﺻﺎﺑﺔ اﻟﺷﺧﺻﯾﺔ، ﯾرﺟﻰ ﯾﺟب أن ﯾﺗم اﻟﺗﺛﺑﯾت واﻟﻌﻣل اﻟﻛﮭرﺑﺎﺋﻲ ﻣن ﻗﺑل ﺷﺧص ﻣؤھل وﻓ ﻘ ً ﺎ ﻟﺟﻣﯾﻊ اﻟرﻣوز واﻟﻣﻌﺎﯾﯾر اﻟﺳﺎرﯾﺔ إذا...
- Page 3 اﻟﺣذر 1 ﻟﻠﺣد ﻣن ﺧطر ﺣرﯾﻖ واﺳﺗﻧﻔﺎد اﻟﮭواء ﺑﺷﻛل ﺻﺣﯾﺢ، وﻣن اﻟﺿروري أن ﯾﻛون اﻟﮭواء اﻟﻌﺎدم إﻟﻰ اﻟﮭواء .اﻟﻣرآب أو اﻟدرج أو اﻟﺟدران أو اﻷﺳﻘف ﻣن ﻓﺿﺎء ﻐﺎز اﻟﻌﺎدم ﻓﻲ ا اﻟ ﻻ ﺗﺻرﯾف اﻟطﻠﻖ ام اﻟﻣﻧظﻔﺎت ﻛن ﺣذرا ﻋﻧد اﺳﺗﺧد اﻟﺷﻔﺎط...
- Page 4 اﻟﺗرﻛﯾب ﺗﻌﻠﯾﻣﺎت ...ﻗﺑل أن ﺗﺑدأ .اﻗرأ اﻟدﻟﯾل ﺑﻌﻧﺎﯾﺔ وﺑﺎﻟﻛﺎﻣل ﻣراﺟﻌﺔ ﻗواﻧﯾن اﻟﺑﻧﺎء اﻟﺷﻔﺎط ﯾﻠﺑﻲ اﻟﻣﻌﺎﯾﯾر اﻟﻛﮭرﺑﺎﺋﯾﺔ ذات اﻟﺻﻠﺔ. إذا ﻛﺎن ﻟدﯾك أي ﻣﺗطﻠﺑﺎت أﺧرى، ﯾرﺟﻰ .اﻟﻣﺣﻠﯾﺔ ﯾﺟب ﺗرﻛﯾب اﻟﺷﻔﺎط ﺑﺣﯾث .ﻟذﻟك ﯾﻠزم اﺗﺻﺎل ﺑﺎﻷرض ،اﻟﻣﻌدات اﻟﺗﻲ ﺗم ﺗﺻﻧﯾﻌﮭﺎ ﺣﺳب اﻟﺻﻧف اﻷول .ﯾﻣﻛن...
- Page 5 إﻟﻰ اﻟﺳﻘف ﺗرﻛﯾب اﻷﻧﺎﺑﯾب ﻋوادم ﻋﻣودﯾﺎ اﻟﺷﻔﺎط اﻟﺧﺎرج و اﻟﺷﻔﺎط ﻧظﺎم اﻷﻧﺎﺑﯾب ﺑﯾن ف ﻣوﻗ ﺗﺣدﯾد اﻷﻧﺎﺑﯾب اﻟﺟدار ﯾﻣﺗد إﻟﻰ ﺧﻠف اﻟﻣدﺧﻧﺔ ﻣن ﺧﻼل وﻟﻛن ﯾﻣﻛن أن أو ﻣن ﺧﻼل اﻟﺳﻘف ﻋﻣودﯾ ﺎ ً ﻋﻠﻰ أﻧﺎﺑﯾب اﻟﺳﻘف ﺳطﺢ اﻟﺧﺎرﺟﻲ اﻟﻣدﺧﻧﺔ واﻟﻣﻧﺣﻲ...
- Page 6 اﻟﻣﺑدأ اﻟﺗوﺟﯾﮭﻲ ﻟﻠﺗرﻛﯾب ﻣﻌﻠﻘﺔ ﻋﻠﻰ اﻟﺣﺎﺋط اﻟﺷﻔﺎط إﺧراج اﻟﺷﻔﺎط اﻟزاوﯾﺔ ﺗرﻛﯾب ﻏطﺎء اﻟﻣﺻﺑﺎح اﻧﻔﺻﺎل ﻏطﺎء اﻟﻣﺻﺑﺎح ورﻓﻊ ﻗوس ﻋن طرﯾﻖ ﺗﻔﻛﯾك ﻗم ﺑﺗرﻛﯾب اﻟﻘوس اﻷﯾﻣن ﻟﻠﺷﻔﺎط، ﺛم ﻗم ﺑﺗﺷدﯾد اﻟﻣﺳﺎﻣﯾر ﻗم ﺑﺗوﺻﯾل ﻛﺑﻠﺗﯾن أﻋد ﺗرﻛﯾب اﻟﻘوس اﻷﯾﺳر وﻗم ﺑﺗﺷدﯾد اﻟﻣﺳﺎﻣﯾر .ﻣﻼﺣظﺔ: إرﺷﺎدات...
- Page 7 إﺳﺗواء اﻟﺟﮭﺎز ﺗﺛﺑﯾت اﻟﺷﻔﺎط ﻋﻠﻰ اﻟﺟدار .ﻣﺳﺗوى ﯾﻣﻛن ﺗﻌدﯾﻠﮭﺎ ﻋن طرﯾﻖ ﺗﻧﺎوب اﺛﻧﯾن ﻣن اﻟﻣﺳﻣﺎرﯾن ﻋﻠﻰ ﻗذﯾﻔﺔ اﻟﺷﻔﺎط 口 ﺑداﺋل اﻟﺗرﻛﯾب :اﻟﺷﻔﺎط ﯾﻣﻛن ﺗرﻛﯾﺑﮫ ﻓﻲ اﻟطرق اﻟﺗﺎﻟﯾﺔ ﺗﻌﻣﯾم اﻟﮭواء اﻟداﺧﻠﻲ )أ ﺗﻧﻔﯾس ﻓﻲ اﻟﮭواء اﻟطﻠﻖ)ب 已 引川V !ﺗذﻛر .ﯾﺟب أن ﺗﻛون اﻟﻣﺳﺎﻓﺔ ﺑﯾن ﻗﻣﺔ اﻟﻔرن واﻟﺟزء اﻟﺳﻔﻠﻲ ﻣن ﺷﻔﺎط اﻟطﺑﺎخ 56 ﺳم ﻋﻠﻰ اﻷﻗل .إذا...
- Page 8 ﺗﻌﻠﯾﻣﺎت اﻻﺳﺗﺧدام واﻟرﻋﺎﯾﺔ اﻟﻌﻣﻠﯾﺎت 15 1 أﻓﺿل أداء ﻟﻠﻘﺿﺎء ﻋﻠﻰ راﺋﺣﺔ اﻟطﺑﺦ، ﯾوﺻﻰ ﺑﺗﺷﻐﯾل ﺷﻔﺎط اﻟﻣطﺑﺦ ﻗﺑل اﻟطﮭﻲ وﺗرﻛﮫ ﯾﻌﻣل ﻟﻣدة .دﻗﯾﻘﺔ ﺑﻌد اﻟطﮭﻲ .2 ﺗﻧظﯾف ﺳطﺢ ﻏطﺎء اﻟﺷﻔﺎط ﺑﺎﻧﺗظﺎم ﺑﺎﺳﺗﺧدام ﻣﻧظف ﻏﯾر ﻛﺎﺷط 3 ﯾﻠﺗﻘط ﻣرﺷﺢ ﻣﻘﺎوﻣﺔ اﻟﺷﺣوم ﺟزﯾﺋﺎت اﻟﺷﺣوم اﻟﻣﻌﻠﻘﺔ ﻓﻲ اﻟﮭواء. أﻧﮭﺎ ﺳﺗﺗراﻛم اﻟﺷﺣوم واﻷوﺳﺎخ اﻋﺗﻣﺎدا .ﻋﻠﻰ...
- Page 9 ب. ﺗﺣﻛم إﻟﻛﺗروﻧﻲ إﻋداد ﻣﻧﺧﻔض اﻟﺳرﻋﺔ ① ﻟﻣﺳﺔ اﻹﯾﻘﺎف ﻟﻣﺳﺔ . ﺗﺄﺧﯾر 5 دﻗﺎﺋﻖ ﻟﻣﺳﺔ 3 ﺛوان إﻋداد ﻣﺗوﺳط اﻟﺳرﻋﺔ ② ﻟﻣﺳﺔ اﻹﯾﻘﺎف ﻟﻣﺳﺔ . ﺗﺄﺧﯾر 5 دﻗﺎﺋﻖ ﻟﻣﺳﺔ 3 ﺛوان إﻋداد ﻋﺎﻟﯾﺔ اﻟﺳرﻋﺔ ③ ﻟﻣﺳﺔ ...
- Page 10 ھـ. اﻟﺗﺣﻛم ﺑﺎﻟﻣﻘﺑض اﻟﻛﺗروﻧﻲ ،اﺿﻐط اﻟزر ﻓﺎﻟﺿوء ﻣﻔﺗوح 1 اﻟﺳرﻋﺔ 1 اﻟﺳرﻋﺔ اﻟﺿوء ﻣﻔﺗوح 2 اﻟﺳرﻋﺔ 2 اﻟﺳرﻋﺔ اﻟﺿوء ﻣﻔﺗوح 3 اﻟﺳرﻋﺔ 3 اﻟﺳرﻋﺔ اﻟﺿوء ﻣﻔﺗوح ﺗﺄﺧﯾر 3 دﻗﺎﺋﻖ ﻓﻲ ﻋﺎﻟﯾﺔ اﻟﺳرﻋﺔ اﻟﺿوء ﻣﻔﺗوح ﺗﺷﻐﯾل/إﯾﻘﺎف ﻋرض 3اﻟﺳرﻋﺔ 1 و2 و اﻟﺿوء...
- Page 11 اﻟرﻋﺎﯾﺔ واﻟﺗﻧظﯾف (اﻟﻘﯾﺎﺳﻲ اﻟﺷﻔﺎط اﻟﻛرﺑون اﺳﺗﺑدال ﻣرﺷﺢ ﻛﻣﺎ (اﻟﻘﯾﺎﺳﻲ اﻟﺷﻔﺎط اﻟﻛرﺑون اﺳﺗﺑدال ﻣرﺷﺢ اﻟﻌﺎﻣﺔ :ﯾﻠﻲ اﻟﺗﺷﻐﯾل اﻟﻌﺎدي اﻟﺻﯾﺎﻧﺔ اﻟدورﯾﺔ ﻣطﻠوﺑﺔ ﻟﺿﻣﺎن .ﻗم ﺑﺈزاﻟﺔ ﻣرﺷﺢ اﻟﺷﺣم ھذا ﯾﻧطﺑﻖ ﺑﺷﻛل ﺧﺎص ﻋﻠﻰ ﻣرﺷﺣﺎت .اﻟﺷﻔﺎط ﻣن اﻟﻛرﺑون اﻟﺷﺣوم و اﻟﻣﺷﺎﺑك اﻟﻣوﺟودة ﻋﻠﻰ ﻣرﺷﺢ اﺿﻐط...
- Page 12 (ﺟﺎﻣﻊ اﻟدھون اﻟﻣزودة ﺑ ﺷﻔﺎط ﻟﮭذه اﻟ اﻟدھون ﻣﻊ ﺎ إﻓراغ وﺗﻧظﯾف ﺟﮭﺎز ﺟ .اﻟﻣروﺣﺔ ﻏﻼف ﯾﺟﻣﻊ اﻟدھون ﻣن ﺷﻔرات اﻟﻣروﺣﺔ و اﻟذي ﺗﺟﮭﯾز اﻟﻣروﺣﺔ ﻣﻊ ﺟﻣﻊ اﻟدھون ﺗم .()إذا ﻛﺎن ﺗرﻛﯾﺑﮭﺎ اﻟﻛرﺑون إزاﻟﺔ ﻣرﺷﺢ اﻟﺷﺣوم وﻣرﺷﺢ .ﺗﻧظﯾﻔﮭﺎ ﻓﻲ ﻏﺳﺎﻟﺔ اﻟﺻﺣون اﻟداﻓﺊ...
- Page 13 !. ﺗذﻛر أن اﻟﻠﻣﺑﺔ ﯾﻣﻛن أن ﺗﻛون ﺳﺎﺧﻧﺔ ﻗم ﺑﺈزاﻟﺔ ﻣﺻﺎﺑﯾﺢ إزاﻟﺔ .اﻟﺟدﯾد أدﺧل ﺿوء ﺧدﻣﺗﮫ. اﺳﺗﺧدم داﺋ ﻣ ً ﺎ اﻟﻘﻔﺎزات ﺣﯾﺎة إذا ﻗﻣت ﺑﻠﻣس ﻣﺻﺑﺎح اﻟﮭﺎﻟوﺟﯾن ﺑﯾدﯾك اﻟﻌﺎرﯾﺗﯾن ﻓﻘد ﯾؤدي ذﻟك إﻟﻰ ﺗﻘﻠﯾل .أو ﻗطﻌﺔ ﻗﻣﺎش ﻟﺗﺟﻧب اﻻﺗﺻﺎل اﻟﻣﺑﺎﺷر ﻣﻼﺣظﺔ...
- Page 14 1100m³/h 1100m³/h 1100m³/h 1100m³/h 1100m³/h 1100m³/h 1100m³/h 1100m³/h TORNADO 90-1100 1100m³/h 1100m³/h 1100m³/h 1100m³/h THUNDER 90-1100 WCHP21GG 90-1100 1100m³/h 1100m³/h...
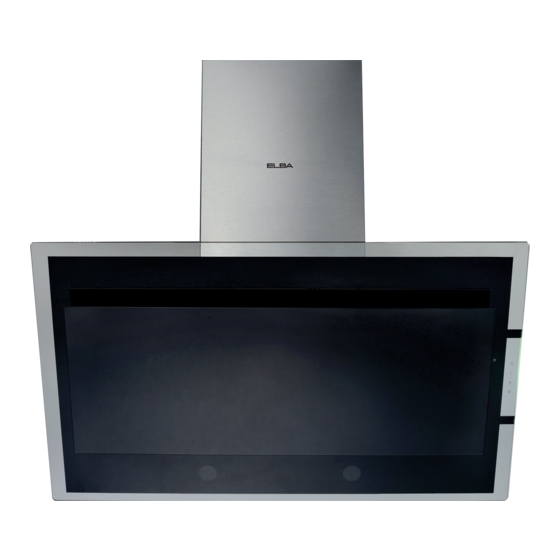
- Page 15 CCH8891TGW CCH8391TGB PCH3391TGB CCH5191SS CCH51291SGB TORNADO 90-1100 HCH7391TGB CCH5391TGB WCHP21GG 90-1100 CCH5391TGW PCH6191TS PCH6491TGB PCH6491TGW THUNDER 90-1100...
- Page 16 دﻟﯾل اﺻﻼح اﻻﺧطﺎء ﺣل ﺳﺑب ﻣﺣﺗﻣل اﻻﺧطﺎء .اﻓﺣص ﺗوﺻﯾل ﻗﺎﺑس .ﻻ ﯾوﺟد اﻣدادات ﻛﮭرﺑﺎﺋﯾﺔ اﻓﺣص ﻣﻔﺗﺎح رﺋﯾﺳﻲ ﻓﻲ وﺿﻊ ﻻ ﯾﺗم ﺗﺷﻐﯾل .اﻟﺗﺷﻐﯾل اﺗﺻﺎل اﻟﺧدﻣﺔ اﻟﻔﻧﻲ ﺳﻠك اﻟطﺎﻗﺔ ﺗﺎﻟﻔﺔ ﻗم ﺑﺗﻧظﯾف اﻟﻣرﺷﺣﺎت واﺳﺗﺑداﻟﮭﺎ ﻣرﺷﺣﺎت اﻟﺷﺣوم اﻷﻟوﻣﻧﯾوم ﻣﺳدودة .ﻋﻧد اﻟﺗﺟﻔﯾف ﺳوء ﺗدﻓﻖ اﻟﮭواء .ﻣرﺷﺣﺎت...
- Page 17 Cooker Hoods Owners Manual...
-
Page 18: Important Safety Information
IMPORTANT SAFETY INFORMATION **Read the complete manual carefully before installation** Intended for Domestic Kitchen Use Only Warnings: TO REDUCE THE RISK OF FIRE, ELECTRICAL SHOCK OR PERSONAL INJURY, PLEASE OBSERVE THE FOLLOWING: 1. Installation and electrical work must be done by a qualified person in accordance with all applicable codes and standards 2. - Page 19 CAUTION 1. To reduce the risk of fire and to properly exhaust air, be sure to duct air outside. Do not vent exhaust air into spaces within walls or ceiling or into attics, crawl spaces or garages. 2. Take care when using cleaning agents or detergents. 3.
- Page 20 。 INSTALLATI N INSTRUCTIONS Before You Start ... Read this manual carefully and completely. The range hoods conform to related appliances standards. Please check your local building codes for any additional requirements. The appliance has been manufactured as class I, therefore earthed connection is necessary. The range hood must be installed so that the plug is easily accessible.
-
Page 21: Installing The Ductwork
Installing the Ductwork to叩ap 合 1. Plan where the ductwork will run between the hood and the outside. The hoods exhaust vertically but can be ducted to the rear behind the 合 chimney duct through an outside wall or vertically up through the ceiling to the roof. - Page 22 Installing Guideline Duct-out Wall Mounted Angled Hood Installation for lamp cover - Separate lamp cover and lift the bracket by unscrewing. - Install the right bracket to the cooker hood, then tighten the screws. - Connect two cables. - Re-Install left bracket and tighten the screws. Note: The above installation guideline for references onl y , please contact your local dealer for a installation service.
-
Page 24: Description Of The Controls
USE AND CARE INSTRUCTIONS Operations 1. For optimum performance in removing cooking odors, it is recommended that you turn on your range hood prior to cooking and you leave it operating for 15 minutes after cooking. 2. Clean the surfaces of the range hood regularly using a non-abrasive detergent. 3. -
Page 25: Electronic Control
B. Electronic Control Low speed setting ① Touch 3 seconds Delay off timer 5 min. Medium speed setting ② Touch 3 seconds Delay off timer 5 min. High speed setting ③ Touch 3 seconds Delay off timer 5 min. C. Push button cont「ol ©... -
Page 26: Touch Control
E. Electronic knob control Press the knob, the light is on Speed 1 Speed 1, light is on Speed 2, light is on Speed 2 Speed 3 Speed 3, light is on Delay off timer 3 min in high speed F. -
Page 27: Care And Cleaning
CARE AND CLEANING General Replacing the charcoal filter (standard hood) Replace the charcoal filter (standard hood) as Regular maintenance is required to ensure that the follows: cooker hood functions properly. This is especially true of the grease and charcoal filters. Clean the fan and other surfaces of the cooker hood Remove the grease filter. -
Page 28: Replacing The Bulbs
。 Emptying and cleaning the fat collect r (For these hood fitted with fat collector) The fan is fitted with a fat collecto「that collects fat from the fan blades and fan housing. 1. Remove the grease filter and the charcoal filter (if fitted). 2. - Page 29 2. Remove the blown LED lights. Remember that the bulb can be hot! 3. Insert the new LED light. If you touch the halogen bulb with your bare hands this may reduce its service life. Always use a glove or a cloth to avoid direct contact.
- Page 30 1100m³/h 1100m³/h 1100m³/h 1100m³/h 1100m³/h 1100m³/h 1100m³/h 1100m³/h TORNADO 90-1100 Push button control 1100m³/h 1100m³/h 1100m³/h 1100m³/h THUNDER 90-1100 WCHP21GG 90-1100 Push button control Push button control 1100m³/h 1100m³/h...
- Page 31 CCH8891TGW CCH8391TGB PCH3391TGB CCH5191SS CCH51291SGB TORNADO 90-1100 HCH7391TGB CCH5391TGB WCHP21GG 90-1100 CCH5391TGW PCH6191TS PCH6491TGB PCH6491TGW THUNDER 90-1100...
-
Page 32: Troubleshooting Guide
Trouble Shooting Guide Problem Possible Reason Solution Check the plug is connected. No electrical supply. Check the main switch is ’ Hood doesn t turn on. turned on. Contact technician service Power cord is damaged Clean the filters and replace Aluminum grease filters clogged when dry.
Need help?
Do you have a question about the CCH5191SS and is the answer not in the manual?
Questions and answers