Table of Contents
Advertisement
Advertisement
Table of Contents

Related Manuals for Moffat Washing machine


Summary of Contents for Moffat Washing machine
- Page 1 Instructions for Use Washing machine...
-
Page 2: Table Of Contents
Thank you for your confi dence in purchasing our washing machine, and congratulations on the excellent choice. Your new washing machine meets the requirements of modern clothes care. It consumes less energy, water and washing agents. Our appliances are friendly to the environment. -
Page 3: Description Of Washing Machine
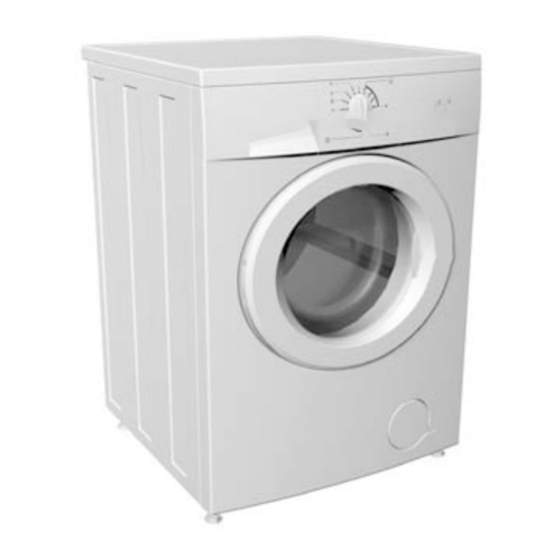
Description of washing machine 1. Front panel 5. Adjustable legs 2. Detergent dispenser 6. Water outlet hose 3. Door 7. Water inlet hose 4. Filter lid 8. Main power cable Dimensions (w x d x h): Technical information 600 mm x 600 mm x 850 mm... -
Page 4: Cautions
Do not locate the machine in a room with temperature below 0°C. Parts of the machine may be damaged if frozen. • Install the washing machine in a perfectly horizontal position, on solid fl at concrete fl oor. • Follow the instructions for correct installation and water and main connections. - Page 5 • Before any transport insert at least one transport blocking rod. Prior to this operation disconnect the appliance from the main power! • Rating plate with basic information is located above the opening of the machine. Before connecting the appliance read these instructions carefully.
-
Page 6: Important Safety Instructions
GAS IS EXPLOSIVE, if the hot water system has not been used for such a period, before using a washing machine, turn on all hot water faucets and let the water fl ow from each for several minutes. This will release any accumulated hydrogen gas. - Page 7 maintenance instructions or in published user- repair instructions that you understand and have the skills to carry out. 11. To reduce the risk of electric shock, disconnect the appliance from the power supply before attempting any user maintenance. Turning the control to the »OFF« position does not disconnect the appliance from the power supply.
-
Page 8: Installation And Connection
Installation and connection In removing the wrapping be careful not to Package removal damage the appliance with a sharp object. • Our appliances are packed in environmentally friendly materials which may be recycled, deposited or decomposed without any threat to the environment. - Page 9 • If you have a tumble dryer of the same dimensions, you can place it on top of the washing machine. To ensure correct operation of the appliance, Water inlet connection water pressure inlet must be between 7 psi to 116 psi (0,05 MPa and 0,8 MPa).
- Page 10 • Fix the outlet hose to run into the sink or the Water outlet connection bathtub, or connect it directly to the wall drain outlet (diameter min. 1,6 inch - 4 cm). • Wall drain must be installed properly and must enable occasional cleaning.
-
Page 12: Control Panel And Features
Operation A - program selector Signal LED’s: - ON/OFF (orange) B - rinse hold knob - rinse hold/failure C - START/PAUSE knob (green) Basic programs Program selector Partial programs Cottons Gentle rinse Perma press Rinse & spin Delicates Drain only Knit Spin only •... -
Page 13: Selection Of Basic Programs
- Open the water inlet faucet. - Push the ON/OFF button and select washing program. Program is selected by turning the program selector (A) Washing machine from the “0” position to the desired washing program. operation The ON/OFF signal LED starts fl ashing. The program... -
Page 14: Additional Functions
Cottons: whites/colored Normally stained cotton and fl ax bed linen and underwear, table cloth, bathroom towels, top garments, etc. For less stained laundry of this type, use short program. It saves energy and washing time. Perma press Normally stained shirts, blouses and other polyester and polyamide garments, or a mixture of these fabrics with cotton. -
Page 15: Selection Of Partial Programs
• The selected program is completed by pushing the START button (C), but you may also apply partial programs (drain or spin only), but you must fi rst return the program selector to the “0” position for at least one second, prior selecting any of the additional programs. - Page 16 - Adding washing and softening agents (see Tips for washing and energy saving) • pre-wash compartment • main wash compartment • softener compartment Washing detergent may be added directly into the drum, using the measuring vessel. When adding softener, be careful to fi ll the dispenser only up to the marked level.
- Page 17 - End of operation Flashing START/STOP LED indicates that the program was completed. • Extract the laundry from the drum and remove any foreign objects from the door gasket. • Leave the door ajar to allow the interior to dry. •...
- Page 18 • By the user Interruptions Selecting Pump stop function Program is stopped when it comes to the ‘PUMP STOP’ stage (if this function had been previously selected). Drum door remains closed all the time. Indicator LED above the ‘Pump stop’ function starts fl ashing.
-
Page 19: Tips For Washing And Energy Saving
Tips for washing and energy saving • Before washing sort out the laundry according to the type, degree of dirtiness and color fastness. • Prior to selecting the washing program consult the sewn tab with information on a particular piece of laundry (see Maintenance chart on the last page). - Page 20 • Washing machine is equipped with the dispenser partition gate, so you may pour liquid detergent also into the central compartment. If you use powder detergent the gate is lifted up, and in case of liquid detergent it is slid down.
-
Page 21: Cleaning And Maintenance
Cleaning and maintenance Disconnect the washing machine from the main power supply before cleaning! • The cabinet should be cleaned with soft cloth and mild detergent. • The interior of the drum and the door gasket is cleaned by washing at 140°F (60°C) without laundry and adding half quantity of detergent. - Page 22 • Wash it under running water using a brush, and dry it. Remove any leftover dried detergent from the bottom of the casing. • Clean frequently the water inlet hose screen under running water. • After each wash wipe the door rubber gasket. This will prolong its useful life.
- Page 23 • Filter needs occasional cleaning, especially following heavily shaggy or old laundry. • Before cleaning, drain any water from the machine via drain pipe (certain models only). • Turn it counter-clockwise, pull it out and clean under running water. • Insert the fi lter back as shown on the picture (arrow and pointer), and tighten by turning it in clockwise direction.
-
Page 24: Troubleshooting
Troubleshooting The washing machine automatically monitors the execution of particular functions during the operation, and reports any detected failures. In such cases both signal LED’s start fl ashing in certain sequence. Flashing sequence changes in accordance with the nature of the detected failure. - Page 25 Failure Possible cause Remedy The machine does not Machine is not powered. Check if: work (symbols are not • power in the socket, illuminated). • the fuse is OK, • plug is in the socket. Washing program Door is not properly closed. Close door fi rmly.
- Page 26 Failure Possible cause Remedy Laundry is stained You used liquid detergent or Use the detergent containing after washing. detergent for colored laundry whitener. which does not contain whitener. White powdery It is not the consequence of bad Immediately rinse the laundry once residues on the rinsing, but because of neo- again.
-
Page 27: Tables
Tables Program chart - 7 kg Basic program Cottons - white 2,10 Cotton - color 1,14 1000 Cotton - color 0,66 Cotton - short 0,18 Perma press 0,93 Perma press 1000 0,52 Perma press - short 0,10 Delicates 0,45 Delicates 0,07 Knit 0,32... -
Page 28: Maintenance Chart
Maintenance chart Normal wash Max. Max. Max. Max. washing washing washing washing temp. temp. temp. Washing temp. 95°C Manual 60°C 40°C 30°C Delicate wash washing allowed Whitening Whitening in cold water Whitening not allowed Ironing Hot iron max. Hot iron max. Hot iron max. -
Page 31: Warranty
Warranty... -
Page 32: Consumer Support
Consumer Support... - Page 36 350A4502P546 PS PG1 OEM MOFFAT 162971/en/ (06-06)
Need help?
Do you have a question about the Washing machine and is the answer not in the manual?
Questions and answers
Washer only two years old and won’t fill or spin