Advertisement
Quick Links
21/03/2011
Installation and User Instructions
Heatrae Sadia Heating, Hurricane Way,
Norwich, Norfolk NR6 6EA.
For Service enquiries call 01603 420330
Page 1
partsarena.co.uk/baxi/.../I47-2835.htm
www.partsarena.co.uk/baxi/System/DA...
DART 2005
Please read and understand these instructions
before starting work
Please leave with the user
Booklet No. 3600 5903 Issue 1
1/16
Advertisement

Related Manuals for Heatrae Sadia DART 2005


Summary of Contents for Heatrae Sadia DART 2005
- Page 1 Booklet No. 3600 5903 Issue 1 DART 2005 Installation and User Instructions Please read and understand these instructions before starting work Heatrae Sadia Heating, Hurricane Way, Norwich, Norfolk NR6 6EA. For Service enquiries call 01603 420330 Page 1 partsarena.co.uk/baxi/…/I47-2835.htm 1/16...
- Page 2 21/03/2011 www.partsarena.co.uk/baxi/System/DA… Figure 1.0 Major Internal Components Figure 1.1 Internal Circuit Diagram Page 2 CONTENTS partsarena.co.uk/baxi/…/I47-2835.htm 2/16...
- Page 3 21/03/2011 www.partsarena.co.uk/baxi/System/DA… YOUR SHOWER Recognition of major components Circuit Diagram SECTION ONE Important information for installers and users How an instantaneous shower works SECTION TWO Siting and Plumbing SECTION THREE Electrical Installation SECTION FOUR Connecting the shower to services SECTION FIVE Fault-Finding SECTION SIX User Instructions NB Due to product variations the precise appearance of your shower may not be exactly as depicted in this leaflet.
- Page 4 21/03/2011 www.partsarena.co.uk/baxi/System/DA… 1.8 IT IS IMPORTANT TO CLEAN THE HANDSET SPRAY PLATE REGULARLY, particularly in hard water areas, where this may be necessary as often as once a week. Failure to do so will affect the performance of the shower, and in extreme cases may cause the pressure relief device to operate.
- Page 5 21/03/2011 www.partsarena.co.uk/baxi/System/DA… Figure 1.17 Showing how the water is heated as it passes through. Page 5 SECTION TWO Siting and Plumbing Spend some time planning exactly where to site the shower heater and riser rail. Bear in mind the height of people who will be using it. Tools you may need: - Adjustable spanner giving at least 25 A/F - Flat blade screwdriver with blade width 5-6mm...
- Page 6 21/03/2011 www.partsarena.co.uk/baxi/System/DA… The minimun figures are running pressures with at least 5 l/min flowing. The use of other services connected to the water pipe supplying the shower heater may cause the water pressure to drop below the minimum. Figure 2.6 Siting of riser rail and heater. The following conversions may be useful: 1 bar =14.5 lbf/in...
- Page 7 21/03/2011 www.partsarena.co.uk/baxi/System/DA… its lowest position no lower than 305mm (12") below the heater (see Fig. 2.6). 2.7 Remember that if the handset can reach to within 25mm (1") of the spillover level of the bath, shower tray, wash basin, WC or bidet, then to prevent the possiblity of back-siphonage of used water, you must either: (i) install a hose-restraining ring (see Fig.
-
Page 8: Section Three Electrical Installation
21/03/2011 www.partsarena.co.uk/baxi/System/DA… SECTION THREE Electrical Installation WARNING: THIS APPLIANCE MUST BE EARTHED The Installation must comply with the Building Regulations Part P. Where there is a new installation, or a replacement product is not identical to the one being replaced, the cable sizes, circuit protective devices, bonding and other requirements of the Building Regulations must be assessed by a (registered) qualifed and competent electrican, who should carry out the installation taking into account the site conditions. - Page 9 21/03/2011 www.partsarena.co.uk/baxi/System/DA… Figure 4.2 4.3 Carefully take out the removable bottom section of the backplate by lifting its sockets clear of the pegs on the backplate (See Fig. 1.0). This section allows greater access for installing the cable and pipe. Keep it safe, as it could easily be damaged.
- Page 10 21/03/2011 www.partsarena.co.uk/baxi/System/DA… Figure 4.8 Backplate dimensions (in mm) Pipe Entry 4.9 Available entry points: Top, bottom, rear and right hand side (bottom is generally the easiest). The inlet spigot is smooth, 15mm diameter and is designed to accept a 15mm compression fitting. This must be an elbow for top, bottom and rear entry, and a straight connector for side entry.
- Page 11 21/03/2011 www.partsarena.co.uk/baxi/System/DA… Figure 4.9 Connection of pipe to inlet (top entry shown). Not to scale. Page 10 Rear Entry If the pipework is to enter from the rear, you must cut away the wall from around the pipe to allow room for the nut on the compression elbow to be recessed into the wall (See Fig.
- Page 12 21/03/2011 www.partsarena.co.uk/baxi/System/DA… water, by opening a tap that the pipe supplies. 4.15 Make your connection to the pipe. If it is on a low-lying loop there may be some water left in the pipe, so be prepared for some flow of water. Make all joints except that to the shower heater before flushing. 4.16 It is essential to flush the system in order to clear any debris, bits of solder and swarf which could enter and damage components within the shower heater (See Fig.
-
Page 13: Section Five Fault-Finding
21/03/2011 www.partsarena.co.uk/baxi/System/DA… 4.33 Press the push-buttons in turn to check that their mechanism operates smoothly. Page 12 Testing: Once you have finished installing your shower, carry out the following tests to ensure that you have followed our installation instructions correctly and that your shower is functioning as it should. 4.34 Secure the handset on the riser rail where it can spray safely. - Page 14 21/03/2011 www.partsarena.co.uk/baxi/System/DA… Symptom Possible Cause Remedy 1. No Flow or hot A. Water control knob is turned A. Turn water control knob anti-clockwise. enough Flow fully clockwise. B. Water turned off at mains or B. Ensure water is fully turned on at the mains and at servicing valve.
-
Page 15: Section Six User Instructions
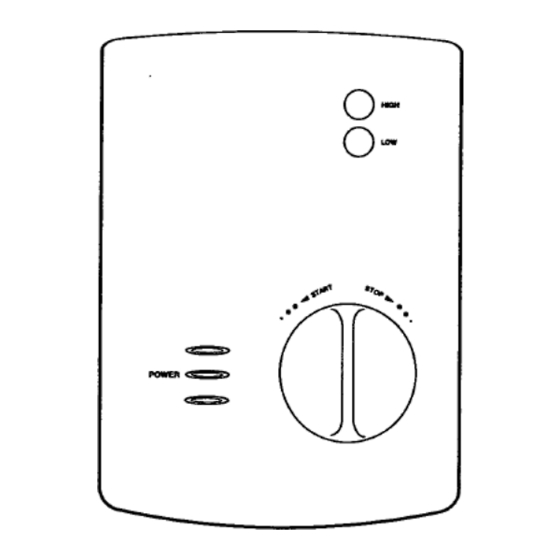
21/03/2011 www.partsarena.co.uk/baxi/System/DA… Pressure Relief Section 6. Call a service engineer to remove the front Device (PRD) has cover and reset the PRD by removing the bent bracket, operated due to pushing the black outlet boss back into the heat excess pressure exchanger and refitting a new bracket. - Page 16 21/03/2011 www.partsarena.co.uk/baxi/System/DA… WARMER- DECREASE FLOW - TURN KNOB CLOCKWISE COOLER- INCREASE FLOW - TURN KNOB ANTI-CLOCKWISE Make adjustments carefully. Give the shower a few seconds after each adjustment to stabilise, then check the temperature by hand before stepping into the shower. The 'low' setting cuts out one heating element and so can be used to save energy in the summer months when incoming water temperatures are higher, or simply to reduce the spray temperature.
Need help?
Do you have a question about the DART 2005 and is the answer not in the manual?
Questions and answers