Cochlear Nucleus CR210 User Manual
Remote control
Hide thumbs
Also See for Nucleus CR210:
- User manual (32 pages) ,
- Quick manual (16 pages) ,
- Quick manual (16 pages)
Table of Contents
Advertisement
Quick Links
Advertisement
Table of Contents

Related Manuals for Cochlear Nucleus CR210


Summary of Contents for Cochlear Nucleus CR210
-
Page 1: Remote Control
Nucleus® CR210 Remote Control User Guide... -
Page 2: About
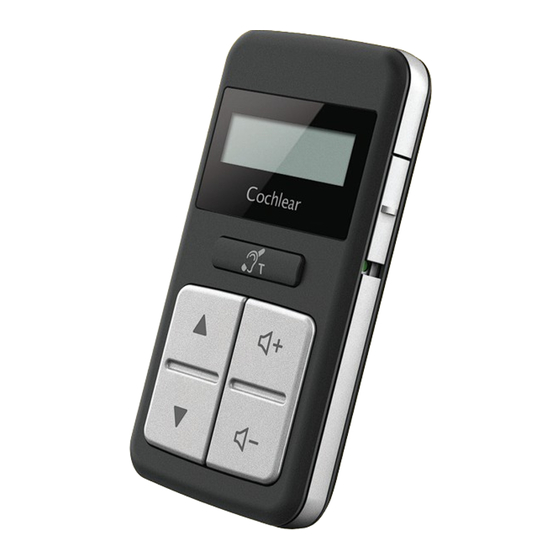
For more information on your processor, refer to the Cochlear™ Nucleus® CP910 and CP920 Sound Processor User Guide. This guide is intended for cochlear implant recipients and their carers using the Cochlear™ Nucleus® CP910 or CP920 Sound Processors. Note... - Page 3 CR210 Remote Control Volume or sensitivity Program Processor(s) paired On/Off switch Telecoil button Next Volume or program button sensitivity up button Previous Volume or sensitivity down program button button Pin for attaching lanyard Other indicators on your remote control Telecoil on Accessory on Low battery in remote control...
- Page 4 NOTe Please refer to the booklet Important Information: Warnings, Precautions and Electromagnetic Compatibility for important information that applies to cochlear implant systems. Symbols Note Important information or advice. Time saving hint. Caution (no harm) Special care to be taken to ensure safety and effectiveness.
-
Page 5: Table Of Contents
Section guide About ........Battery ....... . . Turn on . - Page 7 Contents About Care ........If your remote control gets wet .
-
Page 9: Battery
Battery... - Page 10 Battery Change the battery whenever you see the low battery indicator, or if the display stays blank when you try to turn the remote control on. A battery should last up to three months (if the remote control is used about 15 times a day).
- Page 11 Insert the new battery. Make sure the plus sign “+” is facing up. Take care not to damage the battery contacts. Replace the battery cover, bottom edge first. Lock the battery cover in place by turning the screw clockwise with a small Phillips head screwdriver until tight.
-
Page 13: Turn On
Turn on Turn on Turn off Pair Out of range... - Page 14 Turn on Slide the switch up to turn on. When the switch is in the up position, the remote control will “go to sleep” when not in use. Press any button to “wake” it again.
- Page 15 Turn off Slide the switch down to turn off. Turn off your remote control to stop it “waking” when not in use, for example, when carried in your pocket. NUCLEUS® CR210 REMOTE CONTROL USER GUIDE...
-
Page 16: Pair
Pair Pairing allows the remote control to communicate with the processor. Your clinician may have already paired your remote control with your processor. If not, you will need to pair it the first time you use it. If your remote control is not paired to any processor, it displays dashes (shown left) and “blinks”... -
Page 17: Out Of Range
The remote control will show pairing in progress. The remote control then shows successful pairing of either left (L) or right (R) processor. If you have two processors (bilateral), repeat steps 2-4 for your second processor. Out of range If your processor is out of range or experiencing interference, the remote control displays dashes (shown left). -
Page 19: Use
Change programs Adjust volume or sensitivity Use telecoil Use audio accessories... - Page 20 Change programs Your clinician may program your processor with up to four programs which you can choose with your remote control. Press to move to the next program Press to move to the previous program Control two processors Your remote control adjusts both processors at the same time. If your processors have different settings (perhaps because you adjusted one using the processor buttons), the remote control will display the program and volume/sensitivity settings for the left processor.
- Page 21 Adjust volume or sensitivity Usually, your clinician will set up your remote control to adjust the volume of the sound you hear. But your clinician can set it up to adjust sensitivity instead. Volume is the level of sound you hear. Sensitivity is the range of sounds you hear, for example, soft, background, close or far away.
-
Page 22: Use Telecoil
Use telecoil NOTe Listen to hearing loops and hear voices on the telephone Certain electronic devices or with the telecoil. Your clinician can set up your processor machinery may automatically turn on auto telecoil (you may with manual telecoil and also auto telecoil. Auto telecoil hear a buzzing noise). -
Page 23: Use Audio Accessories
Use audio accessories When you connect an audio accessory to your processor, the accessory will be turned on automatically and your remote control will display an accessory icon. If telecoil was turned on, it will be turned off automatically. While the audio accessory is connected, use your remote control to turn the accessory off and on again. -
Page 25: Care
Care... -
Page 26: If Your Remote Control Gets Wet
Care Keep your remote control dry. Clean your remote control by wiping the display and buttons with a soft dry cloth. If your remote control gets wet Dry the remote control with a soft dry cloth. Remove the battery. See Change the battery on page 8. - Page 27 NOTe Before replacing the battery, check for any remaining moisture. If moisture remains, repeat the earlier steps. Leave the remote control in a warm and Insert a new battery. well ventilated place (out of reach of See Change the battery on page 8. children and out of direct sunlight) to dry for approximately 12 hours.
-
Page 29: Troubleshoot
Troubleshoot... - Page 30 Troubleshoot Problem resoluTioN remote control won’t • If you have two processors, check both processors change program or adjust are turned on. volume/sensitivity • Move the remote control closer to your processor(s). • Move the remote control away from metal objects (e.g.
- Page 31 Problem resoluTioN Processor doesn’t pair • Make sure the processor and the remote control are both with remote control turned on and “awake”. • Make sure you hold the coil in place until the remote control has finished pairing. • Contact your clinician. Telecoil button doesn’t • Make sure an audio accessory is not connected to one of turn telecoil on...
-
Page 32: Warnings
Warnings • Do not use your remote control if it • Keep your remote control dry. becomes unusually warm. Notify your • Do not disassemble, modify, deform or clinician immediately. immerse your remote control in water. • Small parts such as the coin battery If your remote control is not working, could pose a choking hazard. -
Page 33: Other Information
Other information Physical configuration Wireless communication link The remote control comprises: The remote control wireless communication • analogue and digital integrated circuits link operates in the 2.4 GHz ISM band using based on a micro-processor design, with GFSK (Gaussian frequency shift keying) on bi-directional wireless communication 5 channels. - Page 34 Dimensions ComPoNeNT leNgTh WiDTh DePTh CR210 Remote Control 66.0 mm 36.5 mm 10.6 mm Weight ComPoNeNT WeighT CR210 Remote Control (with battery) Operating characteristics CharaCTerisTiC Value/raNge Wireless technology Proprietary low power bi-directional wireless link RF frequency 2.4 GHz Battery type One disposable CR2032 or 5004LC lithium coin cell battery Operating battery voltage...
-
Page 35: Environmental Conditions
Environmental conditions CoNDiTioN miNimum maximum Storage & transport temperature -30°C (-22°F) +50°C (+122°F) Storage & transport relative humidity 0% RH 90% RH Storage & transport pressure 250 hPa 1030 hPa Operating temperature +5°C (+41°F) +40°C (+104°F) Operating relative humidity 0% RH 90% RH Operating pressure 700 hPa... - Page 36 Cochlear Limited may void the FCC the following measures: authorisation to operate this equipment. • Reorient or relocate the receiving antenna.
- Page 37 Labelling symbols The following symbols may appear on your processor or remote components and/or packaging: Consult instructions for use Manufacturer Authorised representative in the European Community Catalogue number Serial number Batch code Date of manufacture Temperature limit Humidity limitation CE registration mark with notified body number. Indicates compliance with the requirements of the Active Implantable Medical Device Directive 90/385/EEC NUCLEUS®...
- Page 38 Certification Australia Certification New Zealand Certification Japan Certification Korea Certification Taiwan Do not re-use By prescription Recyclable material Recycle under green dot scheme Dispose of electrical components in accordance with your local regulations Dispose of lithium-ion batteries in accordance with your local regulations Keep dry Coil guide.
-
Page 39: Legal Statement
Legal statement The statements made in this guide are believed to be true and correct as of the date of publication. However, specifications are subject to change without notice. © Cochlear Limited 2013... - Page 40 Cochlear Benelux NV Schaliënhoevedreef 20 i, B-2800 Mechelen, Belgium Tel: +32 15 79 55 11 Fax: +32 15 79 55 70 Cochlear France S.A.S. Route de l’Orme aux Merisiers, Z.I. Les Algorithmes – Bât. Homère, 91190 Saint-Aubin, France Tel: +33 805 200 016 Fax: +33 160 196 499 Cochlear Italia S.r.l.
Need help?
Do you have a question about the Nucleus CR210 and is the answer not in the manual?
Questions and answers