Table of Contents
Advertisement
Quick Links
See also:
Manual
User Guide
WARNING
Use only with supplied power supply.
Avoid spilling liquids onto/into the unit.
Do not expose to excessive heat or moisture.
Do not open – there are no user serviceable parts inside.
This equipment has been tested and found to comply with the limits for a Class B digital
device pursuant to Part 15 of FCC rules. Operation is subject to the following two conditions:
(1) This device may not cause harmful interference, and (2) this device must accept any
interference received, including interference that may cause undesired operation.
Complete TF UG Part # 159020
TF UG Contents Part # 141131 Rev E
Eventide and Harmonizer are registered trademarks of Eventide Inc. ©2014 Eventide Inc.
Advertisement
Table of Contents

Related Manuals for Eventide TimeFactor


Summary of Contents for Eventide TimeFactor
- Page 1 (1) This device may not cause harmful interference, and (2) this device must accept any interference received, including interference that may cause undesired operation. Complete TF UG Part # 159020 TF UG Contents Part # 141131 Rev E Eventide and Harmonizer are registered trademarks of Eventide Inc. ©2014 Eventide Inc.
-
Page 2: Table Of Contents
TimeFactor User Guide Table of Contents Introduction ......................5 A Few Words of Advice ................... 5 Key Features ......................5 The Website ......................5 Overview ........................ 6 The Basics ......................6 Connections ......................9 Typical Setups ......................9 Bypass ......................... 16 Mix Control ...................... - Page 3 TimeFactor User Guide Table of Contents Catchup ....................... 31 Expression Pedal ....................32 The Footswitches - Play and Bank Mode ............... 34 Play Mode ........................34 Bank Mode ........................35 Tempo ......................... 36 Tempo ON/OFF ......................36 Tap Tempo ........................37 Adjusting Tempo &...
- Page 4 TimeFactor User Guide Table of Contents LIMITED WARRANTY ..................... 57...
-
Page 5: Introduction
TimeFactor packs an unprecedented degree of processing and flexibility into a small package. Our goal in creating TimeFactor was to give you the power to transform your sound. From the start, we recognized that the key to realizing this goal was to give you the flexibility to bend and twist this power in the service of your creativity. -
Page 6: Overview
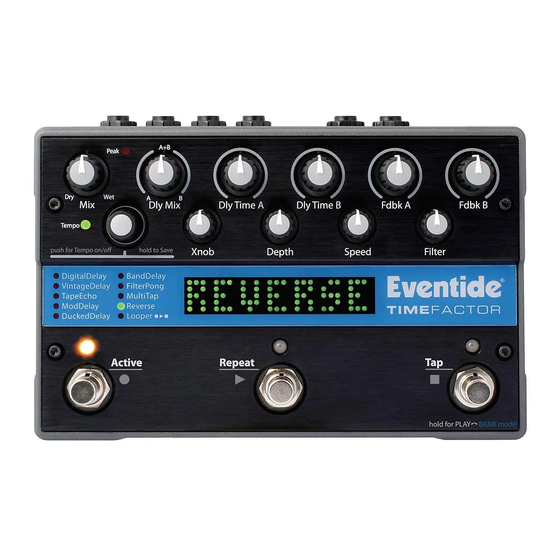
Overview Overview The Basics There are a few basic concepts that you’ll have to grasp to use TimeFactor successfully. If you read nothing else, please read this section. The Effects There are ten distinct delay types which we call “Effects.” Select an Effect by turning the Encoder knob. - Page 7 TimeFactor lets you save an Effect after you’ve adjusted the Control Knobs. An Effect along with a particular setting of its parameters is called a “Preset.” TimeFactor lets you save up to 100 Presets. Instructions on saving Presets are covered later in this User Guide.
- Page 8 2 seconds of pressing a bank change footswitch. TimeFactor Power Up When TimeFactor turns on it remembers what it was last doing and powers up in the same mode, running the same Effect, with the same parameter values, same tempo, same system settings, etc.
-
Page 9: Connections
Connections Connections TimeFactor is designed to be flexible and can support both instrument and line-level inputs and outputs. Rear panel toggle switches allow you to independently select input and output levels. Audio Inputs and Outputs accept standard mono (unbalanced) ¼” phone plugs. - Page 10 This is the simplest way to connect TimeFactor. Connect your guitar cable to TimeFactor Input 1 and a cable from TimeFactor Output 1 to your amp. Input and Output Level switches (In Lvl & Out Lvl) should be set to GUITAR and AMP.
- Page 11 Connect your guitar cable to TimeFactor Input 1 and a cable from TimeFactor Output 1 to one amp and a second cable from TimeFactor Output 2 to the other amp. Input Level switch (In Lvl) should be set to GUITAR and Output Level switch (Out Lvl) set to AMP.
- Page 12 Guitar > Amp Effects Send > TimeFactor > Amp Effects Return If your Amp has an Effect Loop, you can connect TimeFactor’s Input to the Amp Effect Loop Send and TimeFactor’s Output to the Amp Effect Loop Return. Most guitar amp’s Effects...
- Page 13 TimeFactor User Guide Typical Setups Mixer Effects Send> TimeFactor > Mixer Effects Return When connecting TimeFactor to a Mixer, set TimeFactor’s Input and Output Level Switches to “Line.”...
- Page 14 To make it easier to control input noise (hiss), we have added an input signal level. To access the meter, make sure the TimeFactor is in PLAY Mode. Press and hold both the Left and Right Footswitches. A vertical bar will appear in the middle display, and a meter will light from left to right when there is an input signal present.
- Page 15 TimeFactor User Guide SpillOver SpillOver SpillOver provides smooth transitions when changing Presets by fading the lingering echoes of one Preset into the echoes of the next Preset. SpillOver [SPILL] can be turned ON or OFF from the Utility section of the System menu.
-
Page 16: Bypass
LINE or the Input Lvl switch is set for LINE and the Output Lvl switch is set to AMP, TimeFactor will not have unity gain. In this case, using Relay Bypass will result in a level change whenever you Bypass TimeFactor. -
Page 17: Mix Control
Press and hold the Encoder and Right Footswitch simultaneously for a few seconds to exit System Mode. Note: TimeFactor has been carefully designed to not mess with your tone in any of the Bypass settings. Note: When connecting TimeFactor to a computer, we suggest that you use a dedicated audio interface (e.g. -
Page 18: Peak Led
The Peak LED lights to indicate that the input signal level is near clipping. Occasional flashing is OK. If Peak LED is lit solidly, reduce the input level either by reducing the signal level fed to TimeFactor or by setting the rear panel input switch to the Line position. -
Page 19: The Effects
The nine delay Effects and the Looper can be selected by turning the Encoder. Using the Encoder to select Effects is a good way to get a feel for what TimeFactor can do. Turn the Encoder to step through and load each of the Effects. As each Effect is selected, the Effect is loaded, the green LED to the left of the Effect name is lit and the Billboard displays the Effect name. -
Page 20: Control Knobs/Effect Parameters
TimeFactor User Guide Control Knobs/Effect Parameters Control Knobs/Effect Parameters When an Effect is selected using the Encoder, the Effect’s parameter values are set by the current position of the ten control knobs. When a control knob is turned, the Billboard displays the parameter’s name and value. -
Page 21: Dly Mix
Dly Mix Dly Mix (Delay Mix) controls the relative level of the twin delays, Delay A and Delay B. TimeFactor has circuitry that detects which input/output jacks are being used and adjusts the routing of signals through the Effects algorithm accordingly. -
Page 22: Dly Time A & Dly Time B
These controls set Delay A’s and Delay B’s feedback amount from 0 to 110% which, in turn, controls the number of repeats. Note: High feedback values allow the TimeFactor to go into self-oscillation, resulting in some very interesting (and potentially LOUD) sounds. BE CAREFUL! Note: For FilterPong, Fdbk B is used to control the diffusion (SLUR) of the repeats. -
Page 23: Moddelay
TimeFactor User Guide Control Knobs/Effect Parameters Filter: Controls the filter characteristics to simulate tape recorder frequency response. As you increase the filter value, you’ll hear a more pronounced tape tone. ModDelay Xnob/Wave Shape: Selects the modulation wave shape as displayed by the Billboard display. -
Page 24: Reverse
Xnob/Crossfade: In Reverse, the audio segments are read backwards and must be spliced. TimeFactor performs a crossfade at the splice point to prevent abrupt changes that could result in glitching or clicking. Xnob sets the rate of the crossfade. Small values result in fast crossfades and a more audible rhythm for the reverse effect, larger values more gradual crossfades and a smoother reverse sound. -
Page 25: Looper
If your TimeFactor is connected to a stereo source, the inputs are automatically summed and the sum is the Looper’s input. The Looper’s output drives both outputs identically. -
Page 26: Recording
TimeFactor User Guide Looper Recording While recording, the Billboard displays running record time [R>00.00] or beat count [R>(beats)] and the Footswitches are used to: – Press to create Loop End and start Dubbing. The Dub Mode setting determines if the new audio is added to or replaces the previously recorded audio. -
Page 27: Bank Mode
Bank Mode is for loading a new preset and, when using the Looper, you should remain in Play Mode. In Bank Mode, the Footswitches do not operate as Looper transport controls. Also, when in Bank Mode, TimeFactor is bypassed. Looper Control Knobs In the Looper, the Control Knobs function as follows: Mix: Mix control between the Dry audio input and Looper playback. - Page 28 TimeFactor User Guide Looper To Dub, press the Footswitch while the loop is playing or recording. The action of Footswitch when dubbing depends on the setting of the Fdbk B control. If you want to simply press and release the switch to Dub, set this control to one of the two Latching modes.
-
Page 29: Tempo Mode And Midiclk Sync
Tempo Mode and MIDICLK Sync Tempo Mode allows beat-based recording and playback that stays in sync with TimeFactor’s internal MIDICLK or as a slave to an external MIDICLK. Press the Encoder to toggle the Looper in and out of Tempo Mode. - Page 30 TimeFactor User Guide Looper Empty – Starting a new recording syncs to the next beat ONLY if in MIDICLK Slave mode AFTER having received a MIDI Start command. Otherwise, this begins recording on the next tick. ►– No action.
-
Page 31: Catchup
(One mS is a thousandth of a second). TimeFactor’s Catchup feature is designed to prevent parameter values from abruptly changing when the knob positions don’t correspond to the Preset values. When Catchup is ON and a Control Knob is turned, the parameter value doesn’t change instantly. -
Page 32: Expression Pedal
For proper operation the Expression Pedal should be a simple resistive potentiometer with a maximum value of between 5k Ohms and 20k Ohms. Refer to www.eventide.com/AudioDivision.aspx for information on recommended expression pedals. Because different pedals can have different electrical characteristics, it is a good idea to “calibrate”... - Page 33 If you hear a “hum” only when you’ve connected a control voltage source to TimeFactor’s Expression Pedal input jack, then it is likely that the device generating the control voltage is grounded to a different ground than your audio ins and outs.
-
Page 34: The Footswitches - Play And Bank Mode
TimeFactor’s footswitches are multi-purpose and operate in one of three modes, Play Mode, Bank Mode, and System Mode. In normal use, TimeFactor is in either Play Mode or Bank Mode. These two operating modes are discussed in this section. System Mode is used to set up MIDI, external controls and various system parameters. -
Page 35: Bank Mode
Tempo On/Off status. Expression pedal mapping. * Note: TimeFactor can be set up to change the Mix and/or Tempo values when a Preset is loaded or to ignore the values saved with the Preset. While Mix and Tempo values are always saved with the Preset, you may prefer to have your current Mix and/or Tempo stay the same as you switch from Preset to Preset. -
Page 36: Tempo
TimeFactor User Guide The Footswitches Selecting Preset Banks In Bank Mode, the Right Footswitch is used to select the current Bank. Tap the Right Footswitch to increment through the active Banks. When a Bank is displayed, the associated pair of Presets is cued but the new Preset is not yet loaded. The next time that either the Left or Middle Footswitch is pressed, the corresponding Preset will load from the cued Bank. -
Page 37: Tap Tempo
Control Knob corresponding to the delay that you want to tweak; either Dly Time A or Dly Time B. Next, press the Tap Footswitch (TimeFactor must be in Play Mode) so that the Billboard displays the Delay Time value. Now turn the Encoder to adjust Delay Time. While adjusting, the Billboard displays the updated Delay Time and the parameter Control Knobs are disabled. -
Page 38: Saving Presets
Preset. Naming Your Presets TimeFactor gives you the ability to name your Presets. When you load a new Preset in Bank Mode, the entire Preset Name will scroll once. Then the Bank/Preset number will be displayed, followed by the first 4-6 letters of the Preset Name. -
Page 39: Organizing Your Presets In Banks
MIDI device or to a computer using the MIDI’s SysEx facility. SysEx dump is a MIDI System Exclusive Message that can be sent from TimeFactor and recorded by a MIDI sequencer or computer. TimeFactor’s Presets and System Settings can then be restored at a later time. This is a useful way to backup saved settings or to reconfigure the unit as it was on your previous project. -
Page 40: Auxiliary Switches
Tap Tempo switch or Repeat switch or Preset Switch. As noted above, the TimeFactor has two operating modes, Bank and Play. An Aux Switch can be used to instantly toggle between the TimeFactor’s Bank and Play Modes. Alternately, some users may want to have all six switch functions immediately available (3 from each Footswitch Mode). -
Page 41: System Mode
TimeFactor User Guide System Menu Tree System Mode System Mode is used for settings that cover the overall system such as the Bypass, Aux Switch, MIDI, Expression Pedal, etc. To Enter/Exit System Mode Press and hold the Encoder and Right Footswitch simultaneously for a few seconds to enter and exit the System Mode. -
Page 42: [Aux Sw] - Program Auxiliary Switches
The three Aux Switches are connected to the rear panel ¼” stereo phone jack. TimeFactor detects closures by sensing whether the tip, the ring or both the tip and ring are grounded. Note that you must use a stereo phone plug when connecting three Aux Switches. - Page 43 TimeFactor User Guide System Menu Tree PLY – Looper Play STP – Looper Stop MT – Looper Empty KB0…9 – Because of the limited space in the Billboard display, the Parameter Control Knob names cannot be meaningfully displayed. Instead, for display purposes, we’ve numbered the knobs from 0 to 9 shown in the image below.
- Page 44 TimeFactor User Guide System Menu Tree The parameters controlled in this mode are system-wide and will apply to all Effects and Presets. For example, if DigitalDelay was running when you entered System Mode, the Delay Mix Knob is used to set the relative levels of the two delays. You could assign an Aux Switch to DlyMix (KB1) with [MIN VAL] set to 100% Delay A and [MAX VAL] set to 100% Delay B.
-
Page 45: [Midi] - Midi Functions
Effects parameters and system control. The idea is to first select the TimeFactor parameter or function that you want to externally control (Mix for example) and then select either MIDI Bend or the MIDI CC with which you want to control it. - Page 46 TimeFactor User Guide System Menu Tree REC – Looper Record PLY – Looper Play STP – Looper Stop MT – Looper Empty KB0…9 – Parameter Control Knobs FS1…3 – Alternate Mode (AUX Switches act as Play Switches when the Stompbox is in Bank Mode, and Bank Switches when the Stompbox is in Play Mode) PDL –...
- Page 47 [XMT CC] – Control knobs transmit MIDI Continuous Control The default patch is as follows: PDL>C15, KB0>C22, KB1>C23, KB2>C24,…,KB9>C31 XMT CC makes it possible to use TimeFactor’s Expression Pedal and Control Knobs as MIDI controllers. Here’s how it works: Press the Encoder to select XMT CC. You will see two fields (split display) of the Billboard display showing Control source and Destination assignments.
- Page 48 System Menu Tree [RCV MAP] – Create a MIDI Program Change Receive Map MIDI maps are an efficient way to instantly recall any of TimeFactor’s Presets using your favorite MIDI controller (pedal board, sequencer, etc.). Press the Encoder to select and create a MIDI Program Change Receive Map. This function sets the corresponding Preset that is recalled when a MIDI Program Change message is received.
- Page 49 [OUTPUT] – MIDI Transmit/Thru Select (XMT, THRU) Press the Encoder to select. Turn Encoder to select MIDI output to either transmit (XMT) TimeFactor MIDI data or pass incoming MIDI data THRU TimeFactor. If THRU is selected, the TimeFactor cannot generate any MIDI messages.
-
Page 50: [Global] - Global Functions
[CLK OUT] – MIDI Output Clock Enable (ON, OFF) Press the Encoder to select. Turn Encoder to set MIDI Output Clock ON or OFF. If ON, TimeFactor can now be used as a MIDI Clock source. Press the Middle Footswitch once to back-up one level to MIDI menu. -
Page 51: [Utility] - Utility Functions
TimeFactor User Guide System Menu Tree [UTILITY] - Utility Functions After entering System mode, turn the Encoder to select [UTILITY], then press the Encoder to enter the Utility functions settings mode. Turn the Encoder to scroll through the following Utility functions. Press the Encoder to select and set: [KNOBS] –... - Page 52 Press the Middle Footswitch twice to go to top level System menu. [SER#] – Serial Number Press the Encoder to display your TimeFactor’s unique serial number. You’ll need to know this number to request support and to download software updates.
-
Page 53: H9 Control
H9 Control can be found at: www.eventide.com/AudioDivision/Support/Stompboxes/h9.aspx. In order to begin using H9 Control with your TimeFactor pedal, connect it to the computer via USB cable and launch the application. H9 Control will then ask for your Eventide user name to ensure that the device is registered to you (if you have not already registered your pedal or created an Eventide account, please do so at eventide.com). -
Page 54: Restoring Factory Settings/Software Updates
Middle Footswitch until [UPDATE] is displayed. With Software Versions 5.0 and higher, TimeFactor’s software can be updated in one of two ways; using either the H9 Control application or the Eventide Update Utility. H9 Control is the recommended method although either will work just fine. -
Page 55: Midi Implementation Chart
TimeFactor User Guide MIDI Implementation Chart MIDI Implementation Chart Mode 1: Omni On, Poly Mode 2: Omni On, Mono O=Yes Mode 3: Omni Off, Poly Mode 4: Omni Off, Mono X=No Function Transmitted Recognized Remarks Default 1-16 1-16 Basic Channel... -
Page 56: Specifications
Power Supply 9 VDC, 1200 ma, Tip hot (+) Dimensions English: 4.8” (H) x 7.5” (W) x 2.12” (D) Metric: 122 (H) x 190 (W) x 54 (D) mm Weight TimeFactor 2.15 lbs, 1 kG Specifications subject to change without notice. -
Page 57: Limited Warranty
When the warranty becomes effective The one-year warranty period begins on the day the unit is purchased from an Authorized Eventide Dealer or, if the unit is drop-shipped from Eventide, on the day shipped, plus a reasonable allowance for shipping delays. This applies whether or not you return your warranty registration form.
Need help?
Do you have a question about the TimeFactor and is the answer not in the manual?
Questions and answers