Table of Contents
Advertisement
Quick Links
Advertisement
Table of Contents

Related Manuals for Eventide Harmonizer H90


Summary of Contents for Eventide Harmonizer H90
- Page 2 Bluetooth® and the Bluetooth logo are registered trademarks of Bluetooth SIG, Inc. Eventide is a registered trademark of Eventide Inc. Harmonizer is Eventide's trademark for a special effects device that incorporates pitch change. MixingLink® is a registered trademark of Manifold Labs, LLC.
-
Page 3: Table Of Contents
Table Of Contents 1. Introduction 1.1. Key Features 1.2. A Few Words of Advice 1.3. What’s in the Box 2. Hardware 2.1. Top Panel 2.2. Rear and Side 3. Setup 3.1. Simple Guitar Setup 3.2. Two Mono Inserts 3.3. One Stereo Insert 3.4. - Page 4 4. Terminology 4.1. List 4.2. Program 4.3. Algorithm 4.4. Preset 5. Play Modes 5.1. Select Mode 5.1.1. Program Select 5.1.2. Bank Select 5.2. Perform Mode 5.2.1. Performance Parameters 5.3. Quick Knob Assignments...
- Page 5 6. Edit Modes 6.1. Programs 6.1.1. Saving Programs 6.2. Routing 6.2.1. Insert Routing 6.2.2. Dual Routing 6.3. Presets 6.3.1. Saving Presets 6.4. Parameters 6.4.1. Mapping 6.4.2. HotKnob 6.4.3. HotSwitch 6.4.4. Tempo Sync...
- Page 6 7. System Menu 7.1. Global 7.2. I/O 7.3. Bluetooth 7.3.1. macOS connection: 7.3.2. iPad Connection 7.3.3. iOS Connection 7.3.4. Pairing your H90 to multiple devices 7.3.5. Bluetooth System Requirements 7.4. MIDI 7.5. Preferences 7.6. About 8. Tempo Menu 9. Software Updates...
- Page 7 10. H90 Control 10.1. Getting Started 10.1.1. Register and Install 10.1.2. Connection 10.2. Home Screen 10.3. Edit Menu 10.3.1. The Playlist 10.3.2. Parameters Edit Menu 10.3.3. Routing/Inserts 10.3.4. Control Assignments 10.3.5. Preset Library 10.4. Program Library 10.5. System...
- Page 8 11. Algorithm Guide Delay Band Delay Bouquet Delay Digital Delay Ducked Delay Filter Pong Head Space Mod Delay MultiTap Reverse Tape Echo UltraTap Vintage Delay Distortion Aggravate CrushStation PitchFuzz Sculpt WeedWacker EQ Compressor Looper...
- Page 9 Modulation Chorus Even-Vibe Flanger Harmadillo Instant Flanger Instant Phaser ModFilter Phaser Q-Wah RingMod Rotary Sticky Tape TremoloPan Tricerachorus Undulator Vibrato Multi SpaceTime Pitch Crystals Diatonic H910 H949 HarModulator HarPeggiator...
- Page 10 MicroPitch Octaver PitchFlex PolyFlex Polyphony Prism Shift Quadravox Resonator Reverb Blackhole DualVerb DynaVerb Hall MangledVerb ModEchoVerb Plate Reverse Reverb Room SP2016 Reverb Spring Shimmer TremoloVerb Wormhole Synth HotSawz...
- Page 11 PolySynth Synthonizer Utility Mute Thru A. Tech Support B. Tech Specs C. Global Mapping Chart D. Startup Sequences D.1. Recovery Mode D.2. Clear Current State D.3. Factory Reset E. Legalese 5.1. Safety and Warranty 5.2. FCC Compliance Statement...
- Page 12 This page was intentionally left 99.88% blank.
-
Page 13: Introduction
Whether you want high-quality effects or experimental sounds yet unheard, the H90 offers the great sounding effects you have always loved from Eventide, and more. Complete with an intuitive UI, comprehensive I/O, flexible routing options, and a wealth of effects to choose from, the H90 is designed to be the heart of your rig. -
Page 14: A Few Words Of Advice
Chapter (Section 3) to help you get started. 1.3. What’s in the Box The box contains: • • Quick Reference Guide • Universal AC power supply • USB-C to USB-A cable • 4x rubber feet • Eventide sticker • Guitar pick... -
Page 15: Hardware
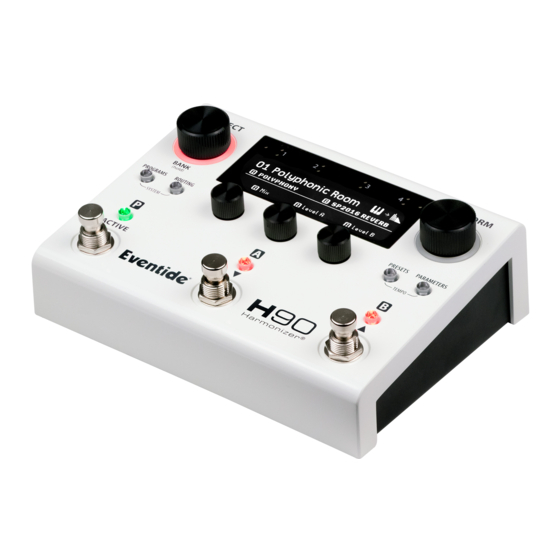
2. HARDWARE 2. HARDWARE Before you set up your H90, let’s get familiar with the main controls and input and output connections. 2.1. Top Panel Fig. 2.1 H90 Top Panel SELECT Knob Press the Select Knob to enter Select Mode. Press and hold the Select Knob to enter Bank Select Mode. - Page 16 2. HARDWARE OLED Display Displays user interface with access to Effect Parameters and System Settings. Input Level Indicators The bottom row of LEDs indicate signal presence for input channels 1-4. The top row indicates clipping. If your signal is overloading the H90’s inputs, adjust the output level of your device or adjust the H90’s input levels.
- Page 17 2. HARDWARE Tip Press and hold the Programs and Routing Buttons simultaneously to access the System Menu. Fig. 2.2 Press and hold the Programs and Routing Buttons simultaneously Presets Press to enter Preset Edit Mode and browse the Preset Library. Parameters Press to enter Parameters Edit Mode to adjust Program and Preset parameters.
-
Page 18: Rear And Side
2. HARDWARE P/A/B LED Buttons In Select/Bank mode, press the LED Buttons to activate/bypass a Program or Preset. In Perform mode, press the LED Buttons to assign a Performance Parameter to a Footswitch. Footswitches In Select/Bank Mode, use the three Footswitches to cue up and load Programs. In Perform Mode, these are user-programable Footswitches. - Page 19 2. HARDWARE Analog Inputs Four ¼” mono tip/sleeve input jacks. Configurable to instrument or line level. Analog Outputs Four ¼” mono tip/sleeve output jacks. Configurable to instrument or line level. Tip If you’re not sure how to connect the H90’s inputs and outputs, visit Setup (Section 3) for information about how to integrate the H90 into your rig.
- Page 20 2. HARDWARE Sync MIDI devices to the H90’s internal clock, or transmit PC messages and H90 controllers as CCs.
-
Page 21: Setup
3. SETUP 3. SETUP Get in tune! Press and hold the A and B Footswitches together to access the tuner. Fig. 3.1 Tuner display page • Turn Quick Knob 1 to change the tuning frequency in one-Hz increments. • Turn Quick Knob 3 to change from Mute to Thru. -
Page 22: Simple Guitar Setup
3. SETUP 3.1. Simple Guitar Setup It’s best to start simple. Fig. 3.2 A simple mono guitar configuration • Connect your guitar to H90 Input 1. • Connect H90 Output 1 to your guitar amp. • Use Select Mode to explore the User 1 Playlist. -
Page 23: Two Mono Inserts
Programs on the H90, press the Programs Button to enter Programs Edit Mode (Section 6.1). 3.2. Two Mono Inserts This configuration introduces two mono inserts. In this example an Eventide dot9 MicroPitch stompbox is being used for Insert 1, and an Eventide H9 Max is being used for Insert 2. - Page 24 3. SETUP • Press the Routing Button and turn the Quick Knobs to select where the Inserts will be in the signal path. • Check out Insert Routing (Section 6.2.1) for more info.
-
Page 25: One Stereo Insert
3. SETUP 3.3. One Stereo Insert You can also use a single stereo insert, such as an Eventide PitchFactor. Fig. 3.4 One Stereo Insert • Connect your guitar to H90 Input 1. • Connect H90 Output 1 to guitar amp 1. - Page 26 3. SETUP Fig. 3.5 Stereo Insert pre-Preset A and B • Check out Insert Routing (Section 6.2.1) for more info. Tip If any of your connected gear operates at line level instead of instrument level, press and hold the Programs and Routing Buttons together to access the System Menu, navigate to the I/O menu, and set the levels appropriately.
-
Page 27: Wet/Dry Amplifier
3. SETUP 3.4. Wet/Dry Amplifier Fig. 3.6 Wet/Dry guitar amp configuration A wet/dry amplifier setup allows you to use two amplifiers and place different types of effects in each amplifier. Typically, the “dry” amplifier would be used for distortion, EQ, and compression effects, while the “wet”... -
Page 28: Wet/Dry Examples
3. SETUP 3.4.1. Wet/Dry Examples Series Using Series routing, if the tap position of the dry amp is pre-Preset A and B, this gives you an unprocessed signal in the dry amp, and a signal that is processed by both Presets in the wet amp. Set the Insert Mix to 0% and try using a combination of modulation and reverb in the wet amp, such as Even- Vibe in series with SP2016 Reverb. -
Page 29: Wet/Dry/Wet Amplifier
3. SETUP 3.5. Wet/Dry/Wet Amplifier Fig. 3.9 Wet/Dry/Wet guitar amp configuration A wet/dry/wet amplifier setup is similar to the Wet/Dry Amplifier setup, but this adds another amplifier to the “wet” portion of the rig, allowing you to create a true stereo image and hear all of the glory of the H90’s stereo effects processing. -
Page 30: Guitar And Vocals With Mixinglink
3. SETUP 3.6. Guitar and Vocals with MixingLink Using the Eventide MixingLink, you can easily amplify a microphone signal, as well as another signal such as guitar, on two separate effects paths using the H90’s Dual Routing feature. Fig. 3.10 Guitar and Vocals with MixingLink •... -
Page 31: Pre/Post Amplifier
3. SETUP 3.7. Pre/Post Amplifier If your guitar amp has an effects loop, it is sometimes desirable to put certain effects such as drive or compression before the preamp, and other effects such as delay and reverb after the preamp. This can be referred to as a Pre/Post setup, or the four-cable method (4CM). -
Page 32: Dual Inserts With A Daw Or Mixing Console
3. SETUP • Turn Kill Dry on for whichever presets are in the amp’s effects loop. • Check out Dual Routing (Section 6.2.2) for more info. 3.8. Dual Inserts with a DAW or Mixing Console The H90 is well suited to be used as an outboard effects processor for a mixing console or your DAW. Using Dual Routing allows you to use the H90 as two separate signal processing paths, so Path 1 can be your reverb bus, and Path 2 can be your delay bus. - Page 33 3. SETUP • Connect H90 Output 1 and 2 to aux return 1 of your mixing console or to a pair of Inputs on your audio interface. • Connect another stereo pair of Outputs from your mixing console or audio interface to H90 Input 3 and 4.
- Page 34 This page was intentionally left 99.88% blank.
-
Page 35: Terminology
4. TERMINOLOGY 4. TERMINOLOGY These terms represent the overarching layout of the H90: 4.1. List Lists contain up to 99 Programs each, and are divided into editable User Lists and un-editable Factory Lists. The H90 ships with an assortment of Factory Lists, from which a choice selection of Programs have been picked for the first User List. -
Page 36: Algorithm
Program Select Mode displaying the Clean Ambient Program 4.3. Algorithm An Algorithm is an Eventide-designed audio processing module, with carefully chosen parameters. Each parameter may be adjusted and mapped (Section 6.4) to Footswitches, knobs, expression pedals, and MIDI. The Algorithm Guide provides in-depth descriptions of each Algorithm. - Page 37 4. TERMINOLOGY Fig. 4.5 The Polyphony Algorithm’s Preset, Jazz Vibes, in Parameters Edit Mode...
- Page 38 This page was intentionally left 99.88% blank.
-
Page 39: Play Modes
5. PLAY MODES 5. PLAY MODES The H90 has two Play Modes: Select and Perform. Picking one of these two Play Modes will determine how you interface with the pedal. In Select Mode, using Program Select allows you to scroll through the entire Playlist, while Bank Select organizes your Playlist into Banks of three Programs, giving you quick access to instantly load any three programs using the Footswitches. -
Page 40: Bank Select
5. PLAY MODES Turn the Select Knob or press the A or B Footswitch to scroll up and down through the Playlist. Press the P (Active) Footswitch, or the Select Knob, to load the highlighted Program. The Active LED and the Program Number will blink until the selection is confirmed. -
Page 41: Performance Parameters
5. PLAY MODES Perform Mode allows you to customize the H90’s interface with two pages of user-programmable Footswitch assignments such as tap tempo, active/bypass, momentary active, three independent HotSwitches, and Algorithm-specific parameters. The H90’s algorithm-specific performance parameters can provide for a wealth of expressive and artistic tools, right at your feet! •... - Page 42 5. PLAY MODES Fig. 5.5 Page two of the performance parameter mappings 5.2.1.1. Assign to Footswitches Press the P, A, or B LED Button to cycle through a List of the P, A, or B Footswitch available performance parameters. The available performance parameters will vary depending on what Presets are currently loaded, there are choices like momentary states denoted by the (M), or a HotSwitch, or the performance functions of the algorithm.
- Page 43 5. PLAY MODES Performance Parameter Assignment Options Program Tap Tempo 5.2.1.2. Map to External Controllers You may find that you’ll want more than just six footswitches to control the variety of performance parameters offered by a given Program. For instance, you may want to always control the bypass/active states of your Programs and Presets using the H90’s footswitches and control the HotSwitches and algorithm-specific performance parameters from another source.
-
Page 44: Quick Knob Assignments
5. PLAY MODES This allows you to have your time based effects always be in sync to the H90’s tempo. For example, you can specify a 1/4 note triplet delay time, change the H90’s tempo from 120 BPM to 160 BPM, and you will now have a 1/4 note triplet delay time at 160 BPM. - Page 45 5. PLAY MODES Tip Any combination of Quick Knob assignments can be made to suit your Program or performance needs. You can map all of the Quick Knobs to the Parameters of Preset A or B, or mix things up between both Preset and Program-level parameters.
- Page 46 This page was intentionally left 99.88% blank.
-
Page 47: Edit Modes
6. EDIT MODES 6. EDIT MODES 6.1. Programs Programs Edit Mode allows you to search through and audition the Programs on the H90. Press the Programs Button to enter Programs Edit Mode. Press any Footswitch to exit. Fig. 6.1 The upper right corner displays the List and location of the Program. The three Quick Knobs filter the List of Programs: •... -
Page 48: Saving Programs
6. EDIT MODES 6.1.1. Saving Programs Press and hold the Programs Button to save a Program. Fig. 6.2 Program save display Turn Quick Knob 3 to select the List to which you’d like to save it. This defaults to the currently active Playlist. -
Page 49: Routing
6. EDIT MODES • Press the Select Knob to cancel the save operation. 6.2. Routing Routing Edit Mode adjusts the routing of the currently loaded Program. The H90’s two Presets can be routed to process your signal in series or parallel for each Program. This is useful for a variety of applications: •... -
Page 50: Insert Routing
6. EDIT MODES Pressing the P, A, or B LED Buttons will toggle active/bypass for the Program, Preset A, or Preset B. Tip When using Insert or Dual routing, press Quick Knob 1 to swap Presets A and B. 6.2.1. - Page 51 6. EDIT MODES Note Programs with Presets routed in series will display in the top right corner. Fig. 6.5 Programs with Presets routed in series Programs with Presets routed in parallel will display in the top right corner. Fig. 6.6 Programs with Presets routed in parallel •...
- Page 52 6. EDIT MODES Fig. 6.8 Insert 1 pre-Preset A, Insert 2 post-Preset B Fig. 6.9 Insert 1 pre-Preset A, Insert 2 in Parallel with Preset A & B Fig. 6.10 Inserts 1 & 2 routed in Parallel with Preset A & B Fig.
- Page 53 6. EDIT MODES Fig. 6.12 Insert routing in Series with one stereo Insert Each Insert has its own set of parameters: Send Level, Return Level, Mix %, Tails, Latency (from 0 samples to 512 samples), and Polarity (Normal/Inverted). Press the Routing Button or turn the Select Knob to scroll through the parameters.
- Page 54 • Disengage the polarity invert. • When using an Eventide H9, set the insert latency to 109 samples. Note The H90 will automatically adjust to process audio in mono or stereo depending on the physical input and output connections. Insert routing will sum or mult the signal accordingly.
-
Page 55: Dual Routing
6. EDIT MODES 6.2.2. Dual Routing Dual Routing allows you to route two processing paths within your H90. This can be used to process two instruments separately through two different Presets, or to connect to an amplifier in a Pre/Post configuration using one Preset in your preamp section and one Preset in your amp’s effects return. - Page 56 6. EDIT MODES Fig. 6.16 Presets A & B in Series on Path 1 Fig. 6.17 Presets A & B in Parallel on Path 1 Fig. 6.18 Dual Routing in Pre/Post Fig. 6.19 Presets A & B in Series on Path 2...
-
Page 57: Presets
6. EDIT MODES Fig. 6.20 Presets A & B in Parallel on Path 2 6.3. Presets Presets Edit Mode allows you to quickly hear the effects of different Algorithm Presets on the currently loaded Program. Press the Presets Button to enter Presets Edit Mode. Press again to toggle the selection between Presets A and B. -
Page 58: Saving Presets
6. EDIT MODES • Quick Knob 2 selects the Effect Type for which to search. • Quick Knob 3 selects the Algorithm filter. Turn the Select Knob to scroll through the filtered List, which auto-loads each Preset into the selected A or B slot for quick auditioning. -
Page 59: Parameters
6. EDIT MODES Fig. 6.24 Existing preset prompt Note Factory Presets must be renamed and saved as a new User Preset to the Library. 6.4. Parameters Parameters Edit Mode allows you to adjust and map the Program-level and Preset parameters. Press the Parameters Button to enter Parameters Edit Mode. -
Page 60: Mapping
6. EDIT MODES Fig. 6.26 Parameter Edit Mode displaying the parameters for Preset A • Press the B LED Button to view the parameters for Preset B. Press it again to bypass/activate Preset B. Fig. 6.27 Parameter Edit Mode displaying the parameters for Preset B 6.4.1. -
Page 61: Hotknob
6. EDIT MODES Turn the Select Knob to view the Control Range menu. Turn Quick Knobs 1 and 2 to set the Start/ • End or Minimum/Maximum values of the controller. • You can reverse the direction of your external controller by adjusting the End point to be before the Start point. -
Page 62: Hotswitch
6. EDIT MODES Press the Parameters Button to cycle through the different parameter view pages, and this will determine which HotKnob is being used. Note that in Perform Mode, HotKnob P will always be used. To map a parameter to a HotKnob: •... -
Page 63: Tempo Sync
6. EDIT MODES To map a HotSwitch: • Press the Parameters Button to enter Parameters Edit Mode. • Press and hold the P, A, or B LED Button to map its respective HotSwitch. • Press a Quick Knob to assign the parameter to the HotSwitch. Turn the Quick Knob to change the value of that parameter. - Page 64 6. EDIT MODES Tip Tap tempo can be used to adjust time based parameter values with Tempo Sync off. See Tap Tempo for more information.
-
Page 65: System Menu
7. SYSTEM MENU 7. SYSTEM MENU Press and hold the Programs and Routing Buttons simultaneously to enter the System Menu. Press the Perform Knob to exit. Fig. 7.1 Press and hold the Programs and Routing Buttons simultaneously • Navigate between pages either by turning the Select Knob, or by pressing the Programs or Routing Button. -
Page 66: Global
7. SYSTEM MENU 7.1. Global Fig. 7.3 Page 1 of the Global settings Fig. 7.4 Page 2 of the Global settings Playlist Select which User List you’d like to use in Select Mode. Note Only User Lists can be designated as the Playlist, and there can only be one active Playlist. Factory Lists cannot be the Playlist, but they are searchable in Programs Edit Mode. - Page 67 7. SYSTEM MENU These two Global Routing Configurations affect Routing Edit Mode’s available options. Turn Quick Knob 1 to change the Global Routing Configuration. A prompt will appear to confirm or cancel the change. Press Quick Knob 3 to confirm, or press Quick Knob 1 to cancel. Fig.
- Page 68 7. SYSTEM MENU This determines how the pitch tracking, filters, and tone controls will respond to the audio source. While the source names suggest specific instruments, these can also be thought of as the sonic range of your audio source. •...
-
Page 69: I/O
7. SYSTEM MENU Kill Dry This is the global kill dry setting that all Programs and presets will subscribe to. If a Program or Preset’s kill dry setting is set to Global, it will reflect this setting of on or off. Pedal Control Global Pedal Control allows you to define external controllers such as aux switches and expression pedals that will always affect the H90, regardless of what Program is loaded. - Page 70 7. SYSTEM MENU Fig. 7.6 Input level display Fig. 7.7 Output level display Exp/Ctl...
- Page 71 7. SYSTEM MENU Set pedal 1 and/or 2 to expression pedal or switch using Quick Knob 1 and 2. Fig. 7.8 Exp & Aux setup display Turn Quick Knob 3 to enable calibration. Fig. 7.9 This example shows one expression pedal and one aux switch being calibrated. Jacks Displays which inputs and outputs are connected.
-
Page 72: Bluetooth
7. SYSTEM MENU Determines the H90’s routing behavior: • Auto: The H90’s algorithms will automatically determine the correct mono/stereo and summing behavior based off of what jacks are physically connected. • Mono input/output will result in all algorithms processing in mono. Use I/O 1, I/O 2 is not supported for mono operation. - Page 73 7. SYSTEM MENU Tip Press and hold the Programs and Routing buttons to enter the H90’s System Menu, then locate the Bluetooth menu to enable Bluetooth and pair/connect your H90. Fig. 7.11 Press and hold the Programs and Routing buttons to enter the H90’s System Menu.
- Page 74 7. SYSTEM MENU Turn Quick Knob 3 to forget all paired devices. Tip Once you have forgotten a host device on the H90, you must also forget the H90 Bluetooth device from the Host Device’s Bluetooth settings. You must then follow the instructions to pair the device again.
-
Page 75: Macos Connection
7. SYSTEM MENU 7.3.1. macOS connection: Turn Quick Knob 1 to turn the H90’s Bluetooth on. The left Bluetooth LED will illuminate blue. Open H90 Control, and click the Bluetooth pairing button. This will open the macOS Bluetooth Configuration menu. Fig. - Page 76 7. SYSTEM MENU Fig. 7.17 The passkey will be displayed on your H90. Fig. 7.18 Enter the 6-digit code to pair with your device In H90 Control, click “Add Device” followed by “Select Port”. Fig. 7.19 Select the H90 Bluetooth Device to add it.
- Page 77 7. SYSTEM MENU Select the H90 Bluetooth device, and click “Add”. You can now connect your H90 to H90 Control via Bluetooth. Additionally, your H90 Bluetooth device will now be available as a MIDI device in your DAW. Fig. 7.20 The H90 Bluetooth device is now available in Ableton Live.
- Page 78 7. SYSTEM MENU macOS pairing tips: If you turn your Mac’s Bluetooth off, or disconnect the H90 from the Bluetooth Configuration menu, this will break the Bluetooth connection and turn the H90’s Bluetooth off. Turn it on again in the H90’s Bluetooth menu to reconnect. If you choose to “forget”...
-
Page 79: Ipad Connection
7. SYSTEM MENU Fig. 7.22 This device is not available and needs to be reconnected. Fig. 7.23 Click connect to make the device available in H90 Control. 7.3.2. iPad Connection Download and install H90 Control from the App Store. Open H90 Control and click the Bluetooth icon in the top right corner to begin pairing your H90. Fig. - Page 80 7. SYSTEM MENU Select your H90 from the iPad’s Bluetooth MIDI Devices menu. Fig. 7.25 Select your H90 to begin the pairing process. You will be prompted to enter a 6-digit code that is displayed on the H90’s Bluetooth menu under the Passkey.
- Page 81 7. SYSTEM MENU Fig. 7.26 Enter the Passkey displayed on the H90. Enter the Passkey on your iOS device and click the “Pair” button. In H90 Control, click “Add Device” followed by “Select Port”.
- Page 82 7. SYSTEM MENU Fig. 7.27 Select the H90 Bluetooth Device to add it. Select the H90 Bluetooth device, and click “Add”. Your H90 Bluetooth device will now be connected to your iPad. The right Bluetooth LED on the H90 will illuminate blue to indicate it is connected to a host. You can now control your H90 using your iPad with H90 Control.
- Page 83 7. SYSTEM MENU Fig. 7.28 Click “connect” to connect your H90 with H90 Control. Additionally, the H90 Bluetooth device will now be available as a MIDI device in your DAW or MIDI control app.
- Page 84 7. SYSTEM MENU Fig. 7.29 The H90 Bluetooth device is now available in Logic.
-
Page 85: Ios Connection
7. SYSTEM MENU iPad pairing tips: If you turn your iPad’s Bluetooth off, this will break the Bluetooth connection and turn the H90’s Bluetooth off. Turn it on again in the H90’s Bluetooth menu to reconnect. If you choose to “forget” the iPad your H90 is paired with, you must also remove the H90 Bluetooth device from the iPad’s Bluetooth settings before your H90 can reconnect. - Page 86 7. SYSTEM MENU Open the Bluetooth MIDI pairing app; your H90 should be available as a device to connect to.
- Page 87 7. SYSTEM MENU...
- Page 88 7. SYSTEM MENU Fig. 7.31 Select the H90 to pair with your iOS device. Select the H90 and you will be prompted to enter a 6-digit code that is displayed on the H90’s Bluetooth menu under the Passkey.
- Page 89 7. SYSTEM MENU...
- Page 90 7. SYSTEM MENU Fig. 7.32 Enter the Passkey displayed on the H90. Enter the Passkey on your iOS device and click the “Pair” button. Your H90 Bluetooth device will now be connected to your iOS device. The right Bluetooth LED on the H90 will illuminate blue to indicate it is connected to a host.
- Page 91 7. SYSTEM MENU iOS pairing tips: H90 Control is only available for Mac/iPad. If you turn your iOS device’s Bluetooth off, this will disconnect the Bluetooth connection and turn the H90’s Bluetooth off. Turn it on again in the H90’s Bluetooth menu to reconnect. If you choose to “forget”...
- Page 92 7. SYSTEM MENU...
-
Page 93: Pairing Your H90 To Multiple Devices
7. SYSTEM MENU Fig. 7.33 Forget the H90 on your iOS device before pairing again. 7.3.4. Pairing your H90 to multiple devices • The H90 can pair with multiple host devices (Mac, iPad, iOS device, etc.) but it can only connect to one host device at a time. -
Page 94: Midi
7. SYSTEM MENU 7.4. MIDI Configure global MIDI settings for your H90. These controls will be enabled regardless of the current Program loaded. Fig. 7.34 MIDI menu page 1 Channel Select the MIDI channel (1-16) on which the H90 receives and transmits. Receive Omni Turn this on if you’d like the H90 to receive MIDI from all channels simultaneously. - Page 95 7. SYSTEM MENU Fig. 7.35 MIDI menu page 2 PC Offset By default, the H90 will transmit and receive Program Changes using PC numbers 1-100. Enabling a PC Offset on the H90 will make it transmit and receive Programs Changes using PC numbers 0-99. When using other MIDI devices that use PC numbers starting at 0, set PC Offset to 1 so the PC numbers match on all of your devices.
- Page 96 7. SYSTEM MENU MIDI Global Control allows you to define MIDI control messages that will always affect the H90, regardless of which Program is loaded. For example, if you always want CC #5 on your MIDI controller to control Quick Knob 1, you can configure this using the MIDI Global Controls.
-
Page 97: Preferences
7. SYSTEM MENU 7.5. Preferences Fig. 7.38 Preferences menu display LED Bright Adjust the brightness of the LEDs. • High • Med-High • Low-Med • Screensaver Configure the amount of time it takes for the screensaver to be enabled. The screensaver will display an H90 animation, and help preserve the longevity of the H90’s OLED screen. - Page 98 7. SYSTEM MENU Fig. 7.39 Page 1 of the About menu Fig. 7.40 Page 2 of the About menu Fig. 7.41 Page 3 of the About menu...
-
Page 99: Tempo Menu
8. TEMPO MENU 8. TEMPO MENU Press and hold the Presets and Parameters Buttons simultaneously to enter the Tempo Menu. Press the Perform Knob to exit. Fig. 8.1 Press and hold the Presets and Parameters Buttons simultaneously Fig. 8.2 The Tempo Menu Tempo BPM The H90’s internal tempo can be adjusted from 20 BPM to 500 BPM. - Page 100 8. TEMPO MENU Tempo Source • Global: All Programs will subscribe to the Global Tempo setting. • Program: Programs will save with the current tempo BPM. Programs will load with the saved BPM value. • MIDI Clock: Tempo will be synced to MIDI clock from DIN or USB. Go to System Menu > MIDI (Section 7.4) to configure USB or DIN as the MIDI clock source.
- Page 101 9. SOFTWARE UPDATES 9. SOFTWARE UPDATES We recommend that you keep your H90’s software up to date. All of your updates will be done using the H90 Control application, which will notify you whenever a new update is available. Fig. 9.1 You will be notified when an update is required.
- Page 102 9. SOFTWARE UPDATES • If your computer is connected to the internet and your H90’s software is not up to date, you will be prompted to update your H90. • Follow the on-screen instructions to update. Warning Do not unplug the power supply of your H90 during the update process. The H90’s screen will display a connection icon to indicate that the update is in progress.
-
Page 103: H90 Control
Tip When you first open H90 Control you will be need to sign into your Eventide account. Make sure you use your Eventide username, not your email address, when signing in to avoid errors. You will... -
Page 104: Connection
USB, directly to your device using the included USB cable. Wirelessly, using Bluetooth. Checkout the Bluetooth section of the user manual for instructions and troubleshooting. 10.2. Home Screen Once you have opened H90 Control and logged into your Eventide account, you will first see the home screen. - Page 105 Fig. 10.1 The H90 Control home screen. Click the burger icon for the following options: • H90 Control settings • Logout of your Eventide account • View this user guide • Open the H90 Control logfile for support purposes •...
- Page 106 10. H90 CONTROL Once you have connected to a device, it will show up in the top bar. You can connect to multiple H90s at once and select each device this way. Click the arrow icon to detach the device’s tab and view it in a separate window.
-
Page 107: Edit Menu
10. H90 CONTROL 10.3. Edit Menu The Edit Menu is used to edit and save Programs and Presets. 10.3.1. The Playlist The Playlist will be available in all of the Edit Menu tabs, as well as the Program Library. - Page 108 10. H90 CONTROL...
- Page 109 10. H90 CONTROL Fig. 10.3 The Playlist. Select a list from the drop down menu. Click any Program to load a Program from the Playlist. You can also navigate the Playlist using the up and down arrow keys, and press Enter to select a Program. Click a Bank to rename it, press Enter to save the new Bank name.
-
Page 110: Parameters Edit Menu
10. H90 CONTROL 10.3.2. Parameters Edit Menu Fig. 10.4 The parameters edit menu. Click the burger icon for the following options: • View this user guide. - Page 111 10. H90 CONTROL Open H90 Control logfile for support purposes. • • Backup Device. This will save a full backup of all the settings on your H90 as a file on your computer. The following settings will not be saved: •...
- Page 112 10. H90 CONTROL • Import a preset from a location on your computer. • Save to Library. Save the current state of the preset as a new preset to the Preset Library. Turn tempo sync on/off for either preset. Bypass either preset. Edit Preset specific parameters, such as mix, delay time, etc.
- Page 113 10. H90 CONTROL Save your Changes! Just like the pedal, you will see an asterisk whenever any parameter is changed next to to Program’s name indicating unsaved changes. Fig. 10.6 The asterisk indicates unsaved changes. Click the save button in the top right or bottom left corner of the screen to save your changes.
-
Page 114: Routing/Inserts
10. H90 CONTROL 10.3.3. Routing/Inserts Fig. 10.7 The Routing/Inserts edit menu. Insert 1 is Pre Preset A. Change your routing from Series/Parallel. Determine if you would like two mono inserts or one stereo insert. Adjust the position of the inserts. - Page 115 10. H90 CONTROL Adjust the insert parameters. More information can be found in the Insert Routing section of the manual.
-
Page 116: Control Assignments
10. H90 CONTROL 10.3.4. Control Assignments Fig. 10.8 The Controls Assignments edit menu. Assign parameters to the 6 available Quick Knobs. Assign Performance Parameters and HotSwitches to the 6 onboard footswitches. - Page 117 10. H90 CONTROL Assign external controllers to the available Performance Parameters. • Click the P,A, or B switch to determine which set of parameters you would like to access. • Click the parameter drop down menu to select a parameter. •...
-
Page 118: Preset Library
10. H90 CONTROL 10.3.5. Preset Library Fig. 10.9 The Preset Library. The Preset Library is used to filter and sort through your saved presets. Click the A or B preset slot to select which preset you would like to replace. -
Page 119: Program Library
10. H90 CONTROL Click a preset from the Library to replace the A or B preset. View only User saved presets. View only favorited presets. Hover your mouse to the left of a Preset to expose the heart icon, and click it to favorite a preset. The lock icon indicates a Factory Preset. - Page 120 10. H90 CONTROL Fig. 10.11 The Program Library. Click here to only show Programs from a specific list. Click here to only show favorited Programs. Hide duplicate Programs that are present on many lists. Program Auto-load: • When enabled, Programs will load immediately when selected. •...
- Page 121 10. H90 CONTROL Click anywhere on the Program text to load it, depending on your auto-load setting. Click and drag a Program to a list location on the Playlist to overwrite the Program in that location. Click the 3-dot icon to copy a Program. You may then Paste it to another List location by clicking the 3-dot icon on a one of the 99 Programs from the current Playlist.
- Page 122 10. H90 CONTROL Fig. 10.12 The Program Library with Delay and Band Delay filters applied. Only Programs that include the Band Delay algorithm are shown. Click the arrow to show/hide the search bar. Use the search bar to search for programs by name. Use the Effect Type filter to search for all programs that contain a certain effect type.
-
Page 123: System
10. H90 CONTROL 10.5. System This menu is where you will adjust the H90’s System settings. It also displays your H90’s serial number, Routing Mode, and software version. General Settings... - Page 124 10. H90 CONTROL Fig. 10.13 The General Settings menu. Set the Tempo Source or internal tempo BPM. Configure MIDI settings described in the MIDI section of the manual. Set Global Preferences, such as: • LED Brightness • Screen Saver • Source Type...
- Page 125 10. H90 CONTROL • Spillover Time • Program Bypass Mode • Kill Dry Input/Output...
- Page 126 10. H90 CONTROL Fig. 10.14 Input/Output Settings menu. Set the input/output levels of the H90 from instrument to line level. Set the exp/ctl inputs to be either an expression pedal or a switch. Note that you must calibrate the connected device using the H90, you cannot calibrate using H90 Control. The Rear Panel Jack icons will be highlighted when a cable is connected to the respective jack.
- Page 127 10. H90 CONTROL Fig. 10.15 The General Settings menu. Set the Global Pedal Controls to use either footswitches, expression pedals or MIDI CCs. View the Global Mapping Chart for a full list of the available options. Configure your footswitches or expression pedal to transmit MIDI CCs. View the MIDI section of the manual for more information about MIDI transmit.
- Page 128 This page was intentionally left 99.88% blank.
-
Page 129: Algorithm Guide
11. ALGORITHM GUIDE 11. ALGORITHM GUIDE To get an overview of the wide selection of effects the H90 offers, a stroll through this guide is recommended. You may search Algorithm descriptions by using this manual’s search box, but the best way to quickly find the best effect is to make use of the H90’s powerful real-time database features by using either the Preset Edit mode or H90 Control. -
Page 130: Delay
11. ALGORITHM GUIDE Delay Band Delay Delays are followed by user selectable modulated filters. • Mix: Wet/dry mixer, 100% is all wet signal. • Delay Mix: Controls the relative level of Delay A and Delay B. Delay Mix’s mixing behavior depends on whether you’re using mono or stereo outputs. -
Page 131: Bouquet Delay
11. ALGORITHM GUIDE Modulation Speed: Sets the modulation rate for the filter center frequencies (0 to 5 Hz). • • Filter: Select filter type – Low Pass, Band Pass or Hi Pass. Performance Parameters • Repeat: A momentary or latching parameter that sets the feedback to the highest value. Factory Presets •... -
Page 132: Digital Delay
11. ALGORITHM GUIDE • • RAMP • NOISE • Delay Mode: (Lofi/Modern) Two different options for delay sounds. LoFi emulates an early bucket brigade pedal that was limited to a delay time of 300 ms. Modern will be a little brighter/cleaner sounding and the self-oscillation will be a little more uniform. - Page 133 11. ALGORITHM GUIDE For mono output: • Delay Mix = 0%, output 1 will have only delay A’s contribution. • Delay Mix = 50%, output 1 has an equal amount of delay A and delay B. • Delay Mix = 100%, output 1 will have only delay B’s contribution. For stereo output: •...
-
Page 134: Ducked Delay
11. ALGORITHM GUIDE • 1.. And 2 • ChorusyTrem • Filtered Digital • Storm Brewing1 • Ambient Delay • ComfNumbVerse • Flaser • Storm Brewing2 • AnothrBrick1 • Copy Cat • LastFewBricks1 • Trem Delays • Big Nice Day • DDLY •... -
Page 135: Filter Pong
11. ALGORITHM GUIDE Ducking Ratio: Sets the ducking ratio or the degree to which the delay is attenuated. • • Threshold: Sets the ducking threshold - the audio amplitude - at which ducking kicks in (-36 dB to -66 dB). •... - Page 136 11. ALGORITHM GUIDE For stereo output: • Delay Mix = 0%, both outputs will have only delay A’s contribution. • Delay Mix = 50%, delay A goes to output 1 only and delay B goes to output 2 only. • Delay Mix = 100%, both outputs will have only Delay B’s contribution.
-
Page 137: Head Space
11. ALGORITHM GUIDE • GooeyFilterOPong • Science Museum • Nice Thick Thickener • Springy Verb • Pong Echoes • WubbaWubbaWub • Schizo Delay Head Space An authentic emulation of classic tape delays from days past; only this time you’re in complete control. Adjustable playback heads let you decide just how many you have and where they are in relation to the record head. - Page 138 11. ALGORITHM GUIDE maintained high end tape machine. Use 10 for a lower end, old tape machine in need of some serious repair. • Tape Hiss: Controls the amount of tape hiss. 0 is no hiss. 10 is the most amount of hiss. Control is global over all playback heads.
-
Page 139: Mod Delay
11. ALGORITHM GUIDE Factory Presets • DeadSpace • MultiTape Tap • Warm Slap • Head Space • Old Age Deviant • Whole Lotta Drive • Heartbreak Vibe • Shorty Pickin • Wild Echoes Mod Delay Modulated delays – great for creating chorus effects and chorused delays. •... -
Page 140: Multitap
11. ALGORITHM GUIDE Modulation Wave Shape: Selects the modulation wave shape. There are two choices for each wave • shape. The single waveforms modulate the two delays in phase and the double waveforms modulate the two delays out of phase. •... - Page 141 11. ALGORITHM GUIDE • Delay Mix = 50%, delay A goes to output 1 only and delay B goes to output 2 only. • Delay Mix = 100%, both outputs will have only Delay B’s contribution. • Delay A: Sets delay time from 0 to 3000 ms (milliseconds). With Tempo Sync OFF, delay is displayed in ms.
-
Page 142: Reverse
11. ALGORITHM GUIDE Reverse Reverse audio effects. Audio is broken into segments, are played backwards and spliced. Crossfading at the splice points prevents nasties. X-Fade controls the length of the crossfade. Small values result in fast crossfades adding an audible rhythm to the effect. Larger values result in long crossfades and a smoother reverse sound. -
Page 143: Tape Echo
11. ALGORITHM GUIDE Modulation Speed: Sets the delay modulation rate (0 - 5 Hz). • • Filter: A low pass/high pass filter variable from -100 (max high pass) to 0 (no filtering) to 100 (max low pass) to change the tone of your delay repeats. Performance Parameters •... - Page 144 11. ALGORITHM GUIDE • Delay Mix = 50%, delay A goes to output 1 only and delay B goes to output 2 only. • Delay Mix = 100%, both outputs will have only Delay B’s contribution. • Delay A: Sets delay time for Delay A output B from 0 to 3000 ms (milliseconds). With Tempo Sync OFF, delay is displayed in ms.
-
Page 145: Ultratap
11. ALGORITHM GUIDE UltraTap UltraTap is a versatile multi-tap delay-line effect capable of a myriad of sounds from rhythmic and glitchy delays, to wacky comb filtering, to huge pad-like volume swells, to unique reverbs, tremolos, and everything in between. It’s the perfect tool for creating drum fills, vocal choruses, swelling guitar chords and other evolving effects. - Page 146 11. ALGORITHM GUIDE • Feedback: Repeats of a length-valued delay that is fed back around the entire multi-tap machine. • Tone: A tone control. • Positive values for brighter sounding taps. • Negative values for darker sounding taps. • Slurm: Juicy tap slurring/smearing and modulation. •...
-
Page 147: Vintage Delay
11. ALGORITHM GUIDE • Batman • Disappearing Hall • Mosquito • Synth Ghosts • Bouncing Ball • Follow Me • Nano Studder • TapSlap • Bullfrog • Ghosthunter • Six Pulsing • UltraSwell • Chop Hall • GlitchTrigger • Slowing Down •... - Page 148 11. ALGORITHM GUIDE Feedback B: Same as Feedback A. • • Bits: Selects the number of bits of resolution. Early digital delays used analog to digital converters with limited resolution. Theory predicts that each bit equals 6 dB of resolution; so that an 8 bit converter would deliver, at best, a mere 48 dB of dynamic range.
-
Page 149: Distortion
11. ALGORITHM GUIDE Distortion Aggravate Aggravate is an Octave fuzz inspired by famous classic analog octave fuzzes from the 70’s. This algorithm will satisfy all your Fuzz needs with its versatile controls, rich feature set and most importantly, its chewy tone that makes playing through it addicting! •... -
Page 150: Crushstation
An overdrive/distortion command center with controls that drive your tone from creamy saturation to brutal sonic assault with everything in between. Use Eventide Harmonizer technology to crush some octaves into the mix, or turn up the Sag to bring the whole sound to its knees. An added bonus, CrushStation is a true stereo distortion. -
Page 151: Pitchfuzz
Fuzz is the first effect in the signal path, getting its inspiration from classic analog fuzz pedals as well as Eventide’s own CrushStation and Sculpt Algorithms. The Pitch Shifters are next in the signal path and are based on Eventide’s PitchFlex Algorithm from the PitchFactor pedal. The Delay section is last in the signal path and its lineage can be traced back to the Vintage Delay Algorithm in TimeFactor. -
Page 152: Sculpt
11. ALGORITHM GUIDE • 3 Octaves • Dovers Peach • LawfulKnowledge • Peaches KICK IT • Arpeggiate • Fripper Fuzz • Lethal Weapon 7 • Pitch Busters • Atmospheres • Fruit In The Rain • Mima Lead • R U Fuzz •... -
Page 153: Weedwacker
11. ALGORITHM GUIDE • Envelope Follower: Envelope follower that modulates both Filter-Pre and Filter-Post according to this input sensitivity setting. The values of Filter-Pre and Filter-Post become the depths that the envelope glides up to. Interesting dynamic changes are achieved when pre and post are set to opposite sweeps, e.g. - Page 154 11. ALGORITHM GUIDE Factory Presets • Bass Overdrive • Slap Drive • Bass Overdrive • Slasher • Bass Overdrive 2 • Stank Drive • Hairy Distortion • Tight Drive • Light n Bright • WeedWacker...
-
Page 155: Eq Compressor
11. ALGORITHM GUIDE EQ Compressor The EQ Compressor Algorithm is a multi-featured parametric equalizer coupled with a dynamic, intuitive compressor, offering a premium tone shaping tool for a variety of instrumentation. The EQ section includes two completely parametric bands along with low shelf and high shelf filters for easy manipulation of your tone. - Page 156 11. ALGORITHM GUIDE Factory Presets • AcousticElec • Bright • Leo to Les • SlapBass2 • Balls • DiscoGuit • Les to Leo • Sweet Home • Basonex • DubBass • Mountain1 • SweetVocal • BassPre2 • Flat EQ • ParkedWah •...
-
Page 157: Looper
11. ALGORITHM GUIDE Looper 60 seconds of stereo recording at full audio quality and up to 480 seconds at reduced audio quality. Salient features: record in seconds or beats, variable speed scrubbing during playback and dubbing (including reverse playback and dubbing), seamless dubbing, real-time adjustment of the loop starting point and loop length, full featured MIDI Clock sync, and the all-new 1-Button Looper. - Page 158 11. ALGORITHM GUIDE and the Loop Length is set to 4 seconds, the recorded Loop will play from 2 seconds to 6 seconds into the 12 second Loop. The Play-Length value is automatically reduced in cases where the Play- Start Point moves past the currently set Play-Length. The Loop Play-Length defaults to Loop Length at the beginning of new loop.
- Page 159 11. ALGORITHM GUIDE • Rev-Direction: When recording reaches the Max-Length, loop begins playing automatically and plays continuously. During Playback, the audio loops around to loop’s start point when it reaches Play-Length, and PLAY at any point can then be used to toggle the playback direction. •...
- Page 160 11. ALGORITHM GUIDE independently control the tone on playback. Turn to the left to cut low frequencies and to the right to cut high frequencies. For flat response, set the knob to 12 o’clock. Tempo sync Tempo sync allows beat-based recording and playback that stays in sync with your H90’s internal clock or with an external MIDI clock.
- Page 161 11. ALGORITHM GUIDE Tempo Sync Footswitch Quantization MIDI Clock is made up of a series 24 “ticks” per beat. Tempo Sync quantizes many of the Footswitch actions either to the next MIDI beat or the next MIDI tick. The quantization action of the Footswitches for each Looper State is as follows: Empty: •...
- Page 162 11. ALGORITHM GUIDE Parameter Tempo Sync Features The following control knobs have enhanced features for Tempo Sync allowing for perfect beat sync even when the tempo source changes. • Loop Play-Start Point: When using Tempo Sync, the minimum length of audio that can be played out is 1 beat so, the Play-Start Point will display in beats allowing you start playback from 0 beats up to Loop Length minus 1 beat.
- Page 163 11. ALGORITHM GUIDE Performance Parameters • 1-Button Looper: The 1-button looper allows you to easily control the transport of the looper using a single Footswitch. • Press once to begin recording a loop. Press again to finish recording and play the loop. •...
-
Page 164: Modulation
11. ALGORITHM GUIDE Modulation Chorus Chorus is an effect that takes a single voiced instrument and gives it the sound of many instruments playing together. This is achieved through randomly modulating several delay lines to create pitch and timing imperfections and then panning these voices in the stereo field. •... - Page 165 11. ALGORITHM GUIDE • Mod Rate / Mod Sens: Sets the secondary LFO rate – determines how fast the Depth Mod and Speed Mod “wiggle” their targets. Ranges from 1/8th to 8x the Speed value. Mod Rate becomes Mod Sens when Mod Source is set to Envelope or ADSR. •...
-
Page 166: Even-Vibe
11. ALGORITHM GUIDE Even-Vibe A faithful emulation of the classic Shin-ei Uni-Vibe™ in stereo! Imagine owning two Uni-Vibes and being able to control their LFOs for a true stereo effect, plus an envelope follower as an added bonus. A clunky foot controller is not required or included, but feel free to map your expression pedal to Speed for maximum vibes. -
Page 167: Flanger
11. ALGORITHM GUIDE Flanger Flanging is similar to Phasing but more intense – deeper, more numerous frequency notches. • Intensity: Effect level. • Type: • Positive: Mixes the feed-forward and feedback signals, non-inverted. • Negative: Mixes the feed-forward and feedback signals, inverted. •... -
Page 168: Harmadillo
11. ALGORITHM GUIDE • Random • Square • Ramp • SampHold • Envelope: The modulation becomes driven by the amplitude of the audio input. • ADSR: The modulation becomes driven by an ADSR triggered by the amplitude of the audio input. - Page 169 11. ALGORITHM GUIDE A harmonic tremolo takes a different approach. It splits the signal into low and high frequency bands and then applies the LFO to the low band and an inverted copy of the LFO to the high band. When the low band becomes louder, the high band becomes quieter, and vice versa.
- Page 170 11. ALGORITHM GUIDE • Rump: The second half of a sine wave (Rump is the inverse of Lump). The low band’s waveform is pointed at the maximum and rounded at the minimum. Like rump, this is a good shape for fast, vibey tremolos.
- Page 171 11. ALGORITHM GUIDE Drive: This control adds warmth to the signal by mimicking the behavior of a tube amplifier’s • harmonic tremolo. • Env Depth: This control uses the amplitude envelope of the input to increase or decrease the tremolo’s depth. Positive values increase the depth of the tremolo when you attack a note. The depth will return to the level set by the Depth control as the note decays.
-
Page 172: Instant Flanger
11. ALGORITHM GUIDE Tone: A tone control for shaping the high or low end of the output signal. Negative values roll off • high frequencies (High Cut), and positive values roll off low frequencies (Low Cut). Performance Parameters • Retrigger: Retriggers the LFO to the beginning of the cycle. Useful for re-syncing during playback, or creative effects. - Page 173 11. ALGORITHM GUIDE Note Many modulation-type effects provide mix controls. The Instant Flanger has a mix knob too, but rather than being labeled Mix, it is called Depth. Why is it called Depth, you ask? As you add more of the dry signal to the wet signal, nulls appear in the output spectrum. These nulls get deeper as the two signals approach equal amplitude.
-
Page 174: Instant Phaser
Flange the Attack Instant Phaser Released in 1972, Eventide’s Instant Phaser began the studio effects revolution by successfully simulating tape flanging, an effect that’s been at the core of legendary albums for the last five decades. Modeled on the original hardware unit, the Instant Phaser Algorithm accomplishes the same legendary... - Page 175 11. ALGORITHM GUIDE sound with all the analog personality, smooth modulations, and inherent musicality. Its capabilities have been expanded, and now you can even take your phaser on an excursion from the 70s far into the future with the delightfully characteristic “Age” knob. Outfitted with a complete host of control options, the Instant Phaser is out of the rack and into your pedal arsenal.
-
Page 176: Modfilter
11. ALGORITHM GUIDE • Envelope: Lets the level of the input signal control the phasing, with adjustable threshold and release time. • LFO Rate: Controls the rate of the LFO from 0.01Hz to 20Hz • LFO Width: Adjusts the range of the sweep of the Phaser’s LFO. 100 is the widest possible sweep and equivalent to the range of the original hardware. - Page 177 11. ALGORITHM GUIDE • Depth: Sets the modulation sweep range from narrow to wide. Controls the frequency offset of the left and right channels to create a stereo image. • Speed / Sensitivity: Sets the modulation sweep rate. Speed becomes Sensitivity when Shape is set to Envelope or ADSR.
-
Page 178: Phaser
11. ALGORITHM GUIDE Performance Parameters • Retrigger: Retriggers the primary and secondary modulation LFOs to the beginning of their cycles. Useful for re-syncing during playback, or creative effects. • Speed / Brake: The Brake engages while this switch is pressed. Short-press to toggle between Fast and Slow. - Page 179 11. ALGORITHM GUIDE • Square • Ramp • SampHold • Envelope: The modulation becomes driven by the amplitude of the audio input. • ADSR: The modulation becomes driven by an ADSR triggered by the amplitude of the audio input. • Manual: When selected, the Manual Mod parameter will control the modulation.
-
Page 180: Q-Wah
11. ALGORITHM GUIDE Factory Presets • Ain’t Talkin ‘Bout Phase • Phat Phase • FunkPhase • SawModPhaser • Lou-nivibe • StoppedPhase • Phaser Wah • VibraPhaser Q-Wah The Q-Wah effect can be a classic wah wah effect, an auto wah, or a combination of both. Use Depth and/ or other wave shapes to create more complex wah sounds. - Page 181 11. ALGORITHM GUIDE List of available vowels: • B..EA..T • M..I..X • S..E..T • S..A..X • H..O..T • R..A..W • W..OO..D • T..U..NE • F..U..N • B..IR..D • Speed / Sensitivity: Sets the modulation sweep rate. Speed becomes Sensitivity when Shape is set to Envelope or ADSR.
- Page 182 11. ALGORITHM GUIDE Speed Mod: Controls the amount of modulation of the Speed parameter. Analogous to FM • (Frequency Modulation). • Mod Rate / Mod Sens: Sets the secondary LFO rate – determines how fast the Depth Mod and Speed Mod “wiggle” their targets. Ranges from 1/8th to 8x the Speed value. Mod Rate becomes Mod Sens when Mod Source is set to Envelope or ADSR.
-
Page 183: Ringmod
11. ALGORITHM GUIDE RingMod Ring Modulator is an effect created by multiplying an input signal by an audio frequency waveform; the result is a waveform containing the sums and differences of those frequencies and their partials. This creates a waveform with complex (and usually nonharmonic) bell-like overtones. By using the Speed Mod control to modulate this carrier frequency you can create useful and interesting sounds. -
Page 184: Rotary
11. ALGORITHM GUIDE • Triangle • Peak • Random • Square • Ramp • SampHold • Envelope: The modulation becomes driven by the amplitude of the audio input. • ADSR: The modulation becomes driven by an ADSR triggered by the amplitude of the audio input. - Page 185 11. ALGORITHM GUIDE control the speed of the rotor and horn independently, adjust the mix of the two, and modulate the speeds themselves, for interesting and dynamic effects. • Mix: Wet/Dry mix, where 100 is an all wet signal. It has a special nonlinear taper which puts most of the knob travel in the most usable range.
-
Page 186: Sticky Tape
11. ALGORITHM GUIDE • Speed / Brake: The Brake engages while this switch is pressed. Short-press to toggle between Fast and Slow. Long-press to engage Brake. • Fast / Slow: Press to toggle between Fast and Slow, which slows the primary and secondary LFOs by a predetermined factor. -
Page 187: Tremolopan
11. ALGORITHM GUIDE NOTE: With no offset, or no flanging engaged this will sound like detuning. With offset, or a flange engaged this sounds like modulation. • W&F Rate: Controls the speed of the wow and flutter. 10 is a faster, more fluttery sound and 0 is more wowy. - Page 188 11. ALGORITHM GUIDE • When Effect Type is set to Opto, this controls the input’s slew rate (Edge) and, depending on the input signal, may only have a subtle effect. • Type • Bias: Tube-inspired. • Opto: Opto-coupled. • Depth: Sets the modulation sweep range from narrow to wide. •...
-
Page 189: Tricerachorus
1980s. These units used bucket brigade delay (BBD) chips to create chorusing. TriceraChorus pairs rich BBD-style trichorusing with another classic effect of the 1980s: Eventide MicroPitch detuning. This effect can be used to thicken the sound, to add static chorusing, and to spread the stereo field by detuning the left and right signals in opposite directions. - Page 190 11. ALGORITHM GUIDE The Depth L / Depth C / Depth R knobs control the depth of the respective voices. Larger depth values increase the amount of delay modulation, creating greater changes in pitch. When a depth control is set to Off, that voice is removed from the output, and the volume levels of the other voices will be automatically adjusted to maintain a constant level.
- Page 191 11. ALGORITHM GUIDE In mono to stereo routing, if Depth L is OFF but Depth R is active, the chorused signal will be routed to the right and the dry signal will be routed to the left. This is a classic technique for producing a wider stereo image.
-
Page 192: Undulator
Zwarbl Undulator Undulator is Eventide’s classic modulated tremolo effect from the iconic H3000 effects processor. This unique, rhythmic effect combines input swell, chained detuned delays, and ethereal feedback run through an AM/FM modulated tremolo. Additional secondary modulation allows for greater creativity... - Page 193 11. ALGORITHM GUIDE and control. Whether used for manipulating samples or adding movement to strings, pads, guitars, and keys, Undulator is a muse for creative musicians. • Intensity: Increase the dry/effect ratio. • Feedback: Controls the amount of feedback in the delay structure. •...
-
Page 194: Vibrato
11. ALGORITHM GUIDE • ADSR: The modulation becomes driven by an ADSR triggered by the amplitude of the audio input. • Manual: When selected, the Manual Mod parameter will control the modulation. Performance Parameters • Retrigger: Retriggers the primary and secondary modulation LFOs to the beginning of their cycles. Useful for re-syncing during playback, or creative effects. - Page 195 11. ALGORITHM GUIDE • Triangle • Peak • Random • Square • Ramp • SampHold • Envelope: The modulation becomes driven by the amplitude of the audio input. • ADSR: The modulation becomes driven by an ADSR triggered by the amplitude of the audio input.
- Page 196 11. ALGORITHM GUIDE • Fast / Slow: Press to toggle between Fast and Slow, which slows the primary and secondary LFOs by a predetermined factor. The Brake does not engage while this switch is pressed. • Brake (M): Slows the LFOs at a constant rate and pauses the LFOs until the switch is released. Factory Presets •...
-
Page 197: Multi
Eventide’s Vintage Delay Algorithm from the TimeFactor pedal and the Reverb section draws from both the Plate Algorithm in Eventide’s SPACE pedal, as well as Eventide’s ULTRA REVERB Native Plug-in. Unique to SpaceTime is the ability to route the Delays and Reverb in series or parallel after Modulation, further adding to its versatility and creative applications. - Page 198 11. ALGORITHM GUIDE the pattern length. The shorter delay will not repeat again until the longer delay has passed. F2 is a traditional feedback control, where delay times are independent. Factory Presets • Aphelion • IntaStella • Quarter Delay • Star Sailor •...
-
Page 199: Pitch
MicroPitch and Crystals — go-to sounds for inspiration. Crystals Crystals is a classic Eventide effect combining twin reverse pitch shifters, delays, feedback, and reverb. It can create out-of-this-world climbing and cascading pitched delays, unique sounding reverbs, and granular effects for helping instruments stand out in a mix. -
Page 200: Diatonic
11. ALGORITHM GUIDE • AreYouThere • NS Reverb • Seagulls • Classic Crystals • Pitch A La V • Steampunk • Crystal Dance • Reverse Detune • Voice On Ice • Eerie Cavern • ReverseLows • WeirdBass • From A Bad Dream Diatonic Diatonic pitch shifters track the notes that you’re playing and shift the pitch by the selected harmonic interval based on the Key and Scale that you’ve selected. -
Page 201: H910 H949
• Storyteller • Wyld Stallions • Emaj 3rd+ • The Thief H910 H949 This effect emulates the sound and functionality of Eventide’s legendary H910 H949 Harmonizer™ effects units. The H910 Harmonizer was the world’s first real-time pro-audio pitch changer and... - Page 202 11. ALGORITHM GUIDE introduced the word “glitching” to the pro-audio vocabulary. The H949 was the world’s first de-glitched Harmonizer. Unlike the Diatonic pitch shifters, pitch shifting is in the feedback loop allowing for arpeggiated repeats. Note For the purists in our audience, you may remember that the H910 and H949 were mono in, stereo out devices.
-
Page 203: Harmodulator
11. ALGORITHM GUIDE • H949-2: Algorithm 2 uses an intelligent splicing Algorithm that greatly reduces glitching, but will add varying degrees of coloration to the signal, and is more suitable for extreme pitch ratios. • Modern: The Modern pitch shifting Algorithm takes advantage of its powerful DSP to further reduce glitching. - Page 204 11. ALGORITHM GUIDE setting both Pitch A and Pitch B to UNISON, the delays to minimum, and feedback to 0. Now use the Mod Depth control to set the amount of pitch modulation and the Mod Speed control to adjust the modulation rate.
-
Page 205: Harpeggiator
11. ALGORITHM GUIDE • Bass Min Maj Mod • Lightside Darkside • Planet Obelisk • BassGuitSolo • Munchkin Whales • Psycho Waiting • Chromatic Delay • One Finger Power • Trance Octaves • Elec12String Roo • Photon Pistol • VaiBallerina •... - Page 206 11. ALGORITHM GUIDE The first several pitch sequences are fairly straightforward. Here’s a general description of each of these sequences: All steps are one octave up. All steps are one octave down. All steps are a fifth up. All steps are a fourth down. Unison and one octave down.
- Page 207 11. ALGORITHM GUIDE Intervals are indicated as follows: • 1oct = one octave • 2oct = two octaves • M2 = major second • m2 = minor second • M3 = major third • m3 = minor third • P4 = perfect fourth •...
- Page 208 11. ALGORITHM GUIDE 11 +1oct -1oct unison +1oct unison 12 +1oct -1oct -1oct +1oct unison 13 +1oct -1oct unison +2oct +1oct 14 +1oct -1oct unison +2oct +1oct 15 +1oct -1oct unison +2oct +1oct 16 +1oct -1oct unison +2oct +1oct Pitch Sequences 8 – 14 -1oct ↑...
- Page 209 11. ALGORITHM GUIDE 15 +1oct Unison +1oct unison unison Unison unison 16 +2oct Unison +1oct unison unison Unison unison Pitch Sequences 15 - 21 +1oct unison ↓ unison ↓ +P5 ↓ unison +1oct unison -m2 ↓ -d5 ↓ +1oct unison +1oct -M3 ↓...
- Page 210 11. ALGORITHM GUIDE unison unison unison ↑ unison -1oct unison unison -1oct Unison unison unison unison +1oct +1oct unison -1oct unison unison +1oct unison unison +1oct +m6 ↑ unison Unison unison unison -1oct unison Unison unison unison +1oct unison unison unison Unison +1oct...
- Page 211 11. ALGORITHM GUIDE Rhythm B: See the description for Rhythm A. • • Dynamics (Attack/Release Time): Sets attack and release time for the dynamics of the Rhythm and Effects. When set to minimum (-10), the audio takes the entire step length to fade in; at mid-range (0), the audio is present for the entire step duration;...
-
Page 212: Micropitch
11. ALGORITHM GUIDE • BassWith Arps • Fake Shredding • LightEmUp • Old Video Game • BigChill • Get Them Kids Moving • Machines • Rave Vocals • BoilingSolo • Hypernotes Arp • Menace • SpaceTrem • Bubbles • Intellivision •... -
Page 213: Octaver
11. ALGORITHM GUIDE Performance Parameters • FLEX: Doubles the pitch shift amount of both voices. Factory Presets • BassChorus(es) • Elevator Delays • Spacey Springs • Bottomless Drop • H3000 MicroPitch • Thick • Chorus Room • NiceChorus • VibraChorus •... -
Page 214: Pitchflex
11. ALGORITHM GUIDE • Bass Voweler Growl • NazztyBass • Classic Octaver • OctoFuzzver • Crab Bass • ThroatyBass • Drty Vocals • WahElectronique • Massivuzz PitchFlex PitchFlex is designed to be used ‘live’ with either an Expression Pedal, the on board HotKnob, or the Flex switch. -
Page 215: Polyflex
11. ALGORITHM GUIDE • Flex Harmony • Flex Harmony +FL • Octave • Pitch Flex -2Oct +2nd • Flex Harmony Flexswitch • Pitch Flex -2nd • Flex Harmony -1oct • Pitch Flex +1oct • Pitch Flex -4th +3rd • Flex Harmony •... -
Page 216: Polyphony
Auto Engage is On, you won’t hear the frozen signal when you are not flexing. Polyphony A low-latency, high quality polyphonic pitch shifter capable of so much more. Making use of Eventide’s new SIFT (Spectral Instantaneous Frequency Tracking) technology, this algorithm shifts any chord or note you throw at it with zero tracking errors, all while the preserving the tone of your guitar. - Page 217 11. ALGORITHM GUIDE Tip The Percussive instrument mode is designed to prioritize preserving the transients and tone of the original signal while also having less latency. For applications where you would like to re-tune a guitar or bass (Mix is 100% wet) Percussive mode may work better for small shift intervals.
-
Page 218: Prism Shift
Open the door to never before heard polyphonic effects. PrismShift leverages sophisticated polyphonic pitch tracking and Eventide’s new low-latency polyphonic pitch shifting engine to generate 3 arpeggiated voices (Low, Mid, High)—all from a single chord. The detected chord intervals are separated, staggered and pitch shifted to create 4 different arpeggio types: rising, falling, rising/falling, and falling/rising The arpeggios span up to 3 octaves, and can use 6 different groups of intervals. - Page 219 11. ALGORITHM GUIDE then the high voice will rise, following by a rising mid voice, and then a rising low voice. This creates a simultaneous ascending while descending sort of effect. The choices are: • L-M-H • L-H-M • M-L-H •...
-
Page 220: Quadravox
11. ALGORITHM GUIDE Factory Presets • All A Dream • End Of All • Ocean Waves • Suspense • Arp Dancer • Glimmer Verb • Prism Ballet • Unraveling • Deep Echoes • Glitter • Prism Shift • Water Reflections •... -
Page 221: Resonator
11. ALGORITHM GUIDE Scale: Selects the scale. The supported scales are: • • Major • Mixolydian • Whole Tone • Minor • Locrian • Enigmatic • Dorian • Harmonic Minor • Neapolitan • Phrygian • Melodic Minor • Hungarian • Lydian •... -
Page 222: Reverb
11. ALGORITHM GUIDE creates dynamic effects that react with more or less intensity based on the harmonic content of the input audio. • Mix: Wet/dry mixer, 100% is all wet signal. • Length: Total length of the delay line. This length is split into 8 subdivisions on which the comb filters can be staggered. -
Page 223: Blackhole
H8000, its lush sound and popularity encouraged us to feature it as one of the premier Algorithms in Eventide’s Space guitar pedal. Its soft attack and lingering, harmonic tail cause it to really shine on guitars, strings, and pads, but those same qualities also allow it to transform a drum track into something other- worldly. -
Page 224: Dualverb
11. ALGORITHM GUIDE Factory Presets • AmeBlackDrone • FishHole • Pulsar II • Blackhole • Hey Honey • StarCrater • Centaurus • Nebula • Train Tracks • Cigaroos • Neutrino • Transfigured • Dark Matter • Pulsar • Vortexting • Dogstar DualVerb DualVerb combines two different high quality studio reverbs (A and B) in parallel, with independent... -
Page 225: Dynaverb
HotSw Freeze • SpaceGallop DynaVerb DynaVerb couples an Eventide Eclipse reverb with a model of the Eventide Omnipressor® to create an adaptable dynamics reverb. The Omnipressor is capable of all types of dynamics processing from gating, expansion, compression, limiting, and even its signature ‘dynamic reversal, ’ where loud signals are squashed, but quiet signals are amplified. -
Page 226: Hall
11. ALGORITHM GUIDE Factory Presets • Adapt-A-Room • Ames Duck • DynaVerb • Phil Mcavity • Radio Static • Tap-n-Trem Hall Hall simulates the sound of large enclosed spaces. Hall offers flexible control of a 3-band crossover reverb network. There are independent decay controls for the low and high band, as well as independent level controls for low, mid, and high band. -
Page 227: Mangledverb
11. ALGORITHM GUIDE • 1985 Damage • DelayedPlate • Kubrix • Amedeo-Slap • Dish Delay • Panoromance • Carnegie Hall • Doom Chamber • Phantom Verb • Cave Space • Earth Hall • Tornadian • Corridors • Hall • Vapor Trail •... -
Page 228: Modechoverb
MangledVern ModEchoVerb ModEchoVerb is based on a popular reverb structure from the Eventide H8000 that brought about such presets as Echospace Of God and Glorious Flange Canyon. It feeds the output of an infinite reverb into an infinite feedback delay and slathers on an extra helping of modulation. The modulation choices are H3000-type swept verb, flanging, or chorusing. -
Page 229: Plate
11. ALGORITHM GUIDE • High Band Shelving Level: Post reverb shelving boost/cut of high frequencies with cutoff at 2000 • Echo Feedback: Feedback amount around the post reverb echo. • Modulation Rate: The modulation rate from 0 to 100. • Modulation Type and Depth: Select modulation type and depth: •... -
Page 230: Reverse Reverb
11. ALGORITHM GUIDE Factory Presets • Centauri • Plate • Dinner Plate • Pressure • GuitPlate • Sift Plate • Just Cuz • Space Plate • OilDrum Reverse Reverb A true reverse reverb followed by a forward reverb with delay and feedback. Turn Size and Feedback all the way down for a straightforward tempo-sync-able rush-up reverse reverb, use Size to dial in a second reverb for increased wetness, and add Feedback around the whole thing for other-worldly ambiance. -
Page 231: Room
• Lux Space • Shutter Room SP2016 Reverb An emulation of the reverb processing from Eventide’s classic SP2016 Signal Processor. • Mix: Controls the mix between the unprocessed input and the reverberated output. This is especially useful when some pre-delay is added. - Page 232 11. ALGORITHM GUIDE The Vintage Algorithms are modeled on the original SP2016’s Algorithms and hardware, and feature a lower bit-depth than the modern versions. The Modern Algorithms are brighter, more diffuse, and use a higher bit-depth. Note The Position, Diffusion, and EQ controls are disabled for the Vintage Plate Algorithm because they were not present in the original SP2016 Algorithm.
-
Page 233: Spring
11. ALGORITHM GUIDE Note The equalization section provides controls for high and low shelving filters. These controls affect parameters deep within the feedback structure of the reverberator and the effect may be subtle or dramatic depending on the program material and other reverb settings such as Decay, Position, or Diffusion. -
Page 234: Shimmer
11. ALGORITHM GUIDE Tension and Num Spring knobs to control the amount of ‘springiness’ . For good measure, we’ve also included a tube amp style tremolo. • Mix: Wet/dry between reverb and tremolo dry signal. • If Tremolo Pre/Post is set to Pre, then this controls the wet/dry mix between the spring reverb and the tremolo’d dry signal. -
Page 235: Tremoloverb
11. ALGORITHM GUIDE • Decay: Arbitrary 0-100 decay (less decay will also take away reverb attack). • Size: Size of the reverb. • Delay: Post reverb and pre pitch-shift delay time in milliseconds or note-based with Tempo Sync on. • Low Band Decay: Amount of post reverb and pitch-shifter low band signal (this is in the feedback path). - Page 236 11. ALGORITHM GUIDE create a convulsing cloud; Envelope or ADSR to control the reverb with your playing; or the Expression Pedal to control it with your foot. • Mix: Wet/dry mixer, 100% is all wet signal. • Decay: Decay in seconds or note-based with Tempo Sync ON. •...
-
Page 237: Wormhole
11. ALGORITHM GUIDE • ABitShakey • Horror Show • AmeTremVerb1 • Splitter Verb • AmeTremVerb2 • TremoloVerb • Broken Glitch Wormhole Mega-sized, tilting reverb. How deep are you willing to go? • Mix: Wet/dry mixer, 0 is fully dry, 100 is fully wet. •... - Page 238 11. ALGORITHM GUIDE • Warp Mix: Sets the mix level of the effect during warping, overrides the Mix control. • Warp Bass: Bass EQ control for Warp effect. • Warp Treble: Treble EQ control for Warp effect. Performance Parameters • Warp (L): Latching footswitch.
-
Page 239: Synth
11. ALGORITHM GUIDE Synth HotSawz Just like a synth, HotSawz is a musical palette for creating interesting sounds. HotSawz is based around classic subtractive synthesis using saw waves for all oscillators. We’re using 6 oscillators that follow a mono pitch tracker. The filter type is low pass. HotSawz has three modulation sources: LFO, Envelope Follower, and a Gate, as well as four assignable modulation destinations: Filter Cutoff, Volume, Pitch, and Oscillator Depth. - Page 240 11. ALGORITHM GUIDE • Depth: Assigns LFO to modulate Oscillator Depth. • Attack: Gate Attack speed from 0 to 3000ms. When the Gate Sustain/Range knob is set to OFF, Attack knob has no effect. • Decay: Gate Decay speed from 0 to 3000ms. When the Gate Sustain/Range knob is set to OFF, Decay knob has no effect.
-
Page 241: Polysynth
11. ALGORITHM GUIDE • Analog-ish Lead • Knife Walker 2 • Pitchup Synth • Space Chihuahua • Camino • Laser Gun • Poblano Peril • Synth Filter Bass • Choo Choo • Major HotSwitch • Pulsar • Synth Surfing • Dark Castle Bass •... - Page 242 11. ALGORITHM GUIDE • • Detune • LFO Amount: Controls the amount of modulation the LFO applies. -100 to 100. • LFO Rate: Sets the speed of the LFO. 0.01 to 20.0 Hz or Tempo Based. • LFO Shape: Sets the shape of the LFO: •...
-
Page 243: Synthonizer
11. ALGORITHM GUIDE The following parameter apply to each voice: • Level: Level of each oscillator. 0 to 100. • Shift: The shift amount of the oscillator voice given in musical intervals. -Oct, -M7, -m7, -M6, -m6, - P5, -Tri, -P4, -M3, -m3, -M2, -m2, Uni, m2, M2, m3, M3, P4, Tri, P5, m6, M6, m7, M7, Oct •... - Page 244 11. ALGORITHM GUIDE • Triangle • Sawtooth • Organ 1 • Organ 2 • Sweep B: Controls the sweepable filter on voice B. Values from 0 to 50 sweep a low-pass filter, values from 50 to 100 sweep a high-pass filter. Performance Parameters Flex: Shifts both voices up one octave.
-
Page 245: Utility
11. ALGORITHM GUIDE Utility Mute Mutes incoming audio completely. Thru Passes audio through unaffected. - Page 246 This page was intentionally left 99.88% blank.
-
Page 247: Tech Support
Eventide Stompbox Forum The official Eventide forum for the H90 and other stompboxes: https://etide.io/forums-pedals H90 Official Facebook Group A group where H90 users can interface with each other and members of the Eventide team: https://etide.io/ H90-FBUG H90 FAQ Get answers to frequently asked questions and get the most out of your H90: https://etide.io/H90-FAQs... - Page 248 This page was intentionally left 99.88% blank.
-
Page 249: Tech Specs
B. TECH SPECS B. TECH SPECS Latency Specifications Preset Routing Mode Total Latency Parallel 3.8 ms Series 4.5 ms Note • Program and Preset level parameters such as mix, bypass, kill dry, and bypass mode do not contribute to the total latency. •... - Page 250 B. TECH SPECS Audio Specifications Input Impedance Instrument Level > 600 kOhm Line Level 80 kOhm Recommended Load 10 kOhm Output Impedance Instrument/Line Level 220 Ohm Maximum Input Level Instrument Level +4 dBu Line Level +14 dBu Analog Audio Connections Number of Channels Four inputs, Four outputs, ¼”...
- Page 251 B. TECH SPECS Physical Dimensions Size Net Weight 2.5 H x 6.5 W x 5.25 D in 1.85 lbs 65 H x 179 W x 136 D mm 1.36 kg All specifications are subject to change or improvement at any time without notice or obligation. Please visit https://etide.io/H90Specs for updated product specifications.
- Page 252 This page was intentionally left 99.88% blank.
-
Page 253: Global Mapping Chart
C. GLOBAL MAPPING CHART C. GLOBAL MAPPING CHART Global MIDI and Pedal Control allows you to define external controllers such as MIDI controllers, aux switches, and expression pedals that will always affect the H90’s parameters, regardless of what Program is loaded. For example, if you’d like an expression pedal to always control HotKnob P, you can configure this using the Global Pedal Control. - Page 254 C. GLOBAL MAPPING CHART Global Mapping Options Dec + Load Decrement Program and load immediately Bank Up Increment three Programs to next Bank Bank Down Decrement three Programs to the previous Bank Tuner Enter / Exit Tuner Mode Tap Tempo Program Tap Tempo Mode Toggle Toggles b/t SELECT and PERFORM Mode...
- Page 255 C. GLOBAL MAPPING CHART Global Mapping Options HS3 (M) Momentary engage HotSwitch 3 PERFORM 1 Engage Program Performance Parameter 1 PERFORM 2 Engage Program Performance Parameter 2 PERFORM 3 Engage Program Performance Parameter 3 PERFORM 4 Engage Program Performance Parameter 4 PERFORM 5 Engage Program Performance Parameter 5 PERFORM 6...
- Page 256 C. GLOBAL MAPPING CHART Global Mapping Options P Mix Adjust Program Mix...
-
Page 257: Startup Sequences
D. STARTUP SEQUENCES D. STARTUP SEQUENCES By pressing and holding certain button combinations while inserting the power cable, you can perform the following functions: D.1. Recovery Mode • Connect the provided USB-C cable from your H90 to your computer. • Press and hold the Select Knob, Perform Knob, and Quick Knob 1, while inserting the power cable to enter Recovery Mode. -
Page 258: Factory Reset
D. STARTUP SEQUENCES Fig. D.2 The H90’s state is being cleared. D.3. Factory Reset Press and hold all three Quick Knobs while inserting the power cable until the text “Performing factory reset” appears on the H90’s screen. Fig. D.3 The H90 is being factory reset. ... -
Page 259: Legalese
Do not expose to excessive heat or moisture. Limited Warranty Eventide Stompboxes are built to exacting quality standards and should give years of trouble-free service. If you are experiencing problems which are not cleared up in this manual, your recourse is this warranty. - Page 260 A copy of your purchase invoice is normally necessary and sufficient for this. If you have any questions about who is an Authorized Eventide Dealer, call us. Units with the serial number plate defaced or removed will not be serviced or covered by this warranty.
- Page 261 Who Performs Warranty Work The only company authorized to perform work under this warranty is Eventide Inc., Little Ferry, New Jersey. While you are free to give personal authorization to anyone else (or to work on it yourself), we will not honor claims for payment for parts or labor from you or from third parties.
-
Page 262: Fcc Compliance Statement
E. LEGALESE 1. The unit must be prepaid to our door. This means that you are responsible for all shipping charges, including customs brokerage and duties. When a unit is shipped to us it must be cleared through United States Customs by an authorized broker. You must make arrangements for this to be done. - Page 263 This page was intentionally left 99.88% blank.
- Page 264 © Copyright 2024, Eventide Inc.
Need help?
Do you have a question about the Harmonizer H90 and is the answer not in the manual?
Questions and answers