Table of Contents
Advertisement
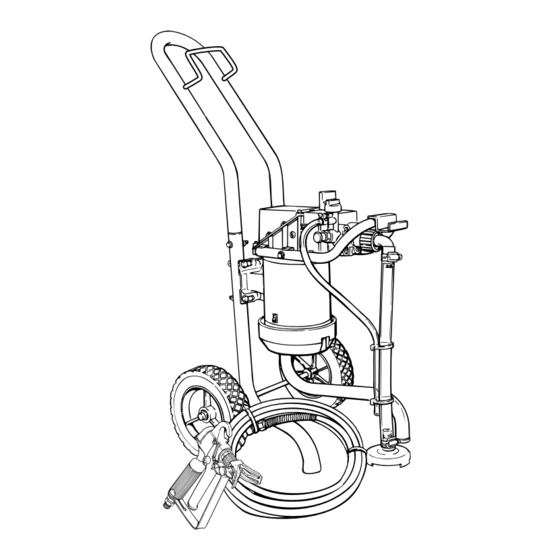
Quick Links
High-performance
Airless Sprayer
Owner's Manual • Notice d'utilisation • Manual del Propietario
Q
uick-start
Easy does it from setup to cleanup:
1
Read all WARNINGS!
Lire toutes les mises en garde!
¡Lea todas las advertencias!
5
Attach the paint hose
Attacher le tuyau à fluide.
Fije la manguera de fluido.
9
Set the pressure
Régler la pression.
Fije la presión.
1 2
Maintain
Faire l'entretien.
Mantenga (De mantenimiento).
Printed in the U. S. A.
R
2
Assemble the sprayer
Monter le pulvérisateur.
Ensamble el atomizador.
6
Prepare to prime
Préparer l'amorçage.
Prepare para cebar.
1 0
Spray
Pulvériser
Atomice.
3
Attach the tip
Attacher la tête de pulvérisation.
Fije la boquilla.
7
Attach the suction set
Attacher l'ensemble d'aspiration.
Fije el equipo de succión.
1 1
Store temporarily
Ranger de façon temporaire
Almacene temporalmente
Need help?
Call us first for answers fast.
Call Wagner toll-free if you have any comments
or problems with this Wagner product.
1-800-880-0993
Wagner Technical Service
Weekdays:
Weekends:
1770 Fernbrook Lane, Minneapolis, MN 55447
http://www.wagnerspraytech.com
website
0298
Español
Français
4
Attach the return hose
Attacher le tuyau de retour.
Fije la manguera de retorno.
8
Prime the pump
Amorcer la pompe.
Cebe la bomba.
OR
clean up
OU
nettoyer.
O
limpie.
8:00 - 4:30 Central time
9:00 - 4:00 Central time
Form No. 0278976A
English
Advertisement
Table of Contents

Related Manuals for WAGNER High-performance Airless Sprayer


Summary of Contents for WAGNER High-performance Airless Sprayer
- Page 1 Fije la presión. Atomice. Almacene temporalmente limpie. Need help? Call us first for answers fast. Call Wagner toll-free if you have any comments or problems with this Wagner product. 1-800-880-0993 Wagner Technical Service Weekdays: 8:00 - 4:30 Central time Weekends:...
-
Page 2: Table Of Contents
The following are located in the literature set with this Spray Gun operator’s manual: • Spare Outlet Spring P/N 0047485 • Spare Tip Seal , P/N 0156713 Fluid Hose • Return tube fitting, P/N 0088715 • Registration card. English © 1996 Wagner Spray Tech - All rights reserved. -
Page 3: Safety Precautions
• NEVER put your hand in front of the gun. Gloves will not not compatible with aluminum and may cause an provide protection against an injection injury. explosion. If you are unsure of a material’s compatibility with aluminum, contact your coating's supplier. © 1996 Wagner Spray Tech - All rights reserved. English... -
Page 4: Grounding Instructions
If you need to paint further than 100 feet from your power source, use more paint hose, not more extension cord. Shorter extension cords will ensure maximum electrical power for proper operation. English © 1996 Wagner Spray Tech - All rights reserved. -
Page 5: Setup
2. Insert the seal so that the curve of the seal aligns with the curve of the tip. Correct Incorrect © 1996 Wagner Spray Tech - All rights reserved. English... -
Page 6: Attaching The Return Hose
NEVER trigger the gun unless the tip is completely turned to either the spray or the unclog position. ALWAYS engage the gun trigger lock before removing, replacing or cleaning tip. English © 1996 Wagner Spray Tech - All rights reserved. -
Page 7: Priming
PRIME ( ) or until the spray gun is triggered to relieve the pressure. © 1996 Wagner Spray Tech - All rights reserved. English... -
Page 8: Spraying
Do not trigger the gun during the middle of a Good spray pattern stroke. This will result in an uneven spray and splotchy coverage. Paint tailing pattern English © 1996 Wagner Spray Tech - All rights reserved. -
Page 9: If The Spray Tip Becomes Clogged
Check it every time you change paint buckets. Remove the screen by pulling it out of the retainer with a plier. Clean the screen with water or solvent and a soft-bristle brush. © 1996 Wagner Spray Tech - All rights reserved. English... -
Page 10: Cleanup
4. Turn the pressure control knob slowly until paint starts to flow into the bucket. As soon as the water or solvent starts to come into the bucket, release the trigger. English © 1996 Wagner Spray Tech - All rights reserved. - Page 11 Use a soft brush. Return the suction set filter to its original position. 20. Wipe the entire unit, hose and gun with a damp cloth to remove accumulated paint. © 1996 Wagner Spray Tech - All rights reserved. English...
-
Page 12: Maintenance
The top will show the imprint of the end cap, while the bottom should be perfectly flat to match the seat in the pump casting. English © 1996 Wagner Spray Tech - All rights reserved. -
Page 13: Troubleshooting
8. There is a problem with the motor. 8. Take the sprayer to a Wagner Authorized Service Center. The sprayer starts up but does not 1. The unit will not prime properly or has lost prime. 1. Try to prime the unit again. -
Page 14: Final Assembly
Thumb nut ....1 9810111 Tuerca de mariposa ... . 1 English Français Español © 1996 Wagner Spray Tech - All rights reserved. -
Page 15: Paint Pump Assembly
Repair Kit ....1 Para reemplazar el sujetador y el asiento Replaces both Holder & Seat © 1996 Wagner Spray Tech - All rights reserved. Español Français... -
Page 16: Suction Set Assembly
Tubing, Return ....1 0270363 Tubo, Retorno....1 English Français Español © 1996 Wagner Spray Tech - All rights reserved. -
Page 17: Spray Gun
Conjunto del gatillo ... . . 1 NOTE: Part numbers may change without notice due to NOTA: Los números de las piezas pueden cambiar sin improvements and modifications. aviso debido a mejoras o modificaciones. © 1996 Wagner Spray Tech - All rights reserved. Español Français English... -
Page 20: Warranty
30 jours à compter de la date d'achat pour des fins professionnelles ou pour la location, pourvu que l'on se serve du produit en suivant les recommandations et consignes écrites de Wagner. Dans le cas de l'usage à domicile, la durée de la présente garantie est d'un an à compter de la date d'achat.
Need help?
Do you have a question about the High-performance Airless Sprayer and is the answer not in the manual?
Questions and answers