
Related Manuals for Gastroback Mini


Summary of Contents for Gastroback Mini
-
Page 1: Operating Instructions
Operating Instructions Automatic Milk Frother - Mini Art.-Nr. 42399 Automatic Milk Frother - Mini Read all provided instructions before first usage! Model and attachments are subject to change! For domestic use only! -
Page 2: Table Of Contents
Carefully read all provided instructions before you start running the appliance and pay regard to the warnings mentioned in these instructions. Table of Contents Knowing the Milk Frother ...............19 Important Safeguards ..............20 Important Safeguards for Electrical Appliance .......21 Hot Surfaces – Risk of Burns ............21 Technical Specifications ..............22 Before first usage ................22 Operation ..................23... -
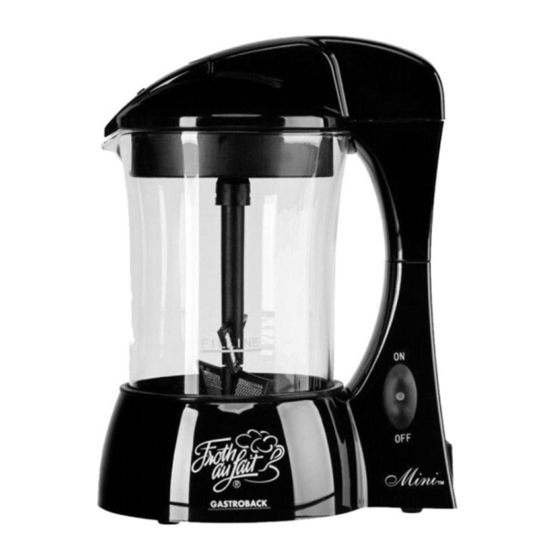
Page 3: Knowing The Milk Frother
These instructions for use will inform you about the various functions and features of the Auto- matic Milk Frother - Mini. That makes it easy to take pleasure in your new milk frother. We hope that you will enjoy your new Automatic Milk Frother. -
Page 4: Important Safeguards
Important Safeguards Carefully read all instructions before operating this appliance and save for further reference. Do not attempt to use this appliance for any other than the intended use, described in these instructions. Any other use, especially misuse, can cause severe injuries or damage by elec- tric shock, heat or fire. -
Page 5: Important Safeguards For Electrical Appliance
current of 30 mA in the supplying electrical circuit is recommended. If in doubt, contact your electrician for further information. • Always unplug the appliance when not in use and before moving or cleaning the appli- ance. Do not leave the appliance unattended while connected to the power supply. •... -
Page 6: Technical Specifications
When serving, especially to children, wait briefly for heated liquid to cool to taste and sip cautiously. Technical Specifications Model: Art.-No. 42399 Automatic milk frother - Mini Power supply: 230 V AC, 50 Hz Power consumption: 500 W Length of power cord: ca. -
Page 7: Operation
Operation 1. Place unit onto a counter or table. Insert the modular power cord into the unit‘s power receptacle and plug the other end into a power outlet. 2. While holding Lid upside down, insert Froth Whip and Whip Holder onto gear shaft located in center of Lid. -
Page 8: Care And Cleaning
After approximately 1½ minutes of frothing, or when Frothing Pitcher begins to feel warm to touch, press down on Flavor Hatch so that it opens fully and pouring channel is exposed. Pour desired amount of flavoring into Pitcher. Push back end of Flavor Hatch forward and down to close. -
Page 9: Recipes
Carefully pull Whip out of Whip Holder. Never remove Froth Whip by pulling on the frothing blades. • After each use Frothing Pitcher, Froth Whip, and Lid should be carefully washed with warm, soapy water using a scrubber pad or sponge. ALL MILK RESIDUE MUST BE REMOVED FROM PITCHER BOTTOM. - Page 10 Milk Froth Floaters (2 - 4 servings) • fat free milk, low fat, or reduced-fat milk • 2 - 4 tablespoons flavored coffee syrups (vanilla, hazelnut, caramel or raspberry) or a liqueur* Follow steps to make “Flavored Milk Froth” Spoon flavored froth into 4 cups about half filled with hot coffee, hot espresso, or hot chocolate, or smaller cups with 2 to 3 tablespoons of liqueur.* Pour remaining hot milk (to taste) into beverage.
- Page 11 Tip: For a different consistency and a less frothy drink, you may use up to an additional 125 ml of milk above FILL LINE. Classic or Flavored Guilt Free Whipped Topping (3 - 4 servings) • fat free milk • 2 - 4 tablespoons vanilla syrup or other flavored coffee syrups* •...
- Page 12 Hatch opening and close Hatch. When ingredients are mixed and unit shuts off automati- cally, remove Lid. For addionally serve: • ½ cup mini or regular chocolate chips Add chocolate chips. Shake Pitcher slightly to mix chips with froth, then pour mixture into 4 wine glasses. Eat with spoons or sip slowly.
-
Page 13: Troubleshooting Guide
Troubleshooting Guide Problem Possible Cause Solution Froth Whip not rotating Froth Whip not properly seated in Whip Verify that Froth Whip is seated in Whip Holder Holder and locked in place. Check that Whip Holder is fully snapped onto Lid. Lid not properly seated Check that Lid is fully seated on the electrical connector of base unit. -
Page 14: Storage
The purchaser has to present the sales slip in assertion-of-claim and has to bear all charges of costs and risk of the transport. Information and Service Please check www.gastroback.de for further information. For technical support, please contact Gastroback Customer Care Center by phone: +49 (0)4165/22 25-0 or e-mail info@gastroback.de. - Page 15 GASTROBACK GmbH Gewerbestraße 20 . D-21279 Hollenstedt / Germany Telefon +49 (0)41 65/22 25-0 . Telefax +49 (0)41 65/22 25-29 info@gastroback.de . www.gastroback.de...
Need help?
Do you have a question about the Mini and is the answer not in the manual?
Questions and answers