DMP Electronics XR150 User Manual
Digital monitoring products alarm panels user's guide
Hide thumbs
Also See for XR150:
- User manual (88 pages) ,
- Installation manual (28 pages) ,
- Quick start manual (4 pages)
Table of Contents
Advertisement
Quick Links
Advertisement
Table of Contents

Related Manuals for DMP Electronics XR150


Summary of Contents for DMP Electronics XR150
- Page 1 XR150/XR350/XR550 U S E R ’ S G U I D E...
-
Page 2: Silencing An Alarm
Abort or Cancel message to the Central Station and the security system will be disarmed. © 2013 Digital Monitoring Products, Inc. Information furnished by DMP is believed to be accurate and reliable. This information is subject to change without notice. -
Page 3: Table Of Contents
Page Section Page Introduction ............... 1 Panic Functions .................5 XR150, XR350, and XR550 Systems ..........1 Thinline™, Aqualite™ and Wireless Keypads: ......5 About Your Security System ............1 Clear Touch™ and Graphic Touchscreen Keypads: ....5 Parts of the System ...............1 7/0 Panic Function ..............6 LCD Keypad ................1... - Page 4 Disarming During an Alarm ..........21 Arming and Disarming ............. 13 Extending Schedules .............. 22 View Zone Status ..............13 Keypad Shortcut Keys .............. 22 Browser Feature ..............13 Arming Function ..............22 General Arming Operation ............13 XR150/XR350/XR550 User’s Guide...
- Page 5 Browser Feature ..............28 Browser Feature ..............37 Zone Monitor ................28 Sending User codes to Z-Wave locks ........37 Monitor (Chime) Shortcut Key ..........28 Forgive Failure to Exit .............. 37 Testing your system’s burglary protection ......28 XR150/XR350/XR550 User’s Guide...
- Page 6 Area Names and Numbers Record ..........46 Wireless Jamming Event Displays ..........55 Area ..................46 Keypad Display ..............55 Area ..................46 Wireless Trouble Event Displays ..........55 Favorite List ................47 Keypad Display ..............55 User Profiles Record ............... 48 XR150/XR350/XR550 User’s Guide...
- Page 7 Email/Cell Phone Message User’s Guide ........66 MyAccess™ Text Messaging Commands ........67 Arming All Areas with Text Message Commands ....67 Arming Partial Areas with Text Commands ......67 Disarming All Areas with Text Message Commands ....67 XR150/XR350/XR550 User’s Guide...
-
Page 8: Introduction
XR150, XR350, and XR550 Systems A Note About False Alarms One of the most important concerns facing the security industry This Guide covers operation of the XR150, XR350, and XR550 Series today is false alarms. The accidental dispatching of police and systems. -
Page 9: Emergency Evacuation Plans
Never enter a building to look for someone. Practice Your Escape Plans Devising an escape plan is only the beginning. For the plan to be effective everyone should practice escape routes from each room. XR150/XR350/XR550 User’s Guide Introduction... -
Page 10: Dmp Keypads
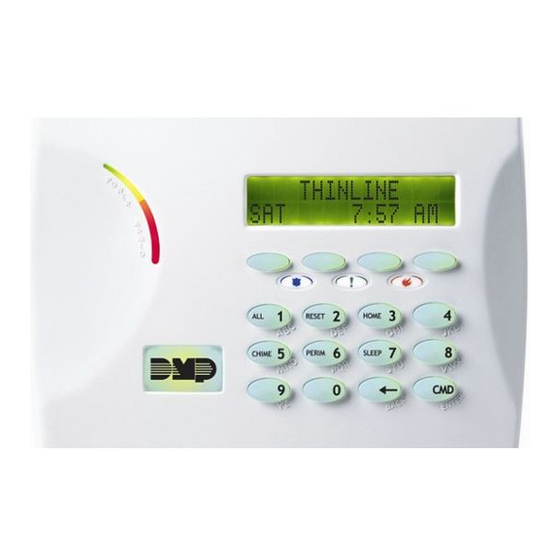
SMITH RESIDENCE Logo 12:51 PM Micro SD Card Slot Select Keys Carousel Local Weather Menu Conditions Backlit Logo COMMAND Key and Proximity Antenna Back Arrow Key Data Entry Digit keys Graphic Touchscreen Keypad Thinline™ Wireless Keypad Introduction XR150/XR350/XR550 User’s Guide... -
Page 11: The Select Keys
Graphic Touchscreen Keypads, when instructed to press the first Select key, touch Select Area 1; the second Select key touch Select Area 2; third Select key touch Select Area 3; and the fourth Select key touch Select Area 4. XR150/XR350/XR550 User’s Guide Introduction... -
Page 12: Power/Armed Logo
With Shaded Buttons To Indicate Police Panic Keys Clear Touch™ and Graphic Touchscreen Keypads: Touch the icon for 2 seconds until a beep is heard. PRESS AND HOLD BUTTON TO SEND PANIC OPTIONS Touch Select Areas POLICE EMERGENCY FIRE Police Emergency Fire Clear Touch™ Keypad Panic Icons Graphic Touchscreen Panic Icons Introduction XR150/XR350/XR550 User’s Guide... -
Page 13: 7/0 Panic Function
For some User Menu options, such as Access Areas under User Profiles there are several displays containing lists. For example, when using Access Areas, areas 1 through 32 display on four separate displays. First, areas 1 through 8 display. Press the COMMAND key to display areas 9 through 16. Press the COMMAND key again to display areas 17 through 25. Press the COMMAND key one more time to display areas 26 through 32. Note: Only areas pre-programmed at installation can be viewed. XR150/XR350/XR550 User’s Guide Introduction... -
Page 14: Asterisks In Area Armed Displays
At the SET BRIGHTNESS display, use the left Select key to lower rest of the area numbers on XR550 systems. the keypad brightness. Use the right Select key to increase the Note: XR150 Systems support 8 areas. brightness. Note: If the brightness level is lowered, it temporarily reverts back 32-Character Name Display to maximum intensity whenever a key is pressed. -
Page 15: Internal Speaker Tone
This only silences the keypad and does not correct again. Below are brief descriptions of the different tones you hear the condition that originally caused the trouble. from the keypad. XR150/XR350/XR550 User’s Guide Introduction... -
Page 16: Dmp Wireless
There is a problem with a protection device or system component. If there is no LED light, the battery for your key fob may need This display is accompanied by a description of the problem. replacing or you could be out of range. Introduction XR150/XR350/XR550 User’s Guide... -
Page 17: Alarm Not Sent
Check the user code or PIN or present the card to TEST IN PROGRESS the reader again. The system is currently being tested by an installation or service technician. XR150/XR350/XR550 User’s Guide Introduction... -
Page 18: Cell Phone Messages
A zone refers to one or more protected openings (doors or Areas windows) or pro t ection devices (motion or glassbreak detectors) An area is made up of burglary zones that can be armed or grouped together under the same zone name and number. disarmed together. One area might consist of the office doors and Often, similar devices in the same general location share the same windows. When you arm the office, these zones arm together and zone. For example, the windows on the east side of the premises sound an alarm if opened. can all be grouped together in a zone named E. WINDOWS. Introduction XR150/XR350/XR550 User’s Guide... -
Page 19: Instant Zone
Home/Sleep/Away system. The current arming status of the Guest this information on its display. systems displays as follows: XR150/XR350/XR550 User’s Guide Introduction... -
Page 20: Arming And Disarming
• Home/Sleep/Away with Guest — Your burglary protection has a main house system and up to two guest house systems (XR150 has 1 guest house system while XR350 and XR550 offers 2). Each house is separate and works just like the Home/Sleep/Away system previously mentioned. -
Page 21: Arming Functions
This restart can occur only one time. When the exit delay time ex p ires, all disarmed zones are armed. XR150/XR350/XR550 User’s Guide Arming and Disarming... -
Page 22: Key Fob Arming
Key Fob Disarming 7c. Select BYPASS to bypass all faulted zones being Press and hold the key fob button programmed for Disarming displayed. or the Toggle arm/disarm button. The Green LED two-second acknowledgement light indicates All System Off. Note: 24-hour zones cannot be bypassed. Arming and Disarming XR150/XR350/XR550 User’s Guide... -
Page 23: Quick Arming
Select NAME to list all of the armed areas by name. Select NBR to passed zones are automatically reset. enter the area number you would like to check. Select LIST to list Disarmed Message: The keypad displays ALL SYSTEM OFF after the all of the armed areas by number. system disarms. XR150/XR350/XR550 User’s Guide Arming and Disarming... -
Page 24: Disarming The Area System From The Keypad
7. If all areas have been disarmed, the keypad next displays ALL SYSTEM OFF. Quick Disarming To quickly disarm a desired area, enter the area number followed by the COMMAND key when the ALL? NO YES option displays. Arming and Disarming XR150/XR350/XR550 User’s Guide... -
Page 25: All/Perimeter System Arming
9. When the system is fully armed, the keypad displays All/Perimeter Shortcut Key Arming PERIMETER ON for perimeter arming and ALL SYSTEM ON for Arm Perimeter — Press 6 for 2 seconds. perimeter and interior arming. Arm All — Press 1 for 2 seconds. XR150/XR350/XR550 User’s Guide Arming and Disarming... -
Page 26: All/Perimeter System Disarming
This is optional and can be system is disarmed. programmed for you at any time. If the alarm is valid, select NO or VERIFY and send a verify message to the Central Station. Arming and Disarming XR150/XR350/XR550 User’s Guide... -
Page 27: Home/Sleep/Away And Home/Sleep/Away With Guest System Arming
Arm Sleep — Press 7 for 2 seconds to arm the perimeter and 9. You can select INSTNT while EXIT: ## INSTNT is displayed to interior areas and leave the bedroom area off. immediately arm all exit zones and make them instant. The keypad displays INSTANT. Arm Away — Press 1 for 2 seconds. XR150/XR350/XR550 User’s Guide Arming and Disarming... -
Page 28: Home/Sleep/Away And Home/Sleep/Away With Guest System Disarming
This is optional and can be programmed for you at any time. If the alarm is valid, select NO or VERIFY and send a verify message to the Central Station. Arming and Disarming XR150/XR350/XR550 User’s Guide... -
Page 29: Extending Schedules
System Operation: Home/Sleep/Away, Home/Sleep/Away with Guest, or All/Perimeter. You can use the Arming shortcut keys, 1, 3, 6, and 7 when the system is disarmed. You may be prompted to enter your user code. XR150/XR350/XR550 User’s Guide Arming and Disarming... -
Page 30: Sensor (Fire) Reset Function
Note: The Monitor (Chime) shortcut key applies to all Exit zones section of this guide. FAVORITES in an Area system and to all zones assigned to the perimeter in a Allows activate Favorite Home/Sleep/Away, Home/Sleep/Away with Guest, or All/Perimeter described in the System Setup section of this guide. system. User Menu XR150/XR350/XR550 User’s Guide... -
Page 31: Alarm Silence
You can silence the alarm by entering your user all XR150, XR350, and XR550 Series panels. code or by presenting your card to a reader during the Status List XR550N or XR550E panels allow additional display. -
Page 32: Sensor (Fire) Reset Shortcut Key
Locks and unlocks doors from the keypad. momentarily. Using Door Lock/Unlock 4. The keypad returns to the Status List display. 1. Access the User Menu. 2. Press COMMAND until DOOR LOCK/UNLOCK? displays. 3. Enter the door number and press COMMAND. -OR- Press the fourth Select Key to browse door names. Use the COMMAND key to scroll through names and press any Select Key when the desired door is displayed. 4. Press Back Arrow return DOOR LOCK/UNLOCK? display. User Menu XR150/XR350/XR550 User’s Guide... -
Page 33: Armed Areas Display
Under certain conditions, some outputs cannot be turned on. If you select a restricted output, the keypad displays CANNOT TURN ON. XR150/XR350/XR550 User’s Guide User Menu... -
Page 34: Favorite
During arming, when choosing to bypass a zone or device, there may be a pre-programmed maximum number of zones (up to 8. At the ZONE NO: - option, enter the zone number you want 8) that can be bypassed in an area. This limit is programmed at to check and press COMMAND. installation. User Menu XR150/XR350/XR550 User’s Guide... -
Page 35: Using The Bypass Zones Function
3. Press any Select key. The keypad displays ALL NBR or You can place any combination of disarmed zones in Zone Monitor PERIM ALL NBR. but only the most recent zone faulted displays. The displayed zone 4. Select PERIM to place all disarmed perimeter zones into name clears automatically after a short time or when the zone is Zone Monitor. armed. 4a. The keypad displays ALL? ADD RMV. 4b. Select ADD to add all disarmed zones to Zone Monitor. 4c. Select RMV to remove all disarmed zones. XR150/XR350/XR550 User’s Guide User Menu... -
Page 36: Browser Feature
Zone Monitor browser. TAMPER Panel box tamper These are followed by either OKAY or TRBL (trouble). If TRBL displays, call the service department for assistance. 4. The system then displays its firmware version, and then exits the User Menu. For example: VER_118_1/20/13 MODEL XR550 User Menu XR150/XR350/XR550 User’s Guide... -
Page 37: System Test
* The transmit test does not occur on local systems. Note: During the Panic Zone Test, any zones that fail are not sent to the receiver unless pre-programmed at installation to be sent. Note: Your system may be programmed to limit the Panic Zone Test to only be performed during the Area 32 schedule. XR150/XR350/XR550 User’s Guide User Menu... -
Page 38: User Profiles
Output Group assigned to this profile. Press the COMMAND key. 99 is ALL areas assigned. Profile 99 is predefined in the system by 8. The keypad displays each of the menus as shown in the the factory. For the XR150 Series system you can assign areas 1 to Profile Table for you to enable for this profile number. Select 8. For the XR350 Series panel you can assign areas 1 to 16 and in an YES or NO and press the COMMAND key to advance to the XR550 Series system you can assign areas 1 to 32. -
Page 39: Browser Feature
Select YES or NO and press the code. The ALL NO YES? option does not display when this option COMMAND key to advance to the next menu selection. is enabled. 11. When you complete Selecting all User Profile menu assignments, the keypad displays the PROFILE CHNGD message for 4 seconds, indicating the profile is changed. XR150/XR350/XR550 User’s Guide User Menu... -
Page 40: Access Schedules
When the custodian needs to remove trash, program 10 minutes for the activity. Or, an overhead door only requires access when a delivery is made. Program up to 720 minutes to allow the loading dock supervisor to load or unload a semi-truck. User Menu XR150/XR350/XR550 User’s Guide... -
Page 41: User Profiles Chart
Service Request FIRE DRILL Fire Drill TEMP CODE Temp User Code ANTI PASS Anti-Passback ACCESS SCHEDULES Sch. 1-99 Access Time RE ARM DLY 0 – 720 Re-Arm Delay EASY ARM/DISARM Arm/Disarm SEC LANGUAGE Preferred Language XR150/XR350/XR550 User’s Guide User Menu... -
Page 42: User Codes
Appendix C for Entering User Names information. Note: On All/Perimeter or Home/Sleep/Away systems use the default profiles 1 through 10. For Home/Sleep/Away with Guest User Profile - The user is also assigned a Profile (1 to 99) by the systems use the default profiles 2 through 9 for the main house person administrating the system. The profile number determines system, default profiles 12-19 for the Guest 1 house system, the areas and functions the user can access. and default profiles 22-29 for the Guest 2 house system. User Menu XR150/XR350/XR550 User’s Guide... -
Page 43: Browser Feature
6. The display changes to USER CODE: * * * * * *. Press any Select key and enter the new user code. Press COMMAND. 7. The display then shows the current user name. Press any top row key to clear. See Entering Names in Appendix C to enter a new name. XR150/XR350/XR550 User’s Guide User Menu... -
Page 44: Deleting User Codes
3 for the next user. Press the Back Arrow key (by user number 2-20) will lock the door or unlock and disarm the to exit this menu. system according to the user’s privileges. User Menu XR150/XR350/XR550 User’s Guide... -
Page 45: Ambush Code
Note: If the system is not armed by the scheduled closing time, a Late to Close report is sent to the central station. If the schedule is extended, a Schedule Change report is sent to the central station. XR150/XR350/XR550 User’s Guide User Menu... -
Page 46: Schedules
– : AM PM. Enter the new opening time and Holiday Schedules that supersede all other schedules. select AM or PM. 6. Favorites allows you to activate a Z-Wave Favorite (1-20). Enter all schedule times using a 12 hour clock. For example, to enter 6 AM you would enter a 0 + 6 + 0 + 0 and select AM. For 11 PM you would enter a 1 + 1 + 0 + 0 and select PM. User Menu XR150/XR350/XR550 User’s Guide... -
Page 47: Delete A Schedule
6. The keypad displays the next schedule number allowing you The keypad displays ENTER SCHEDULE and the schedule to enter additional programming. To exit the user menu name. To edit the name press any Select key to make press the Back Arrow key. changes. Press COMMAND to proceed. XR150/XR350/XR550 User’s Guide User Menu... -
Page 48: Setting Holiday Abc Schedules
The display changes to END TIME? This is followed by the when HOL schedules are used. For information on setting holiday display – : AM PM. schedules for Area, Output, and Door, see Setting Holiday ABC Enter a new time. Schedules. Enter all schedule times using a 12 hour clock. For example, to enter 6 AM you would enter 0 + 6 + 0 + 0 select AM. For 11 PM you would enter 1 + 1 + 0 + 0 and select PM. User Menu XR150/XR350/XR550 User’s Guide... -
Page 49: Setting The Date And Time
Enter up to 2 digits for the year. FAVORITE XX ACTIVATED (XX = Favorite number entered). If Press COMMAND. the Favorite activation is unsuccessful, the keypad displays FAVORITE XX NOT PROGRAMMED. The display returns to the TIME DAY DATE display. Press the Back Arrow key to exit the User Menu. XR150/XR350/XR550 User’s Guide User Menu... -
Page 50: Display Events
Your user code profile may be programmed for Service Request. This User Menu feature allows you to simply press any Select key when SERVICE REQUEST? displays and have the system automatically send a “Request for Service” message to the central station. The display changes momentarily to REQUEST MADE to confirm your request was sent. System Setup XR150/XR350/XR550 User’s Guide... -
Page 51: System Setup
System Setup Record Keypad Record This System Setup section allows you to track the current and Note: XR150 systems support 8 keypad devices. XR350 and XR550 future status of the programmable options on your system. If systems support 16 keypad devices. changes are made to the system, update the information contained... -
Page 52: Key Fob Button Programming
Which keypads provide Door Access reports? 1 2 3 4 5 7 8 6 10 11 12 9 13 14 15 N/A 16 System Setup XR150/XR350/XR550 User’s Guide... -
Page 53: Area Names And Numbers Record
23 ___________________________________________________ ___________________________________________________ 24 ___________________________________________________ ___________________________________________________ 25 ___________________________________________________ 10 ___________________________________________________ 26 ___________________________________________________ 11 ___________________________________________________ 27 ___________________________________________________ 12 ___________________________________________________ 28 ___________________________________________________ 13 ___________________________________________________ 29 ___________________________________________________ 14 ___________________________________________________ 30 ___________________________________________________ 15 ___________________________________________________ 31 ___________________________________________________ 16 ___________________________________________________ 32 ___________________________________________________ XR150/XR350/XR550 User’s Guide System Setup... -
Page 54: Favorite List
____________ _________________________________________________________________________________ ___________ ____________ _________________________________________________________________________________ ___________ ____________ _________________________________________________________________________________ ___________ ____________ _________________________________________________________________________________ ___________ ____________ _________________________________________________________________________________ ___________ ____________ _________________________________________________________________________________ ___________ ____________ _________________________________________________________________________________ ___________ ____________ _________________________________________________________________________________ ___________ ____________ _________________________________________________________________________________ ___________ ____________ _________________________________________________________________________________ ___________ ____________ _________________________________________________________________________________ ___________ ____________ _________________________________________________________________________________ System Setup XR150/XR350/XR550 User’s Guide... -
Page 55: User Profiles Record
User Profiles Record Note: For All/Perimeter or Home/Sleep/Away systems use the default profiles 1 through 10. For Home/Sleep/Away with Guest systems use the default profiles 2 through 9 for the main house system, default profiles 12-19 for the Guest 1 house system, and default profiles 22-29 for the Guest 2 house system. Profile Name XR150/XR350/XR550 User’s Guide System Setup... -
Page 56: User Codes Record
User Codes Record As you add new users or change current user codes, you can keep track of their profile number in the system. Use the following table to track custom user codes in your system. Only 4-digit user codes can be assigned to All/Perimeter, Home/Sleep/Away, or Home/Sleep/ Away with Guest system users. Profile Profile User # User Name User # User Name System Setup XR150/XR350/XR550 User’s Guide... -
Page 57: Schedules Record
: _M : _M : _M : _M : _M : _M : _M : _M : _M : _M : _M : _M : _M : _M : _M : _M : _M : _M XR150/XR350/XR550 User’s Guide System Setup... -
Page 58: Holiday Date Record
A or B or C 39. ____/____ A or B or C Use the Output number in the User Menu when setting Output 19. ____/____ A or B or C Schedules or using the Outputs ON OFF option to manually toggle 40. ____/____ A or B or C 20. ____/____ A or B or C the relays. Appendix A XR150/XR350/XR550 User’s Guide... -
Page 59: About The Display Events Section
FRST DATE: 8/21. Press any Select key and enter a 4-digit Display Events or press SRT to define a new sort. beginning date for the sort. Press COMMAND. 5. The keypad displays LAST DATE: 10/17. Press any Select key and enter a 4-digit ending date for the sort. Press COMMAND. XR150/XR350/XR550 User’s Guide Appendix A... -
Page 60: Arming And Disarming Event Displays
SVC - Service smoke detector Note: You may sometimes see the user as SWG. This is short for LOW - Low battery MIS - Missing wireless transmitter Swinger Bypass which is an automatic function that allows the Note: LOW and MIS are for wireless systems only. system to automatically bypass a zone. Appendix A XR150/XR350/XR550 User’s Guide... -
Page 61: Door Access Event Displays
The days display using three letters. Press the first Select key to display the scheduled Opening time and once again for the scheduled Closing time. 024 - User number of the person who made the change. Press the third Select key under 024 to display the user name. XR150/XR350/XR550 User’s Guide Appendix A... -
Page 62: Wireless Jamming Event Displays
11:41A 10/17 occurred on October 17 at 11:41 WIRELESS Wireless Trouble Event Types - There are two event types: TBL - Trouble RST - Restore Note: Trouble and Restore events display WIRELESS as the device. Appendix B XR150/XR350/XR550 User’s Guide... -
Page 63: Appendix B
-BYPAS = the zone is bypassed to enter another -BAD O = the zone is open -BAD O = the zone is open zone number. -BAD S = the zone is shorted -BAD S = the zone is shorted XR150/XR350/XR550 User’s Guide Appendix B... -
Page 64: Bypass Zones Browser
BYP to Bypass the zone. The display returns to Selecting RMV the ZONE: prompt Selecting ADD places removes the zone ZONE: - RST BYP allowing you to enter the zone in monitor mode. from monitor mode. another zone number. Appendix B XR150/XR350/XR550 User’s Guide... -
Page 65: Add User Codes Browser
KATIE SMITH USER 012 data entry keys to enter a new user name. Press any SELECT key/area to clear this name. See the Entering User Names diagram in Appendix B. XR150/XR350/XR550 User’s Guide Appendix B... -
Page 66: Delete User Codes Browser
COMMAND when finished. If this is the user you want to delete, press any SELECT key/area. USER NUMBER: 013 Verify the user number. PROFILE 012 ADDED Press COMMAND. USER 13 DELETED Appendix B XR150/XR350/XR550 User’s Guide... -
Page 67: Change User Profiles Browser
Verify the profile number. Follow the prompts to complete the profile Press COMMAND. Press the COMMAND change. key to delete the profile. PROFILE 12 DELTD When you complete changes PROFILE 12 CHNGD to the profile, press COMMAND. XR150/XR350/XR550 User’s Guide Appendix B... -
Page 68: Output Groups Browser
The next output group name displays. WINDOWS . . . OUTPUT: 127 ON OFF The display shows the door or output number. DOOR: 128 ON OFF Press any Select key/area and the output group FRONT OFFICE number displays. Appendix C XR150/XR350/XR550 User’s Guide... -
Page 69: Appendix D
Pressing the 9 key provides you Pressing the 0 (zero) key provides with Y, Z, and a space to use you with a – (dash), . (period), between names. For example: * (asterisk), and a # (pound sign). BOB SMITH. XR550/XR350/XR150 User’s Guide Appendix D... -
Page 70: Dmp Wireless Description
LED lights once as shown in the table below. LED Color Duration Description 2.0 Seconds All System On Green 2.0 Seconds All System Off System On Green/Red 2.0 Seconds (Some Areas Armed) When a button programmed as Unused is pressed, the LED does not operate. Appendix E XR550/XR350/XR150 User’s Guide... -
Page 71: Easy Entry™ User's Guide
Select NO to arm or disarm individual areas. Select YES, or simply wait, and the keypad automatically arms or disarms all areas for which you are authorized. XR550/XR350/XR150 User’s Guide Appendix F... -
Page 72: Arming And Disarming An All/Perimeter System
Using the Access Reader for User Menu Access You can also use a card reader to access the User Menu. When MENU? NO YES displays, select YES and enter a code when requested. Appendix E XR550/XR350/XR150 User’s Guide... -
Page 73: Appendix F
Subject: System Message panel sent the message. John's Home System has an AC Power Failure. For alarm messages sent to a cell phone number, you have the Message sent at 10:02 AM option to reply with “cancel” to cancel the existing alarm. Examples of email messages XR550/XR350/XR150 User’s Guide Appendix F... -
Page 74: Myaccess™ Text Messaging Commands
ARM, AWAY, or ALL: To arm all areas, depending on your comma should separate the areas. If only DISARM is sent, all areas system will be disarmed. If the system is already disarmed, you will receive a message saying the system is already disarmed. Appendix F XR550/XR350/XR150 User’s Guide... -
Page 75: Cancelling An Alarm With Text Messaging
1. To activate a Favorite, text ACTIVATE followed by the Favorite 3. To turn a specific light off, text TURN OFF followed by the name. For example, to activate the Favorite named House light name. For example, to turn Bedroom Light off, you Lights, you would text: ACTIVATE HOUSE LIGHTS. would text: TURN OFF BEDROOM LIGHT. XR550/XR350/XR150 User’s Guide Appendix F... -
Page 76: Check Armed Status Text Command
Text the word SUBSCRIBE to show the current subscription status and the available subscription options. 2. To receive the Status of Z-Wave compatible locks, text: STATUS LOCKS. 3. To receive the Status of Z-Wave compatible thermostats, text: STATUS THERMOSTATS. Appendix F XR550/XR350/XR150 User’s Guide... -
Page 77: Frequently Asked Questions
The keypad now displays 2HR 4HR 6HR 8HR. Select the number of hours to extend the schedule. If the system is not armed by the scheduled closing time, a Late to Close report is sent to the central station. If the schedule is extended, a Schedule Change report may be sent to the central station. XR550/XR350/XR150 User’s Guide Appendix F... -
Page 78: Common Keypad Displays
The user must exit the area through the proper door. If FAILED TO EXIT to re-enter an area from which they did not exit not possible, your system administrator should select properly. the Forgive option in the User Codes menu. Appendix F XR550/XR350/XR150 User’s Guide... - Page 79 Door Access 10, 24, 52 Display 25 Central Station Monitoring 11 Disarming 16 Armed Status 12 Clear Touch™ Keypad Door Strike 62 Arming 11, 13, 15 Panic Icons 5 All/Perimeter System 17, 63 CLOSING TIME! 36 XR550/XR350/XR150 User’s Guide Appendix F...
- Page 80 How Your System Operates 13 Extending Schedules 10, 21, 41 Extend (EXT) 37 Monitoring 11 Holiday (HOL) 37 Instant Arming 18 Multi-lingual Display 6, 23 Output (OUT) 37 Instant Zone 11 Record 48 Setting Holiday ABC Schedules 39 Appendix F XR550/XR350/XR150 User’s Guide...
- Page 81 Zone Monitor 27 Deleting 34, 57 Browser 55 Names 33, 60 Zone Status 12, 26 Numbers 33 Browser 54 Record 47 User Disarm and Entry 9, 60 User Menu Options 23 Alarm Silence 24 Armed Areas Display 25 XR150/XR350/XR550 User’s Guide Index...
- Page 84 LT-1278 1.01 © 2013 Digital Monitoring Products, Inc. 13315...
Need help?
Do you have a question about the XR150 and is the answer not in the manual?
Questions and answers
What does the blue button on the key fob do. The button at 3 o'clock