
Related Manuals for Chiayo Q-200


Summary of Contents for Chiayo Q-200
-
Page 1: Operation Manual
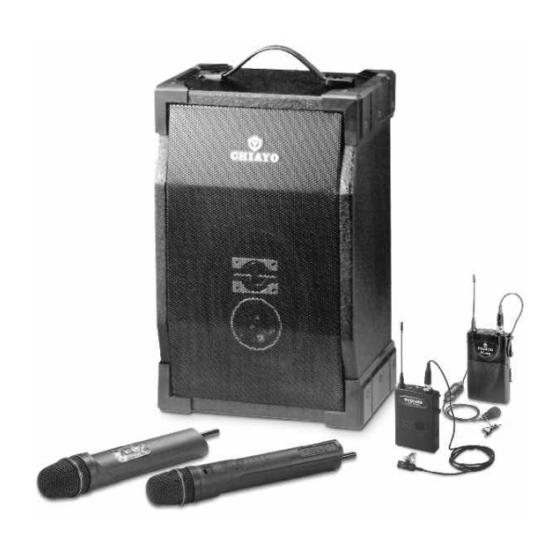
Q-200 / Q-300 / M-2 00 / M-300 (VHF) Q-800 / Q-809 / M- 800 / M-809 (UHF) OPERATION MANUAL... - Page 2 General Congratulation for owning this all-in-one portable sound system. Please read this operating instruction thoroughly to fully understand its controls and functions. The following table gives an overview of the various Dynasty 1000 versions. NO. OF Models TAPE BATTERY CHANNEL U1CA U1CR U1TA...
-
Page 3: Battery Status Indicator
Rear panel configuration ( TAPE ) 1. MIC IN XLR/PHONE COMBO JACK BALANCED/UNBACANCED 2. RF INDICATOR 1 RF INDICATOR 2 RECEIVER WM 1 POWER SWITCH AND VOLUME CONTROL RECEIVER WM2 PWR SWITCH 22 23 24 & VOLUME CONTROL LINE IN AND VOLUME CONTROL CASSETTE DECK VOLUME CONTROL TONE CONTROL... -
Page 4: Lcd Display
Rear panel configuration ( CD-1 ) 1. MIC IN XLR/PHONE COMBO JACK BALANCED/UNBACANCED 2. RF INDICATOR 1 RF INDICATOR 2 RECEIVER WM 1 POWER SWITCH AND VOLUME CONTROL RECEIVER WM2 PWR SWITCH & VOLUME CONTROL LINE IN AND VOLUME CONTROL CD DECK VOLUME CONTROL TONE CONTROL LINE OUT... - Page 5 Rear panel configuration ( CD-2 ) 1. MIC IN XLR/PHONE COMBO JACK BALANCED/UNBACANCED 2. RF INDICATOR 1 RF INDICATOR 2 RECEIVER WM 1 POWER SWITCH AND VOLUME CONTROL RECEIVER WM2 PWR SWITCH & VOLUME CONTROL LINE IN AND VOLUME CONTROL CD CK VOLUME CONTROL TONE CONTROL LINE OUT...
- Page 6 COMPANION SPEAKER Fig 4.
- Page 7 Rear panel configuration ( Fig. 2, 3, 4 & 5 ) The rear panel is divided into two different segments or modules as follow : Cassette Recorder or CD player Module Cassette Recorder Module ( Fig. 2 ) 1.Eject key 2.Counter 3.Variable Speed Control 4.Auto Reverse indicator...
- Page 8 The Power Supply and basic Battery Management. The power supply of Dynasty 1000 system comes from the two pieces of 12V / 4.5 AH built-in rechargeable batteries ( maintenance free Lead Acid type, which has no memory effect ) . An understanding and knowledge of rechargeable battery is imperative in the operation of the portable sound system as it helps to give a trouble-free operation of this system.
- Page 9 Operating the Wireless Microphone System. To use the First wireless system, switch on the receiver module power supply switch WM1(4) . Switch on the corresponding matching transmitter or handheld microphone ( please refer to the operating instruction of the individual transmitter ). When RF signal is being received by the receiver, the receiver RF signal indicator 1 ( 2 ) will light up.
- Page 10 Operating the Cassette Recorder Keys Functions FF Fast Forward Press this key for fast forward . Press this key for play in forward direction. FP Forward Play Stop Press this key to stop the tape. RP Reverse Play Press this key for play in reverse direction. Press this key for fast reverse.
- Page 11 CD-1 CONTROLS Keys Explanation PLAY / PAUSE When it is pressed during STOP , PLAY will start after track search. When it is pressed during PLAY, it will change to PAUSE and the word PLAY flashes. When it is pressed during PAUSE, it will change to PLAY. STOP When it is pressed at PLAY mode, CD will STOP .
- Page 12 CD-2 CONTROLS PROG Program button. Select the desired song. To store the , Press ENTER key. SHUFFLE Pressing of this key will pick and play the song in random STOP When it is pressed at PLAY mode, CD will STOP . PLAY / PAUSE When it is pressed during STOP , PLAY will start after track search.
- Page 13 ! 2.The frequency of the 2nd module MUST be from the non-interference list recommended by Chiayo. 3.It is advisable to plug in the same type of receiver as the 1st one to get the same performance.
-
Page 14: Specification
120 V / 230 V AC 3A or 24 - 35 V DC Recharge Time 10 Hour Receiver Module UHFor VHF band Wired microphone Chiayo or other compatible brand Mic In XLR / Phone Conbo jack * 1 Handheld / Lavalier / Headset Wireless microphone Output... -
Page 15: Hand-Held Microphone
Battery compartment Color Cap Battery Q-200 / Q-209 / Q-800 / Q-809 use a 9V battery for power. To change or replace the battery, Please remove the color cap first, then press at the bottom of battery compartment to release the cover as... - Page 16 Sensitivity Switch These microphones have a sensitivity switch, For close mouth singing or normal speech please put the switch to N (normal) position. For tripod-mount speech, please put the switch to H (high) position. SENS SENS Low Sensitivity High Sensitivity Changing of capsule These microphone have a module design.
-
Page 17: Operating Instructions
Operating instructions Before operation, please check and make sure that transmitter & receiver are of matching frequency or frequency group (for PLL version). For PLL version, further verify that the channel selected at both ends are of the same. To switch on the microphone, put the switch to "ON" position. The green LED indicator will light on indicates that battery is fresh. -
Page 18: Belt-Pack Transmitter
Belt-Pack Transmitter Four different transmitters ( see table below ) are sharing this operating manual, please go through it thoroughly before operation. The basic operations of all the above transmitters are almost the same. However, sometimes they use different connectors to suit different requirements. -
Page 19: Installation Of Batteries
Installation of batteries This transmitter uses 3 pieces of " AA " size batteries (Alkaline battery is recommended ). To install or remove the batteries, press the release buttons at the edges of the transmitter to open or close the cover as illustrated ( Fig.2 ). When installing the batteries with the cover open toward you, the cover might block your hand. - Page 20 Installation of Lavalier / Headset microphones or instrument inputs. Depending on customer requirements, Lavalier / Headset microphone or instrument inputs could be connected to the transmitter via the audio input connector. User is free to choose the various input sources but is advised to take note that connector used must be compatible to each other.
- Page 21 Installation of cable restraint To prevent contact noise caused by constant tension applied to the connector,, a cable restraint is designed such that tension is totally reduced when it is properly used ( see Fig.9 ). When the audio cable go through the cable restraint, it could prevent sweat from going diectly into the electronic board via the connector.
-
Page 22: Line Control
Line Control This is a Chiayo unique Line Control. The purpose of the L ine Control is to control : Max. gain before feedback Remote control of the Gain The Line Control is designed such that when Max. Gain before feedback is achieved, a disable switch could lock out the function of the Line Control to prevent accidental adjustment of the control. - Page 23 Input Level Gain Control Adjustment Low impedance ( Lo-Z ) " MT" & high impedance ( Hi-Z ) " GT" gain controls are situated inside the transmitter as shown in Fig 10. Gain controls are adjustment por ts that enable you to use microphones of differing output levels and Guitar or instruments with Hi-Z output.
Need help?
Do you have a question about the Q-200 and is the answer not in the manual?
Questions and answers