
Related Manuals for Teltonika UM1000


Summary of Contents for Teltonika UM1000
- Page 1 TELTONIKA ModemUSB/G10 (UM1000) User Manual v0.2 Address: Žirmūnų g. 27, Vilnius LT-09105, Tel.: +370 5 2127472, Fax: +3705 276 1380, E-mail: info@teltonika.lt...
-
Page 2: Table Of Contents
ModemUSB/G10 Users Manual TABLE OF CONTENTS TABLE OF CONTENTS..........................2 ATTENTION............................3 FOR YOUR SAFETY ..........................3 USER‘S SERVICE ........................... 5 BASIC INFORMATION ........................6 Introduction............................6 Legal Notice............................6 Contacts............................. 6 Acronyms ............................6 PACKAGE CONTENTS........................7 TECHNICAL SPECIFICATION......................7 Data transferring .......................... -
Page 3: Attention
ModemUSB/G10 Users Manual 1. ATTENTION All wireless devices for data transferring are susceptible to interference, which could affect performance Service personnel may install driver of this product. We strongly recommend read this user manual before start installation. The device is not water-resistant. Keep it dry. IMPORTANT NOTES! It is mandatory to read the notes and manual carefully before starting to use the device. - Page 4 ModemUSB/G10 Users Manual If the device fails to work properly, only qualified personnel may repair this product. We recommend to dismantle the device and forward it to repair centre or to the manufacturer. The modem does not contain any parts, which can be replaced. At the installation site, supply circuits should have protective devices (bipolar back up protection device) which will protect from short-circuit and wrong ground installation.
-
Page 5: User's Service
ModemUSB/G10 Users Manual The device should not be connected to PC before the installation of the drivers. SIM card is mandatory for setting up connection to the GSM network. However, the manufacturer of this equipment does not supply the SIM card. The SIM card can be purchased from your GSM (mobile) service provider! For APN, user name and password please contact your GSM (mobile) service provider. -
Page 6: Basic Information
ModemUSB/G10 supports the following data-bearers: CSD, GPRS and SMS. Legal Notice Copyright © 2007 TELTONIKA Ltd. All rights reserved. Reproduction, transfer, distribution or storage of part or all of the contents in this document in any form without the prior written permission of TELTONIKA Ltd is prohibited. -
Page 7: Package Contents
ModemUSB/G10 Users Manual 5. PACKAGE CONTENTS ModemUSB/G10 modem is packed in a box and contains all the accessories required for normal operation: ModemUSB/G10 modem. CD with User Manual and drivers. “USB A jack ↔ USB A socket“ connection cable. Leaflet “Quick Start Guide”. Note: The manufacturer does not supply the SIM card, which is mandatory for setting up a connection to the GSM network! The SIM card may be purchased from your GSM (mobile) service provider!! -
Page 8: Indication
ModemUSB/G10 Users Manual Indication A LED indicator “Power“ is located on the side of ModemUSB/G10. This LED indicates the operating mode and failure conditions of the modem. Modem operating modes are described in Table 6.3.1. A LED indicator “Power“ is located on the side of ModemUSB/G10. LED‘s Status Description „Power“... -
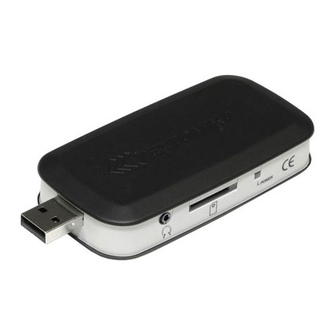
Page 9: Mechanical Characteristics
ModemUSB/G10 Users Manual Mechanical characteristics ModemUSB/G10 modem housing is made of plastic. External view and measurements (in mm) of the device are shown in Figure 6.5.1. 42.0 15.1 85.5 Figure 6.5.1. External view of ModemUSB/G10 7 HOW TO START? Before you begin make sure that: You have a GSM SIM card with data transfer service activated. - Page 10 ModemUSB/G10 Users Manual Advanced User: Can press Browse button to choose specific folder where you will install Modem Control Tool. To continue installation plug in your ModemUSB/G10 now and click OK...
-
Page 11: Driver And Software Installation On Windows Vista
ModemUSB/G10 Users Manual Driver and Software Installation on Windows Vista Notice: For first time ModemUSB/G10 modem can only be connected to the PC during the driver installation. Insert the CD into CD-ROM. Click Install in automatically opened window. If the window did not appear, run autorun.exe file located on the CD in Software catalog. -
Page 12: Software Description
To run the Modem Control Tool, double click the MCT pictogram located on the desktop, or go to Start → Programs → Teltonika ModemUSB G10 → Modem Control Tool USB G10. If the program is being run for the first time or there are more than one modems installed, a window asking to select modem from the list will appear. -
Page 13: Connecting To Internet
ModemUSB/G10 Users Manual If PIN code request is active in your SIM card, a window for inserting the PIN code will appear. If you will enter wrong PIN code three times in a row, the program will ask to enter the PUK code! When the required data inserted correctly, click OK and the main Modem Control Tool window will open. - Page 14 ModemUSB/G10 Users Manual In order to connect to the Internet, enter the required data in Connection window. In the main MCT window click Settings → Connection. Enter connection data as shown below. To save the entered data, click Update. Before connecting to the Internet, check the GSM signal quality (see the indicator located on the right side of the Modem Control Tool program).
-
Page 15: Sending Sms
ModemUSB/G10 Users Manual If the ModemUSB/G10 modem connects to the Internet, indicator denoted as Disconnected on the left corner of MCT window turns green and will be denoted as Connected. When connected to the Internet, on the left side of MCT you will be able to monitor downloaded/uploaded traffic, upload/download speed and time while connected. - Page 16 ModemUSB/G10 Users Manual To make a reply to the message, click Reply. To close the window – Close.
-
Page 17: Settings Of Modemusb/G10
ModemUSB/G10 Users Manual 7.3.4 Settings of ModemUSB/G10 To set ModemUSB/G10 modem parameters or to change them, click Settings in the main Modem Control Tool window. If you click Main in the Settings window, you will be able to choose a modem from the list of modems installed in your PC. - Page 18 ModemUSB/G10 Users Manual SMS center number is shown in Settings → SMS. To change Modem Control Tool program language, go to Settings → Application. In Application window choose the language from Set Language field and click Update Language.
- Page 19 ModemUSB/G10 Users Manual Click About to see the Modem Control Tool program version and other Information.
-
Page 20: Uninstalling Modemusb/G10
To uninstall ModemUSB/G10 modem, plug it off from the USB port of the PC, and go to Start → Programs → Teltonika ModemUSB G10 → Uninstall. A uninstall window will appear. Now the ModemUSB/G10 modem is completely removed from the operating system of your PC. -
Page 21: Technical Support
ModemUSB/G10 Users Manual 8 TECHNICAL SUPPORT Unforeseen cases and alternative modes 1. Modem Control Tool does not detect the modem. Solution: Check if the device is connected to the PC and its “Power” LED is ON. Reboot the PC and Modem. 2.
Need help?
Do you have a question about the UM1000 and is the answer not in the manual?
Questions and answers