Table of Contents
Advertisement
RINNAI
Lumina
Open Fire Operation Manual and Installation Guide
This appliance shall be installed in accordance with:
• Manufacturer's Installation Instructions
• Local Gas Fitting Regulations
• Municipal Building Codes
• A.G.A. Installation Code AG601/AS5601/NZS:5261 Gas Installations
• Any other local relevant statutory Regulation
This product is only to be installed with an approved Rinnai flue system.
It is primarily a decorative appliance not certified as a space heater.
Installation and Service must be performed by an authorised person.
INSTALLER: PLEASE LEAVE THIS MANUAL WITH THE CUSTOMER
AFTER INSTALLATION
OWNER: PLEASE RETAIN THIS MANUAL FOR FUTURE REFERENCE
1
Rinnai New Zealand
LUMINA
Advertisement
Table of Contents

Related Manuals for Rinnai LUMINA800BL


Summary of Contents for Rinnai LUMINA800BL
- Page 1 This appliance shall be installed in accordance with: • Manufacturer’s Installation Instructions • Local Gas Fitting Regulations • Municipal Building Codes • A.G.A. Installation Code AG601/AS5601/NZS:5261 Gas Installations • Any other local relevant statutory Regulation This product is only to be installed with an approved Rinnai flue system. It is primarily a decorative appliance not certified as a space heater. Installation and Service must be performed by an authorised person. INSTALLER: PLEASE LEAVE THIS MANUAL WITH THE CUSTOMER AFTER INSTALLATION OWNER: PLEASE RETAIN THIS MANUAL FOR FUTURE REFERENCE Rinnai New Zealand LUMINA...
-
Page 2: Limited Warranty
Please keep these instructions in a safe place for future reference. RECORD AND ATTACH YOUR PROOF OF PURCHASE BELOW: Your Retailer:____________________________________________________________ Name:__________________________________________________________________ Address:______________________________________________________________ ________________________________________________________________________ Telephone:( _______ ) __________________________________________________ Date of Purchase: ______ / ______ / _________ Rinnai New Zealand LUMINA... -
Page 3: Table Of Contents
Customer Information - Troubleshooting ......................8 Installer Information - Dimensions ........................9 Installer Information - Location ..........................10 Installer Information - Framing Dimensions ......................11 Installer Information - Combustible Surface Clearance and Bend Flue Installation ......11 Installer Information - Flue Installation .......................12 Installer Information - Installation Procedure ....................13 Installer Information - Installation Procedure Cont’d ..................14 Installer Information - Gas Connection .......................14 Installer Information - Electrical Connection ....................15 Installer Information - Coals/River Stones ......................15 Installer Information - Test and Commission .....................16 Installer Information - Test and Commission Cont’d ..................17 Installer Information - Technical Specifications ....................17 Installer Information - Wiring diagram ........................18 Installation/Commissioning Checklist .........................19 Installer details ................................19 Customer Contacts ..............................20 Rinnai New Zealand LUMINA... -
Page 4: Customer Information - Safety Points
Do not unplug the appliance while it is in operation. Some floorings will react to heat. Therefore to prevent (Unpluging the appliance will switch it off and will reset discolouration of floor coverings from heat, it is the appliance to its default settings; low combustion and recommended that a fan off.) mat be placed in front of the appliance when it is in operation. When the appliance is operated for the first time or after long periods of non-use a slight odour may be emitted. A dedicated 230~240V 10 Amp power point must be This is normal, however if odours persist switch off the used with this appliance. Do not use power boards or appliance and contact Rinnai. double adaptors to operate this appliance. DO NOT PLACE ARTICLES ON OR AGAINST THIS APPLIANCE. DO NOT USE OR STORE FLAMMABLE MATERIALS NEAR THIS APPLIANCE. DO NOT SPRAY AEROSOLS IN THE VICINITY OF THIS APPLIANCE WHILST IT IS IN OPERATION. Rinnai New Zealand LUMINA... -
Page 5: Customer Information - Operation
Next time the appliance is turned ON, the control system will resume the previous Flame and Fan settings unless the appliance was switched off due to power failure. In case of power failure the Control System will return to the Default setting which is Low Flame and Fan OFF. The Remote Control has all the features of Under gas failure conditions, the appliance the Control Receiver but also an additional will go into Lock Out condition after Timer Function. sparking for 1 minute (approx). Under Lock Out condition the Power LEd will remain By pressing Timer Button once the Pwr LED illuminated. To start the appliance again will start flashing and after 30 minutes the press and release the Power Button twice appliance will shut off automatically. after the gas supply resumes. Pressing the Timer Button again within 30 Note: The appliance will not work minutes of shut off time will reset the timer without electrical power. and the Pwr LED will stop flashing. Rinnai New Zealand LUMINA... -
Page 6: Customer Information - Important Points
8. This appliance discharges a large volume of if used near this appliance when in use. warm air at low level to provide even heat Use of aerosols, paint, polishes, etc distribution. If the air in the room contains whilst this appliance is in use may cause cooking vapour or cigarette smoke, and the unpleasant smells. appliance is used on a carpet, the surface 14. Do not operate/install this appliance of the carpet may become discoloured. in places where painting is taking In addition, some nylon carpets contain place, or in places such as hair dyes which may be affected by the warm dressing salons, where there may be air flow. Some soft vinyl surfaces are also a lot of fluff and dust, and where subject to distortion, or discolouration aerosols are used. by warm air. To prevent discolouration of Rinnai New Zealand LUMINA... -
Page 7: Customer Information - Specifications
Top front louvres Flue: Natural draft round flue (Ø200 Inner Ø250 Outer) Ignition: Electronic spark Power Supply: 230~240v. 50Hz Data Plate Location: Bottom panel, front left hand side Weight: Lumina 800 65 kgs (packaged) Lumina 1000 70 kgs (packaged) IMPORTANT NOTE: Before installation commences, check the data plate and labelling on the appliance to ensure that it is the correct type to suit your gas. If the appliance requires conversion to suit your gas, this must be carried out only by an Authorised Technician who has the Appropriate Gas Pressure Measuring Equipment. Rinnai New Zealand LUMINA... -
Page 8: Customer Information - Troubleshooting
If the appliance shuts off repeatedly it means it r equires servicing. • NOTE: I f you have any other faults or problems, please refer to your installer or call Rinnai on 0800 Rinnai. • IMPORTANT: D o not remove any panels or attempt to carry out any service work other than that m entioned in the trouble shooting chart. -
Page 9: Installer Information - Dimensions
Installer Information - Dimensions THIS BOOK CONTAINS IMPORTANT INFORMATION. PLEASE KEEP IT IN A SAFE PLACE FOR FUTURE REFERENCE. THE MANUFACTURER RESERVES THE RIGHT TO CHANGE OR MOdIFy SPECIFICATIONS WITHOUT NOTICE. THIS INSTRUCTION MANUAL APPLIES TO: RINNAI INBUILT GAS FIRES - LUMINA 1000B, LUMINA 1000SS, LUMINA 8000B AND LUMINA 800SS BLACK STAINLESS STEEL BLACK STAINLESS STEEL Rinnai New Zealand... -
Page 10: Installer Information - Location
2. Warm air distribution See diagram below. 3. Ensure that the area in which the appliance is installed has adequate fixed ventilation. This fixed ventilation must be provided as per AG601/AS5601 Clause 5.4 to 5.4.5/ NZ5261. 4. The appliance must not be installed where 1/2X + 50 (150) curtains or other combustible materials could come into contact with it. In some cases, curtains may need restraining. 50 Maximum at 300 above See below for minimum clearances required. 300mm 300mm 300mm 1000mm 5. A gas appliance must not be connected to a chimney flue serving a separate solid-fuel burning appliance. Rinnai New Zealand LUMINA... -
Page 11: Installer Information - Framing Dimensions
NOTE: HEIGHT dOES NOT INCLUdE ANy HEARTH OR FLOOR COVERING UNdER THE UNIT Installer Information - Combustible Surface Clearance and Bend Flue Installation • MINIMUM CLEARANCE FROM INNER FLUE TO COMBUSTIBLE MATERIAL MUST BE GREATER THAN 50mm. • MINIMUM FLUE LENGTH MUST BE 3.6m VERTICAL. • MAXIMUM FLUE LENGTH RINNAI RECOMMEND IS 8.0m. • MINIMUM OF 1.2m OF VERTICAL FLUE IS REQUIREd BEFORE ANY BENDS OR OFFSETS. Rinnai New Zealand LUMINA... -
Page 12: Installer Information - Flue Installation
Installer Information - Flue Installation A Flue Installation Guide and Flue Transition are available to assist with flueing installation. The Flue Installation Guide acts as a template for aligning the flue with the appliance prior to installing the appliance. It therefore enables you to install the flue without the appliance and is ideal for when the wall lining is to be completed before the appliance is installed. It is also recommened for any installation with bends or offsets. (It is not necessary for installations where the appliance is to be installed prior to the wall lining being completed.) The Flue Transition is a sleeve that secures the Flue to the Flue Installation Guide. (Detailed installation instructions accompany the Flue Installation Guide and Flue Transition) Note: The Flue Installation Guide is not designed to support the weight of the Flue System. Neither should the weight of the Flue System be supported by the Appliance INSTALLATION WITH INSTALLATION WITHOUT FLUE INSTALLATION GUIdE FLUE INSTALLATION GUIdE Rinnai New Zealand LUMINA... -
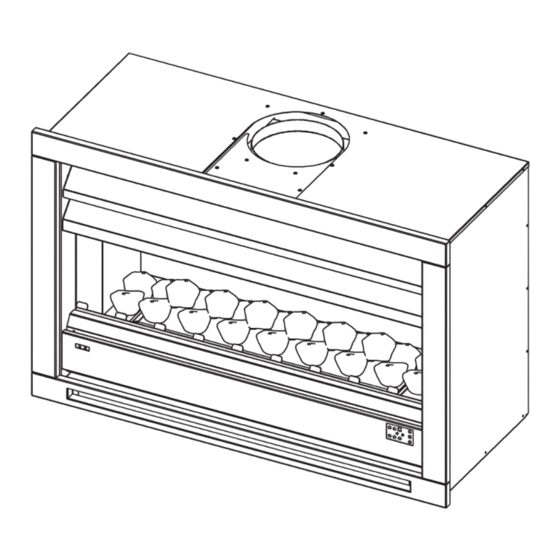
Page 13: Installer Information - Installation Procedure
• and fit together ready for fitting to the Preparation appliance. Refer to the Location and Flueing sections • Installation to make sure the decorative fireplace cavity is suitable for installation before continuing. Slide the appliance carefully into the cavity, while feeding the Stainless Steel Flexitube Place the appliance on a flat surface. through the supply access opening at the Remove the four screws holding the Front left hand rear. Take care not to damage Panel Assembly in place (1). the Stainless Steel Flexitube or any of the Disconnect the Cat 5 Cable from Control components inside the appliance while Receiver fitted on the rear RH side of Front sliding the appliance into the cavity. Panel Assembly (2). 1. Front Panel Assembly 2. Control Receiver 3. Flue Cover Assembly 4. Reflectors (Note: Installer must peel protective covering from panels before installing) 5. Decorative Grate (Note: The Decorative Grate is supplied with the Lumina Black models only) Rinnai New Zealand LUMINA... -
Page 14: Installer Information - Installation Procedure Cont'd
Installer Information - Installation Procedure • There are two levelling screws in the base of Fit appliance into place the appliance held in place with locknuts. When the appliance is in place and properly If the appliance does not sit flat when in place, secured, attach the Stainless Steel Flexitube it may be necessary to adjust these. to the Gas Control Inlet Adaptor. For flue installation, please follow the flue NOTE: On completion of work a gas installation instructions on Page 11 & 12. leak test must be carried out. Once the appliance is sitting flat, attach it to Use a soapy solution on all gas the wall using four holes (two per side) in the connections. Leaks will be visible when front flanges. the soapy solution forms bubbles. When finished, wipe soapy solution with a rag to remove residue. Installer Information - Gas Connection Rinnai New Zealand LUMINA... -
Page 15: Installer Information - Electrical Connection
Refer to an electrician for local codes. Installer Information - Coals/River Stones Stack the remaining 6 Coals/River Stones Remove Coals/River Stones & granules from on top of the bottom layer of Coals/River the accessory box. Stones as shown in Diagram B. Stack Coals/River Stones evenly in two rows While placing the Coals/River Stones extra of (Approx Gap 15mm) on top of Ceramat care must be taken not to damage the Burner as shown in Diagram A. Ceramat (Black fibres on top of the burner). Place all the granules in the space Please do not operate the appliance if you between the Coals/River Stones evenly observe any damage to the Ceramat during on top of Ceramat Burner. To avoid the installation or after use. Granule Dust going into the Ceramat, don’t pour the granules. Using the appliance with damaged Ceramat could be dangerous. Take care not to drop the granules on the base panel, which contains electronic components. The burner may need to be replaced. DON’T FORGET GRANULES PLACE GRANULES ON TOP OF CERAMAT IN THE SPACE BETWEEN COALS/RIVER STONES EVENLY. Rinnai New Zealand LUMINA... -
Page 16: Installer Information - Test And Commission
Support - refer to item 4 in the exploded Operating Valve (POV) to the maximum view on page 13. NOTE: Ensure you peel condition. Use a 10mm spanner to screw in the plastic protective coating from the Nut A to increase the outlet pressure and screw two Side Reflectors. it out to decrease the pressure. • All burner aerations are factory preset and cannot be adjusted. • If you are unable to get the unit to operate correctly, refer to Troubleshooting on Page 8 before contacting your local service contact as listed on Page 20. • It may take approximately 2 hours of operation for the coals/river stones to achieve their full flame pattern and glow. • During the initial burning in period, some smoke and smell may be experienced, the appliance should be run on the high position in a well ventilated room until these dissipate. Gas Control & Ignition Pack Assembly Rinnai New Zealand LUMINA... -
Page 17: Installer Information - Test And Commission Cont'd
On base panel to the right hand side of gas control. Gas Control: SIT modulating gas valve. Gas Connection: 1/2”BSPT male union. Flue Terminal: Ø200mm (Inner) & Ø250mm (Outer) round top discharge. Power Supply: 230~240V 50Hz unit is supplied with 3 pin, 10 Amp plug and supply lead, replace only with Rinnai NZ P/N6765B. Fan: Tangential 2 speed, power rating 60Watts. Combustion System: Ceramat burner. Coals/River Stones: Ceramic. Ignition System: Continuous spark intermittent Pilot ignition system. Operation: Soft touch buttons and remote control to light pilot and burners. Safety Device: Overheat thermal cutout switch & Tip over switch. Combustion method: Naturally aspirated burner. Installation Type: Inbuilt only. Flue Requirement: A minimum flue height of 3.6m is required and it may be necessary to extend beyond this, to a maximum of 8.0m. A minimum of 1.2m of vertical flue is required before any bends or offsets. A maxium of two 45 bends may be used. Rinnai New Zealand LUMINA... -
Page 18: Installer Information - Wiring Diagram
Installer Information - Wiring Diagram If the supply cord is damaged or requires replacing, it must be replaced by the manufacturer or the manufacturer’s agent or similarly qualified person in order to avoid a hazard. The supply cord must only be replaced with a genuine Rinnai spare part. Rinnai New Zealand LUMINA... -
Page 19: Installation/Commissioning Checklist
Installation/Commissioning Checklist 1 Was a fireplace inspection carried out? (i.e. clearances, combustibles etc.) 2. Was a Rinnai approved flue system installed? 3. Has specified gas pressures been checked and set? 4 Are Coals/River Stones located correctly? 5. Have the granules been placed evenly on top of the burner, free of dust and powder? 6. Has the appliance been test fired for correct operation? 7. Is the end-user fully aware of operating procedure? Installer details Company name:__________________________________________________________________ Installers name:___________________________________________________________________ Address:_________________________________________________________________________ ________________________________________________________________________________ Phone: ________________________________ Mobile:___________________________________ Permit number for installation:______________________________________________________ Signed: _______________________________ Date:_____________________________________ Rinnai New Zealand LUMINA... -
Page 20: Customer Contacts
Customer Contacts For more information about buying and living with rinnai gas appliances call 0800 RINNAI (0800 746 624) Rinnai New Zealand Limited 105 Pavilion Drive, Airport Oaks, Mangere PO Box 53177, Airport Retail Centre, Manukau 2150 Email: info@rinnai.co.nz www.rinnai.co.nz All Rinnai appliances meet or exceed the safety standards required by New Zealand gas and electrical regulations. Rinnai is constantly improving its products and as such specifications are subject to change or variation without notice. RINNAI Lumina PART NUMBER 10737 Issue C Rinnai New Zealand LUMINA...
Need help?
Do you have a question about the LUMINA800BL and is the answer not in the manual?
Questions and answers