Table of Contents
Advertisement
INSTRUCTION MANUAL
ROTATING LASER
RL-H4C
Class 3R Laser Product
・ Please read this operator's manual carefully before using this product.
・ Verify that all equipment is included.
"STANDARD EQUIPMENT"
・ The specifications and general appearance of the instrument, and the content of this manual are
subject to change without notice.
・ Some of the diagrams shown in this manual may be simplified for easier understanding.
PRECAUTIONS FOR SAFE OPERATION
For the safe use of the product and prevention of injury to operators and other persons as well as
prevention of property damage, items which should be observed are indicated by an exclamation
point within a triangle used with WARNING and CAUTION statements in this operator's manual.
The definitions of the indications are listed below. Be sure you understand them before reading the
manual's main text.
Definition of Indication
Ignoring this indication and making an operation error could possibly result in
WARNING
death or serious injury to the operator.
Ignoring this indication and making an operation error could possibly result in
CAUTION
minor injury or property damage.
Definition of Symbols
This symbol indicates items for which caution (hazard warnings inclusive) is
urged. Specific details are printed in or near the symbol.
This symbol indicates items which are prohibited. Specific details are printed in
or near the symbol.
This symbol indicates items which must always be performed. Specific details
are printed in or near the symbol.
General
WARNING
Do not use the unit in areas exposed to high amounts of dust or ash, in areas where
there is inadequate ventilation, or near combustible materials. An explosion could oc-
cur.
Do not perform disassembly or rebuilding. Fire, electric shock, burns or hazardous ra-
diation exposure could result.
When securing the instrument in the carrying case make sure that all catches, includ-
ing the side catches, are closed. Failure to do so could result in the instrument falling
out while being carried, causing injury.
CAUTION
Do not use the carrying case as a footstool. The case is slippery and unstable so a
person could slip and fall off it.
Do not place the instrument in a case with a damaged catch or handle. The case or
instrument could be dropped and cause injury.
Tripod
CAUTION
When mounting the instrument to the tripod, tighten the centering screw securely. Fail-
ure to tighten the screw properly could result in the instrument falling off the tripod,
causing injury.
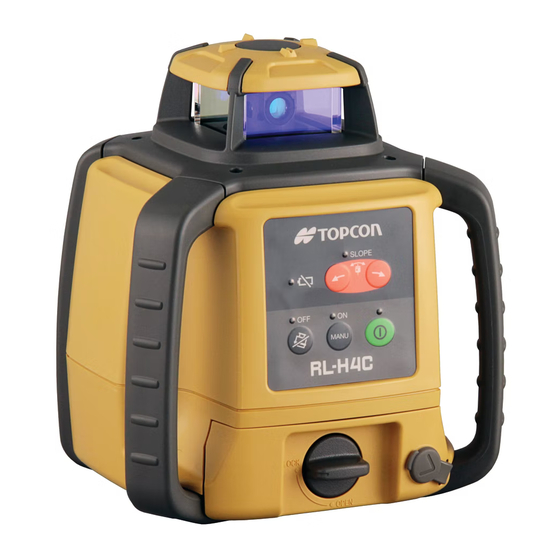
NOMENCLATURE AND FUNCTIONS
Battery power lamp (Red)
Blinking:
The power is low, but laser is
still usable. (Blinking continues
for one minute.)
On Solid:
Dead batteries. Replace the batteries
with new ones. (The lamp is solid for five
minutes, then turned off automatically.)
Manual mode ON lamp (Red)
Auto leveling does not function.
Height alert OFF lamp (Red)
Height alert function is not active.
Height alert OFF key
OFF: Push twice continuously.
ON: Push once.
Height alert function (Refer to the
description on the back page.)
Manual mode ON key
ON: Push twice continuously.
OFF: Push once.
Note:
In manual mode
• Auto-leveling function is not active.
• Height alert function is not active.
• Setting slope function is not active.
MAINTAINING POWER SOURCES
RL-H4C (Replacing dry cell batteries)
1 Remove the DB-74 battery holder by turning battery holder knob to
"OPEN" side.
2 Install the new 4xD size dry cell batteries (alkaline) referring to the
illustration on the battery holder.*1), 2), 3)
3 Install the battery holder. Tighten the battery cover knob to "LOCK"
side.
*1 Replace all 4 batteries with new ones at the same time. Do not mix used and new
batteries, and do not mix different types of batteries together.
*2 Use alkaline dry cells. (Dry cells for movement confirmation are packed in shipment.)
Nickel hydrogen dry cells and nickel cadmium dry cells can be used too, but the
operating time is different from the time of alkaline dry cells.
*3 Generally, performances of dry cell deteriorate temporarily in low temperature, but
recover in normal temperature.
• It is possible to remove the dry cell batteries from the DB-74 battery holder and
use the battery pack BT-74Q.
• The DB-74 dry cell battery holder cannot be used to charge the BT-74Q Ni-MH
battery pack. Use the DB-74C charging battery holder instead.
LS-80L Replacing Battery
1 Keep pushing the battery cover in 1 direction, and then try to slide the cover
in 2 direction.The cover does not move but it will be open.
2 Take out the battery and place a new one (2xAA size alkaline dry cell
batteries) into the battery box.
3 Press the lid down and click to close.
STANDARD EQUIPMENT
Rechargeable battery type
1
RL-H4C Instrument . . . . . . . . . . . . .1pc.
2
Level Sensor (LS-80L). . . . . . . . . . .1pc.
3
Battery holder DB-74C . . . . . . . . . .1pc.
4
Ni-MH battery pack BT-74Q . . . . . .1set
5
AC/DC converter AD-15 . . . . . . . . .1pc.
6
AA-size dry cell batteries*1) . . . . . .2pcs.
7
Model-6 Level Sensor Holder . . . . .1pc.
8
Carrying case . . . . . . . . . . . . . . . . .1pc.
9
Instruction manual . . . . . . . . . . . . . .1vol.
EXCEPTIONS FROM RESPONSIBILITY
• The user of this product is expected to follow all operating instructions and make periodic checks of the product's performance.
• The manufacturer, or its representatives, assumes no responsibility for results of faulty or intentional usage or misuse including
any direct, indirect, consequential damage, or loss of profits.
• The manufacturer, or its representatives, assumes no responsibility for consequential damage, or loss of profits due to any
natural disaster, (earthquake, storms, floods etc.), fire, accident, or an act of a third party and/or usage under unusual
conditions.
• The manufacturer, or its representatives, assumes no responsibility for any damage (change of data, loss of data, loss of profits,
an interruption of business etc.) caused by use of the product or an unusable product.
• The manufacturer, or its representatives, assumes no responsibility for any damage, and loss of profits caused by usage
different to that explained in the operator's manual.
• The manufacturer, or its representatives, assumes no responsibility for damage caused by incorrect operation, or action
resulting from connecting to other products.
CAUTION
Tighten securely the leg fixing screws of the tripod on which the instrument is mounted.
Failure to tighten the screws could result in the tripod collapsing, causing injury.
Do not carry the tripod with the tripod shoes pointed at other persons. A person could
be injured if struck by the tripod shoes.
Keep hands and feet away from the tripod shoes when fixing the tripod in the ground.
A hand or foot stab wound could result.
Tighten the leg fixing screws securely before carrying the tripod. Failure to tighten the
screws could lead to the tripod legs extending, causing injury.
Power Supply
WARNING
Do not use voltage other than the specified power supply voltage. Fire or electrical
shock could result.
Do not short circuit. Heat or ignition could result.
Do not use damaged power cords, plugs or loose outlets. Fire or electric shock could
result.
Do not place articles such as clothing on the battery charger while charging batteries.
Sparks could be induced, leading to fire.
To prevent shorting of the battery in storage, apply insulating tape or equivalent to the
terminals. Otherwise shorting could occur, resulting in fire or burns.
Do not use batteries or the battery charger if wet. Resultant shorting could lead to fire
or burns.
Do not connect or disconnect power supply plugs with wet hands. Electric shock could
result.
Do not use the battery or charger for any other equipment or purpose. Fire or burns
caused by ignition could result.
Use only the specified battery charger to recharge batteries. Other chargers may be
of different voltage rating or polarity, causing sparking which could lead to fire or burns.
Do not use batteries other than those designated. An explosion could occur, or abnor-
mal heat generated, leading to fire.
Do not heat or throw batteries into fire. An explosion could occur, resulting in injury.
CAUTION
Do not touch liquid leaking from batteries. Harmful chemicals could cause burns or
blisters.
PRECAUTIONS
Before starting work or during operation, check that the instrument is functioning correctly and perfor-
mance is normal.
RL-H4C
Make sure all of the following are included.
Dry battery type
1
RL-H4C Instrument . . . . . . . . . . . . 1pc.
2
Level Sensor (LS-80L) . . . . . . . . . . 1pc.
3
Battery holder DB-74 . . . . . . . . . . . 1pc.
4
D-size dry cell batteries*2) . . . . . . . 4pcs.
5
AA-size dry cell batteries*3). . . . . . 2pcs.
6
Model-6 Level Sensor Holder . . . . 1pc.
7
Carrying case. . . . . . . . . . . . . . . . . 1pc.
8
Instruction manual . . . . . . . . . . . . . 1vol.
*1), 2), 3)
Batteries included in the package are to confirm the initial operation. Please replace
the batteries provided with new batteries (alkaline) as soon as possible.
Sight
Protective glass
Rotary head
Laser beam emits from here.
Slope lamp (Green)
Red: Error
Aligning Direction of Slope (Refer to
the description on the back page.)
Slope key
Tilts beam plane in direction of arrow
This key does not function during auto leveling
and in the "Manual" mode.
Aligning Direction of Slope (Refer to
(1 9/16")
the description on the back page.)
Auto leveling lamp (Green)
Blinking quickly : Auto leveling is in process.
Auto leveling function
(Refer to the description below.)
Blinking slowly : Auto leveling is almost complete.
On Solid : Auto leveling is complete.
Power switch
Turn the instrument ON or OFF.
On-Grade
Index
Control panel
Battery holder knob
Battery holder
Handle
Charging connector (only in the rechargeable
battery type)
with cap
Auto leveling function
When the power is turned on, the laser beam is
automatically positioned within the accuracy range by
the auto leveling function.
RL-H4C (Rechargeable battery pack)
1 Insert the battery pack BT-74Q into the DB-74C battery holder.
DB-74
2 Install the battery holder. Tighten the battery cover knob to "LOCK" side.
• It is possible to remove the battery pack BT-74Q from the DB-74C battery holder
and use the dry cell batteries.
For Charging
1 Plug the AC/DC converter (AD-15) into the DB-74C battery holder or plug
the AD-15 into the battery pack BT-74Q.
2 Insert the AD-15 power cord in an outlet.
3 Complete charging by unplugging the plug from the DB-74C battery holder
or battery pack BT-74Q after approximately 13 hours.
4 Unplug the AD-15 power cord from the outlet.
RUN charge
As illustrated at the right, while charging is in process with the power supply
unit installed to the instrument, you can use the instrument.
• Recharging should take place in a room with an ambient temperature range of 10
40
(50
to 104
).
°C
°F
°F
• Do not perform charging with others except the AC/DC converter AD-15.
• For longer battery life, conform to the suggested charging time to the extent possible.
• The battery source will discharge when stored and should be checked before using
with instrument.
• Be sure to charge stored battery source every 3 or 6 months and store in a place at 30
C or below. If you allow the battery to become completely discharged, it will have an
effect on future charging.
HOW TO STORE
After using the instrument, store it as shown below.
• It is possible to store LS-80A/80B/90 and LS-B10/B10W. (LS-70 cannot be
stored.)
• Any other holder except the holder model 6 cannot be stored.
STORAGE PRECAUTIONS
Always clean the instrument after use.
Use a clean cloth moistened with neutral detergent or water.
Never use an abrasive cleaner, ether, thinner, benzene, or other solvents.
Always make sure the instrument is completely dry before storing. Dry any moisture with a soft, clean cloth.
PRECAUTIONS REGARDING LONG-TERM STORAGE
Remove batteries before storing when the instrument will not be used for periods on 1 month or more.Bat-
teries may leak fluid when left inside the instrument causing malfunction.
LASER SAFETY INFORMATION
The RL-H4C is classified as a class 3R Laser Product according to IEC Standard Publication 60825-1 Ed.2.0:
2007 and United States Government Code of Federal Regulation FDA CDRH 21CFR Part1040.10 and
1040.11 (Complies with FDA performance standards for laser products except for deviations pursuant to
Laser Notice No.50, dated June 24, 2007.)
WARNING
• Use of controls or adjustments or performance of procedures other than those specified herein may result in
hazardous radiation exposure.
• Follow the safety instructions on the labels attached to the instrument as well as in this manual to ensure safe
use of this laser product.
Label position
Explanatory Label
Each label is differed by the market.
• Do not look directly into the laser beam. Doing so could cause permanent eye damage.
• Do not stare at the laser beam. Doing so could cause permanent eye damage.
• If an eye injury is caused by exposure to the laser beam, seek immediate medical attention from a licensed
ophthalmologist.
CAUTION
• Perform checks at start of work and periodic checks and adjustments with the laser beam emitted under
normal conditions.
• When the instrument is not being used, turn off the power.
• When disposing of the instrument, destroy the battery connector so that the laser beam cannot be emitted.
• Operate the instrument with due caution to avoid injuries that may be caused by the laser beam
unintentionally striking a person in the eye. Avoid setting the instrument at heights at which the path of the
laser beam may strike pedestrians or drivers at head height.
Power switch
The power switch turns ON or OFF by pressing.
On-Grade precision switch
Two on-grade precision options are available, normal
precision (±2mm) and high precision (±1mm). By pressing
this switch, the precision options are switched alternately.
Confirm the precision choice by the indicator. (Normal
precision is the default setting each time the sensor is turned
on.)
Beam receiving window
Turn the beam receiving window side towards RL-H4C to
detect the laser beam.
Indicator
LS-80L Indicator (Refer to the description on
the back page.)
Detect the on-grade position "---" by moving the level sensor
up and down. Directional arrows and audio signals assist in
locating the on-grade position as the laser strikes the beam
receiving window. (Top of level sensor is 40mm (1 9/16")
from on-grade index for offset marking.)
The indicators are located on front and back sides of the
instrument.
Buzzer sound switch
Volume of the sensor buzzer can be alternately switched to
LOW/LOUD/OFF by pressing the switch.
Buzzer speaker
• Auto-cut off function
The power will be turned off automatically if no laser beam
LS-80L
is detected for approximately 30 minutes. (To turn on the
level sensor, press the power switch again.)
(Level Sensor)
BT-74Q
DB-74C
°C
to
LS-80L (LS-80A/80B/90)
Model-6
Level Sensor
Holder
RL-H4C
AD-15
BT-74Q
(LS-B10/B10W)
AA-size
dry cell
batteries
D-size dry cell batteries
Beam aperture
Plug
Plug
AD-15
Advertisement
Table of Contents

Related Manuals for Topcon RL-H4C


Summary of Contents for Topcon RL-H4C
-
Page 1: How To Store
The RL-H4C is classified as a class 3R Laser Product according to IEC Standard Publication 60825-1 Ed.2.0: Ignoring this indication and making an operation error could possibly result in Power Supply 2007 and United States Government Code of Federal Regulation FDA CDRH 21CFR Part1040.10 and... -
Page 2: Error Code
5 Measure the distance between the first and second marks on each wall. If the difference between each set of marks is less than 4mm (5/32 of an inch), no error exists. * If the difference value is greater than 4mm (5/32 inch), contact your Topcon dealer. ERROR CODE...
Need help?
Do you have a question about the RL-H4C and is the answer not in the manual?
Questions and answers
bottom three lights flashing and rotateing slowly has new battries in it
When the bottom three lights on a Topcon RL-H4C are flashing and rotating slowly, even with new batteries, it indicates that the power is low. The unit may still operate, but the low power warning is active. This can occur despite new batteries if they are not fully charged or are not providing enough voltage.
This answer is automatically generated
The laser got bumped and won’t turn on now
The Topcon RL-H4C laser will not turn on after being bumped because it has a safety feature that detects disturbances in elevation. When the laser is bumped, it enters a slower rotating speed and provides a warning through flashing lights and a signal on the handheld receiver. Unlike some other self-leveling lasers that may relevel and continue operating, the RL-H4C shuts down and stays off to prevent height errors in measurements.
This answer is automatically generated