Table of Contents
Advertisement
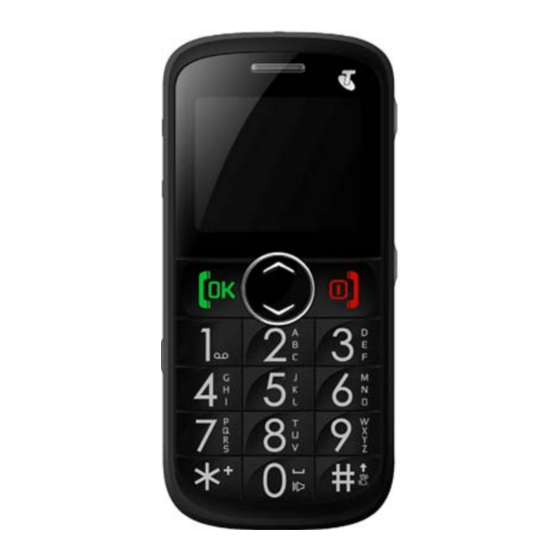
Telstra EasyCall® 2 Mobile Phone
User Guide
LEGAL INFORMATION
Copyright © 2010 ZTE CORPORATION.
Version 1.0
March 2011
All rights reserved.
No part of this publication may be excerpted, reproduced, translated or utilized in any form or
by any means, electronic or mechanical, including photocopying and microfilm, without the
prior written permission of ZTE Corporation.
The manual is published by ZTE Corporation. We reserve the right to make modifications on
print errors or update specifications without prior notice.
1
Advertisement
Table of Contents

Related Manuals for Telstra EasyCall 2


Summary of Contents for Telstra EasyCall 2
-
Page 1: User Guide
Telstra EasyCall® 2 Mobile Phone User Guide LEGAL INFORMATION Copyright © 2010 ZTE CORPORATION. Version 1.0 March 2011 All rights reserved. No part of this publication may be excerpted, reproduced, translated or utilized in any form or by any means, electronic or mechanical, including photocopying and microfilm, without the prior written permission of ZTE Corporation. -
Page 2: Table Of Contents
Index Introduction......................4 General Precautions..................4 Precautions While Driving ................5 Aircraft Safety....................5 Precautions for Medical Devices and Facilities............5 Precautions for Potentially Explosive Atmospheres..........6 Battery Safety ....................6 Limitation of Liability ..................7 RF Safety (SAR) ....................7 Getting Started.................... - Page 3 Step by step guide....................17 Switch Setting....................17 Make and receive a call.................. 18 Add a Contact to your Phone Book ..............19 Make a call from the Phone Book ..............19 Messages ....................20 Text Input methods ..................21 Phone Book ....................
-
Page 4: Introduction
Introduction This section includes some important information on safety and efficient operation. Please read this section before using the phone. General Precautions The antenna is located in the top portion of the handset, behind the display. When you are using the handset try to avoid shielding the antenna area with your hand. Hold the handset between your thumb and fingers towards the base of the handset. -
Page 5: Precautions While Driving
Using the phone near electrical appliances such as TV, telephone, radio and personal computer may cause interference. Do not drop or throw your handset. Rough handling can cause physical damage. Do not attempt to disassemble the handset or battery. Precautions While Driving ... -
Page 6: Precautions For Potentially Explosive Atmospheres
Obey the restrictions on the use of mobile phones at prescribed places such as hospitals, airports, service stations, refineries, chemical works etc. Switch off your phone as required. Precautions for Potentially Explosive Atmospheres Switch off your phone prior to entering any area with potentially explosive atmospheres, such as fuel or chemical transfer or storage facilities. -
Page 7: Limitation Of Liability
Your handset is locked to the Telstra network. If you wish to use your handset with another service provider you need to contact Telstra to obtain the unlocking code. An unlocking fee may apply for this service. -
Page 8: Getting Started
Getting Started Insert the SIM Card Remove the battery cover by pressing down on the back cover and sliding the cover down. Insert the SIM card with the metal contacts facing down and the notch on the bottom left corner as shown:... -
Page 9: Insert The Battery
Insert the battery 1. Insert the battery carefully with the contacts located against the gold springs - the battery will only fit one way. 2. Replace the battery cover. Make sure that the cover closes completely. -
Page 10: Charging The Battery
Charging the battery The phone can be charged in the On or Off state. Make sure that the battery is inserted before charging. The charger lead is keyed and will only fit one way. Insert the lead carefully observing the correct alignment of the plug and socket. -
Page 11: Battery Level Indicator
Battery level indicator Charging Charged The phone will give an audible alert when battery is low and display a low battery message on screen. Please recharge the battery promptly to maintain service. Switch your phone On Press and hold the red key for 2 seconds to switch the phone on. -
Page 12: Get To Know Your Phone
Get to know your phone Your phone... -
Page 13: Main Display
Main Display Information Bar Network Provider Time & Day Date Display Icons Battery level Keypad locked Network signal level Headset inserted New SMS message Alarm enabled SMS memory is full Silent Mode enabled Missed call CTM Mode enabled (TTY) Call Forwarding active Roaming... -
Page 14: Key Functions
Key functions Function Description Call key Press to make a call. Press to answer an incoming call. (Green Key) From the idle screen, press to enter the call history list. Press to confirm the function you choose. End key ... - Page 15 Function Description From the idle screen press to enter ‘*’, ‘+’, ‘W’, or ‘P’ Use + for the international dialling prefix. ‘W’ will wait until the next number is entered into the dialling sequence. ‘P’ inserts a 3 second pause into the dialling sequence. ...
-
Page 16: Menu Map
Menu Map... -
Page 17: Step By Step Guide
Step by step guide Switch Setting The Switch on the back of the handset can be programmed to make a call and/or send an SMS to friends or relatives simultaneously. Press Down > Down > Down > Down to get to the Settings Menu ... -
Page 18: Make And Receive A Call
Make and receive a call Enter the phone number using the number keys and press the Green key to dial. If you enter a wrong digit use the Red Key to delete the mistake. Long press the Red key to clear all the characters and return to the idle screen. ... -
Page 19: Add A Contact To Your Phone Book
Add a Contact to your Phone Book Menu > Phone Book > Add New Contact > To Phone, To SIM > Name > Edit Type in the Name using the keypad letter keys, (eg press the key once for the first letter, twice for the second letter etc.), press OK when finished. -
Page 20: Messages
Messages The envelope icon indicates a new message. Press the Green key to read the message. Press the Red key to exit. The double envelope icon indicates the mail box is full. Please delete some SMS messages. ... -
Page 21: Text Input Methods
Text Input methods 1. When editing text press the # key to change between eZiEng, abc, Abc, ABC, or 123. 2. Input Letters: In abc modes press the letter keys until the correct letter appears. 3. Input Words: In eZiEng mode, input each letter with a single key press. The word updates as you enter more letters. -
Page 22: Phone Book
7. Press the Red key to clear a character. Hold the Red key to delete all characters. 8. Press the Up/Down keys to move the cursor to left or right. Phone Book You can save names and numbers to the phone memory and the SIM card. ... -
Page 23: Speed Dial
Speed Dial Once you have saved some Contacts you can assign speed dial keys to your favourite contacts. Select Settings > Call Setup > Speed Dial > Set Number. Program speed dial keys. Once saved, long press the key to activate Speed Dial to the preset number. Note: Speed Dial 1 = Voice Message Bank, Speed Dial 3 = International Message Bank. -
Page 24: Settings > Audio Settings
4.10 Audio Settings Select Settings > Audio Profiles > Personalise to set the following: Tone Setup 1. Incoming Call 5. Message Tone 2. Alarms / Reminder 6. Key Tone 3. Power On 7. Alert Tone 4. Power Off The Power On / Off tones are played when the phone is switched on or off. ... -
Page 25: Settings > Phone Settings
4.11 Phone Settings Select Settings > Phone Setup > Set Time to set time (24hrs only) and date. Network Time is enabled by default and will automatically update the time from the network. Switch off Network Time to set the time and date manually. ... -
Page 26: Settings > Call Settings
4.12 Call Settings Select Settings > Call Setup > Call Forwarding. Enables your calls to be diverted to another number when your phone is busy, after no reply, or unreachable. Select Settings > Call Setup > Call Waiting. If you are on a call you will be notified of another incoming call. -
Page 27: Settings > Network Settings
Once saved, long press the key to activate Speed Dial to the preset number. Note: Speed Dial 1 = Voicemail, Speed Dial 3 = International Message Bank. Speed dial numbers can only be set to numbers already in your Contacts. ... - Page 28 Select the required Alarm or Reminder function from the available options. Select Add > Edit to enter a name (optional). Press the down arrow to select the time field (hh:mm), press Change to enter the alarm time. ...
-
Page 29: Organiser > Calendar
4.16 Organiser > Calendar Go to Organiser > Calendar to view the calendar. 4.17 Organiser > Calculator Go to Organiser > Select Calculator. Press Up/Down keys to highlight the required functions +, -, *, /, = and press the Green key for Equals. ... -
Page 30: Fm Radio Switch
4.20 FM Radio Switch Slide the FM key switch up to turn the radio on. Press the Up / Down arrow keys to manually tune to the required frequency. Use the side volume keys to adjust the volume. ... -
Page 31: Technical Reference
For Warranty Service directions please see http://www.zte.com.au All calls for PIN number enquiries, Network problems, Next G Services, BigPond account information, Web Access, Account and Billing Information, (U)SIM card registration and general enquiries should be directed to Telstra. -
Page 32: Warranty Information
4.23 Warranty Information The warranty does not apply to defects or errors in the product caused by: (a) Reasonable abrasion. (b) Misuse including mishandling, physical damage, improper installation, unauthorized disassembly of the product. Water, exposure to solvents or any other liquid damage. (d) Any unauthorized repair or modification.
Need help?
Do you have a question about the EasyCall 2 and is the answer not in the manual?
Questions and answers