Osburn 1600 Owner's Manual
Osburn 1600 wood stove owner's manual
Hide thumbs
Also See for Osburn 1600:
- Owner's manual (39 pages) ,
- Installation and operation manual (59 pages) ,
- Installation instructions (5 pages)
Table of Contents
Advertisement
Quick Links
Download this manual
See also:
Owner's Manual
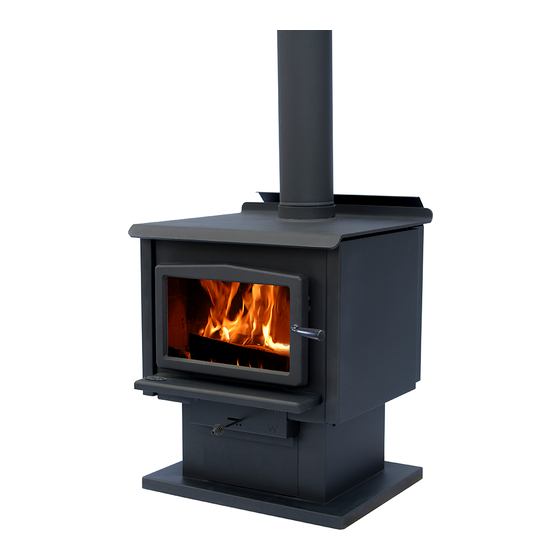
O S B U R N 1 6 0 0 W O O D S T O V E
P L E AS E R E AD A N D K E E P T H I S M A N U AL F O R R E F E R E N C E
GLEN DIMPLEX AUSTRALASIA LIMITED
38 Harris Road, East Tamaki, Manukau 2013
Ph: 09 274 8265 Fax 09 274 8472
Email:sales@glendimplex.co.nz
www.masportheating.co.nz
10.06.2010
O W N E R ` S M A N U A L
Manuf ac tur ed by
G len Dim plex Aus tr alas ia Lim ited
GLEN DIMPLEX AUSTRALIA PTY LTD
Unit 2,205 Abbotts Road
Dandenong South, Victoria 3175
Ph: 1 300 566 816 Fax 8787 3570
Email: sales@glendimplex.com.au
www.masportheating.com.au
583085
Advertisement
Table of Contents

Related Manuals for Osburn Osburn 1600


Summary of Contents for Osburn Osburn 1600
- Page 1 P L E AS E R E AD A N D K E E P T H I S M A N U AL F O R R E F E R E N C E GLEN DIMPLEX AUSTRALASIA LIMITED GLEN DIMPLEX AUSTRALIA PTY LTD 38 Harris Road, East Tamaki, Manukau 2013...
-
Page 3: Table Of Contents
TABLE OF CONTENTS INTRODUCTION ....................... 2 TECHNICAL SPECIFICATIONS ..................3 ASSEMBLY ........................4 DOOR ADJUSTMENT ........................6 INSTALLATION ......................... 7 POSITIONING THE STOVE ......................8 SEISMIC RESTRAINT OF THE WOODFIRE AND FLOOR PROTECTOR…………………….8 FLOOR PROTECTOR ........................8 CLEARANCES TO HEAT-SENSITIVE MATERIALS ..............9 REDUCED CLEARANCES USING SHIELDING ..............10 FLUE TERMINATION REQUIREMENTS………………………………………………………11 OPERATING AND MAINTENANCE INSTRUCTIONS ............. -
Page 4: Introduction
INTRODUCTION Glen Dimplex Australasia congratulates you on your purchase and wishes to help you get maximum satisfaction from your wood stove. In the pages that follow, we will give you advice on wood heating and controlled combustion as well as technical specifications regarding installation, operation and maintenance of the model you have chosen. -
Page 5: Technical Specifications
TECHNICAL SPECIFICATIONS All performance values are valid only when burning soft wood. OSBURN (dry): Maximum average heat output: 13.5 kW Overall average efficiency: 70 % Average particulate emission: 0.7 g/kg OSBURN (wet): Maximum average heat output: 11.7 kW Overall average efficiency: 72 % Average particulate emission: 0.9 g/kg... -
Page 6: Assembly
ASSEMBLY CAUTION: Operation of your Osburn stove without the baffle may cause unsafe and hazardous temperature conditions and will void the warranty. NOTE: Before installing the firebrick, check to ensure that none are broken or damaged in any way. If so, have the damaged ones replaced. Check the firebrick for damage at least annually and replace any broken or damaged ones with new ones. - Page 7 5- Similarly place two bricks crosswise so that they rest over the left hand side bricks and the steel baffle brick retainer. Push them toward the back so there are no gaps between the bricks. 6- Now lift the 202x101 x32mm brick on top of the already laid baffle bricks. The long edge of this brick is parallel with the door.
-
Page 8: Door Adjustment
DOOR ADJUSTMENT In order for your stove to operate properly, the door should be adjusted periodically to provide an air tight fit. To adjust: Remove the lock pin (spring pin) by pulling and turning it using pliers ("Vise grip") Turn the handle counter clock wise one turn to increase pressure Re-install the lock pin (spring pin) with a small hammer Figure 2: Door Adjustment... -
Page 9: Installation
INSTALLATION IT IS RECOMMEND THAT THE INSTALLATION OF YOUR OSBURN WOODFIRE BE CARRIED OUT BY A QUALIFIED SPECIALIST INSTALLER. IF ANY ELECTRICAL WORK IS REQUIRED, IT MUST BE CARRIED OUT BY A LICENSED ELECTRICIAN. WARNING: The instructions pertaining to the installation of your wood stove comply with the AS/NZS 2918 standard. -
Page 10: Positioning The Stove
POSITIONING THE STOVE It is very important to position the wood stove as close as possible to the chimney, and in an area that will favour the most efficient heat distribution possible throughout the house. The stove must therefore be installed in the room where the most time is spent, and in the most spacious room possible. -
Page 11: Clearances To Heat-Sensitive Materials
It is of outmost importance that the minimum clearances to heat-sensitive materials be carefully maintained upon installation of the stove. Refer to the table below: CLEARANCE DIMENSIONS FROM WALLS MINIMUM FLOOR PROTECTOR DIMENSIONS MINIMUM CLEARANCES TO HEAT SENSITIVE MATERIALS** Model : OSBURN 1600 NEW-ZEALAND 100mm 360mm 300mm 81mm... -
Page 12: Reduced Clearances Using Shielding
REDUCED CLEARANCES USING SHIELDING You may decrease the minimum clearances to heat-sensitive materials by installing heat radiation shields between the walls or the ceiling and the stove. These heat radiation shields must be installed permanently, and must be made of a heat-resistant or heat-tolerant material. An air gap must separate the heat shield from any heat-sensitive surface. -
Page 13: Flue Termination Requirements
FLUE TERMINATION EQUIREMENTS... -
Page 14: Operating And Maintenance Instructions
OPERATING AND MAINTENANCE INSTRUCTIONS Keep these instructions for future reference. WARNING: ANY MODIFICATION OF THE APPLIANCE THAT HAS NOT BEEN APPROVED IN WRITING BY THE AS/NZS 4013. TESTING AUTHORITY IS CONSIDERED AS BREACHING • DO NOT USE FLAMMABLE LIQUIDS OR AEROSOLS TO START OR REKINDLE THE FIRE. •... -
Page 15: Testing Your Wood
Many problems related to the operation of a wood stove are caused by the fact that the wood used is too damp or has dried in poor conditions. These problems can be: problems lighting the fire creosote build-up causing flue fires low energy yield blackened windows incomplete log combustion... -
Page 16: Lighting The Fire
LIGHTING THE FIRE After making sure that the stove air intake controls are fully open to the right (located on the front of the stove, see Figure 3), place several rumpled sheets of paper in the center of the combustion chamber. Place 8 to 10 pieces of small dry kindling wood over the paper in the form of a tent. -
Page 17: Heating
Figure 3: Air control setting HEATING Controlled combustion is the most efficient technique for wood heating because it enables you to select the type of combustion you want for each given situation. The wood will burn slowly if the wood stove air intake control is adjusted to reduce the oxygen supply in the combustion chamber to a minimum. -
Page 18: Reloading
RELOADING Once you have obtained a good bed of embers, you should reload the unit. In order to do so, open the air control to its maximum for approximately 15 seconds prior to opening the stove door. Then, proceed by opening the door very slowly; open it by 20 to 40 mm for 10 to 15 seconds before opening it completely. -
Page 19: Ash Disposal
ASH DISPOSAL Ashes should be removed from the stove every few days or when ashes get to 50 to 75mm deep. Always empty the stove when it is cold, such as in the morning. Always dispose of ashes in a metal container with a tight fitting lid. Place this container on a non combustible floor or on the ground, well away from all heat-sensitive materials, pending final disposal. - Page 20 5. Cover the plug with the remaining ashes and continue operation of your stove as usual. The Ash Drawer is shown in Figure 4 and can be removed by pulling it out toward you. Lift the Ash Drawer slightly or the pedestal base may get scratched. Close the rear half of the Ash Drawer lid to prevent spillage.
-
Page 21: Paint
PAINT Only clean your stove with a dry soft cloth that will not harm the paint finish. If the paint becomes scratched or damaged, it is possible to give your wood stove a brand new look, by repainting it with a 650 C heat resistant paint.
Need help?
Do you have a question about the Osburn 1600 and is the answer not in the manual?
Questions and answers