
Related Manuals for LevelOne KVM-0811


Summary of Contents for LevelOne KVM-0811
-
Page 1: User Manual
LevelOne KVM-0811/KVM-1611 8/16-Port PS2 KVM Switch User Manual Ver.: 1.0.1 - 0706... - Page 2 Safety This equipment has been tested and found to comply with Part 15 of the FCC Rules. Operation is subject to the following two conditions: (1) This device may not cause harmful interference (2) This device must accept any interference received. It’s including interference that may cause undesired operation.
-
Page 3: Table Of Contents
Table of Contents INTRODUCTION ......................1 ..........................1 EATURES ......................2 ACKAGE ONTENT .....................2 YSTEM EQUIREMENTS ....................3 ECHNICAL PECIFICATIONS ........................4 RONT ANEL ........................4 ANEL .......................5 ABLE IAGRAMS HARDWARE INSTALLATION..................6 ....................6 OUNTING .....................6 OCAL ONSOLE 3 PS2 K ......................7 EYBOARD 4 PS2 M ......................7 OUSE 5 PC P ...................7... -
Page 4: Introduction
1. Introduction Controlling multiple PCs from One Keyboard, Mouse and VGA Monitor. KVM switch is loaded with features such as 19” Rack Mount Size, Daisy Chain up to eight units, On Screen Display Manual, Password security, searching PC server name, Hot key Control, Push Button and Auto Scan Control. -
Page 5: Package Content
Package Content KVM-0811: 8-Port PS2 KVM Switch 8 port PS2 KVM Switch 1 PCS AC to DC Power Adapter 1 PCS Rack Mount Kit 1 SET User Manual 1 PCS KVM-1611: 16-Port PS2 KVM Switch 16 port PS2 KVM Switch... -
Page 6: Technical Specifications
Technical Specifications Model No. KVM-0811 KVM-1611 PC Port Console Port PC Port Connector VGA HDDB 15pin ( shared with PS2 keyboard and Mouse ) (All Female Type) Console Port PS/2 Keyboard Mini Din 6 pin Connector PS/2 Mouse Mini Din 6 pin... -
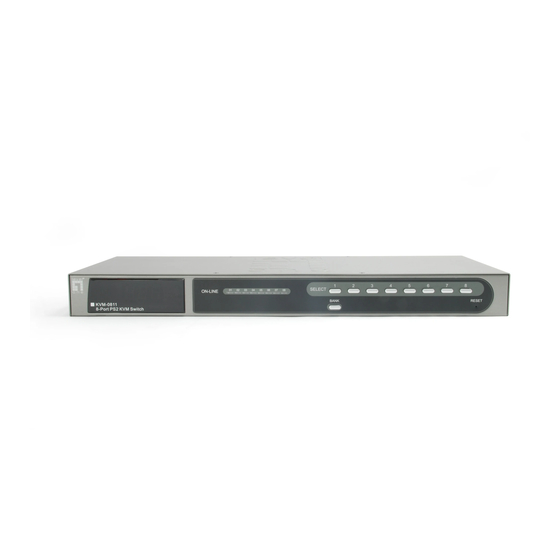
Page 7: Front Panel
Front Panel KVM-0811 KVM-1611 Rear Panel KVM-0811 KVM-1611... -
Page 8: Cable Diagrams
Cable Diagrams PC Port Special Cable: (ACC-2001, ACC-2002) HDB15 pin male to one HDDB 15 pin and Mini Din 6 pin special cables ------------ AT to PS/2 keyboard adapter: (Optional) Din 5 pin Male to Mini Din 6 pin Female Daisy Chain Cable: (ACC-2009) PS/2 Cable: Mini Din 6 pin Male to Male... -
Page 9: Hardware Installation
2. Hardware Installation Before installation, please make sure all of peripherals and computers have been turned off. This example of installation is based on 8 port Rack Mount KVM Switch and you also can think that 4 port Rack Mount KVM Switch and 16 port Rack Mount KVM Switch have the same installation procedure. -
Page 10: Step 3 Ps2 Keyboard
Step 3 PS2 Keyboard Connect the keyboard to the KVM Switch. If you have an AT type keyboard, you will need an AT to PS/2 adapter. Step 4 PS2 Mouse Connect the mouse to the KVM Switch. Step 5 PC Port Connection Now the PC connections will be made with the monitor (VGA) connections first. -
Page 11: Step 6 Pc Port - Mouse
Step 6 PC Port - Mouse Connect the first computer’s mouse cable to the KVM Switch. If using a PS/2 cable, connect one end to the PS/2 mouse port on the computer, and the other end to the PC1 PS/2 mouse port on the back of KVM Switch. If using a serial mouse cable (optional), connect one end to a DB-9 serial port on the computer, and the other end to the PC1 DB-9 serial mouse port on the back of the KVM Switch. -
Page 12: Step 9 Repeat Step 5 To 7
Step 9 Repeat Step 5 to 7 Repeat step 5 to 7 for the remainder of the computers. Step 10 Power On Attach the power supply to the KVM unit and plug the other end into an electrical receptacle. Now you will see the LED for Port 1 light up, and you will hear a beep. Switch on your monitor. -
Page 13: Operation
3. Operation The power on state of 8/16 port KVM switch: When you power on KVM switch, it will ask you the password, the default password value is eight zero –“ 00000000 “. Please key in eight zero and enter the same value at retype field. Note: Before you are not familiar with the operation of OSD manual, please don’t change the password –... -
Page 14: Reset Button
Reset Button To press both “PC1” button and “bank” button of master bank simultaneously can reset KVM switch. This reset action will not only return KVM switch back to initial state --- Check the password, but also re-check all of slave banks which connected to mast KVM Switch. If you add a new KVM Switch as a slave bank, please use reset button of master KVM Switch to automatically assign a new ID to it. - Page 15 Scroll Scroll Page Previous Bank Lock Lock Scroll Scroll Page Next Bank Lock Lock Down To select PC port: Port No. 1~4 (4 port) Scroll Scroll Bank 1~8 (8 port) Port No 1~16 (16 port) Lock Lock No 1~8 0 or 1 Scroll Scroll Beeper...
- Page 16 Scroll Scroll Search the same PC name Lock Lock Note: Search PC name starting from 1st PC port) F I N D : █ Scroll Scroll Lock Lock + Space bar = On Screen Display Menu Example To access a computer attached to Port 4 of the three Bank. You can press through hot key as below: Scroll lock + Scroll lock + 3 + 04 To access a computer attached from Bank 3 to Bank 4, You can press through hot key...
-
Page 17: Daisy Chain Connection
4. Daisy Chain Connection Please use the 3 feet 3-in-one daisy chain Cable Kit (Optional ACC-2009) to daisy chain the KVM Switch. 1. Connect Keyboard, Mouse and Monitor to the console port (white color block) of bank 1 KVM switch. 2. -
Page 18: Hot Plug
5. Hot Plug The KVM Switch supports “Hot Plug“ function for easy addition or removal of PCs. The user can arrange or maintain PCs as follows: 1. A PC can be disconnected and reconnected to the same or different port of the KVM unit without having to power it off as long as it is not the Daisy-chain port or pass through port. -
Page 19: On Screen Display
6. On Screen Display 1. OSD menu can be popped up in powered on PC port or non-powered on PC port or empty PC port. The resolution of OSD menu is fixed to 1024X768 for non-powered on PC port or empty PC port. 2. -
Page 20: Enter Password
BANK : To press “ INS” key for editing PC name. SYSTEM 01 ☼SYS█EM 02 After finishing the edit, please press “ Enter “ key for saving information. To use “ Tab “ key to select items like Bank, OSD, SCAN, CHANGE PASSWORD, CONSOLE ON/OFF, etc…... -
Page 21: New Password Complete
NEW PASSWORD COMPLETE ESC : QUIT ENTER : COMPLETE D. The “ CONSOLE ON/OFF “ means to manage the console of KVM switch. If you select “ CONSOLE ON “, it means that any user can use the console. If you select “ CONSOLE OFF “(factory default OFF state), it means that any user will not be allowed to use the console unless you enter the password. -
Page 22: Troubleshooting
7. Troubleshooting 1. Ensure that all cables are well seated. Label all of cables with the number for each respective computer to avoid confusion. 2. The recommended VGA cable distance is 5 meters maximum without ghosting and degradation. Normally, the cable length is based on driver capacity of your VGA card. If you need longer VGA cable, please use VGA extender to accomplish your applications.
Need help?
Do you have a question about the KVM-0811 and is the answer not in the manual?
Questions and answers