
Subscribe to Our Youtube Channel
Related Manuals for LevelOne KVM-0831


Summary of Contents for LevelOne KVM-0831
-
Page 1: User Manual
LevelOne KVM-0831/KVM-1631 8/16-Port Combo KVM Switch w/ Expansion Slot User Manual Ver. 1.0-0706... - Page 3 Safety This equipment has been tested and found to comply with Part 15 of the FCC Rules. Operation is subject to the following two conditions: (1) This device may not cause harmful interference (2) This device must accept any interference received. It’s including interference that may cause undesired operation.
-
Page 4: Table Of Contents
Table of Contents 1. INTRODUCTION ..................1 .......................2 EATURES ......................2 ACKAGE ONTENT & M ..................3 PTIONAL ABLES ODULE ....................3 YSTEM EQUIREMENT .........................4 RONT ANEL ........................5 ANEL ......................6 XPANSION 2. HARDWARE INSTALLATION ..............7 ....................7 OUNTING ....................7 OCAL ONSOLE 3 USB K ....................7 EYBOARD 4 USB M... - Page 5 TIME SETTINGS.....................22 OSD MOUSE ......................22 6. TECHNICAL SPECIFICATION............... 23 7. TROUBLESHOOTING ................24...
-
Page 6: Introduction
KVM switches to expand the capacity. Revolutionized video enhancement technology ensures superb quality up to 1920 x 1440. KVM-0831/1631 supports host PC with PS/2 and USB interface. The convenient HDDB-15 to VGA+PS/2+USB cable allows user to connect to different kinds of PC interfaces by the same cable. -
Page 7: Key Features
LED display for easy status monitoring Buzzer sound for switching port confirmation Built-in one daisy chain port for cascading up to 8 KVM-0831/KVM-1631 Provides one expansion slot and can be used for KVM Cat.5 Console or future extension functionality *... -
Page 8: Optional Cables & Module
90cm Daisy Chain cable KVM-9007 KVM Cat.5 Receiver Connection Diagram ACC-1000 KVM-9007 System Requirement Model No. KVM-0831 / KVM-1631 One VGA Monitor Local Console One USB Keyboard side One USB Mouse HDDB 15 pin male to HDDB 15 pin + Mini Computer side... -
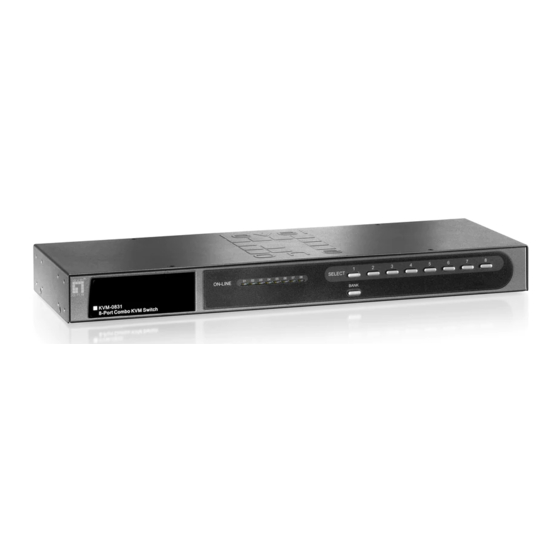
Page 9: Front Panel
Front Panel KVM-0831 KVM-1631 7-Segment BANK LED indication This KVM switch has three 7-segment LEDs to indicate which bank and port is selected. The first digit of 7-segment LED indicate the bank you selected and the last two digits indicate which port you select on this bank. -
Page 10: Rear Panel
Rear Panel KVM-0831 KVM-1631 PC Port Special Cable: (ACC-2101, ACC-2102, ACC-2103) HDDB15 pin male to one HDDB 15 pin male, one Mini Din 6 pin and one USB special cables Daisy Chain Cable: (ACC-2109) HDDB15 pin Male to Male... -
Page 11: Expansion Slot
Expansion Slot The Expansion Slot extends functionality with optional module add-on, such as the ACC-1000 KVM Cat.5 Console module which allows IT people to manage the system away from server room for up to 300 meters. ACC-1000 KVM Cat.5 Console (optional) To be able remote control through Cat.5 Console, use requires the standard Cat.5 cable and KVM-9007 KVM Cat.5 Receiver. -
Page 12: Hardware Installation
2. Hardware Installation Before installation, please make sure all of peripherals and computers have been turned off. This example of installation is based on KVM-0831 and the procedure of KVM-1631 is the same. Step 1 Rack Mounting KVM-0831 / KVM-1631 can be mounted in a standard 19-inch equipment rack or on a desktop. -
Page 13: Step 4 Usb Mouse
Step 4 USB Mouse Connect an USB mouse to the KVM Switch. Remote Console (Optional Module ACC-1000) Extending your PC console up to 300 meters away: (1) Make sure that the Cat.5 cable is straight through type. (2) Plug one end of Cat.5 cable into the remote console port of KVM switch and the other end of Cat.5 cable into the RJ-45 port of KVM-9007 Cat.5 receiver. -
Page 14: Step 5 Pc Port Connection
NOTE: 1. Local console and Remote console of the KVM switch have the same priority to control computers connected to the KVM switch. The display output is the same at the local and remote console monitors. The priority mechanism is: the first move port has the priority and will release the priority if it did not keep input for 2 seconds. -
Page 15: Operation
3. Operation The power on state of KVM-0831/1631: When you power on the KVM switch, it will prompt a login window for key-in USER NAME and PASSWORD. For more details, please refer to OSD section The push buttons 1~8: To switch from one to another port, please press the push button for the destination port on the front panel. -
Page 16: Daisy Chain Connection
4. Daisy Chain Connection Note: Make sure that power to all the devices you will be connecting up have been turn off. You must unplug the power cords of any computers. We do not recommend to cascading different models through the Daisy Chain connection. -
Page 17: Operate And Display
Operate and Display The BANK button: If you want to view the KVM switch on next bank, please press “BANK“ button. The bank LED will be changed from bank 1 to the maximum daisy chain level and then to press “BANK“... -
Page 18: On Screen Display
5. On Screen Display User can control the KVM switch by three ways – front panel Control Buttons, OSD (On-Screen Display), or Hot key commands through the Console keyboard. It takes approximately 1-2 seconds for the video signal to refresh after switching computers. Re-synchronization of the mouse and keyboard signals also occurs. - Page 19 Example #1 – To bring up the OSD overlay window, press “Caps Lock”, “Caps Lock”, and the “Space Bar”. Immediately, the OSD overlay screen will appear. The superimposed menu screen is generated by the KVM switch, and does not affect your computers or software function in any way.
-
Page 20: Osd Menu
OSD Menu OSD Menu provides a menu-driven interface to control the KVM switch. This OSD Menu has four types of display screens: Login Window --- When powering on this KVM switch, it will prompt a login window and ask for user name and password. This KVM system can setup one SUPERVISOR and eight USERs. -
Page 21: Login Window
Login Window Power on local console monitor, and power on the KVM Switch by plug in the power adapter, the Login window will show up waiting for user name and password. The Login The default is SUPERVISOR and default user name is eight zeros “00000000”. The default password is eight zeros “00000000”. -
Page 22: Port Name
Port Name The first page shows the current port name and the selected port, and the operation hint. The selected The selected Operation Hint User Auto-Scan Firmware OSD Function Key Description Go to the Main Menu To log out the OSD. If Security is enabled it will show up the Login window waiting for username and password. -
Page 23: Main Menu
■ USER --- There are two types of user levels: SUPERVISOR and USER. The default is SUPERVISOR. SUPERVISOR can setup and change the OSD settings at Main Menu. USER can only do the port switch and port search. ■ SCAN TIME --- This is the time interval for auto-scan function. When auto-scan function is activated, the KVM switch will auto-scan the host port one by one in the interval as setting. -
Page 24: Language
LANGUAGE The OSD supports eight languages: English, French, German, Italian, Spanish, Simplified Chinese, Japanese, and Russian. The default language is ENGLISH. Moving the cursor by keyboa rd (Up Arrow key “ ”or the own Arrow key “ ”) or mouse to select the language you like. PORT NAME EDIT The first line bar is Bank number, following lines are port name list. -
Page 25: Port Search
PORT SEARCH Search the computer by port name. Enter “*” will show the all the port names. USER SECURITY There are two types of user levels: SUPERVISOR and USER. There is one SUPERVISOR and up to eight USERs can be configured. Press the Enter key or right button of mouse for editing. -
Page 26: Access List
ACCESS LIST Only SUPERVISOR can configure the ACCESS LIST. The first column is the port number, following the server/computer name list. The last 8 columns are the access right of each user. Use the Enter key or left button of mouse to active/deactivate the access right of each port. -
Page 27: Time Settings
TIME SETTINGS When the Auto-Scan function is activated, the KVM switch will auto-scan the host ports one by one in the interval as setting. Notice that the port without connecting to a computer/server will be skipped over on the scan. The interval range is 5 ~ 99 seconds, and the default interval is 10 seconds. -
Page 28: Technical Specification
120* Housing Metal KVM Switch Power DC 12V, 1.0A Adapter Operation Temperature 0~50℃ Storage Temperature -20 ~ 60℃ Humidity 0~95%, Non-Condensing Weight (kg) 2.0kg 2.3kg Dimension (mm) 445(L) X 160(W) X45 (H) * Cascading 1 KVM-0831 + 7 KVM-1631 together... -
Page 29: Troubleshooting
7. Troubleshooting Ensure that all cables are well seated. Label all of cables with the number for each respective computer to avoid confusion. Don’t press any key on the keyboard while the selected computer is booting up. Otherwise, it might cause the keyboard error or keyboard is not detected at PC side. If the keyboard or mouse does not work when connected to the KVM switch, please make sure the keyboard or mouse works when directly plug into the computer.
Need help?
Do you have a question about the KVM-0831 and is the answer not in the manual?
Questions and answers