
Related Manuals for AT&T TL7612


Summary of Contents for AT&T TL7612
- Page 1 User’s manual (Canada version) TL7612 DECT 6.0 cordless headset and handset lifter...
- Page 2 AT&T product. You can also visit our website at www.telephones.att.com or call 1 (866) 288-4268. Model number: TL7612 (Headset, headset base and handset lifter) Type: DECT 6.0 cordless headset and handset lifter Serial number:...
- Page 3 Save your sales receipt and original packaging in the event warranty service is necessary. User’s manual Quick start guide (Canada version) (Canada version) TL7612 TL7612 DECT 6.0 cordless headset DECT 6.0 cordless headset and handset lifter and handset lifter User's manual...
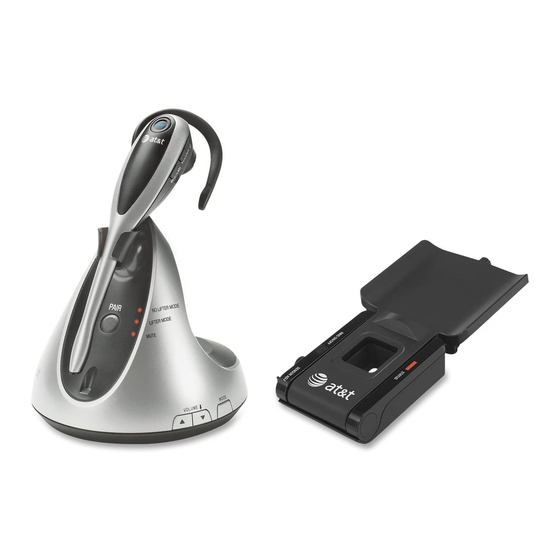
- Page 4 Parts checklist Auxiliary ring detector Base adapter Over the ear hook Headset Cordless headset Headset base base power adapter Behind the neck band Over the head band Colored label (light blue)
- Page 5 Optional accessories The following optional accessories are compatible with your headset and headset base: • The TL7600 is an expansion headset (up to two headsets can be used with the same headset base). • The TL7601 is a dial pad that allows you to dial numbers and place calls when away from your telephone.
-
Page 6: Table Of Contents
User’s manual (Canada version) TL7612 DECT 6.0 cordless headset and handset lifter Table of contents Getting started Adjust the corded handset audio......18 Quick reference guide - Attach the lifter ....19 headset ......... 1 Adjust the switch hook Headset indicator lights ..1 presser position .... - Page 7 Adding and registering a Switch a call between a headset ........27 handset and headset ..42 Adding and registering a Multiple headset/ headset to the headset handset use ......43 base ..........28 Intercom calls and To register a headset to transfers ..........43 the headset base ....
-
Page 8: Getting Started
Getting started Quick reference guide - headset ON/OFF Press to make, answer, or end a call. Headset indicator lights ON/OFF light status • Headset is charging in the headset base. • Headset is trying to register to the headset base. •... - Page 9 Getting started Quick reference guide - headset VOLUME Press the volume keys on the side of the headset to adjust the listening volume when on a call (page 41). MUTE/FLASH Press to mute the microphone during a call (page 44). Press and hold to answer a call waiting call while on a call Earpiece...
-
Page 10: Headset Alert Tones
Getting started Quick reference guide - headset Headset alert tones Three quick beeps • A VOLUME key is pressed when the volume is already at its highest or lowest setting. • The headset is not registered and the headset ON/ button is pressed. -
Page 11: Quick Reference Guide - Headset Base
Getting started Quick reference guide - headset base Charging cradle Insert the headset here for charging (page 12). PAIR Press to register (pages 28-29) or deregister (page 30) the headset. NO LIFTER MODE light On when NO LIFTER MODE is selected. - Page 12 Getting started Quick reference guide - headset base LIFTER AUDIO ADJUST Switch to choose the best headset audio quality when using LIFTER MODE (see page 14 of this manual for more information). VOLUME / Press the volume keys on the side of the headset base to adjust the speaking volume while on a call (page 41).
-
Page 13: Headset Base Indicator Lights
Getting started Quick reference guide - headset base Headset base indicator lights NO LIFTER MODE LIFTER MODE MUTE NO LIFTER MODE • On when NO LIFTER MODE is selected (default mode). • Flashes quickly when there is an incoming call. •... -
Page 14: Quick Reference Guide - Handset Lifter
Getting started Quick reference guide - handset lifter SENSOR ADJ knob Adjusts the sensitivity of the ring detector (page 24). ADJUST LIFTER knob Adjusts the height of the lifter arm (page page 20). Lifter arm Holds the corded telephone handset. Switch hook presser When the CORDED HANDSET CONNECTED ON/OFF... - Page 15 Getting started Quick reference guide - handset lifter RING ON/OFF Press to turn the ring detector on or off. When the ring detector is off, the cordless headset does not ring (page page 24). Switch hook presser adjustment knob Adjusts the position of the switch hook presser (page page 20).
-
Page 16: Status Light
Getting started Quick reference guide - handset lifter STATUS light • On when the headset is not in use and the ring detector is turned off. • Flashes slowly when the headset is in use and the ring detector is turned off. Blue •... -
Page 17: Installation
Getting started Installation You must install and See pages 11-12 STOP charge the battery before for instructions. using the headset. If you subscribe to high-speed Internet service (DSL - digital subscriber line) through your telephone line, you must install a DSL filter between the telephone line cord and the telephone wall jack. -
Page 18: Battery Installation
Getting started Battery installation Install the battery as shown below. After installing the battery, you may be able to make and receive short calls. For optimal performance, charge the headset battery for at least 6 hours before use. When the headset is not in use, recharge the headset by returning it to the headset base. -
Page 19: Battery Charging
Getting started Battery charging After installing the battery, charge the headset by placing it on the headset base as shown below. The headset ON/OFF light is on when the headset is charging. Push ON/OFF light Insert 1. Insert the headset into 2. -
Page 20: Headset Base And Lifter Installation
Getting started Headset base and lifter installation Installation preparation Before installing the headset base, remove the rear bottom piece of the headset base by pushing it away from the base (as shown in Figure 1). Figure 1 Install the headset base as shown on the following pages. After completing installation option 1, 2 or 3 (see page 16), slide the rear bottom piece into the headset base until it clicks into place (as shown in Figure 2). -
Page 21: No Lifter Mode Or Lifter Mode
Getting started Headset base and handset lifter installation No lifter mode or lifter mode There are two answer modes available on the headset base. The current mode is indicated by the NO LIFTER MODE or LIFTER MODE lights on the front of the headset base. •... -
Page 22: Cord Labels
Getting started Headset base and handset lifter installation Cord labels The cords provided with your headset are attached with colored labels to help you plug them into the correct jacks on the headset base. Each jack on the headset base is labeled and marked with a colored dot, allowing you to plug in the correct cords by matching the colors. -
Page 23: Installation Options
Getting started Headset base and handset lifter installation Installation options You have three installation options: Option 1: Connect the handset lifter to a corded phone (see pages 17-24). This option enables you to answer calls even if you are away from the telephone base. For this option, you can use the headset with a single line or multiple line corded telephone (such as the AT&T 1080, 1070 or 1040) or a digital business system (such as... -
Page 24: Option 1: Connect The Handset Lifter To A Corded Phone
Getting started Headset base and handset lifter installation Option 1: Connect the handset lifter to a corded phone 1. Unplug the curly handset cord from the telephone and plug it into the CURLY CORD jack (light blue dot) on the headset base. -
Page 25: Adjust The Corded Handset Audio
Getting started Headset base and handset lifter installation Adjust the corded handset audio 1. Make sure that LIFTER MODE light on the headset base is on. Press the MODE button on the headset base to change the mode. 2. Lift the corded handset to release the switch hook. -
Page 26: Attach The Lifter
Getting started Headset base and handset lifter installation Attach the lifter 1. To choose where to install the lifter on your telephone, look at the space underneath the corded handset. If there is a speaker, the lifter should be centered over the speaker. If there is no speaker, the lifter should be centered within the space. -
Page 27: Adjust The Switch Hook Presser Position
Getting started Headset base and handset lifter installation Adjust the switch hook presser position Turn the knob to move the switch hook presser until it is lined up with your telephone switch hook. Adjust the height of the lifter arm Turn the ADJUST LIFTER knob to change the height of the lifter arm. -
Page 28: Lifter Adjustments And Testing
Getting started Headset base and handset lifter installation Lifter adjustments and testing 1. Make sure that the headset base is set to LIFTER MODE and that the LIFTER AUDIO ADJUST setting is correct (see page 18). 2. Turn the switch hook presser adjustment knob until the switch hook presser is just above the switch hook (see page 20). -
Page 29: Installation Of Large Lifter Pad (Optional)
Getting started Headset base and handset lifter installation Installation of large lifter pad (optional) If the small lifter pad cannot hold the corded handset steadily, you can attach a large lifter pad (provided) to enlarge the contact area. 1. Hold the large lifter pad in front of the small lifter pad as shown below. -
Page 30: About Internal And Auxiliary Ring Detectors
Getting started About internal and auxiliary ring detectors The internal or auxiliary ring detector detects the telephone ringer and sends a ring tone to the headset earpiece. If you installed the lifter over the top of the corded phone speaker, the internal ring detector will recognize when the phone rings. -
Page 31: Ring Detector On/Off
Getting started About internal and auxiliary ring detectors Ring detector on/off When the ring detector detects an incoming call, it sends a ring tone to the headset earpiece. • Press the RING ON/OFF button on the lifter to turn the ring detector on or off. -
Page 32: Headset Base Installation
Getting started Headset base installation Option 2: Connect the headset to a telephone wall jack In order to make calls using this installation option, you need a telephone plugged into the same telephone line or a dial pad (TL7601 purchased separately). Make sure the headset base mode is set to NO LIFTER MODE. -
Page 33: Option 3: Connect The Headset With A Corded Or Cordless Phone
Getting started Headset base installation Option 3: Connect the headset with a corded or cordless phone To use this installation option, make sure the headset base mode is set to NO LIFTER MODE. • Plug the small end • Plug one end of the telephone of the headset line cord into the TEL WALL base power... -
Page 34: Adding And Registering A Headset
(see page 30). The first headset provided with your TL7612 has a blue ON/OFF light. When you register a second headset, the ON/OFF light of... -
Page 35: Adding And Registering A Headset To The Headset
Getting started Adding and registering a headset to the headset base To register a headset to the headset base Make sure the battery is properly installed in the headset (see page 11). The ON/OFF light flashes twice every five seconds to indicate the headset is not registered. -
Page 36: Adding And Registering A Headset To An At&Tdect Cordless Telephone
Getting started Adding and registering a headset to an AT&T DECT cordless telephone To register a headset to an AT&T DECT cordless telephone base You must first deregister the headset from the headset base (see page 30). Make sure the battery is properly installed in the headset (see page 11). -
Page 37: Replacing A Headset
Getting started Replacing a headset You may need to deregister your headsets if: You have two registered headsets and need to replace one of them. -OR- You wish to change the designated headset number and/or the color of the ON/OFF lights of your registered headsets. You must first deregister both headsets, and then individually register again each headset you wish to use. -
Page 38: Headset Attachments
Getting started Headset attachments Over the ear hook To attach the ear hook to the headset: Remove any headset attachment connected to the headset. Insert the earpiece into the ear hook as shown in Figure 1. Press the ear hook onto the earpiece as shown in Figure 2. Hook the headset onto the desired ear. - Page 39 Getting started Headset attachments To adjust the headset to wear on the left or right ear: Hold the headset in your hand. Lift the hook upward as shown in Figure 4. Turn the hook 180 (counter clockwise) as shown in Figure 5. Push the hook downward as shown in Figure 6.
- Page 40 Getting started Headset attachments To remove the ear hook from the headset: Hold the headset with one hand and the ear hook with the other hand. Lift the ear hook up until it separates from the earpiece. NOTE: To wear on the other ear, rotate the headset within the loop of the ear pad.
-
Page 41: Over The Head Band
Getting started Headset attachments Over the head band To attach the headband to the headset for wearing on the left or right ear: Remove any headset attachment currently connected to the headset. Insert the earpiece into the loop of the ear pad as shown in Figure 8. Gently press the earpiece inward until it clicks into place as shown in Figure 9. - Page 42 Getting started Headset attachments To remove the headset from the headband: Hold the headset with one hand and the headband ear pad with the other hand. Twist and pull the headset until it separates from the ear pad.
-
Page 43: Behind The Neck Band
Getting started Headset attachments Behind the neck band When first shipped, the ear pad of the neckband is positioned to be worn on the right ear. To wear the headset on your left ear: Remove the ear pad from the neckband by carefully pulling the stem of the ear pad up through the rectangular socket at the end of the neckband, as shown in Figure 11. - Page 44 Getting started Headset attachments Place the neckband around your neck and over your ears. Adjust and rotate the angle of the headset until the microphone is pointing towards your mouth as shown in Figure 14. Figure 14 NOTE: Firmly grip the padded earpiece with one hand whenever adjusting the headset microphone up or down (Figure 14).
-
Page 45: Operation
Operation Headset operation Making a call When the headset base is connected to a corded handset of your telephone with the handset lifter installed (option 1): You must select LIFTER MODE on the headset base (see page 14). Press on the headset. The switch hook presser rises and releases the switch hook. -
Page 46: Answering A Call On The Headset
Operation Headset operation Answering a call on the headset When the headset base is connected to a corded handset of your telephone with the handset lifter installed (option 1): • Press ON/ on the headset. The switch hook presser rises and releases the switch hook. -
Page 47: Ending A Call On The Headset
Operation Headset operation Ending a call on the headset When the headset base is connected to a corded handset of your telephone with the handset lifter installed (option 1): /OFF on the headset or place the headset in the • Press headset base to end a call. -
Page 48: Options While On Calls
Operation Options while on calls Volume control To adjust the listening volume: While on a call, press the VOLUME /+ - keys on the side of the headset to adjust the listening volume. To adjust the speaking volume: While on a call, press the VOLUME keys on the side of the headset base to adjust the speaking volume. -
Page 49: Switch A Call Between A Handset And Headset
Operation Options while on calls Switch a call between a handset and headset When the headset base is connected to a corded handset of your telephone with the handset lifter installed (option 1): • To switch between a headset and the corded handset while on a call, press ON/OFF on the headset. -
Page 50: Multiple Headset/Handset Use
Operation Options while on calls Multiple headset/handset use Headsets and handsets on the same telephone line can join an external call in progress, creating a conference call. The number of headsets and handsets that can join may be limited by your telephone system. See your telephone user's manual for more information. -
Page 51: Mute
Operation Options while on calls Mute The mute function allows you to turn off the headset microphone. You can hear the caller, but the caller cannot hear you. To mute a call: • Press MUTE/ on the headset to turn off the headset FLASH microphone. -
Page 52: Appendix
Appendix Troubleshooting If you have difficulty with your headset, please try the suggestions below. For customer service, visit our website at www.telephones.att.com 1 (866) 288-4268 or call My headset doesn't work at all. • Make sure the power cord is securely plugged in. •... - Page 53 Appendix Troubleshooting I cannot get a dial tone. • First, try all the suggestions above. • Move the cordless headset closer to the headset base. You might have moved out of range. • If you are using LIFTER MODE, you might need to slide the LIFTER AUDIO ADJUST switch (page 18).
- Page 54 Appendix Troubleshooting I cannot dial out. • First, try all the suggestions above. • Make sure you have a dial tone before dialing. The cordless headset may take a second or two to find the headset base and produce a dial tone. This is normal. Wait an extra second before dialing.
- Page 55 Appendix Troubleshooting My cordless headset isn't performing normally. • Make sure the power cord is securely plugged into the headset base. Plug the unit into a different working electrical outlet not controlled by a wall switch. • Move the cordless headset closer to the headset base. You might have moved out of range.
- Page 56 Appendix Troubleshooting The batteries do not hold a charge. • Make sure that the headset battery is installed and securely plugged into the connector. • If the cordless headset is in the headset base and the ON/OFF light on the headset does not turn on, refer to The ON/OFF light on the headset is off while charging in this Troubleshooting guide.
- Page 57 Appendix Troubleshooting I get noise, static, or weak signal even when I'm near the headset base. • If you subscribe to high-speed Internet service (DSL - digital subscriber line) through your telephone line, you must install a DSL filter between the telephone line cord and the telephone wall jack.
- Page 58 Appendix Troubleshooting I hear other calls while using my headset. • Disconnect the headset base from the telephone jack, and plug in a different telephone. If you still hear other calls, the problem is probably in your building's wiring or telephone service.
-
Page 59: Incoming Call
Appendix Troubleshooting I cannot hear a ring tone from the headset when there is an incoming call. • If you have pressed MUTE/ on the headset when it is FLASH ringing, it mutes the ring tone of the headset. The ring tone resumes on the next call. - Page 60 Make sure the headset base has power. • Make sure your headsets are charged and registered to the headset base. For registration instructions, refer to the manual provided with your TL7612 product, or visit www.telephones.att.com to download the manual. When I press ON/ on the headset, the handset lifter rises, but the call is not connected or I do not hear a dial tone.
- Page 61 Appendix Troubleshooting • If you cannot hear a dial tone when the headset is on, you should adjust the quality of the corded handset audio first. During a call, slide the LIFTER AUDIO ADJUST switch at the side of the headset base from A to G until you obtain good sound quality.
- Page 62 Appendix Troubleshooting I cannot dial out on the headset when the headset base is set to LIFTER MODE. • Try all the suggestions above. • Make sure you have a dial tone before dialing. dialing. . It is normal for a telephone base to take a second or two before producing a dial tone.
- Page 63 Appendix Troubleshooting The ON/OFF light on the headset is off while charging. • Make sure the power and line cords are plugged in correctly and securely. • Make sure that the battery connector is securely plugged into the cordless headset. •...
-
Page 64: Important Safety Information
Appendix Important safety information This symbol is to alert you to important operating or servicing instructions that may appear in this user’s manual. Always follow basic safety precautions when using this product to reduce the risk of injury, fire or electric shock. Safety information •... -
Page 65: Especially About Cordless Headsets
Appendix Important safety information • If this product does not operate normally, see Troubleshooting on pages 45-56 of this user’s manual. If you cannot solve the problem, or if the product is damaged, refer to Limited warranty on pages 67-70. Do not open this product except as may be directed in your user’s manual. - Page 66 Appendix Important safety information • Potential TV interference: Some cordless headsets operate at frequencies that may cause interference to TVs and VCRs. To minimize or prevent such interference, do not place the headset base of the cordless headset near or on top of a TV or VCR.
-
Page 67: Precautions For Users Of Implanted Cardiac Pacemakers
Appendix Important safety information • Do not open or damage the batteries. Released electrolyte is corrosive and may cause injury to the eyes or skin. The electrolyte may be toxic if swallowed. • Do not dispose of the batteries in a fire. Check with local waste management codes for special disposal instructions. -
Page 68: Maintenance
Appendix Maintenance Taking care of your headset • Your cordless headset contains sophisticated electronic parts, so it must be treated with care. • Avoid rough treatment. • Place the headset down gently. Save the original packing materials to protect your headset if you ever need to ship it. Avoid water •... -
Page 69: Fcc Part 68 And Acta
Appendix FCC Part 68 and ACTA This equipment complies with Part 68 of the FCC rules and with technical requirements adopted by the Administrative Council for Terminal Attachments (ACTA). The label on the back or bottom of this equipment contains, among other things, a product identifier in the format US:AAAEQ##TXXXX. - Page 70 Appendix FCC Part 68 and ACTA If this equipment is causing harm to the telephone network, the telephone service provider may temporarily discontinue your telephone service. The telephone service provider is required to notify you before interrupting service. If advance notice is not practical, you will be notified as soon as possible.
- Page 71 Appendix FCC Part 68 and ACTA Industry Canada Operation is subject to the following two conditions: (1) this device may not cause harmful interference, and (2) this device must accept any interference, including interference that may cause undesired operation. The term ‘’IC:‘’ before the certification/registration number only signifies that the Industry Canada technical specifications were met.
-
Page 72: Fcc Part 15
Appendix FCC Part 15 This equipment has been tested and found to comply with the requirements for a Class B digital device under Part 15 of the Federal Communications Commission (FCC) rules. These requirements are intended to provide reasonable protection against harmful interference in a residential installation. - Page 73 Appendix FCC Part 15 To ensure safety of users, the FCC has established criteria for the amount of radio frequency energy that can be safely absorbed by a user or bystander according to the intended usage of the product. This product has been tested and found to comply with the FCC criteria.
-
Page 74: Limited Warranty
Appendix Limited warranty The AT&T brand is used under license - any repair, replacement or warranty service, and all questions about this product should www.telephones.att.com be directed to to our website at 1 (866) 288-4268 or call What does this limited warranty cover? The manufacturer of this AT&T branded product warrants to the holder of a valid proof of purchase (“CONSUMER”... - Page 75 Appendix Limited warranty How long is the limited warranty period? The limited warranty period for the PRODUCT extends for ONE (1) YEAR from the date of purchase. If the manufacturer repairs or replaces a materially defective PRODUCT under the terms of this limited warranty, this limited warranty also applies to repaired or replacement PRODUCT for a period of either (a) 90 days from the date the repaired or replacement PRODUCT is shipped to you or...
- Page 76 Appendix Limited warranty • PRODUCT returned without a valid proof of purchase (see item 6 below); or • Charges for installation or setup, adjustment of customer controls, and installation or repair of systems outside the unit. How do you get warranty service? www.telephones.att.com To obtain warranty service, visit 1 (866) 288-4268...
- Page 77 Appendix Limited warranty Include a “valid proof of purchase” (sales receipt) identifying the PRODUCT purchased (PRODUCT model) and the date of purchase or receipt; and Provide your name, complete and correct mailing address, and telephone number. Other limitations This warranty is the complete and exclusive agreement between you and the manufacturer of this AT&T branded PRODUCT.
-
Page 78: Technical Specifications
Extended range and clarity The TL7612 is a fully cordless DECT 6.0 headset offering a range of up to 500 feet. Open range test was performed by Wyle Laboratories, an independent commercial test facility. “Up to 500 feet” cordless headset range refers to the maximum open field range. -
Page 79: Index
Index Index AC adapter 17, 25, 26 Deregistration 30 Adjust Dial tone 18, 20, 21 corded handset audio 18 DSL 15, 17, 25, 26 height of the lifter arm 20 sensitivity level 24 switch hook presser End a call 40 position 20 Alert tones 3 Answer a call 39... - Page 80 Index Maintenance 61 Safety information 57–60 Make a call 38 Small lifter pad 22 Mute 44 Speaking volume 41 Status light 9 Switch a call 42 No lifter mode 14 Switch hook presser 20 Options while on Temporary ring tone calls 41–44 silencing 40 Over the ear hook 31–33...
- Page 81 www.telephones.att.com © 2011 Advanced American Telephones. All Rights Reserved. AT&T and the AT&T logo are trademarks of AT&T Intellectual Property licensed to Advanced American Telephones, San Antonio, TX 78219. Printed in China. Issue 4 AT&T 12/11.
Need help?
Do you have a question about the TL7612 and is the answer not in the manual?
Questions and answers