Table of Contents
Advertisement
Quick Links
Download this manual
See also:
User Manual
Advertisement
Table of Contents

Related Manuals for Super Circuits MDVR-14


Summary of Contents for Super Circuits MDVR-14
- Page 1 MDVR-14 SOLID STATE MINI DVR User Guide...
-
Page 2: Table Of Contents
Contents 1. SAFETY PRECAUTIONS......................3 2. FEATURES..........................4 3. PACKING LIST...........................4 4. MDVR DESCRIPTION......................5 5. BASIC CONFIGURATION......................7 6. DISPLAY............................8 7. OPERATION..........................9 8. MAIN MENU...........................10 8.1 DATE/ TIME........................12 8.2 Motion Detection .......................13 8.2 Schedule Record.......................11 8.3 Manual Record........................12 8.4 Playback...........................13 9. SD CARD ..........................14 10. -
Page 3: Safety Precautions
1. SAFETY PRECAUTIONS Read the Safety Precaution Guide through carefully before operating the product, to prevent unsafe use of this product. WARNING: The triangle symbols above are intended to alert the user to the presence of un-insulated dangerous voltage. CAUTION: This symbol is intended to alert the user to presence of important operating and maintenance (Servicing) instructions in the literature accompanying the appliance. -
Page 4: Features
2. FEATURES • DVR supports NTSC or PAL video, and auto detects video loss. • DVR comes with MPEG4-SP video and Audio Codec G.726. Supports 1 channel video, 1 channel audio recording and playback . • Uses SD card with FAT16/ 32 fi le system and ASF fi le format. •... -
Page 5: Mdvr Description
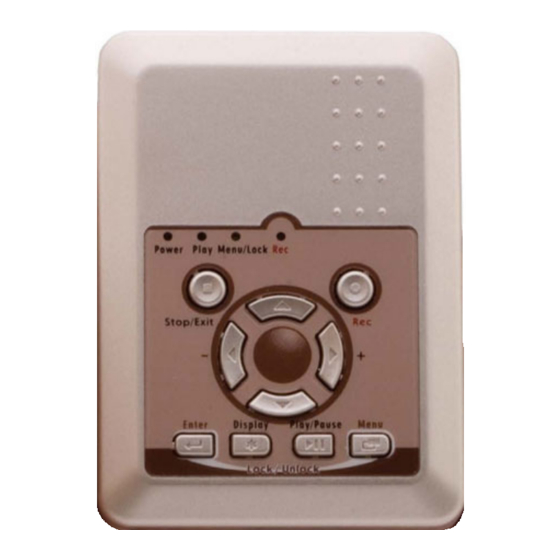
4. MDVR14 DESCRIPTION 4.1 Front View 1. Power LED: Power Indicator 2. Play LED: Play Indicator 3. Menu/ Lock LED: Menu/ Key Lock indicator 4. Rec LED: During recording, record indicator will fl ash slowly. On playback recording is disabled and the record indicator will fl... -
Page 6: Side View
4.2 Side View 15) AV IN: Audio/ Video Input: 3.5 mm jack for audio/ video line in. (16) AV Out: Audio/ Video Output 3.5 mm jack for audio/ video line out. (17) POWER: DC/ Battery Power Switch (18) DC 5V IN: 5V/ 1A Power Input (19) SD Card Slot (20) Battery Compartment Cover... -
Page 7: Basic Configuration
5. BASIC CONFIGURATION 1. Power: Use the power adaptor supplied, or a nickel metal hydride (NiMH), alkaline batteries. 2. Connect the camera to AVI input, MDVR will auto detect NTSC/ PAL video. 3. Switch to DC when using the supplied power adaptor or switch to BATT when using battery. Use (256MB or above) SD Memory Card. -
Page 8: Display
6.0 DISPLAY 6.2.1 SD Card status 1. “ ” icon displayed in bottom right hand corner on the status line, indicates that SD card is operating normally. This icon indicates SD card is not inserted or is malfunctioning. Try re-formatting before proceeding. -
Page 9: Operation
NOTE: When recording, record indicator will fl ash slowly. 7.0 OPERATION 7.1 HARDWARE SETUP 1. Insert SD card into MDVR14 SD slot while the unit is off. 2. Plug AV IN cable in MDVR14 AV IN and connect camera to yellow AV IN cable connector. -
Page 10: Main Menu
8.0 MAIN MENU 8.1 DATE/ TIME SETUP 1. Press Menu button and you will see the MAIN MENU. Select SET DATE/ TIME and press the ENTER button on MDVR14. Set time and date by using + and - buttons to change date values and Up/ Down buttons to scroll up and down. -
Page 11: Schedule Record
2. SELECT ALL mode will enable motion detection for entire viewing screen and is indicated by a red screen. 3. DEL ALL mode will disabel motion detection for entire viewing screen and is indicated by a blue screen. 4. CELL EDIT mode will custom enable or disable motion detection areas. -
Page 12: Manual Record
11. Set RECORD to ON and SCHEDULE to 00:00 23:59 to schedule motion recording 24 hours a day. You can schedule your recording for a specifi c time during the day, but for this example we will expect to monitor motion 24 -7 12. -
Page 13: Motion Detection
8.4 Playback 8.4.1 Continuous Playback Press Play/ Pause button for normal playback. Playback will start with most recent fi le and continue to play all fi les. 2. Press for normal playback speed. 3. Press for Fast Rewind and Fast Forward (Speed: x2/ x4/ x8/ x16/ x32). 4. -
Page 14: Sd Card
9.0 SD CARD 1. Format SD card by inserting into MDVR and selecting SD CARD OPTIONS from MAIN MENU. Select FORMAT and press the enter button. Select YES by pressing the ENTER button. FORMAT OK will display on the screen and you are ready to record. -
Page 15: Specification
12. SPECIFICATIONS System NTSC / PAL Video System and Video Loss Auto Detection Codec MPEG4-SP ASF File Format 1, 2, … , Maximum fps selectable Maximum: Record Frame fps@704x24 Rate NTSC: 30 fps@352x240/ 24 0/ 12 fps@704x480 fps@704x280 PAL: 25 fps@352x280/ 20 / 10 fps@704x560 Record Quality Low / Medium / High...
Need help?
Do you have a question about the MDVR-14 and is the answer not in the manual?
Questions and answers