
Related Manuals for HIKVISION Network Audio/Video Encoder


Summary of Contents for HIKVISION Network Audio/Video Encoder
- Page 1 User Manual of DS-6700 Series Network Audio/Video Encoder Network Audio/Video Encoder User Manual (V1.1.0) UD.6L0202D1098A01...
- Page 2 The content of this manual is furnished for informational use only, is subject to change without notice, and should not be construed as a commitment by Hikvision Digital Technology Co., Ltd. (Hikvision). Hikvision assumes no responsibility or liability for any errors or inaccuracies that may appear in the book.
- Page 3 User Manual of DS-6700 Series Audio/Video Encoder Regulatory information FCC information compliance: This equipment has been tested and found to comply with the limits for a digital device, pursuant to part 15 of the FCC Rules. These limits are designed to provide reasonable protection against harmful interference when the equipment is operated in a commercial environment.
-
Page 4: Preventive And Cautionary Tips
User Manual of DS-6700 Series Audio/Video Encoder Preventive and Cautionary Tips Before connecting and operating your Encoder, please be advised of the following tips: Ensure unit is installed in a well-ventilated, dust-free environment. Keep all liquids away from the Encoder. ... -
Page 5: Table Of Contents
User Manual of DS-6700 Series Audio/Video Encoder TABLE OF CONTENTS Chapter 1 Introduction ......................7 1.1 Description ........................7 1.2 Models ..........................7 1.3 Features .......................... 7 Chapter 2 Structure ........................ 10 2.1 Front Panel ........................10 2.2 Rear Panel ........................12 2.3 Alarm Connections ....................... - Page 6 User Manual of DS-6700 Series Audio/Video Encoder Chapter 7 Device Configuration....................33 7.1 Local Configuration ....................... 33 7.2 Configuring Time Settings ..................... 34 7.3 Network Settings ......................35 7.3.1 Configuring TCP/IP Settings ................... 35 7.3.2 Configuring Port Settings ..................36 7.3.3 Configuring DDNS Settings ..................
- Page 7 User Manual of DS-6700 Series Audio/Video Encoder 8.4.5 Handling Exception ....................64 8.5 Configuring Privacy Mask ..................... 65 8.6 Configuring RS-232/485 Settings .................. 66 8.6.1 RS-232 Settings ...................... 66 8.6.2 RS-485 Settings ...................... 66 Chapter 9 Record/Capture Settings ..................68 9.1 Configuring Holiday Settings..................
-
Page 8: Chapter 1 Introduction
User Manual of DS-6700 Series Audio/Video Encoder Chapter 1 Introduction 1.1 Description Developed on the basis of the latest encoding technology, DS-6700 Series Audio/Video Encoder Server allows the analog signal to be digitized and then stored in hard disk or transmitted via network, capable of encoding at up to WD1(PAL: 960×... - Page 9 Digital Zooming (with Speed Dome) When connected with Hikvision speed dome, digital zooming can be realized by clicking on the image through client software. PTZ linkage Relay input alarm can be responded with PTZ linkage actions, e.g., callup of predefined presets, patrols or...
- Page 10 User Manual of DS-6700 Series Audio/Video Encoder Exceptions Exception Alarm Handling Exception alarms include network disconnect alarm, IP address conflict alarm, illegal access alarm, etc.; multiple alarm handling methods are supported, relay alarm output, buzzer alarm, upload to center, etc. ...
-
Page 11: Chapter 2 Structure
User Manual of DS-6700 Series Audio/Video Encoder Chapter 2 Structure 2.1 Front Panel DS-6701HWI/HFI: Figure 2.1 Front Panel of DS-6701HWI/HFI Table 2.1 Front Panel of DS-6701HWI/HFI Item Description POWER LED Light in red when the device is powered on; light in orange Indicator when the SD card is inserted. - Page 12 User Manual of DS-6700 Series Audio/Video Encoder DS-6704HWI/HFI: Figure 2.2 Front Panel of DS-6704HWI/HFI Table 2.2 Front Panel of DS-6704HWI/HFI Item Description POWER LED Light in red when the device is powered on; light in orange Indicator when the SD card is inserted. LINE IN 3.5mm two-way audio input interface;...
-
Page 13: Rear Panel
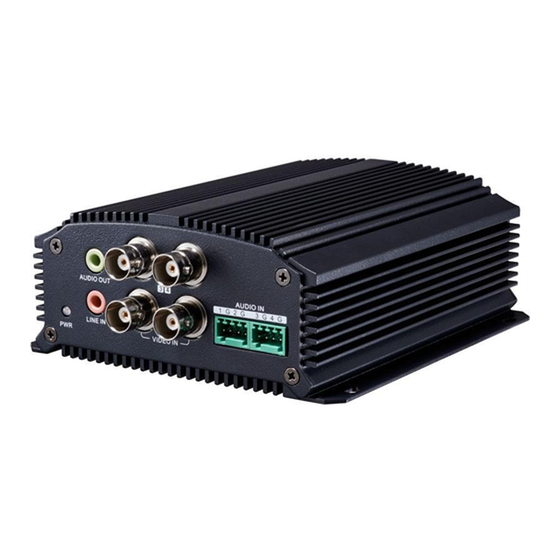
User Manual of DS-6700 Series Audio/Video Encoder Table 2.3 Front Panel of DS-6708/6716 and DS-6701/6704/6708/6716-SATA Indicator Description POWER Lights in red when the device is powered on. STATUS Lights in red when data is being read from or written to HDD. Valid for DS-6708HWI/HFI-SATA model only. - Page 14 User Manual of DS-6700 Series Audio/Video Encoder DS-6704HWI/HFI: Figure 2.6 Rear Panel of DS-6704HWI/HFI Table 2.5 Rear Panel of DS-6704HWI/HFI Item Description ALARM IN Relay alarm input. ALARM OUT Relay alarm output. Serial interface for configuration of device’s parameters or used as RS-232 transparent channel.
- Page 15 User Manual of DS-6700 Series Audio/Video Encoder Table 2.6 Rear Panel of DS-6708HWI/HFI (-SATA) Item Description VIDEO IN BNC connectors for video input. LINE IN 3.5mm two-way audio input interface; connect to active pick-up, microphone, etc. AUDIO OUT 3.5mm audio output interface; connect to audio output device, e.g., loudspeaker, etc.
-
Page 16: Alarm Connections
User Manual of DS-6700 Series Audio/Video Encoder 2.3 Alarm Connections 2.3.1 Alarm Input Connections DS-6700 supports the relay input as the alarm input mode. For the alarm input signal not in open/close open/close relay signal mode, please follow the connections shown as below: Alarm input connections for Emerson Alarm: Encoder Note: The relay input port of the Encoder should be set to NC mode. - Page 17 User Manual of DS-6700 Series Audio/Video Encoder Note: The DS-6701HWI/HFI has no JJ1 relay. Please note the different connections of JJ1 shown above. For DC load, JJ1can be safely used both in NC and NO methods, and it is recommended to use within the limit of 12V/1A.
-
Page 18: Chapter 3 Network Parameters Configuration
User Manual of DS-6700 Series Audio/Video Encoder Chapter 3 Network Parameters Configuration Purpose: If you don’t know the IP address of the decoder and this is not the first time you use the decoder, you can use SADP (IP finder) software or the Serial port tools to find out the IP address of the decoder and to configure the IP address or other network parameters of it. -
Page 19: Modifying Network Parameters
User Manual of DS-6700 Series Audio/Video Encoder Figure 3.1 Search Online Device by SADP Note: Device can be searched and displayed in the list in 15 seconds after it goes online; it will be removed from the list in 45 seconds after it goes offline. ... - Page 20 User Manual of DS-6700 Series Audio/Video Encoder Figure 3.2 Modify Network Parameters...
-
Page 21: Chapter 4 Access To Ds-6700 By Client Software
User Manual of DS-6700 Series Audio/Video Encoder Chapter 4 Access to DS-6700 by Client Software The DS-6700 Series Audio/Video Encoder can be accessed by iVMS-4200 client software (provided in attached CD). Please refer to the User Manual of iVMS-4200 Client Software for more information. The computer which runs the iVMS-4200 client software should meet the following requirements: Operating System: Microsoft Windows 2000 or higher CPU: Intel Pentium IV 3.0 GHz or higher... -
Page 22: Adding Device
User Manual of DS-6700 Series Audio/Video Encoder 4.2.1 Adding Device Steps: Click Control Panel>Device Management to enter the Device Management page: Figure 4.2 Device Management Page Click the Add button to enter the Add Device dialog box: Figure 4.3 Add Device Edit a nickname for the device and then input the IP address, port number (default: 8000), login User Name (default: admin) and Password (default: 12345) of the device. -
Page 23: Starting Live View
User Manual of DS-6700 Series Audio/Video Encoder Figure 4.4 Search Online Devices Click Add to add the device. The successfully added device (s) will be displayed on the device list. Figure 4.5 List of Added Devices 4.2.2 Starting Live View Click Control Panel >... - Page 24 User Manual of DS-6700 Series Audio/Video Encoder Figure 4.6 Start Live View You can click the buttons on the toolbar to operate in the live view mode, e.g., capture picture, start/stop recording, two-way audio, PTZ control (with PTZ camera connected to the encoder), digital zoom, open/close audio, play back video files, etc.
-
Page 25: Chapter 5 Access To Ds-6700 By Web Browser
User Manual of DS-6700 Series Audio/Video Encoder Chapter 5 Access to DS-6700 by WEB Browser The DS-6700 can also be accessed by WEB Browser for configuration and operation. The supported WEB browsers include: Internet Explorer 6/7/8/9, Firefox 3.5 and above, Chrome 8 and above, Safari 5.0.2 and above, Windows XP SP1 and above (32-bit). - Page 26 User Manual of DS-6700 Series Audio/Video Encoder Figure 5.2 Download and Install Plug-in (2) Click Run or Save on the pop-up warning message box. Figure 5.3 Run Web Components (3) Click Next on the pop-up Setup dialog box. Figure 5.4 Click Next (4) When the installation completes, click Finish to finish the installation of Web Components.
-
Page 27: Main Page
User Manual of DS-6700 Series Audio/Video Encoder Figure 5.5 Install the Web Components 5.2 Main Page After successful login, you will enter the main page automatically. Menu Bar PTZ Control Device List Preset Setting/Calling Window-division Live View Window Toolbar Video Parameters Settings Figure 5.6 Main Page Description of the live view page: Menu Bar: Enter the Live View, Playback, Log and Configuration page respectively. -
Page 28: Chapter 6 Live View
User Manual of DS-6700 Series Audio/Video Encoder Chapter 6 Live View Live view shows you the video image getting from the connected camera in real time. After successful login, the system will enter the live view page automatically. 6.1 Starting Live View Steps: In the live view window, select a playing window by clicking the mouse. -
Page 29: Capturing Picture
User Manual of DS-6700 Series Audio/Video Encoder Next page Audio on/off Start/Stop two-way audio Note: Before using two-way audio function or recording with audio, please select the Stream Type to Video & Audio on Section 8.2 Configuring Video Settings. Full-screen Mode You can double click on the live video to switch to the full-screen view mode. -
Page 30: Operating Ptz Movement
User Manual of DS-6700 Series Audio/Video Encoder Figure 6.3 RS-485 Settings 6.3.1 Operating PTZ Movement In live view mode, you can use the PTZ control buttons to realize pan/tilt/zoom control of the camera lens. There are 8 directional buttons (up, down, left, right, upper left, upper right, bottom left, bottom right) on the display window when the mouse is located in the relative positions. -
Page 31: Setting / Calling A Preset
User Manual of DS-6700 Series Audio/Video Encoder 6.3.2 Setting / Calling a Preset Setting a Preset: In live view mode, select a preset number from the preset list. Figure 6.5 Set a Preset Use the PTZ control buttons to move the lens in the desired position. You can use any of the following commands: •... -
Page 32: Configuring Video Parameters
User Manual of DS-6700 Series Audio/Video Encoder The preset can also be used to link to the alarm input when there is alarm event occurring. Figure 6.7 PTZ Linking Please refer to Chapter 8.4 Configuring and Handling Alarms for the PTZ Linking settings (Remote Configuration>Alarm Settings>Alarm Input>Linkage Method). - Page 33 User Manual of DS-6700 Series Audio/Video Encoder Move the slider to set the sharpness to 0~15 and the denoising level to 0~3. The default value is 3 for the sharpness and 1 for the denoising level. Note: You can click the button to restore the default settings.
-
Page 34: Chapter 7 Device Configuration
User Manual of DS-6700 Series Audio/Video Encoder Chapter 7 Device Configuration 7.1 Local Configuration Click Configuration > Local Configuration to enter the Local Configuration interface. Figure 7.1 Local Configuration Configure the following settings: Protocol Type: Set the protocol type of stream transmission to TCP or UDP. ... -
Page 35: Configuring Time Settings
User Manual of DS-6700 Series Audio/Video Encoder 7.2 Configuring Time Settings Steps: Click Remote Configuration > Device Parameters > Time Settings to enter the Time Settings interface: Figure 7.2 Time Settings Select the Time Zone. Select the Time Zone that is closest to the device’s location from the drop-down menu. Figure 7.3 Time Zone Settings Configure the time synchronization by NTP server or by manually. -
Page 36: Network Settings
User Manual of DS-6700 Series Audio/Video Encoder Note: If the device is connected to a public network, you should use a NTP server that has a time synchronization function, such as the server at the National Time Center (IP Address: 210.72.145.44). If the device is set up in a more customized network, NTP software can be used to establish a NTP server used for time synchronization. -
Page 37: Configuring Port Settings
User Manual of DS-6700 Series Audio/Video Encoder Configure the NIC settings, including the NIC Type, IPv4 Address, IPv4 Subnet Mask, IPv4 Default Gateway, and MTU settings. Note: The valid value range of MTU is 500 ~ 1500. If the DHCP server is available, you can click the checkbox of DHCP to automatically obtain an IP address and other network settings from that server. - Page 38 User Manual of DS-6700 Series Audio/Video Encoder Steps: Click the Remote Configuration > Network Settings > DDNS Settings to enter the DDNS Settings interface: Figure 7.9 DDNS Settings Check the Enable DDNS checkbox to enable this feature. Select DDNS Type. Four different DDNS types are selectable: IPServer, DynDNS, PeanutHull and HiDDNS.
- Page 39 User Manual of DS-6700 Series Audio/Video Encoder Figure 7.11 IPServer Settings • PeanutHull: (1) Enter User Name and Password obtained from the PeanutHull website. (2) Click Save to save the settings. Figure 7.12 PeanutHull Settings • HiDDNS: (1) Enter the Server Address of the HiDDNS server: www.hik-online.com. (2) Enter the Domain name of the device.
-
Page 40: Configuring Pppoe Settings
User Manual of DS-6700 Series Audio/Video Encoder 7.3.4 Configuring PPPoE Settings Your device also allows access by Point-to-Point Protocol over Ethernet (PPPoE). Steps: Click the Remote Configuration > Network Settings > PPPoE Settings to enter the PPPoE settings interface: Figure 7.14 PPPoE Settings Check the PPPoE checkbox to enable this feature. - Page 41 User Manual of DS-6700 Series Audio/Video Encoder Figure 7.15 Email Settings (1) Configure the following Email settings: Authentication (optional): If your mail server requires authentication, check this checkbox to use authentication to log in to this server and enter the login User Name and Password. SMTP Server: The SMTP Server IP address or host name (e.g., smtp.263xmail.com).
-
Page 42: Adding Network Disk
User Manual of DS-6700 Series Audio/Video Encoder Figure 7.16 Email Settings (2) Click Save to save the Email settings. Please refer to the following sections for more information: Configure alarm linking methods with Send Email on Section 8.4.1 Configuring Motion Detection, Section 8.4.2 Configuring External Alarm Input, Section 8.4.3 Configuring Video Loss Alarm, Section 8.4.4 Configuring Tamper-proof Alarm and Section 8.4.5 Handling Exception. - Page 43 User Manual of DS-6700 Series Audio/Video Encoder Figure 7.17 Network Disk Settings Enter the IP address of the Network Storage System and File Path in the text filed. Select the type of Network Storage System to IP SAN or NAS. NAS Mode: Enter the IP address of the storage device, and the default file path is /dvr/share, in which the share name is user-defined during creating the DVR of the network storage.
-
Page 44: Configuring Snmp Settings
User Manual of DS-6700 Series Audio/Video Encoder Figure 7.19 Set HDD Property Notes: Please refer to the User Manual of IP SAN/NAS for the creation of File Path in the network management. Up to 8 NAS disks or IP SAN disk can be connected to the DS-6700. 7.3.7 Configuring SNMP Settings Simple Network Management Protocol (SNMP) is an Internet-standard protocol for managing devices on IP networks... -
Page 45: Configuring Qos Settings
User Manual of DS-6700 Series Audio/Video Encoder Figure 7.21 SNMP Settings (2) (1) When the security level is set to “auth, priv”, you can configure the Authentication Algorithm and Private-key Algorithm parameters. (2) When the security level is set to “no auth, no priv”, you cannot configure the Authentication Algorithm and Private-key Algorithm parameters. -
Page 46: Configuring Ftp Settings
User Manual of DS-6700 Series Audio/Video Encoder Figure 7.22 QoS Settings Check the checkbox to enable the QoS function. Enter the DSCP (Differentiated Services Codepoint) value for the video/audio, event/alarm and management traffic. This value is used to mark the traffic’s IP header. The DSCP value defines the priority level for the specified type of traffic, for example, how much bandwidth to reserve for it. -
Page 47: Configuring Socks Settings
User Manual of DS-6700 Series Audio/Video Encoder directory. When the parent directory is selected, you have the option to use the Device Name, Device Number or Device IP for the name of the directory; and when the Child Directory is selected, you can use the Camera Name or Camera No. -
Page 48: Configuring Upnp Settings
User Manual of DS-6700 Series Audio/Video Encoder 7.3.11 Configuring UPnP Settings Purpose: UPnP™ can permit the device seamlessly discover the presence of other network devices on the network and establish functional network services for data sharing, communications, etc. If you want to use the UPnP™ function to enable the fast connection of the device to the WAN via a router, you should configure the UPnP™... -
Page 49: Configuring Https Settings
User Manual of DS-6700 Series Audio/Video Encoder Figure 7.26 UPnP Settings-Manual 7.3.12 Configuring HTTPS Settings Purpose: HTTPS (Hyper Text Transfer Protocol Secure) ensures the data transferred is encrypted using Secure Socket Layer (SSL) or Transport Layer Security (TLS). HTTPS provides authentication of the web site and associated web server that one is communicating with and create a secure channel over an insecure network. -
Page 50: Configuring Bonjour Settings
User Manual of DS-6700 Series Audio/Video Encoder Figure 7.27 HTTPS Settings Task1: Create the self-signed certificate (1) Click the Create button to create the following dialog box. Figure 7.28 Create Self-signed Certificate (2) Enter the country, host name/IP, validity and other information. (3) Click OK to save the settings. -
Page 51: Configuring Ip Address Filter
User Manual of DS-6700 Series Audio/Video Encoder Figure 7.29 Bonjour Settings Check the checkbox to enable the Bonjour function. Edit the name of device. The name is shown when the device is detected by the system. Only the letters, numbers and “-” can be contained in the name. Note: Click Save to save the settings. -
Page 52: Configuring Multicast Address
User Manual of DS-6700 Series Audio/Video Encoder 7.3.15 Configuring Multicast Address Purpose: The multicast address can be configured to realize live view for more than the maximum number of cameras through network. A multicast address spans the Class-D IP range of 224.0.0.0 to 239.255.255.255. It is recommended to use the IP address ranging from 239.252.0.0 to 239.255.255.255. -
Page 53: Chapter 8 Camera Settings
User Manual of DS-6700 Series Audio/Video Encoder Chapter 8 Camera Settings 8.1 Configuring OSD Settings 8.1.1 Configuring Display Settings Purpose: You can customize the camera name and time on the screen. Steps: Click the Remote Configuration >Camera Settings > Display Settings to enter the Display Settings interface: Camera 01 Figure 8.1 Display Settings... -
Page 54: Configuring Text Overlay
User Manual of DS-6700 Series Audio/Video Encoder 12-11-2012 Tuesday 11:21:00 Camera 01 Figure 8.3 Adjust OSD Location If you want to copy the display settings of the current camera to other cameras, spread the Copy to Camera panel and select the camera(s) to copy, or click Select All to select all cameras. Figure 8.4 Copy to Camera Click Save to validate the above settings. - Page 55 User Manual of DS-6700 Series Audio/Video Encoder Highway A Figure 8.5 Text Overlay Settings If you want to copy the text overlay settings of the current camera to other cameras, spread the Copy to Camera panel and select the camera(s) to copy, or click Select All to select all cameras. Figure 8.6 Text Overlay Settings Click Save to activate the above settings.
-
Page 56: Configuring Video Settings
User Manual of DS-6700 Series Audio/Video Encoder 8.2 Configuring Video Settings Steps: Click Remote Configuration > Camera Settings >Video Settings to enter the Video Settings interface: Figure 8.7 Video Settings Select the camera from the drop-down list to configure. Select the Stream Type of the camera to Main Stream (Normal), Main Stream (Event) or Sub Stream. The main stream is usually for recording and live viewing with good bandwidth, and the sub stream can be used for live viewing when the bandwidth is low. -
Page 57: Configuring Snapshot Settings
User Manual of DS-6700 Series Audio/Video Encoder panel and select the camera(s) to copy, or click Select All to select all cameras. Figure 8.8 Copy to Camera Click Save to save the above settings. 8.3 Configuring Snapshot Settings Purpose: You can configure the scheduled snapshot and event-triggered snapshot. The captured picture can be stored in the HDD, SD card (if supported) or the netHDD. -
Page 58: Configuring And Handling Alarms
User Manual of DS-6700 Series Audio/Video Encoder interface. Please refer to Step 3 in Section 8.4.1 Configuring Motion Detection or Step 4 in Section 8.4.2 Configuring External Alarm Input. Please refer to Section 7.3.9 Configuring FTP Settings for more details to configure FTP parameters. 8.4 Configuring and Handling Alarms Purpose: This section explains how to configure the network camera to respond to alarm events, including Motion... - Page 59 User Manual of DS-6700 Series Audio/Video Encoder the live video image. Note: You are allowed to draw 8 motion detection areas in the same image. (5) Click the button to finish drawing. You can click the button to clear all areas. (6) Move the slide bar to set the sensitivity of the camera.
- Page 60 User Manual of DS-6700 Series Audio/Video Encoder Figure 8.13 Motion Detection-Edit Arming Schedule Notes: The time of each segment can’t be overlapped. Up to 8 segments can be configured for each day. The Holiday option is available in the Schedule dropdown list when you have enabled holiday schedule in Holiday settings.
- Page 61 User Manual of DS-6700 Series Audio/Video Encoder Click the Linkage Method tab to enter the setting interface. Select the alarming linkage method(s) including Audible Warning, Notify Surveillance Center, Send Email and Upload to FTP. Audible Warning Trigger an audible beep when an alarm is detected. Note: The DS-6701/6704HWI and DS-6701/6704HFI models provide no audio beep.
-
Page 62: Configuring External Alarm Input
User Manual of DS-6700 Series Audio/Video Encoder Delay refers to the time duration that the alarm output remains in effect after alarm occurs. Note: If you choose Manual, you need to manually disable the alarm output. Click Edit to enter the Edit Schedule Time interface. The time schedule configuration is the same as the Setting of the Arming Schedule for Motion Detection. - Page 63 User Manual of DS-6700 Series Audio/Video Encoder Figure 8.19 Alarm Input Settings-Arming Time Set the arming schedule for the alarm input. Refer to Step 2 Set the Arming Schedule for Motion Detection in Section 8.4.1 Configuring Motion Detection. Click the Linkage Method tab to set the actions taken for the alarm input. Refer to Step 3 Set the Alarm Actions Taken for Motion Detection in Section 8.4.1 Configuring Motion Detection.
-
Page 64: Configuring Video Loss Alarm
User Manual of DS-6700 Series Audio/Video Encoder Choose the PTZ Linking channel. Check the relative checkbox to enable Preset Calling, Patrol Calling or Pattern Calling. You can copy your settings to other alarm inputs. Click Save to save the settings. 8.4.3 Configuring Video Loss Alarm Steps: Click Remote Configuration>... -
Page 65: Handling Exception
User Manual of DS-6700 Series Audio/Video Encoder Select the camera to configure the tamper-proof detection alarm. Figure 8.22 Tamper-proof Alarm Settings Click checkbox of Enable Tamper-proof. Set the tamper-Proof area. Please refer to Step 1 Set the Motion Detection Area in Chapter 8.3.1. Click Edit to edit the arming schedule for tamper-proof. -
Page 66: Configuring Privacy Mask
User Manual of DS-6700 Series Audio/Video Encoder Figure 8.23 Handling Exceptions Click Save to save the settings. 8.5 Configuring Privacy Mask Purpose: Privacy Mask enables you to cover certain areas on the video of the channel to prevent your privacy from live viewing and recording. -
Page 67: Configuring Rs-232/485 Settings
User Manual of DS-6700 Series Audio/Video Encoder Note: Up to 4 privacy mask areas can be configured. When finishing the area setting, click the button to finish drawing. You can click the button to clear all of the areas you set without saving it. Click Save to save the settings. - Page 68 User Manual of DS-6700 Series Audio/Video Encoder Figure 8.26 RS-485 Port Settings 2. Set the RS-485 parameters. By default, the Baud Rate is set as 9600, the Data Bit as 8, the Stop Bit as 1 and the Parity and Flow Control as None.
-
Page 69: Chapter 9 Record/Capture Settings
User Manual of DS-6700 Series Audio/Video Encoder Chapter 9 Record/Capture Settings Before you start Make sure the Encoder is connected with HDD (for DS-6700HWI/HFI-SATA) or network disk, and the HDD or network disk has been initialized for the first time to use. Two record/capture types can be configured: Manual and Scheduled. -
Page 70: Configuring Scheduled Record/Capture
User Manual of DS-6700 Series Audio/Video Encoder Figure 9.2 Edit Holiday You can check the finished holiday settings on the list. Repeat the same steps to edit other holidays. Up to 32 holidays can be configured. Figure 9.3 List of Holidays Note: The Holiday option is available in the Schedule dropdown list when you have enabled holiday schedule in Holiday settings. - Page 71 User Manual of DS-6700 Series Audio/Video Encoder Figure 9.4 Schedule Settings Interface Click Edit to enter the Edit Schedule interface. Choose the day in a week to configure scheduled record/capture. Figure 9.5 Edit Schedule Configure All Day or Customized period record/capture: ...
- Page 72 User Manual of DS-6700 Series Audio/Video Encoder Time and End Time of each period. The time of each period can’t be overlapped. Up to 8 periods can be configured. Note: Select a Record Type or Capture Type. The record/capture type can be Normal, Motion, Alarm, Motion &...
- Page 73 User Manual of DS-6700 Series Audio/Video Encoder If you want to copy the display settings of the current camera to other cameras, spread the Copy to Camera panel and select the camera(s) to copy, or click Select All to select all cameras. Figure 9.7 Copy to Camera Click Save to validate the above settings.
-
Page 74: Chapter 10 Playback
User Manual of DS-6700 Series Network Audio/Video Encoder Chapter 10 Playback Purpose: The recorded video files can be remotely played back through the WEB browser. Steps: Click Playback on the menu bar to enter playback interface: Figure 10.1 Playback Page Click the camera from the device list for playback. - Page 75 User Manual of DS-6700 Series Audio/Video Encoder Figure 10.3 Playback Page Use the buttons on the toolbar to operate in playback mode Figure 10.4 Playback Toolbar Table 10.1 Description of Toolbar Button Operation Button Operation Select window-division mode Play/Pause Stop playing Slow forward Fast forward Play by single frame...
-
Page 76: Chapter 11 Managing User Accounts
User Manual of DS-6700 Series Audio/Video Encoder Chapter 11 Managing User Accounts Click Remote Configuration>Remote Configuration>User Management to enter the User Information interface: Figure 11.1 User Information Interface The admin user is allowed to create normal users. And up to 31 users can be created. 11.1 Adding a User Steps: Click Add to enter the Add user interface. -
Page 77: Modifying A User
User Manual of DS-6700 Series Audio/Video Encoder • User: The Guest user has permission of Local Log Search in Local Configuration, Remote Log Search in Remote Configuration and only has the local/remote playback in the Camera Configuration. Configure the user permissions for the created user account, including the Basic Permission and Camera Operation. -
Page 78: Deleting A User
User Manual of DS-6700 Series Audio/Video Encoder 11.3 Deleting a User Steps: Select a user account from the list on the User Information interface to be deleted. Click Delete, and the information box will pop up: Figure 11.5 Delete a User Click OK to delete the selected user account. -
Page 79: Chapter 12 Log Search And Maintenance
User Manual of DS-6700 Series Audio/Video Encoder Chapter 12 Log Search and Maintenance 12.1 Log Search Purpose The operation, alarm, exception and information of the device can be stored in log files, which can be viewed and exported at any time. Before you start The Log function can be realized only when the Encoder is connected with HDD (for DS-6700HWI/HFI-SATA) or network disk. -
Page 80: Viewing Device Information
User Manual of DS-6700 Series Audio/Video Encoder 12.2 Viewing Device Information Click Remote Configuration > Device Parameters > Device Information to enter the Device Information interface of the encoder: Figure 12.2 Device Information You can edit the Device Name and Device No., and view the device information, including Model, Serial No., Firmware/Encode Version, Number of Channels, Number of HDDs, and Number of Alarm Input / Output. -
Page 81: Restarting The Device
User Manual of DS-6700 Series Audio/Video Encoder Figure 12.3 Maintenance Page 12.3.1 Restarting the Device On the Maintenance> Reboot interface, click Reboot to enter the following message box: Figure 12.4 Reboot the Device Click OK to reboot the device or Cancel to cancel the operation. 12.3.2 Restoring Default Settings On the Maintenance>... -
Page 82: Importing/Exporting Configuration Files
User Manual of DS-6700 Series Audio/Video Encoder By selecting the Restore button, the device restores the default settings for the parameters except the IP address, subnet mask, gateway and port. By selecting the Default button, the device restores the default settings for all parameters. On the pop-up message box, click OK to restore and reboot the device to validate the settings. -
Page 83: Chapter 13 Faq
User Manual of DS-6700 Series Audio/Video Encoder Chapter 13 FAQ Why cannot ping the Encoder? Please refer to Chapter 3 to configure the device’s IP being in the same segment as your PC, and check the cable and switch. ...
Need help?
Do you have a question about the Network Audio/Video Encoder and is the answer not in the manual?
Questions and answers