
Related Manuals for HighPoint RocketRAID 2760


Summary of Contents for HighPoint RocketRAID 2760
- Page 1 RocketRAID 2760 6Gb/s SAS/SATA Host Adapters User’s Guide Revision: 1.0 Date: April 2010 HighPoint Technologies, Inc.
- Page 2 Copyright Copyright © 2010 HighPoint Technologies, Inc. This document contains materials protected by International Copyright Laws. All rights reserved. No part of this manual may be reproduced, transmitted or transcribed in any form and for any purpose without the express written permission of HighPoint Technologies, Inc.
-
Page 3: Table Of Contents
Index: HIGHPOINT TECHNOLOGIES, INC..............5 HIGHPOINT ROCKETRAID 2760 – PCI-EXPRESS 2.0 ........6 1 - Features and Specifications ........................7 2 - Kit Contents ............................. 8 HARDWARE – DESCRIPTION AND INSTALLATION ........9 ROCKETRAID BIOS UTILITY ................12 1 - BIOS Settings Overview ........................12 Using the BIOS Utility ..........................12... - Page 4 4 - Web GUI - Configuring an Array ......................36 Initializing a new hard drive ........................36 Create an Array ............................37 5 - Web GUI - Configuring Spare Disks ....................39 To assign a Spare disk: ..........................39 6 - Web GUI - Recovering an Array ......................41 To Rebuild an array: ..........................41 7 - Web GUI - Maintaining RAID Arrays ....................43 Scheduling Tasks: ............................43...
-
Page 5: Highpoint Technologies, Inc
HighPoint Technologies, Inc. HighPoint Technologies, Inc. is a professional, host-based, RAID controller manufacturer. For more than 15 years, we’ve dedicated ourselves towards the manufacturing and deployment of quality, robust, cutting edge RAID host adapters based on the latest storage interfaces delivering our field-proven products to corporations, system builders, and individual consumers worldwide. -
Page 6: Highpoint Rocketraid 2760 - Pci-Express 2.0
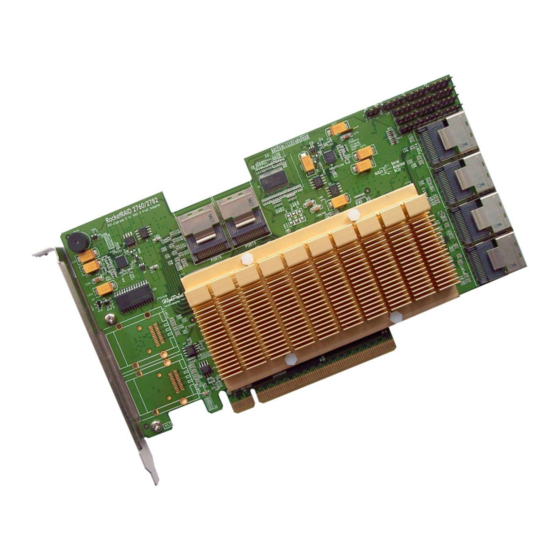
HighPoint RocketRAID 2760 – PCI-Express 2.0 X16 The RocketRAID 2760 host adapter is a high-performance SAS RAID solution, delivering reliability to demanding data-intensive applications such as tiered storage environments (disk-to-disk or disk-to-disk-to- tape backup), security and surveillance, video editing, and digital content creation. -
Page 7: Features And Specifications
1 - Features and Specifications Host Adapter Architecture PCI-Express x16 (Gen2) Support up 24 SAS/SATA drives 6 Internal Mini-SAS Connectors (SFF-8087) NVRAM for write journaling Hot Swap and hot plug RoHS complaint Advanced RAID Features ... -
Page 8: Kit Contents
HighPoint RAID Management (HRM) Hot key (ctrl-h) boot-up RAID manager via BIOS Web browser-base RAID management software (Web GUI) Command Line Interface (CLI) Operating System Support Windows XP, 2003, Windows Vista, Windows 2008, Windows 7 (32 and 64-bit versions) ... -
Page 9: Hardware - Description And Installation
Each port can direct connect up to 4 SATA/SAS hard disks. LED Connections LED connectors (Drive-activity/Drive-failure): The RocketRAID 2760 host adapter has 12 LED connectors that are used to indicate the activity and failure status of hard drives attached to the card’s 4/8 SATA/SAS channels. -
Page 10: Installing The Rocketraid Host Adapter
4. After installing the adapter, attach hard drives to the host adapter using the data cable. The RocketRAID 2760 model utilizes 6 Mini-SAS to Mini-SAS Cables are included in each retail box. Each Mini-SAS cable can direct connect up to 4 hard drives. Consult the chassis manual for proper installation procedures. -
Page 11: Verifying Installation
3 - Verifying Installation Once the host adapter and hard drives have been installed into the chassis, boot-up the system to verify that the hardware is properly recognized. 1. Power on the system. If the system detects the presence of the adapter, the RocketRAID BIOS Utility will be displayed during boot up. -
Page 12: Rocketraid Bios Utility
RocketRAID BIOS Utility The RocketRAID 2760 card will display its BIOS screen during the system's boot process. Press Control + H when prompted, to access the BIOS settings Menu. 1 - BIOS Settings Overview The RocketRAID 2760 BIOS utility is an interface that provides management commands and controller related settings. -
Page 13: Bios Commands
BIOS Commands Create - this command is used to open the RAID Creation menu. Delete - this command will delete the selected RAID array. Add/Remove Spare - this command is used to assign hard disks to function as spare disks. The controller is capable of using spare disks to automatically rebuild broken or faulted RAID arrays. - Page 14 Creating Arrays: Select Create from the toolbar and press Enter. Use the arrow keys to select the RAID level and press ENTER. Use the arrow keys to highlight the Array Name option and press Enter. The array name dialogue box will appear.
- Page 15 On the Create menu, use the arrow keys to highlight the Select Devices item and press Enter. A device list will appear, and display all available hard disk drives. Highlight the target disks that you want to use, and press Enter to select them. You can use the arrow keys to select from the next set of disks (the screen will display 8 ports at a time.
-
Page 16: Deleting Arrays
Sector Size – Also known as “Variable Sector Size”. Use this option if you are using an older 32-bit Windows operating system. This allows older operating systems to support volumes over 2TB in size. Do not use if the operating system already supports large volumes (such as GPT). To complete the creation procedure, use the arrow key to highlight the Start Creation item and press Enter. -
Page 17: Add/Remove Spare Disks
4 - Add/Remove Spare Disks This Add/Remove Spare command is used to assign a hard disk to act as a Spare Disk. Spare Disks are used to automatically rebuild Redundant RAID arrays (RAID 1, 5, 10, 50) in the case of disk failure. As with creating RAID arrays, disks must be initialized before they can be used as spares. -
Page 18: Highpoint Software Cd
HighPoint Software CD Each retail box includes a copy of the HighPoint Products Software CD. This CD can be used to generate driver diskettes, and install the HighPoint RAID Management Utility Suite for a variety of operating systems. Creating a driver diskette Windows XP, 2003 and several distributions of Linux and FreeBSD require driver diskettes when installing the operating system directly to a disk or array hosted by the Rocket RAID host adapter. -
Page 19: Device Driver Installation - Windows Operating Systems
Device Driver Installation – Windows Operating Systems We recommend visiting the RocketRAID product pages for the latest Windows Device Driver updates: http://highpoint-tech.com Drivers are posted in .zip archive format. Most Windows operating systems will recognize this archive format, natively. Double click the driver download to view and extract their contents. Drivers can be extracted and/or copied to various media. -
Page 20: Rocketraid 2760 Windows Driver Installation
RocketRAID 2760 Windows Driver Installation Windows XP, 2003 Installing the RocketRAID driver for an existing Windows system After the operating system has booted, the Hardware Wizard will detected the card and request that the Device Driver be installed. When the “Found New Hardware Wizard” window appears and asks to search online, select “No, not this time”. - Page 21 Click on the “Include this location in the search” option, and click “Browse”. Browse to the location of the driver and click Next. Windows will display a warning message that states the driver has “not been signed”. Select “Continue Anyway”.
- Page 22 Windows will repeat this process 4 times – you will not need to specify the location of the driver. Allow Windows to locate the driver automatically. After the driver has been installed for the last time, Windows will display a new prompt. Click finish when prompted, and allow Windows to reboot.
-
Page 23: Rocketraid 2760 Windows 7/Vista/Windows 2008 Driver Installation
RocketRAID 2760 Windows 7/Vista/Windows 2008 Driver Installation Installing the driver for an existing Windows 7, Vista and 2008 system Install the RocketRAID host adapter into the PC, then boot up Windows Vista. Windows should automatically detect the card, and display the “Found New Hardware” wizard pop-up window. - Page 24 Select “I don’t have disc, show me other options”. Select “Browse my computer for driver software”.
- Page 25 Browse to the location of the driver and click “Next”. When asked: “Would you like to install this driver software?” select “Install”.
- Page 26 Windows can install drivers from several media types: floppy diskette, USB flash disk or CD. Select the RocketRAID 2760 controller driver, and click “Next”. The driver is now installed – the disk or array will be recognized as available disk space. Windows setup will then proceed normally.
-
Page 27: Highpoint Raid Management Utilities (Hrm) - Web Gui / Cli
HighPoint RAID Management Utilities (HRM) – Web GUI / The HighPoint RAID Management Utility Suite, also known as “HRM”, includes several user interface options. The latest version of the Web Management utility user manual, is available from our website. Windows Operating Systems – Installing the Web GUI from the Software CD. Click on “Install RAID Management Software”. -
Page 28: Debian/Ubuntu Linux Distributions - Installing The Web-Based Management Utility
# rpm -e hptsvr-https Linux Distributions – Command Line Interface (CLI) Command Line interface versions of the RocketRAID management utilities are available for Linux and FreeBSD operating systems. These packages are posted on the HighPoint Technologies, Inc. website, under RR2700 Product page (downloads). -
Page 29: Installing The Web Gui (V1.5.3) - Windows Operating Systems (2000, Xp, 2003, Vista, 2008, Windows 7)
1 - Installing the Web GUI (v1.5.3) - Windows Operating Systems (2000, XP, 2003, Vista, 2008, Windows 7) 1) After downloading the Web GUI, double-click the zip file to view the contents. Double-click “Setup” to start installation. If you are running a 64-bit version of Windows 7, 2008 or Vista, you may need to right-click the icon, and select “Run as Administrator.”... - Page 30 2) The HighPoint Web RAID Management Service install screen will display. Click Next to continue: 3) Click Yes to install the Management utility:...
- Page 31 4) Specify the Destination folder and click Next: Confirm the install location, and click Next:...
- Page 32 5) Select the SAF-TE configuration file for the system’s chassis. If the system does not support SAF-TE, select the default option “Skip and Configure Later”. 6) Specify the listening port. 7402 is the default setting, and recommended for most systems.
- Page 33 7) Choose to enable or disable Remote Access. Remote access allows the card to be managed via a Web browser from a separate system. 8) Click OK to complete the installation procedure:...
-
Page 34: Starting The Web Gui
2 - Starting the Web GUI 1) Double-click the “HighPoint Web RAID Management” Icon on the Desktop to start the Web GUI. The system’s default Web Browser will open the following page: 2) Type in the default username and password to start the Web GUI: Username: RAID Password: hpt Note: The password can be changed using the “Settings”... -
Page 35: Web Gui - Icon Definitions
3 - Web GUI – Icon Definitions The Rocket RAID Web GUI uses a variety of Icons to represent various states or functions. The following is a list of common icons, and their definitions. :“Critical-broken” status. Fault-tolerance is disabled. The array requires a replacement disk in order to rebuild parity. -
Page 36: Web Gui - Configuring An Array
4 - Web GUI - Configuring an Array This guide assumes that the hard disks have already been installed into the external chassis, and attached to the card. These hard disks must be initialized before they can be configured as arrays. Initializing a new hard drive Use the Initialize Devices option to prepare hard disks for use (creating arrays, rebuilding arrays, expanding arrays, Spare disks). -
Page 37: Create An Array
Create an Array To create an array, select Manage – Array from the Web RAID Management Utility’s toolbar. This will open the Manage Array menu: To create an array: Select the desired RAID level from the Array Type drop down menu: 2) Name the array –... - Page 38 Foreground: The RAID initialization process will be set as high priority. The array cannot be utilized this procedure is complete, but the build process will take considerably less time, as the host adapter will dedicate its resources to completing this task. This is most secure option. Background: This option lowers the priority of RAID initialization.
-
Page 39: Web Gui - Configuring Spare Disks
5 - Web GUI - Configuring Spare Disks The term “Spare Disk” refers to a hard disk, or dedicated disk space, that is used to rebuild a RAID array in the case of hard disk failure. If free ports/channels are available, spare disks are ideal for minimizing g downtime –... - Page 40 2) Click “OK” when the pop-up window is displayed. This will add the disk to the Spare Pool. 3) To remove a Spare Disk from the Spare pool, click the box before the target Spare Disk, and click the “Remove Spare” button: The disk will be moved o the “Available Disk”...
-
Page 41: Web Gui - Recovering An Array
When a redundant array’s status is ”Critical”, fault tolerance is disabled. The array is can be used in this format, but should be rebuild as soon as possible. If a Spare disk was configured, the RocketRAID 2760 will use this disk to automatically rebuild the array. If a spare is not available, the array can be rebuilt manually. - Page 42 2) Click “Add Disk”. 3) Select the desired drive and click “submit. 4) The Web GUI will initiate the rebuild procedure, and display a progress bar.
-
Page 43: Web Gui - Maintaining Raid Arrays
Web GUI - Maintaining RAID Arrays Regular scheduled RAID Maintenance is essential to data security. We recommend routine RAID verification sessions to ensure the parity of redundant arrays is properly synchronized. Unsynchronized arrays face an elevated risk of data loss in the event of hardware failure, even if the array itself is left intact. To schedule maintenance sessions, or “Tasks”, select the “Task”... -
Page 44: Removing Tasks
Removing Tasks 1) From the task List, Check the box before the target Task and click “Delete”. -
Page 45: Shi - Storage Health Inspector
SHI – Storage Health Inspector The Storage Health Inspector section provides real-time device related information including temperature readings, bad sector counts, and access to SMART data. Click “SMART” besides each disk to see its SMART attribute status. SMART attributes vary based on the disk model and manufacturer. This information is reported by the drives themselves –... -
Page 46: Web Gui - Safeguarding Your Array
8 - Web GUI - Safeguarding your Array The RocketRAID Host Adapter provides a number of innovative maintenance and notification features designed to help streamline the administration of critical data storage, and minimize downtime in the case of a major hardware failure. To access these features, select from the utility toolbar: Settings –... - Page 47 Enable Audible Alarm – enable or disable the card’s alarm. The alarm will sound if the disk or array stops responding. Event Log Path – Use this to select the location of the Web GUI’s event log. Enable Continue to Rebuild on Error – this setting is disabled by default. We do not recommend using unless replacement disks are unavailable, or if recommended by a Customer Support technician.
-
Page 48: Web Gui - Event Notification
9 - Web GUI - Event Notification The RocketRAID 2760 host adapters will record Administrator activity or RAID related errors to the Web GUI’s Event Log. Data recorded to the event log is classified as an “event”. From the toolbar, click “Event”. -
Page 49: Configuring Smtp (E-Mail) Notification
Configuring SMTP (E-mail) Notification The Web GUI provides an SMTP notification system – this feature can be used to instruct the Web GUI to send Event data to an Email address. This feature is useful for remote maintenance sessions. To configure E-mail notification, select from the utility toolbar: Settings –... -
Page 50: Web Gui - Advanced Raid Functions (Windows Vss, Oce/Orlm)
10 - Web GUI - Advanced RAID Functions (Windows VSS, OCE/ORLM) VSS – Variable Sector Size Variable Sector size allows you specify the sector size when creating a RAID array. This feature allows older, 32-bit versions of Windows 2000 and XP to support volumes over 2TB. This feature is limited to data volumes –... - Page 51 After selecting the block size, the Web GUI will display a warning message: Select OK to continue. Click the “Create” button once more to create the array. The Web GUI will notify you that the array has been successfully created. Click OK to confirm. After creating the array, access the Windows Disk Management utility.
- Page 52 Double-click “Administrative Tools”. Double-Click “Computer Management”. Under “Storage”, click on the folder icon labeled “Disk Management”. Disk Management should open the Disk Wizard. Click “Next” to initialize the new volume.
- Page 53 Disk Management Click “Next” to continue...
- Page 54 Click “Finish” to continue. 10. Right-click the “Unallocated” box and select “New Partition”. 11. Partition and format the array as desired.
-
Page 55: Online Capacity Expansion And Raid Level Migration (Oce/Orlm)
Online Capacity Expansion and RAID Level Migration (OCE/ORLM) OCE/ORLM allows you to add hard disks to an existing RAID array, and/or convert the array to another RAID level. Data stored on the array is not lost during this procedure. The procedure described below documents the expansion of a 3-disk 2TB RAID 5 array to a 4-disk, 3TB RAID 5 array. - Page 56 a) Target Name – The GUI will ask that you enter a “new” name for reference (the previous RAID configuration will be displayed until the procedure is complete). The array's name can be changed after the expansion/migration process is complete. b) Specify the Cache policy (Write Back is default).
- Page 57 The Web GUI will notify you when the process starts. A progress bar will be displayed under the Status column of the Manage-Array menu. After the expansion/migration process is complete, Disk Management should recognize the additional capacity. You are free to create a second partition, or expand the existing partition. Notes: ...
-
Page 58: Customer Support
Customer Support If you encounter any problems while utilizing the RocketRAID host adapter, or have any questions about this or any other HighPoint Technologies, Inc. product, feel free to contact our Customer Support Department. Troubleshooting Checklist Before contacting our Customer Support department: ... -
Page 59: Thank You
Thank You Thank you for purchasing the RocketRAID 2760 SAS/SATA RAID Host adapter. We appreciate your support, and welcome any questions, comments or product suggestions you may have. Contact HighPoint Corporate Headquarters USA Address 1161 Cadillac Ct. Milpitas, CA, 95035 http://www.highpoint-tech.com... -
Page 60: European Union Compliance Statement
FCC Part 15 Class B Radio Frequency Interference statement This equipment has been tested and found to comply with the limits for a Class B digital device, pursuant to part 15 of the FCC Rules. These limits are designed to provide reasonable protection against harmful interference in a residential installation.
Need help?
Do you have a question about the RocketRAID 2760 and is the answer not in the manual?
Questions and answers