
Related Manuals for HighPoint RocketRAID 2220


Summary of Contents for HighPoint RocketRAID 2220
- Page 1 RocketRAID 2220 SATAII Host Adapter User’ s Guide Revision: 1.0 Date: March 2005 HighPoint Technologies, Inc.
- Page 2 Copyright Copyright © 2005 HighPoint Technologies, Inc. This document contains materials protected by International Copyright Laws. All rights reserved. No part of this manual may be reproduced, transmitted or transcribed in any form and for any purpose without the express written permission of HighPoint Technologies, Inc.
-
Page 3: Table Of Contents
RocketRAID 2220 Hardware ... 9 1 – RocketRAID 2220 Adapter Layout... 9 2 - LED Connections ... 10 3 - Installing the R ocketRAID 2220 Host Adapter ... 11 4 - Verifying Installation ... 12 5 - Single-RAID Cross Adapter... 12 ROCKETRAID 2220 BIOS UTILITY... - Page 4 3 - Creating an Array... 21 4 - Deleting an Array ... 22 5 - Configuring Spare Disks ... 22 6 - Recovering/Verifying Arrays ... 23 7 – OCE/ORLM ... 23 8 - Misc. Array/Device Options... 24 9 - Managing Events ... 25 10 - Configuring Remote Systems ...
-
Page 5: About This Guide
About this Guide The RocketRAID 2220 SATA II Host Adapter’ s User’ s Guide provides information about the functions and capabilities of the host adapter, and instructions for installing, configuring and maintaining RAID arrays hosted by the adapter. Introducing the RocketRAID 2220 Host Adapter The HighPoint RocketRAID 2220 is an 8 -channel Serial ATA II RAID controller. -
Page 6: Understanding Raid Concepts And Terminology
Non-redundant arrays (RAID0, JBOD) do not need to be initialized. When you create a redundant array using the RocketRAID 2220 controller’ s BIOS Configuration Utility, it will create the array in un-initialized state. The initialization process can be completed after installing the driver and management software. - Page 7 Legacy disk Disks attached to the RocketRAID 2220 that contain valid partition tables will be identified as legacy disks . A legacy disk attached to the RocketRAID 2220 can be accessed by the operating system, but cannot be...
-
Page 8: Rocketraid 2220 Hardware Description/Installation
RocketRAID 2220 Hardware Description/Installation... -
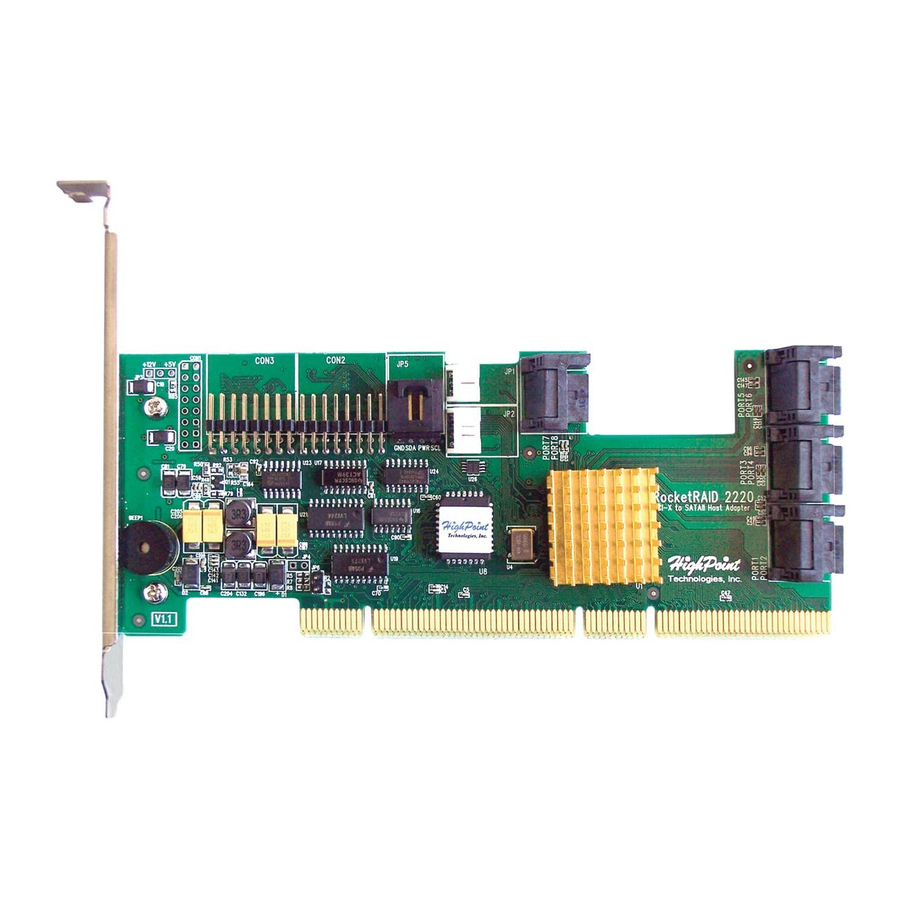
Page 9: Rocketraid 2220 Hardware
1 – RocketRAID 2220 Adapter Layout Port1- Port8 These represent the RocketRAID 2220’ s eight SATA channels. The SATA port furthest away from the surface of the adapter is always the odd numbered channel (1, 3, 5, 7), while the port closest to the adapter is the even numbered channel (2, 4, 6, 8). -
Page 10: Led Connections
D1 through D8 represent SATA channels SATA1 through SATA8 respectively. The following diagrams describe the connector pin definitions for LED CON2 (disk activity), and CON3 (disk failure). CON1is not utilized by the RocketRAID 2220. CON2: Hard Disk Activity (D1 through D8) -
Page 11: Installing The Rocketraid 2220 Host Adapter
Open the system chassis and locate an unused PCI-X slot. Remove the PCI slot cover. Gently insert the RocketRAID 2220 into the PCI slot, and secure the bracket to the system chassis. After installing the adapter, attach hard disks to the RocketRAID 2220 using an SATA data cable. -
Page 12: Verifying Installation
Up to sixteen hard disks can be assigned to a single RAID array, and these disks can be attached to as many as four separate RocketRAID 2220 host adapters. This feature is referred to as “Single-RAID Cross Adapter” support. -
Page 13: Rocketraid 2220 Bios Utility
RocketRAID 2220 BIOS Utility... -
Page 14: Rocketraid 2220 Bios Utility
- this function is used to designate a particular disk or RAID array to function as the RocketRAID 2220's boot device. Note: This setting is only relevant if the motherboard's BIOS has set the RocketRAID 2220 to function as the system’ s primary boot device. -
Page 15: Creating Raid Arrays
ENTER to view the information. RAID arrays – displays information about RAID arrays attached to the RocketRAID 2220. Use the arrow keys to highlight the target array, and press ENTER to view the information. -
Page 16: Adding/Removing Spare Disks
ENTER. Single RAID – Cross Adapter The term “Single RAID – Cross Adapter” refers to the RocketRAID 2220 ability to create RAID arrays between drives attached to multiple RocketRAID 2220 Adapters. Each RAID array can support up to 16 hard disks, and these disks can be attached to as many as 4 separate RocketRAID 2220 adapters. -
Page 17: Rocketraid 2220 Driver And Software Installation Microsoft Windows (2000, Xp, 2003 Server)
RocketRAID 2220 Driver and Software Installation Microsoft Windows (2000, XP, 2003 Server) -
Page 18: Windows Driver Installation
Double click the “ SCSI and RAID controllers” entry. If the RocketRAID 2220 device entry is not displayed, o r there are "?" or "!" marks displayed near the RocketRAID 2220 entry, the driver has not been installed properly. Delete the entries and reinstall the driver. -
Page 19: Installing The Raid Management Console/ Interface Overview
To start the software, double -click the (picture) icon on the desktop. Logging On The RAID Management Console requires that a user (or Administrator) log on. The software is incapable of working with RAID arrays or hard disks attached to the RocketRAID 2220 until the user has logged on. Default Parameters: System Address: 127.0.0.1... -
Page 20: Software Interface - Overview Of Commands/Functions
Logging On (continued) Note: The password and user name fields are case sensitive. The first time the software is used, make sure to enter the information listed above. After successfully logging on, the software will ask you to alter the password (as a security precaution). Enter a password, and press enter. -
Page 21: Creating An Array
3 - Creating an Array To create an array: Highlight the “ Management” menu, then select the "Array Management” function. Click the Create button on the toolbar or select the "Create" command from the "Operation" menu. The array creation wizard will appear. Select the desired RAID level from the drop-down list. -
Page 22: Deleting An Array
Select the capacity - the RocketRAID 2220 can create multiple arrays on the same set of drives. As a result of this feature, you have the option of assigning a physical disk to multiple RAID arrays. -
Page 23: Recovering/Verifying Arrays
3. Click the Verify button on the toolbar or select the "Verify" command from the "Operation" menu. 4. Verify process will start. 7 – OCE/ORLM The RocketRAID 2220 supports both OCE (Online Capacity Expansion), and ORLM (Online RAID Level Migration. The RAID software provides support for these features through a single function, known as OCE/OLRM. -
Page 24: Misc. Array/Device Options
8 - Misc. Array/Device Options Device Management The Device Management window provides configuration information about controllers (the RocketRAID 2220 and other HighPoint host adapters), channels and hard disks. To access the Device Management window, highlight the "Management" menu, and select the "Device Management" function. -
Page 25: Managing Events
Renaming an Array Highlight the "Management" menu, and select the "Array Management” function. Highlight the array you want to rename. Click the Rename button on the toolbar or select the "Rename" command from the "Operation" menu. Enter a new name for the array using the keyboard, and press the OK button to confirm your selection. Note: An array running background tasks cannot be renamed. -
Page 26: Managing Tasks
The RAID management Console can be used to setup routine, periodical background-rebuild or verify tasks that will help maintain the integrity of RAID arrays attached to the RocketRAID 2220. To setup and schedule tasks highlight the “Management” menu, and select the “Task Management”... - Page 27 Task Management (continued) The Task Schedule list displays all of the tasks assigned to the selected remote system. To view detailed information about a specific task, highlight and Double-click the task’ s name. Add a Scheduled Task This command is used to add a Scheduled task for the selected remote system. To add a new scheduled task: Click the “New”...
- Page 28 New Task Wizard (continued Select the task type and the array that you want to verify or rebuild, then click “Next”. Enter a name for the task. Configure the frequency for the task. Set the duration for the task. Check the “Enable the task” option to activate this task. Click “Finish”.
-
Page 29: Configuring Remote Systems
Modify a Scheduled Task This command is used to change settings for a scheduled task. To Modify a Task Schedule: 1. Select a task from the Task schedule list. 2. Click the “Modify” button on the toolbar, and modify the task settings in the popup window. Delete a Scheduled Task This command is used to delete a Scheduled Task for the selected remote system. -
Page 30: Modify A Connection
Modify a Connection This command modifies connection information for a remote system. To modify a connection: Highlight the “File” menu and select the “Remote Control” function. Highlight the system you want to modify. Click the Modify button on the toolbar or select the “ Modify” command from the “ Operation” menu. Enter new connection information in the popup window, and click OK to apply the changes. -
Page 31: System Configuration
Connect to a Remote System (Continued) Note: The initial user name/password for a remote system is RAID/hpt. You are free to modify the username and password after the connection is established. If the connection is successful established, the application will retrieve the event logs from the remote system, then switch to Array Management view. -
Page 32: Configuring Users And Privileges
System Configuration (Continued) Event Port - The client software will retrieve events through this port. The default value is 7403. The System Port value must differ from the value assigned to the Event Port. After you reset a system’ s configuration, you should restart the service on that system for the changes to take effect. -
Page 33: Set Password
Delete a User This function deletes a user’ s account on the connected remote system. To delete a user: 1. Select the target user ID from the User list displayed in the User Management window. 2. Click Delete to remove the selected user. Click “Yes” to delete the item. Select “No” to cancel this command. -
Page 34: Linux Driver Support
Linux Driver Support... -
Page 35: Fedora Core 3 Linux Installation Overview
1 – Fedora Core 3 Linux installation Overview This section provides instructions describing how to install and utilize the RocketRAID 2220 Adapter on a Fedora Core 3 Linux system. 2 - Installing Fedora Core 3 on the RocketRAID 2220 Host Adapter Note: If the OS is running kernel that differs from the one supported by the precompiled driver, the precompiled drivers cannot be used. - Page 36 3 - Installing the RocketRAID 2220 driver for an Existing System Note: If a SCSI adapter is used to boot the system, make sure the RocketRAID 2220 controller BIOS loads/posts after the SCSI adapter’ s BIOS. It may be necessary to move the adapter(s) to another PCI slot.
-
Page 37: Uninstalling The Driver
If the original driver is installed in the system’ s initrd (Initial RAM Disk) file (when using a system installed to Rocket RAID 2220 controller, for example), the driver module in t he initrd file should be updated using the mkinitrd command (or extract the initrd file and replace the driver module manually). -
Page 38: Red Hat Enterprise 3 Overview
Continue the installation as normal. You can refer to Red Hat Enterprise Linux installation guide. Note: 1. The system device mapping order is the same as the order shown in RocketRAID 2220 BIOS Setting Utility. If no other SCSI adapters are installed, the device marked as “BOOT”... - Page 39 3 - Installing the RocketRAID 2220 driver for an Existing System Note: If a SCSI adapter is used to boot the system, make sure the RocketRAID 2220 controller BIOS loads/posts after the SCSI adapter’ s BIOS. It may be necessary to move the adapter(s) to another PCI slot.
- Page 40 /mnt/raid 4 - Updating the Driver If you are not booting from disks attached to RocketRAID 2220 controller, you can update the driver just by reinstalling it following the procedure outlined in the previous section, "Installing the RocketRAID 2220 driver for an Existing System".
-
Page 41: Suse Linux Enterprise Server (Sles) Installation Overview
RocketRAID 2220 controller. This package is available from our website, and is posted on the BIOS/Driver page for the Rocket RAID 2220. To install SLES onto hard disks or RAID arrays attached to RocketRAID 2220 controller, follow the steps outlined below: Step 1 Prepare the Driver Diskette The driver is contained in a floppy diskette image file (slesdd.img). - Page 42 2220 controller, follow the steps outlined below: Note: If a SCSI adapter is used to boot the system, make sure the RocketRAID 2220 controller BIOS loads/posts after the SCSI adapter’ s BIOS. It may be necessary to move the adapter(s) to another PCI slot.
- Page 43 To create a partition on this array (which will listed as /dev/sda1), use the “fdisk /dev/sda” command. Next, use the “mkfs /dev/sda1” command to setup a file system on this partition. Use the command “mkdir xxxx” to create a mount point for the RAID array. Then, mount /dev/sda1 /xxxx in order to access it.
- Page 44 Note: If the driver is loaded in initrd (when system is installed onto a disk or array attached to the RocketRAID 2220), you need to run the mkinitrd command to update the initrd file. If you are using the lilo boot loader, run lilo again (# lilo).
-
Page 45: Customer Support
Customer Support If you encounter any problems while utilizing the RocketRAID 2220, or have any questions about this or any other HighPoint product, feel free to contact our Customer Support Department. Troubleshooting Checklist Before contacting our Customer Support department: Make sure the latest BIOS, driver and RAID Software have been installed for the RocketRAID 2220. - Page 46 FCC Part 15 Class B Radio Frequency Interference statement This equipment has been tested and found to comply with the limits for a Class B digital device, pursuant to part 15 of the FCC Rules. These limits are designed to provide reasonable protection against harmful interference in a residential installation.
Need help?
Do you have a question about the RocketRAID 2220 and is the answer not in the manual?
Questions and answers