Table of Contents
Advertisement
Advertisement
Table of Contents

Related Manuals for Icom IC-F27SR


Summary of Contents for Icom IC-F27SR
- Page 1 INSTRUCTION MANUAL PMR446 TRANSCEIVER iF27SR...
-
Page 2: Explicit Definitions
If disregarded, inconvenience only. No risk of NOTE personal injury, fire or electric shock. Icom, Icom Inc. and the Icom logo are registered trademarks of Icom Incorpo- rated (Japan) in Japan, the United States, the United Kingdom, Germany, France, Spain, Russia and/or other countries. -
Page 3: Country Code List
COUNTRY CODE LIST • ISO 3166-1 Country Codes Country Codes Austria Liechtenstein Belgium Lithuania Bulgaria Luxembourg Croatia Malta Czech Republic Netherlands Cyprus Norway Denmark Poland Estonia Portugal Finland Romania France Slovakia Germany Slovenia Greece Spain Hungary Sweden Iceland Switzerland Ireland Turkey Italy United Kingdom... -
Page 4: Precautions
Use and charge only specified Icom battery packs with Icom radios or Icom chargers. Only Icom battery packs are tested and approved for use with Icom radios or charged with Icom chargers. Using third-party or counterfeit battery packs or chargers may cause smoke, fire, or cause the battery to burst. - Page 5 DO NOT use or place the transceiver in direct sunlight or in areas with temperatures below –25°C or above +55°C. The basic operations, transmission and reception of the transceiver, are guaranteed within the specified operating temperature range. DO NOT modify the transceiver. The transceiver warranty does not cover any problems caused by unauthorized modification.
-
Page 6: Table Of Contents
TABLE OF CONTENTS FOREWORD ..................i EXPLICIT DEFINITIONS ..............i COUNTRY CODE LIST ..............ii PRECAUTIONS ................iii TABLE OF CONTENTS ..............v 1 ACCESSORIES ..............1–4 ‘ Supplied accessories ............1 ‘ Accessory attachments ............2 ï Belt clip ................2 ï Battery pack/case ..............3 ï Jack cover ................4 2 PANEL DESCRIPTION ............5–9... - Page 7 4 BATTERY CHARGING .............19–29 ‘ Caution (for the BP-264 ) ......19 Ni-MH battery ‘ Caution (for the BP-265 ) .......21 Li-ion battery ï Battery caution ..............21 ï Charging caution .............23 ‘ Battery chargers ..............24 ï Using the BC-191 to rapid charge the BP-264 ....24 ï...
-
Page 8: Accessories
ACCESSORIES ■ Supplied accessories The following accessories are supplied with the transceiver. Battery pack* Battery charger* AC adapter* Jack cover Belt clip (with screws) * Not supplied, or the shape is different, depending on the version. -
Page 9: Accessory Attachments
ACCESSORIES Accessory attachments ■ D Belt clip To attach the belt clip: Slide the belt clip in the direction of the arrow until it locks in ➥ place, and makes a ‘click’ sound. Belt clip Battery pack To detach the belt clip: Remove the battery pack from the transceiver, if it is attached. -
Page 10: Battery Pack/Case
ACCESSORIES Supplied accessories (continued) ■ D Battery pack/case To attach the battery pack/case: Fit the battery pack/case in the direction of the arrow, then close. Hook the latch until it makes a ‘click’ sound. Battery pack/case Latch To remove the battery pack/case: Unhook the latch (q), and lift up the battery pack/case in the direc- tion of the arrow (w). -
Page 11: Jack Cover
ACCESSORIES NEVER remove or attach the battery pack/case when the trans- ceiver is wet or soiled. This may result in water or dust getting into the transceiver, battery pack/case, and may result in them being damaged. NOTE: Keep the battery terminals clean. It’s a good idea to reg- ularly clean them. -
Page 12: Panel Description
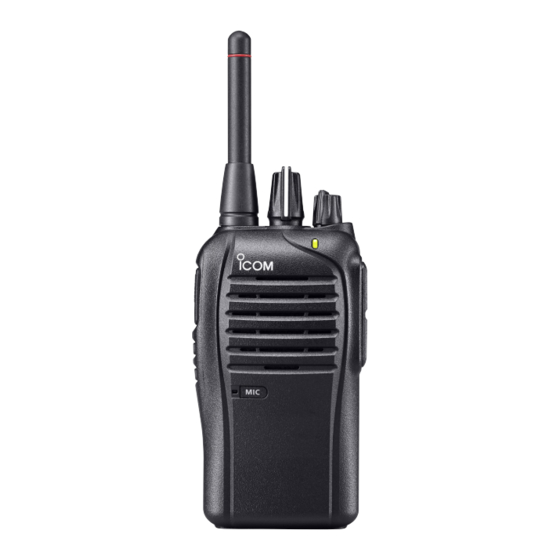
PANEL DESCRIPTION ■ Front, top and side panels ROTARY SELECTOR Antenna VOLUME CONTROL LED INDICATOR PTT SWITCH Speaker SPEAKER- UPPER KEY MICROPHONE LOWER KEY JACK Microphone q ROTARY SELECTOR Rotate to select the preprogrammed memory channels. w VOLUME CONTROL [VOL] Rotate to turn the power ON/OFF, and adjust the audio level. - Page 13 PANEL DESCRIPTION e LED INDICATOR (p. 9) Lights red* while transmitting. ➥ * When the optional battery case is attached, the LED indicator lights orange. Lights green while receiving a signal, or when the squelch ➥ is open. r SPEAKER-MICROPHONE JACK [SP MIC] Connect the optional speaker-microphone or plug adapter ca- ble.
-
Page 14: Programmable Key Functions
If [Upper] or [Lower] is preprogrammed, push to activate whichever function is set. Consult your Icom dealer for details concerning which functions are programmed into the key. SCAN A Push to start or cancel the scanning operation. - Page 15 PANEL DESCRIPTION MONITOR Hold down for 1 second to temporarily release the CTCSS* ➥ DTCS* ) squelch mute. Push to activate the CTCSS* (or DTCS* ) squelch mute. ➥ Holding down [ ] opens any squelch and deactivates any MONI ➥...
-
Page 16: Led Indicator
PANEL DESCRIPTION ■ LED indicator The LED indicator indicates the status of various parameters of the transceiver, as follows; (Ref.; R=Red, G=Green, O=Orange) • TX: Lights Red while transmitting a signal. • RX: Lights Green while receiving a signal. • Fast/Slow scan: Blinks when the Fast/Slow scan is activated. c an •... -
Page 17: Operation
OPERATION ■ Turning ON the power Prior to using the transceiver for the first [VOL] time, the battery pack must be fully charged for optimum life and operation. (p. 19) Rotate [VOL] to turn ON the power. ➥ Battery type selection The battery type must be selected according to the battery pack or case when it is changed, but only the first time it is used. -
Page 18: Channel Selection
OPERATION ■ Channel selection Several types of channel selecting methods are available. They may differ, according to your system set up. To select a desired operating channel, do one of the following: • Rotate [ROTARY SELECTOR]. • Push one of memory channel keys, [MR-CH 1] to [MR-CH 4]. AUTOMATIC SCAN TYPE: Selecting a channel is not necessary for this type. -
Page 19: Receiving And Transmitting
OPERATION Receiving and transmitting ■ Receiving: Rotate [VOL] to turn ON the power. Rotate [ROTARY SELECTOR], or push one of the memory channel keys, [MR-CH 1] to [MR-CH 4], to select a channel. When receiving a call, adjust the audio output to a comfortable listening level. -
Page 20: Preprogrammed Frequency And Ctcss Tone List (Default)
OPERATION Receiving and transmitting (continued) ■ D Preprogrammed frequency and CTCSS tone list (Default) Frequency (MHz)* Tone (Hz)* 446.006250 No setting 446.018750 No setting 446.031250 No setting 446.043750 107.2 446.056250 110.9 446.068750 114.8 446.081250 118.8 446.093750 123.0 446.006250 127.3 446.018750 131.8 446.031250 136.5... -
Page 21: D Transmitting Notes
OPERATION D Transmitting notes • Transmit inhibit function The transceiver has several inhibit functions which restrict trans- mission under the following conditions: - The channel is muted. - The channel is busy. - A signal with an un-matched CTCSS (or DTCS) tone is re- ceived. -
Page 22: Setting The Microphone Gain
OPERATION ■ Setting the microphone gain Adjusts the microphone gain. Rotate [VOL] to turn OFF the [ROTARY SELECTOR] transceiver power. [VOL] Set [ROTARY SELECTOR] to any channel other than Chan- nel 16. While pushing and holding [Lower], rotate [VOL] to turn ON the power and enter the micro- phone gain adjustment mode. -
Page 23: Setting The Squelch Level
OPERATION ■ Setting the squelch level The squelch circuit mutes the received audio signal, depending on the signal strength and the squelch setting. Rotate [VOL] to turn OFF the [ROTARY SELECTOR] transceiver power. [VOL] Set [ROTARY SELECTOR] to any channel other than Channel While pushing and holding [PTT] and [Lower], rotate [VOL] to turn ON the power and enter the... -
Page 24: Priority A Channel Selection
OPERATION ■ Priority A channel selection Depending on the preprogramming, the Priority A channel is se- lected each time the transceiver power is turned ON. ■ Auto scan function The Auto scan function sequentially scans from the selected chan- nel. Scanning automatically searches for signals and makes it eas- ier for you to find stations to contact or to just listen to. -
Page 25: Power Save Function
OPERATION ■ Power save function The power save function reduces the current drain to conserve bat- tery power. • Depending on the preprogramming, the power save function is au- tomatically turned ON when no operation is performed or no signal is received for the preprogrammed time period. -
Page 26: Battery Charging
BATTERY CHARGING ■ Caution (for the BP-264 mh battery R DANGER! NEVER short terminals (or charging terminals) of the battery pack. Also, current may flow into nearby metal objects such as a necklace, so be careful when placing battery packs (or the transceiver) in handbags, etc. - Page 27 BATTERY CHARGING If your Ni-MH battery pack seems to have no capacity, even after being charged, completely discharge it by leaving the power ON overnight. Then, fully charge the battery pack again. If the battery pack still does not retain a charge (or only very little charge), a new battery pack must be purchased.
-
Page 28: Caution (For The Bp-265 Li-Ion Battery )
R DANGER! Use and charge only specified Icom battery packs with Icom radios or Icom chargers. Only Icom battery packs are tested and approved for use with Icom radios or charged with Icom chargers. Using third-party or counterfeit battery packs or chargers may cause smoke, fire, or cause the battery to burst. - Page 29 R WARNING! Immediately stop using the battery if it emits an ab- normal odor, heats up, or is discolored or deformed. If any of these conditions occur, contact your Icom dealer or distributor. R WARNING! Immediately wash, using clean water, any part of the body that comes into contact with fluid from inside the battery.
-
Page 30: Charging Caution
CAUTION: DO NOT charge the battery outside of the specified temperature range: BC-193/BC-197 (+10˚C to +40˚C). Icom recom- mends charging the battery at +20˚C. The battery may heat up or rupture if charged out of the specified temperature range. Addition-... -
Page 31: Battery Chargers
BATTERY CHARGING ■ Battery chargers D Using the BC-191 to rapid charge the BP-264 The BC-191 provides rapid charging of only the BP-264 Ni-MH bat- tery pack. Never use it for any other battery pack. Charging time period for the BP-264: Approximately 2 hours The following item is additionally required: An AC adapter (not sup- plied with some versions), OPC-515L or CP-23L... -
Page 32: Using The Bc-192 To Regular Charge The Bp-264
BATTERY CHARGING Battery chargers (continued) ■ D Using the BC-192 to regular charge the BP-264 The BC-192 provides regular charging of only the BP-264 Ni-MH battery pack. Never use it for any other battery pack. Charging time period for the BP-264 (with the specified AC adapter) : Approximately 16 hours (at 16 V) The following item is additionally required: An AC adapter (not sup-... -
Page 33: Using The Bc-193 To Rapid Charge The Bp-265
BATTERY CHARGING D Using the BC-193 to rapid charge the BP-265 The BC-193 provides rapid charging of only the BP-265 Li-ion bat- tery pack. Never use it for any other battery pack. Charging time period for the BP-265: Approximately 2.5 hours The following item is additionally required: An AC adapter (not sup- plied with some versions), OPC-515L or CP-23L... -
Page 34: Using The Bc-197 To Rapid Charge The Bp-264 Or Bp-265
BATTERY CHARGING Battery chargers (continued) ■ D Using the BC-197 to rapid charge the BP-264 or BP-265 The BC-197 rapidly charges up to six battery packs. Charging time for the BP-264: Approximately 2 hours Charging time for the BP-265: Approximately 2.5 hours The following additional item is required: •... - Page 35 BATTERY CHARGING There are two types of BC-197 chargers for the IC-F27SR; one is for Ni-MH batteries, and the other is for Li-ion batteries. Before you purchase a BC-197, check the type of battery you are using, and then be sure to choose the suitable charger type.
- Page 36 BATTERY CHARGING Battery chargers (continued) ■ IMPORTANT: Ensure the tabs on the battery pack are correctly aligned with the guide rails inside the charger. Tabs BC-191, BC-192, BC-193 Guide rail...
-
Page 37: Battery Case
BATTERY CASE ■ Optional BP-263 battery case When using the optional battery case, install 6 × AA (LR6) size alkaline batteries, as illustrated below. Remove the battery case if it is attached. (p. 3) × AA (LR6) size alkaline batteries, as shown below. Install 6 •... -
Page 38: Options
OPTIONS BATTERY PACK/CASE Battery Voltage Capacity Battery life* pack/case Battery case for BP-263 —* AA (LR6) × 6 alkaline BP-264 7.2 V 1400 mAh 24.8 hrs. BP-265 7.4 V 2000 mAh 35.3 hrs. When the power save function is turned ON, and the operating time is calculated under the following conditions;... -
Page 39: Dc Power Cables
OPTIONS • BC-197 + BC-157SE multi charger ac adapter For rapid simultaneously charging of up to six battery packs. An AC adapter may be supplied with the charger, depending on the version. There are two types of BC-197 chargers for the IC- F27SR. -
Page 40: Other Options
Approved Icom optional equipment is designed for optimal performance when used with an Icom transceiver. Icom is not responsible for the destruction or damage to an Icom trans- ceiver in the event the Icom transceiver is used with equipment that is not manufactured or approved by Icom. -
Page 41: Vox Function
OPTIONS ■ VOX function The transceiver has a VOX (voice operated transmission) function, which allows you hands-free operation. In addition, an HS-94, HS-95 or HS-97 headset and an OPC-2004 plug adapter cable are required. • The VOX function starts transmission when you speak into the micro- phone, then automatically returns to receive when you stop speaking without needing to push or release the PTT switch. -
Page 42: Turning The Vox Function On Or Off
OPTIONS VOX function (continued) ■ D Turning the VOX function ON or OFF The VOX function can be turned ON or OFF when turning the trans- ceiver power ON. Rotate [VOL] to turn OFF the [ROTARY SELECTOR] transceiver power. [VOL] Set [ROTARY SELECTOR] to any channel other than Chan- nel 16. -
Page 43: Setting The Vox Gain
OPTIONS D Setting the VOX gain The VOX sensitivity level can be adjusted from 1 (minimum) to 10 (maximum). Higher values make the VOX function more sensitive to your voice. IMPORTANT! ✓ Set the microphone gain before setting the VOX gain. (p. 15) Connect the optional HS-94, [ROTARY SELECTOR]... -
Page 44: Specifications
400 mA approx. RX Max. audio 330 mA approx. • Power supply requirement : 7.2 V DC nominal* (negative ground) *Only specified Icom’s battery pack • Frequency stability : ±2.5 ppm (–25°C to +55°C) • Antenna impedance : 50 ˘ nominal •... -
Page 45: Transmitter
SPECIFICATIONS Transmitter • Output power : 0.5 W ERP • Modulation system : Variable reactance frequency modulation • Max. frequency deviation : ±2.5 kHz • Spurious emissions : 0.25 µW (1 GHz or below) 1.00 µW (above 1 GHz) • Adjacent channel power : 60 dB •... -
Page 46: Index
INDEX Auto scan function .... 11, 17 Key functions ......7 Lock key ......8 Memory channel select keys . 7 Monitor key ......8 Battery Priority channel rewrite keys . 7 Case ......3, 30 Priority channel select keys . 7 Caution (Li-ion) .... - Page 47 INDEX Rapid charge Upper key [Upper]..... 6 Using the BC-191 to charge the BP-264 ......24 Using the BC-193 to charge Volume control [VOL] ....5 the BP-265 ......26 VOX function ......34 Using the BC-197 to charge Turning ON or OFF .... 35 the BP-264 or BP-265 ..
- Page 48 #91 EUR-22, #92 EUR-23 < Intended Country of Use > #93 UK-02, #94 UK-03 < Intended Country of Use > A-6954D-1EU-q Printed in Japan © 2011 Icom Inc. 1-1-32 Kamiminami, Hirano-ku, Osaka 547-0003, Japan Printed on recycled paper with soy ink.
Need help?
Do you have a question about the IC-F27SR and is the answer not in the manual?
Questions and answers