Table of Contents
Advertisement
TABLE OF CONTENTS
A. SAFETY GUIDELINES...........................................................................................
B. INTRODUCTION....................................................................................................
List of parts.............................................................................................................
Step by step instructions........................................................................................
Floor level adjustment............................................................................................
Understanding the Electronics Package...............................................................
Set.........................................................................................................................
Choosing between Program and Manual mode....................................................
Manual..................................................................................................................
Mode (What each of these categories means) ....................................................
INTERVAL.............................................................................................................
PROGRAM...........................................................................................................
▲
▼
Down.....................................................................................................
Enter/Mode............................................................................................................
Reset.....................................................................................................................
Cleaning The Cycle...............................................................................................
Blank Display........................................................................................................
No Tension............................................................................................................
No "RPM" Reading...............................................................................................
1
2
3
4
8
9
9
10
10
10
11
12
13
13
13
14
15
16
16
Advertisement
Table of Contents

Subscribe to Our Youtube Channel
Related Manuals for SportsArt Fitness 5005B


Summary of Contents for SportsArt Fitness 5005B
-
Page 1: Table Of Contents
TABLE OF CONTENTS A. SAFETY GUIDELINES................... B. INTRODUCTION....................C. ASSEMBLING YOUR CYCLE List of parts......................Step by step instructions..................Floor level adjustment.................... D. EXERCISING ON YOUR CYCLE Understanding the Electronics Package............... Set......................... Choosing between Program and Manual mode............ Manual........................Mode (What each of these categories means) ............ INTERVAL...................... -
Page 2: Safety Guidelines
Sports Art- 5005B/5005H upright cycle SAFETY GUIDELINES: Please read and follow the following safety guidelines: . Read this owner's manual and follow the instructions. . Always unplug the cycle from the electrical outlet immediately after using and before cleaning . Assemble and operate the cycle on a solid, level surface. -
Page 3: Introduction
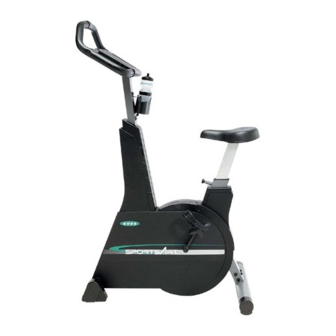
INTRODUCTION: Congratulations on purchasing one of the finest pieces of exercise equipment on the market today. Constructed of high quality materials and designed for years of troublefree usage, you will find the unit very easy to assemble and use. Before using your cycle, we recommend that you familiarize yourself with this Owner's Manual. -
Page 4: Assembling Your Cycle
ASSEMBLING YOUR CYCLE: List of parts: . Six 5/16"x 3/4" bolts - Rear cross tube support . Six 5/16" Spring washers - Rear cross tube support . Six 5/16" flat washers - Rear cross tube support . Four 5/16"x 3/4" bolts - Upright post . -
Page 5: Step By Step Instructions
Step by step instructions Before assembling your cycle, make sure that you have all the above parts. The following steps explain how to assemble your exercise cycle. Please read every step thoroughly, and follow the directions completely to ensure correct assembly. 1. - Page 6 (FIG.2) WARNING: MAKE SURE THE CONNECTOR IS PUSHED SECURELY INTO ITS SOCKET TO AVOID DAMAGE TO THE CONTROL BOARD. 5. Insert the upright post into the cycle frame, using two bolts, two spring washers, two flat washers on each side. Then tighten the bolts securely (see Fig. 3). (FIG.3)
- Page 7 6. Attach the upright post cover to the front of cycle, using two Phillips screws, one for each side (see Fig. 4). (FIG.4) 7. Attach the foot pedals to the crank arms on the cycle. Be careful to install the pedals on the correct crank arm.
- Page 8 8. Place the cycle seat to the seat support, tighten with three bolts, three spring washers from underneath the seat (see Fig.6). (FIG.6) To move the seat support up or down, pull on the seat adjustment knob for adjusting to your desired position. 9.
-
Page 9: Floor Level Adjustment
Floor level adjustment If the cycle is unsteady on your floor, turn the floor level adjustment either on the rear feet or at the front of cycle. Raise or lower the floor level adjustment to steady your cycle (see Fig. 8). (FIG.8) -
Page 10: Exercising On Your Cycle
EXERCISING ON YOUR CYCLE: Understanding the ELECTRONICS PACKAGE The electronics package lets you control your workout. It is designed for safely and easy to use. You may simply press the Enter/Mode key at any time and follow the scrolled message. If you do not press Enter/Mode to enter your selection, after 5 seconds the display will remind you with "PRESS ENTER". -
Page 11: Choosing Between Program And Manual Mode
Choosing Between PROGRAM And MANUAL Mode: ▲ After your weight is set, the screen will read "MAN'L". Pressing an key will scroll through "PRO 1-6", "MAN'L" and "INTV". Once you have set your desired program, then press Enter/Mode. MANUAL: You can use the Enter/Mode key to switch to LEVEL (or WATTS), PACER/RPM, ▲▼... -
Page 12: Interval
LOAD (There are two expression of load): LEVEL: There are 14 levels, with Level 1 being the lightest, and LEVEL 14 being ▲▼ the heaviest. Use the keys to chose the desired level. WATTS: The watts range from 50-320 watts, with the watts 50 being the lightest, ▲▼... -
Page 13: Program
PROGRAM: ▲▼ 1. Use the keys to chose between Programs 1-6, then press "Enter/Mode" when they are displayed. When you press the Program of your choice, you must select either the DIST or the TIME. ▲ ▼ Use the key to set the desired distance or time. After you have set this, press "Enter/Mode". -
Page 14: Key Functions ▲ Up/ ▼ Down
KEY FUNCTIONS: ▲ ▼ DOWN: These keys are used to choose the desired TIME, DIST, MILE/KILO as well as to choose SET, MAN'L, INTV or PROGRAM In PROGRAM Mode, they are used to set the TIME or the DISTANCE. ENTER/MODE: After setting a preference, press these key to record and save your choice. -
Page 15: Maintaining Your Cycle
MAINTAINING YOUR CYCLE This cycle requires little maintenance. The cycle's low friction operation is dependent on keeping the unit as clean as possible. See "Cleaning the cycle" for more information. Cleaning The Cycle CAUTION: Turn off unit and disconnect AC cord before cleaning. Regular cleaning is recommended to keep your cycle at peak performance. -
Page 16: Trouble Shooting Blank Display
TROUBLE SHOOTING: A. Blank Display: 1. If you turn on the POWER switch and the switch is not lit: a. Check if the power cord is plugged securely into the wall socket. b. After the above step performed, if the power switch is still not lit, replace a new fuse. -
Page 17: No Tension
c. Plug the power cord into the wall socket and turn on the machine again. If the power switch is still not lit, please contact your dealer for more information. 2. If you turn on the power switch and the switch is lit, but there is no display, please contact your dealer for more information. - Page 18 Wiring Schematic:...
Need help?
Do you have a question about the 5005B and is the answer not in the manual?
Questions and answers