
Related Manuals for Hornet 564T


Summary of Contents for Hornet 564T
- Page 1 M M o o d d e e l l 5 5 6 6 4 4 T T ➤ O O w w n n e e r r ’ ’ s s G G u u i i d d e e H H o o r r n n e e t t...
-
Page 2: L L I I M M I I T T E E D D L L I I F F E E T T I I M M E E C C O O N N S S U U M M E E R R W W A A R R R R A A N N T T Y Y
l l i i m m i i t t e e d d l l i i f f e e t t i i m m e e c c o o n n s s u u m m e e r r w w a a r r r r a a n n t t y y For a period of one calendar year from the date of purchase of this auto-security device, Directed Electronics, Inc. - Page 3 TO THE MAXIMUM EXTENT ALLOWED BY LAW, ANY AND ALL WAR- RANTIES ARE EXCLUDED BY THE MANUFACTURER AND EACH ENTITY PARTICIPATING IN THE STREAM OF COMMERCE THEREWITH. THIS EXCLUSION INCLUDES BUT IS NOT LIMITED TO THE EXCLUSION OF ANY AND ALL WARRANTY OF MERCHANTABILITY AND/OR ANY AND ALL WAR- RANTY OF FITNESS FOR A PARTICULAR PURPOSE AND/OR ANY AND ALL WARRANTY OF NON-INFRINGEMENT OF PATENTS, IN THE UNITED STATES OF AMERICA AND/OR ABROAD.
-
Page 4: Table Of Contents
t t a a b b l l e e o o f f c c o o n n t t e e n n t t s s l l i i m m i i t t e e d d l l i i f f e e t t i i m m e e c c o o n n s s u u m m e e r r w w a a r r r r a a n n t t y y ................i i r r e e m m o o t t e e c c o o n n f f i i g g u u r r a a t t i i o o n n s s . - Page 5 over and under rev protection ........38 shut down inputs .
-
Page 6: Lcd 2-Way Configuration
r r e e m m o o t t e e c c o o n n f f i i g g u u r r a a t t i i o o n n s s ➜... - Page 7 Vehicle Interior Temperature Indicator Numeric Display AM/PM Indicator Alarm Clock Mode Indicator Timer Function Indicator Transmit Range Indicator Transmission Indication Vibrate/Beep Mode Indicator Power Saver Mode Indicator Remote Start Timer Mode Indicator No Function Vehicle Page Mode Indicator Full Trigger Shock Sensor Indicator Hood/Trunk Open or Trigger Indicator Parking Light Indicator Door Open or Trigger Indicator...
-
Page 8: Standard 4-Button Configuration
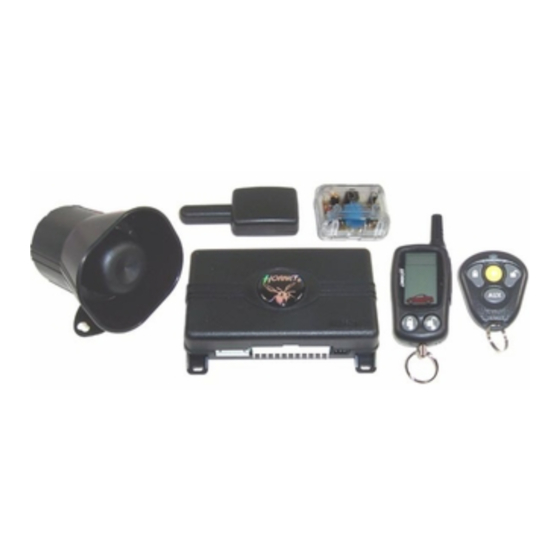
➜ standard 4-button configuration controls the A A r r m m and P P a a n n i i c c On/Off function. controls the D D i i s s a a r r m m and P P a a n n i i c c Off function. controls S S i i l l e e n n t t M M o o d d e e ™... - Page 9 w w h h a a t t i i s s i i n n c c l l u u d d e e d d ➤ A control module ➤ An ASK transceiver/antenna ➤ One four-button remote ➤...
-
Page 10: System Maintenance
➜ system maintenance The system requires no specific maintenance other than battery replacement for the remotes. LCD 2-Way Remote Battery Replacement The 2-way remote is powered by a 1.5V AAA battery. The Battery Level indicator has three level indicators that serve as a visual indication of battery charge. -
Page 11: Your Warranty
➜ your warranty Your warranty registration must be completely filled out and returned within 10 days of purchase. Your product warranty will not be validated if your warranty registration is not returned. Make sure you receive the warranty registration from your dealer. It is also necessary to keep your proof of purchase, which reflects that the product was installed by an authorized dealer. -
Page 12: Caution
Changes or modifications not expressly approved by the party responsible for compliance could void the user's authority to operate this device. ➜ caution This product is designed for fuel injected, automatic transmission vehicles only. Use of this product in a standard transmission vehicle is dangerous and contrary the product's intended use. -
Page 13: Lcd 2-Way Remote Standard Configuration
r r e e m m o o t t e e f f u u n n c c t t i i o o n n s s The remote buttons are used to send commands to the system. The descriptions below reflect the standard configuration for this system. - Page 14 mode, and audible melody selection. For more information, please refer to the Function Button Configurations section of this guide. Buttons The remote start function of the system is controlled by pressing these buttons simultaneously for one second. Buttons When pressed simultaneously these buttons activate the second unlock or other accessory.
-
Page 15: Standard Lcd 2-Way Icon Configuration
Buttons Press these buttons simultaneously to activate the parking timer. Each additional press will toggle through the available options (10 min., 20 min., 30 min., 1 hour, 1.5 hours, 2 hours, and off ). Buttons When pressed simultaneously these buttons toggle between beep notification and vibrate notification. - Page 16 Icon The timer function icon flashes during timed functions including parking timer. Icon The transmit range indicator icon stays visible as long as the system is within operating range. Icon The remote transmission indicator icon displays when the trans- ceiver is transmitting a signal. Icon The vibrate/beep mode icon appears when the transceiver is set to vibrate mode.
- Page 17 Icon The full trigger shock sensor icon indicates that the shock sensor has been triggered by a hard shock. Icons The hood/trunk open or trigger icon illuminates when the hood or trunk trigger has been activated or the hood or trunk is open, and bypasses those zones until it is closed.
- Page 18 Icon The battery level icon indicates the level of power remaining in the battery. Icon The temperature-controlled remote start icon indicates that the system has entered the temperature remote start mode and auto- matically starts the vehicle if the temperature of the vehicle drops below 0 degrees Fahrenheit.
- Page 19 Standard LCD 2-way button functions F F u u n n c c t t i i o o n n B B u u t t t t o o n n Lamp On (10 sec) Power-Saver Mode* Beep/Vibrate Mode Time Adjust for 5 Seconds Mode (hour)**...
-
Page 20: 4-Button Remote Standard Configuration
Melody Selection 2 10 Min Parking Count Down Mode 20 Min Parking Count Down Mode 30 Min Parking Count Down Mode 60 Min Parking Count Down Mode 90 Min Parking Count Down Mode 120 Min Parking Count Down Mode Parking Count Down Off Mode Alarm Clock Mode On/Off****... - Page 21 Button The disarming function is controlled by pressing this button for one second. Button Silent Mode™ and an optional auxiliary function are controlled by this button. (Silent Mode works by pressing this button for less than one second before arming or disarming. An optional auxiliary function, such as trunk release, can be controlled by pressing this button for 1.5 seconds.) The auxiliary output controls __________________________.
-
Page 22: L L C C D D 2 2 - - W W A A Y Y R R E E M M O O T T E E O O P P E E R R A A T T I I O O N
Buttons The remote start timer mode is controlled by pressing these buttons simultaneously. Buttons The short-run turbo mode is activated when these buttons are pressed simultaneously. L L C C D D 2 2 - - w w a a y y r r e e m m o o t t e e o o p p e e r r a a t t i i o o n n The remote start system operates at 434 MHz and incorporates Directed’s proprietary A.S.K. -
Page 23: Warning! Safety First
Page Recognition Mode The transceiver will leave a zone icon illuminated when it has received a triggered response and will wait for violation recogni- tion. Press any button on the transceiver, the LCD information and alarm page alerts will be cleared. note: The transceiver buttons will not send a command to the system until the alarm page is cleared. - Page 24 unintentionally remote start the vehicle. T T H H E E U U S S E E R R M M U U S S T T I I N N S S T T A A L L L L A A C C A A R R B B O O N N M M O O N N O O X X I I D D E E D D E E T T E E C C T T O O R R I I N N O O R R A A B B O O U U T T T T H H E E L L I I V V I I N N G G A A R R E E A A A A D D J J A A C C E E N N T T T T O O T T H H E E V V E E H H I I C C L L E E .
-
Page 25: Active Arming
reinstall the remote start system so that the vehicle does not start in gear. All installations must be performed by an autho- rized Directed dealer. O O P P E E R R A A T T I I O O N N O O F F T T H H E E R R E E M M O O T T E E S S T T A A R R T T M M O O D D U U L L E E I I F F T T H H E E V V E E H H I I C C L L E E S S T T A A R R T T S S I I N N G G E E A A R R I I S S C C O O N N T T R R A A R R Y Y T T O O I I T T S S I I N N T T E E N N D D E E D D M M O O D D E E O O F F O O P P E E R R - - A A T T I I O O N N . -
Page 26: Passive Arming
➜ passive arming The system can be programmed to arm itself automatically (called passive arming). If the system is programmed for passive arming, it will automatically arm 30 seconds after the ignition is turned off and the system detects that you have left the vehicle by opening and closing a door. -
Page 27: Warn Away Response Description
the system is armed, while still providing instant response (even if the door is immediately closed). ➤ Turning on the ignition key will trip the same progressive re- sponse as opening a door. ➤ The optional starter kill prevents the vehicle’s starter from cranking. -
Page 28: Triggered Response Description
➜ triggered response description A Triggered Response can be activated by any of the triggers listed below and consists of an alarm page along with the response described for each trigger. The default Triggered Response dura- tion is 30 seconds but can be programmed from 1-180 seconds by your installer with the Directed Bitwriter ➤... -
Page 29: Multi-Level Security Arming
➤ The zone icons will turn on and remain on until a transceiver button is pressed, clearing the page alert. ➤ The transceiver will enter page recognition mode and generate alarm page alerts. note: Icons 13, 14, 16, and 20 represent alarm system triggered sequence zone inputs. -
Page 30: Arming While Driving
five times followed by a long chirp. All input zones, except the ignition, are now bypassed. note: Multi-Level Security Arming only applies to a sin- gle arming cycle. Once the system is disarmed and then re-armed, all the zones will be active again. ➜... -
Page 31: Disarming
➜ disarming To disarm the security system, press chirps, and the parking lights will flash twice. If the power locks are controlled by the system, the doors will also unlock. The siren chirping either four or five times when disarming indicates Tamper Alert, which is described in the Diagnostics Section of this guide. -
Page 32: Disarming Without A Remote
seconds of the triggered sequence will disarm the security system immediately. The six second timer is provided for your conve- nience, in case the system is accidentally triggered. ➜ disarming without a remote If your remote is lost or damaged, you can manually disarm your vehicle security system. -
Page 33: Silent Mode
➜ silent mode To temporarily turn off the arm or disarm chirps, use Silent Mode™. Simply press arming or disarming, and the confirmation chirp(s) will be elim- inated for that one operation only. If you want the arm/disarm chirps turned off permanently, your dealer can do this for you. note: The Warn Away®... -
Page 34: Valet ® Mode
➜ valet ® mode You can prevent your security system from automatically arming and triggering by using Valet washing the vehicle or having it serviced. In Valet security system will not arm, even with the remote, but all convenience functions (door locks, trunk release, etc.) will continue to work normally. -
Page 35: Remote Start
➜ remote start This feature allows you to remotely start and run your vehicle for a programmable period of time. This makes it possible to warm up the engine, as well as adjust the interior temperature of the vehicle with the climate control system. If interior heating or cooling is desired, the climate controls must be preset, and the fan blower must be set to the desired level prior to remote starting the vehicle. - Page 36 5. Once the vehicle has started, it will run for the pre-program- med period of time (either 12, 24, or 60 minutes - see Programming Options section of this guide) or until a shut- down input is triggered. i i m m p p o o r r t t a a n n t t ! ! It is unsafe to operate a vehicle’s motor in a garage or other closed off area.
-
Page 37: Valet ® Take-Over
unique melody (or vibrate) and the remote start icon (19) will turn off when the remote start shuts down. ➜ valet ® take-over ® The Valet Take-Over feature allows the vehicle to remain running after the key has been removed from the ignition. This feature is useful for occasions when you wish to exit and lock the vehicle for short periods of time, but would like to leave the motor running and the climate controls on. -
Page 38: Short-Run/Turbo
➜ short-run/turbo Short run turbo mode keeps the engine running after arriving at you destination for a programmable period of 1, 3, 5 or 10 minutes. This allows the system’s timer to conveniently cool down the turbo after you have left the vehicle. To activate: Park the vehicle and set parking brake. -
Page 39: Temperature Check Mode
Then press to advance the minute selection or reverse the minute selection. Once the correct time is displayed simply stop pressing any buttons for 10 seconds and the trans- ceiver will automatically exit the clock mode. ➜ temperature check mode This system will report the interior temperature of your vehicle with the press of two buttons. -
Page 40: Starter Anti-Grind Circuitry
The system will start the car and will run for the specified duration, unless shut down by the remote start button shut down with the remote start button remain in timer mode. The system will start every 3 hours until canceled by the brake, hood, or neutral safety shut-down wires. -
Page 41: Disabling The Remote Start System
➜ disabling the remote start system This feature allows your system's remote start unit to be temporarily disabled to prevent the vehicle from being remote started accidentally. This feature is useful if the vehicle is being serviced or stored in an enclosed area. To disable the remote start, move the shutdown toggle switch to the OFF position. -
Page 42: Nuisance Prevention Circuitry
pedal will shut down the motor at any time during remote start operation, as well as preventing the remote start from activating while it is being pressed. ➜ nuisance prevention circuitry Your system has Directed’s Nuisance Prevention Circuitry (NPC ). It prevents annoying repetitive trigger sequences due to ™... - Page 43 note: Arming and disarming the system does not reset this function! The only ways to reset a bypassed zone are for it to not trigger for 60 minutes, or to turn on the igni- tion. If testing your system, it is important to remember that the NPC ™...
-
Page 44: Arming Diagnostics
➜ arming diagnostics If the security system is armed at the same time that an input is active (such as a door opening or sensor triggering), you will hear one siren chirp to indicate arming and a second siren chirp to indi- cate Bypass Notification. -
Page 45: System Status Chirps
➜ system status chirps The siren will chirp when arming/disarming the system. The pattern of chirps will audibly report the system’s status as described below. Action Number of Chirps 1 (3-second delay), 1 Disarm Disarm Disarm ➜ table of zones A zone is represented by the number of LED flashes used by the system to identify a particular type of input. -
Page 46: Interpreting Zone Diagnostics
ZONE (Number of LED Flashes) DESCRIPTION Trunk Pin Instant trigger - a heavier impact detected by the shock sensor Door switch trigger Instant trigger - for optional sensors Ignition trigger Hood Pin ➜ interpreting zone diagnostics Warn Away responses are not reported by arming or disarming diagnostics. - Page 47 c c o o d d e e h h o o p p p p i i n n g g The receiver and remotes use a mathematical formula called an algorithm to change their code each time the remote is used. This technology has been developed to increase the security of the unit.
- Page 48 o o w w n n e e r r r r e e c c o o g g n n i i t t i i o o n n Owner Recognition is a revolutionary new feature available only from Directed.
- Page 49 p p o o w w e e r r s s a a v v e e r r m m o o d d e e Your system will automatically enter Power Saver Mode while armed or in Valet Mode, after a period of time in which no ®...
- Page 50 ➤ The ignition controlled door lock feature o o n n or off: When this feature is programmed on, the doors will lock three seconds after the ignition is turned on, and unlock when the ignition is turned off. If your installer is programming the security system with the Directed Bitwriter, ignition lock and unlock are independent features that can be programmed separately.
- Page 51 ➤ Full trigger response 3 3 0 0 or 60 seconds: This determines how long the full triggered sequence lasts. Some states have laws regulating how long a security system can sound before it is considered a nuisance. If your installer is programming the security system with the Directed Bitwriter, the full triggered response can be programmed for any duration ranging from 1 to 180 seconds.
-
Page 52: Audio Sensor
➤ The engine can be programmed to run for any duration ranging from 1 to 60 minutes. 1 1 2 2 m m i i n n u u t t e e s s is the default. After the programmed run time, the engine will shut down and will not restart, unless in Timer Mode. - Page 53 react to any intrusions into this field with the full triggered sequence. This system offers lock outputs that can control Power Locks: some manufacturers' power door lock systems. For other systems, additional parts may be required. The accessory output of the system can op- Power Trunk Release: erate a factory power release for the vehicle’s trunk or hatch.
- Page 54 g g l l o o s s s s a a r r y y o o f f t t e e r r m m s s The “brain” of your system. Usually hidden under- Control Unit: neath the dash area of the vehicle.
- Page 55 This is what happens when the Trigger or Triggered Sequence: alarm “goes off ” or “trips.” The triggered sequence of your system consists of the siren sounding and parking lights flashing for the programmed duration. A small push-button switch mounted at a discre- Valet ®...
-
Page 56: Quick Reference Guide
QUICK REFERENCE GUIDE Arming ■ To arm, press . When the system arms, you will hear a short chirp, and the parking lights will flash once. Arming while driving ■ To arm the system while driving, press is running. The system will chirp once and then once more to indicate that the ignition is on. - Page 57 The company behind this system is Directed Electronics, Inc. Since its inception, Directed Electronics has had one purpose, to provide consumers with the finest vehicle security and car stereo products and accessories available. The recipient of nearly 100 patents and Innovations Awards in the field of advanced electronic technology, Directed is ISO 9001 registered.
Need help?
Do you have a question about the 564T and is the answer not in the manual?
Questions and answers
Is the hornet 447T remote controller compatible with the hornet 564T system?