Intermec PB31 User Manual
Mobile receipt printer
Hide thumbs
Also See for PB31:
- User manual (80 pages) ,
- User manual (102 pages) ,
- Quick start manual (2 pages)
Table of Contents
Advertisement
Quick Links
Advertisement
Table of Contents
Troubleshooting

Related Manuals for Intermec PB31


Summary of Contents for Intermec PB31
- Page 1 PB 21 | PB 31 Mobile Receipt Printer User Guide...
- Page 2 Intermec Technologies Corporation. Information and specifications contained in this document are subject to change without prior notice and do not represent a commitment on the part of Intermec Technologies Corporation. © 2009–2013 by Intermec Technologies Corporation. All rights reserved.
- Page 3 Appendix A. Added the cleaning pen to the list of accessories. 5/2011 Revised battery information. Added procedures for configuring wireless network with PrintSet. 1/2010 Revised to add information for the magnetic stripe reader, smart card reader, and upgrading the firmware. PB21 and PB31 Mobile Receipt Printer User Guide...
- Page 4 PB21 and PB31 Mobile Receipt Printer User Guide...
-
Page 5: Table Of Contents
......1 Introducing the PB21 and PB31 Mobile Receipt Printer ......2 What’s New . - Page 6 Resetting the Printer ............. 60 PB21 and PB31 Mobile Receipt Printer User Guide...
- Page 7 ................83 PB21 and PB31 Mobile Receipt Printer User Guide...
- Page 8 Contents viii PB21 and PB31 Mobile Receipt Printer User Guide...
-
Page 9: Before You Begin
Global Services and Support Warranty Information To understand the warranty for your Intermec product, visit the Intermec website at www.intermec.com and click Support > Returns and Repairs > Warranty. -
Page 10: Send Feedback
This user guide is for the person who is responsible for installing, configuring, and maintaining the PB21/PB31 printer. This guide provides you with information about the features of the PB21/PB31, and how to install, configure, operate, maintain, and troubleshoot it. Related Documents Here are some related Intermec documents you may find useful: •... - Page 11 4 Click the Manuals tab. If your product does not have its own product page, click Support > Manuals. Use the Product Category, the Product Family, and Product to find your documentation. PB21 and PB31 Mobile Receipt Printer User Guide...
- Page 12 Before You Begin PB21 and PB31 Mobile Receipt Printer User Guide...
-
Page 13: Using The Pb21 And Pb31 Mobile Receipt Printer
Using the PB21 and PB31 Mobile Receipt Printer Use this chapter to familiarize yourself with the PB21 and PB31 mobile receipt printer. This chapter contains these sections: • Introducing the PB21 and PB31 Mobile Receipt Printer • Using the Batteries •... -
Page 14: Introducing The Pb21 And Pb31 Mobile Receipt Printer
Introducing the PB21 and PB31 Mobile Receipt Printer The PB21 and PB31 is a rugged mobile receipt printer that is designed for use with Intermec mobile computers, Intermec vehicle mount computers, and SF51 and SR61 scanners. The PB21 uses 50.8 mm (2 in) media and the PB31 uses 76.2 mm (3 in) media. -
Page 15: Identifying The Parts Of The Printer
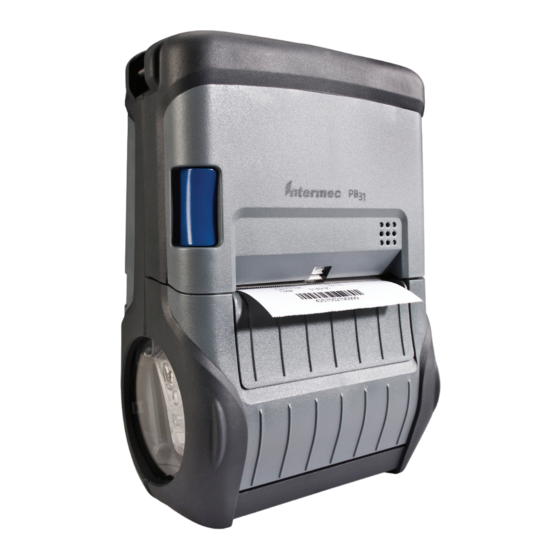
Information Setup button button PB21 and PB31 : This illustration shows the important features of the printer. A weather-resistant flap protects the communications ports and the external power connector. Understanding the Control Panel The printer control panel contains four buttons, a liquid crystal display (LCD), and one LED indicator. - Page 16 Chapter 1 — Using the PB21 and PB31 Mobile Receipt Printer How to Use the PB21 and PB31 Buttons Name Button Function Feed Press to advance the media. The amount of media that feeds is dependent on the type of media you are using.
- Page 17 Chapter 1 — Using the PB21 and PB31 Mobile Receipt Printer Understanding the Soft Keys Button Soft Keys Description • Moves up one level in the menu system. This soft key appears in Setup mode. • Increases the value of a number when editing settings such as an IP address.
-
Page 18: Understanding The Printer Language
Chapter 1 — Using the PB21 and PB31 Mobile Receipt Printer Understanding the Printer Language Your printer comes with Intermec Printer Language (IPL), Fingerprint, ESC/P, ZSim, and the ability to run any of the printer command languages. The language you select affects the functionality of the printer and how you interact with it. -
Page 19: Changing The Printer Language
Chapter 1 — Using the PB21 and PB31 Mobile Receipt Printer Changing the Printer Language You can change the printer command language using PrintSet, the printer home page, a communications program like HyperTerminal, or the printer display. To change the printer language using PrintSet 1 Connect your printer to your PC using a serial cable. - Page 20 Chapter 1 — Using the PB21 and PB31 Mobile Receipt Printer To change the printer language using ESC/P and a communications program 1 Connect your printer to your PC using a serial cable. For help, see “Connecting the Printer Through the Serial Port” on page 2 Start a communications program like HyperTerminal.
-
Page 21: Understanding The Printer Sounds
Chapter 1 — Using the PB21 and PB31 Mobile Receipt Printer 7 Press to select the language. 8 Cold boot the printer: a Remove the printer battery. b Replace the printer battery. c Turn the printer on. To change the printer language using the display and ESC/P 1 Make sure the printer is in Ready mode. -
Page 22: Understanding The Backlight
The battery retains a charge for up to five days when the printer is in Standby mode. A fully charged battery can usually print over 300 6-inch labels (PB31) or 500 6-inch labels (PB21) at 25% print density. When the printer reports low battery, it can usually print over 50 6-inch labels at 10% print density. -
Page 23: Installing The Battery
Chapter 1 — Using the PB21 and PB31 Mobile Receipt Printer • Printer configuration, including network connection settings • Type of media loaded in the printer • Amount of data printed for each label • Threshold at which you configure the low battery warning Use Intermec Model AB27 battery only. -
Page 24: Charging The Batteries
Chapter 1 — Using the PB21 and PB31 Mobile Receipt Printer 3 Insert the edge of the battery under the lip of the printer and then push down until you hear the battery latch click. Charging the Batteries There are two ways to charge the printer battery: Charge the battery in the AC18 4-bay battery charger. -
Page 25: Understanding The Battery Icons
Chapter 1 — Using the PB21 and PB31 Mobile Receipt Printer Understanding the Battery Icons The easiest way to tell the status of your battery is to look at the battery icons on the control panel of the printer. Battery Icon Status... -
Page 26: Loading Media
Chapter 1 — Using the PB21 and PB31 Mobile Receipt Printer • Do not operate the printer when the ambient temperature is -20 °C (-4 °F) or below. Using the printer in temperatures below freezing reduces the overall battery life. - Page 27 Chapter 1 — Using the PB21 and PB31 Mobile Receipt Printer 2 Insert a roll of media. Make sure you load the media clockwise so that it pulls off the core from the bottom of the printer. 3 Pull out 8 cm (3 in) of the media, and then close the media cover.
-
Page 28: Using The Card Readers
Chapter 1 — Using the PB21 and PB31 Mobile Receipt Printer Using the Card Readers Before you can use the magnetic stripe reader or the smart card reader, you need to take the necessary precautions to ensure PCI (Payment Card Industry) compliance and protect cardholder information. -
Page 29: Using The Smart Card Reader
Chapter 1 — Using the PB21 and PB31 Mobile Receipt Printer 3 Place the readable end of the card against the reader, facing the media compartment. 4 Swipe the card through the magnetic stripe reader. Using the Smart Card Reader You can use the smart card reader to read cards embedded with a smart card chip. - Page 30 Chapter 1 — Using the PB21 and PB31 Mobile Receipt Printer 3 Orient the smart card with the chip facing the printer. smart card chip 4 Insert the card into the smart card reader. PB21 and PB31 Mobile Receipt Printer User Guide...
-
Page 31: Understanding The Display Modes
Chapter 1 — Using the PB21 and PB31 Mobile Receipt Printer Understanding the Display Modes The printer has six display modes to help you effectively interact with the printer: Ready, Information, Pause, Setup, Error, and Test. Understanding Ready Mode The printer is in Ready mode when the printer is on and ready to print. -
Page 32: Understanding Pause Mode
Chapter 1 — Using the PB21 and PB31 Mobile Receipt Printer Understanding Pause Mode Use Pause mode to momentarily stop printing or to cancel a current print job. When you pause the printer, the Pause mode screen appears. Use the Feed button to both pause and resume printing. - Page 33 Chapter 1 — Using the PB21 and PB31 Mobile Receipt Printer To enter or exit Setup mode Press the Setup button. • After you enter Setup mode, there are two editing modes: normal and enhanced. Editing Settings in Setup Mode...
-
Page 34: Understanding Error Mode
Chapter 1 — Using the PB21 and PB31 Mobile Receipt Printer Understanding Error Mode The printer enters Error mode when it detects an error condition such as a low battery or a paper fault. Some error messages appear on the screen immediately when they occur, such as DOOR OPEN. - Page 35 Chapter 1 — Using the PB21 and PB31 Mobile Receipt Printer 3 Release both buttons. The printer performs a test feed (sensor calibration), prints, and then enters Dump mode. The printer is now in Dump mode and it scans the communication ports.
-
Page 36: Changing Configuration Settings From The Display
Chapter 1 — Using the PB21 and PB31 Mobile Receipt Printer Options in Extended Test Mode Function Description Select Media This option is almost the same as the process in Test mode, except that the printer performs a slow test feed in Extended Test mode. - Page 37 Chapter 1 — Using the PB21 and PB31 Mobile Receipt Printer The Main Levels of the Setup Menu in Fingerprint The Main Levels of the Setup Menu in IPL ESC/P supports six types of setup commands: • Bluetooth: set Bluetooth parameters •...
-
Page 38: Printing A Test Page
Chapter 1 — Using the PB21 and PB31 Mobile Receipt Printer • Query: retrieve information about the printer or a print request, cancel printing, or reset the printer • Wi-Fi: set Wi-Fi parameters Printing a Test Page After you have loaded media in the printer, you are ready to print a test page. -
Page 39: Configuring The Pb21 And Pb31
Configuring the PB21 and PB31 This chapter contains these sections: • Connecting the Printer to Your PC • Connecting the Printer to Your Network • Configuring the Printer Settings • Downloading Fonts and Graphics... -
Page 40: Connecting The Printer To Your Pc
1 Run InterDriver. 2 The File Download - Security Warning screen appears. Click Run to run the executable. 3 The Intermec End User License Agreement appears. Read the agreement and select the radio button to accept the agreement, and then click Next. -
Page 41: Connecting The Printer Through The Serial Port
Chapter 2 — Configuring the PB21 and PB31 8 On the Hardware Installation warning screen, click Continue Anyway. 9 Click Finish to exit the New Hardware Wizard. InterDriver files are now installed on your computer. 10 Connect the USB cable to the connector on the back of the printer and connect the other end to your PC. - Page 42 Chapter 2 — Configuring the PB21 and PB31 7 PrintSet attempts to connect to your printer. If it cannot find your printer, click Back to review the communication settings, and then try again. When PrintSet connects to your printer, click Next.
-
Page 43: Connecting The Printer To Your Network
The printer cannot initiate a Bluetooth connection. One of the devices must request a connection with the printer. The printer then accepts or rejects the connection. Use Intermec Settings on the mobile computer to enable the Bluetooth settings on the printer. - Page 44 Chapter 2 — Configuring the PB21 and PB31 Each printer equipped with a Bluetooth radio has a unique Bluetooth Device Address (BDA) loaded into its module when manufactured. You can find the BDA on the certification label located on the bottom of the printer.
-
Page 45: Setting Up 802.11 Radio Communications
Chapter 2 — Configuring the PB21 and PB31 Setting Up 802.11 Radio Communications The printer can have an internal 802.11 b/g radio to transfer and receive data using wireless communications. This manual assumes that you have already set up your wireless communications network including your access points. - Page 46 Chapter 2 — Configuring the PB21 and PB31 5 If your wireless access point uses DHCP, select Get TCP/IP parameters automatically. If the access point does not use DHCP, select Use the following TCP/IP parameters and type the device IP Address, Network Mask, Default Router (default gateway), and Name Server (primary DNS server).
-
Page 47: The Printer
Chapter 2 — Configuring the PB21 and PB31 3 From the host PC, check the wireless settings. If you have an IPL version of the printer, send these commands to the printer: <STX><SI>wt,SSID<ETX> <STX><SI>wt,WEP1<ETX> <STX><SI>wt,WEP2<ETX> <STX><SI>wt,WEP3<ETX> <STX><SI>wt,WEP4<ETX> <STX><SI>wt,AUTH<ETX> <STX><SI>wt,WPA<ETX> <STX><SI>wt,WPA2<ETX>... -
Page 48: Configuring Wireless Printing Using Ipl
Chapter 2 — Configuring the PB21 and PB31 Understanding the 802.11 Radio Icons Icon Description Excellent signal Strong signal Good signal Weak signal Poor signal No signal Use the next sections to set most of your wireless communication settings. For help with additional commands and information, see either the Intermec Fingerprint Developer’s Guide... - Page 49 Chapter 2 — Configuring the PB21 and PB31 2 Send these commands to configure the WEP keys. This example sets WEP key 1 to 1234 and enables WEP key 1. <STX><SI>ws,WEP1, 0x0001020304<ETX> <STX><SI>ws,.WEP_KEY,1<ETX> 3 Send this command to activate the settings.
- Page 50 Chapter 2 — Configuring the PB21 and PB31 2 Send one of these commands to enable WPA-802.1x or WPA2- 802.1x authentication. You should also send the WPA_PSK command that does not contain a value: <STX><SI>ws,WPA,ON<ETX> <STX><SI>ws,WPA2,ON<ETX> <STX><SI>ws,WPA_PSK, <ETX> 3 Send these commands to configure the EAP_TYPE: <STX><SI>ws,EAP_TYPE,xxxx<ETX>...
-
Page 51: Configuring Wireless Printing Using Fingerprint
Chapter 2 — Configuring the PB21 and PB31 • Send this command to make sure your values match those used by the access point: <STX><SI>wt,[variable name]<ETX> All variables are returned with the exception of EAP_PASS which always returns “****” if configured and CA_CERT which transmits the name of the last certificate authority successfully installed. - Page 52 Chapter 2 — Configuring the PB21 and PB31 To configure the printer to use WPA-PSK or WPA2-PSK mode 1 Send these commands to login as an admin and set the SSID: run"su-p pass admin" setup write "wlan","uart1:" setup "wlan","SSID","xxxxx" where xxxxx can be from 0 to 32 alphanumeric characters.
- Page 53 Chapter 2 — Configuring the PB21 and PB31 4 Send these commands to configure the EAP_TYPE: setup "8021x","EAP_TYPE","xxxx" where xxxx can be OFF, LEAP, PEAP, or TTLS. setup "8021x",".EAP_USER","xxxx" setup "8021x","EAP_PASS","xxxx" where xxxx is the unique username and the unique password for this protocol.
-
Page 54: Configuring The Printer Settings
Chapter 2 — Configuring the PB21 and PB31 Configuring the Printer Settings You can change the printer configuration settings from: • the display. • the host PC using PrintSet. • the host PC using the command line. • the printer home page. -
Page 55: Changing Configuration Settings From The Printer Home Page
Chapter 2 — Configuring the PB21 and PB31 Changing Configuration Settings from the Printer Home Page If you are have a printer with an 802.11 wireless radio, you can change configuration settings from the home page of the printer. To make changes to the configuration 1 Establish a connection between your printer and the network. -
Page 56: Changing Configuration Settings Using Smartsystems
Chapter 2 — Configuring the PB21 and PB31 Changing Configuration Settings Using SmartSystems You can use the SmartSystems console to change configuration settings on your printer. The printer ships with the SmartSystems client loaded on it. The console is part of SmartSystems and is available from the Intermec website. - Page 57 Chapter 2 — Configuring the PB21 and PB31 3 Download the firmware upgrade file (.bin) to your PC: a Go to www.intermec.com. b Click Support > Downloads. c Use the Product Category, Product Family, and Product fields, to select the printer model.
-
Page 58: Upgrading The Printer Firmware Using The Printer Home Page
Chapter 2 — Configuring the PB21 and PB31 Upgrading the Printer Firmware Using the Printer Home Page You can upgrade your printer using the printer home page with a printer with an 802.11 radio running IPL or Fingerprint. To upgrade using the printer home page 1 Establish a connection between your printer and the network. - Page 59 Chapter 2 — Configuring the PB21 and PB31 6 In the address field type the IP address of your printer and press Enter. 7 Click Maintenance. 8 When prompted, enter your user name and password. 9 Browse to the firmware upgrade file (.bin) and select it.
-
Page 60: Upgrading Printer Firmware Using Smartsystems
You can upgrade your printer firmware using a communications program, like HyperTerminal, and a printer running either the IPL, Fingerprint or ESC/P printer language. Note: Intermec recommends using PrintSet or the printer home page to upgrade the printer firmware. For help, see “Upgrading the Printer Firmware Using PrintSet”... - Page 61 Chapter 2 — Configuring the PB21 and PB31 4 Start a communications program, like HyperTerminal. 5 Type this command: <STX><ESC>.y,ush<ETX> 6 Press Enter. You are prompted to enter more information. 7 Type this command: su -p pass admin. 8 Type this command: dlk -z The printer indicates that it is “Upgrading.”...
- Page 62 Chapter 2 — Configuring the PB21 and PB31 4 Type this command: run “su -p pass admin” 5 Type this command: run “dlk -z” The printer indicates that it is “Upgrading.” 6 In the communications program window, click Transfer > Send File.
-
Page 63: Downloading Fonts And Graphics
Intermec Fingerprint Command Reference Manual, the Intermec Fingerprint Developer’s Guide, the ESC/P Programmer’s Reference Manua , or SmartSystems online help. You can download these documents from the Intermec website at www.intermec.com. PB21 and PB31 Mobile Receipt Printer User Guide... - Page 64 Chapter 2 — Configuring the PB21 and PB31 PB21 and PB31 Mobile Receipt Printer User Guide...
-
Page 65: Troubleshooting And Maintaining The Pb21 And Pb31
Troubleshooting and Maintaining the PB21 and PB31 Use this chapter to solve problems you may encounter while using the PB21 and PB31. This chapter contains these sections: • Troubleshooting the Printer • Resetting the Printer • Cleaning the Printer... -
Page 66: Troubleshooting The Printer
56. If you cannot find the answer to your problem, you may need to contact Product Support. Contacting Product Support Before you call Intermec Product Support, you may want to visit the Intermec technical knowledge base (Knowledge Central) at intermec.custhelp.com to review technical information or to request technical support. - Page 67 Chapter 3 — Troubleshooting and Maintaining the PB21 and PB31 Possible Printer Error Icons and Messages Error Icon Error Message Description Pause The print job is paused. Paper out (IPL) The printer is out of paper. Load a new roll of media.
-
Page 68: Troubleshooting Printer Problems And Finding Solutions
Chapter 3 — Troubleshooting and Maintaining the PB21 and PB31 Possible Printer Error Icons and Messages (continued) Error Icon Error Message Description Door open The printer is not completely closed. Press down on the media cover to make sure it is latched. - Page 69 Chapter 3 — Troubleshooting and Maintaining the PB21 and PB31 Printer Problems and Solutions (continued) Problem Possible Solution • The printer is not Re-establish a Bluetooth connection with the printing with a mobile computer or scanner. For help, see your Bluetooth connection.
-
Page 70: Troubleshooting Communication Problems
Chapter 3 — Troubleshooting and Maintaining the PB21 and PB31 Printer Problems and Solutions (continued) Problem Possible Solution • Print quality is poor. Clean the printhead. For help, see “Upgrading the Firmware” on page • Check the battery and recharge or replace as necessary. -
Page 71: Using Dump Mode In Ipl
Chapter 3 — Troubleshooting and Maintaining the PB21 and PB31 As long as a continuous string of characters is being received, the program wraps the lines until the label is full and then starts to print another label. After each character transmission, this information prints: •... -
Page 72: Resetting The Printer
Chapter 3 — Troubleshooting and Maintaining the PB21 and PB31 Resetting the Printer You rarely need to reset the printer, unless you are upgrading the firmware. If your printer occasionally locks up, you will want to reset it. A reset reinitializes the 802.11 radio and clears the working memory. -
Page 73: Cleaning The Printhead
Paper sensor Platen roller Printhead PB21 and PB31 Mobile Receipt Printer: You need to clean these parts regularly. Cleaning the Printhead Clean the printhead every five rolls of media to prolong the life of the printhead and ensures that you maintain high print quality. -
Page 74: Cleaning The Platen Roller
Chapter 3 — Troubleshooting and Maintaining the PB21 and PB31 5 Repeat Steps 3 and 4 if necessary. 6 Allow the printhead to dry for a minute or more before loading a new supply of media and ribbon. Cleaning the Platen Roller... -
Page 75: Cleaning The Printer Media Compartment
Chapter 3 — Troubleshooting and Maintaining the PB21 and PB31 Cleaning the Printer Media Compartment To clean the printer interior 1 Open the media cover. 2 Remove the media and ribbon. 3 Use a brush or air blow the compartment. - Page 76 Chapter 3 — Troubleshooting and Maintaining the PB21 and PB31 PB21 and PB31 Mobile Receipt Printer User Guide...
-
Page 77: Specifications
Specifications... -
Page 78: Specifications
0 °C to 45 °C (32 °F to 113 °F) Relative humidity: 10 to 90% non-condensing Sealing: IP54 is used. Paper path and card reader slots are excluded from IP54. Memory RAM: 16 MB Flash: 64 MB PB21 and PB31 Mobile Receipt Printer User Guide... - Page 79 Receipt roll stock media is supplied as a continuous roll and has an end of roll indicator. The end of roll indicator is a red marking (on last 3 feet of roll) on the side of the paper that is thermally sensitive. PB21 and PB31 Mobile Receipt Printer User Guide...
- Page 80 The default media sensitivity number is 180. Use this table as a guide when setting sensitivity numbers. Recommended Media Sensitivity and Constant Sensitivity Constant Description North America Receipt Media Duratherm TC Duratherm NTC - 2 Duratherm NTC Duratherm Receipt - Fanfold Duratherm Linerless PB21 and PB31 Mobile Receipt Printer User Guide...
-
Page 81: Interfaces
Description HHC RXD Receive data from host (input) HHC CTS Clear to send from printer (output) HHC RTS Request to send from host (input) HHC TXD Transmit data to printer (output) Ground PB21 and PB31 Mobile Receipt Printer User Guide... -
Page 82: Usb Interface
Ring indicator USB Interface To use the USB interface to print from a PC, you need to have the Intermec InterDriver printer driver installed on your PC. For help setting up USB communications, see “Connecting the Printer Through the USB Interface” on page... -
Page 83: Accessories
Media Core Use the media core to hold the media in place. The 0.75 inch media core ships with the printer. You can also order the 0.4 inch media core separately. PB21 and PB31 Mobile Receipt Printer User Guide... - Page 84 Appendix A — Specifications Intermec Cleaning Swab Use the Intermec cleaning swab (P/N AE26034) to clean the printhead and platen roller. One cleaning swab is included with the printer. You can purchase additional cleaning swabs from www.intermec.com. Cleaning Pen Use the cleaning pen (P/N 757150) to clean the printhead.
-
Page 85: Default Settings
Default Settings... -
Page 86: Factory Default Settings (Fingerprint Printers)
Label constant Label factor Print definitions Clip default Print speed 75 mm/s Feed adjust Start adjust Stop adjust Power Low battery indicator 7.4 V Sleep timer 20 sec Standby timer 30 min PB21 and PB31 Mobile Receipt Printer User Guide... -
Page 87: Factory Default Settings (Ipl Printers)
Form adjust dots X Form adjust dots Y Test feed mode Fast Media type Continuous Darkness Sensitivity Print speed 3 ips Power Low battery indicator 7.4 V Sleep timer 20 sec Standby timer 30 min PB21 and PB31 Mobile Receipt Printer User Guide... -
Page 88: Factory Default Settings (Esc/P Printers)
Disable Device name 1-16 characters Passcode 1234 Factory Default Settings (ESC/P Printers) Factory Default Settings for ESC/P Printers Setting Default Value Auto detect printer Enable Media dark adjust Print speed 75 mm/s PB21 and PB31 Mobile Receipt Printer User Guide... - Page 89 Baud rate 115200 Data bits Parity None Stop bits Protocol XON/XOFF # Network IP selection DHCP and BOOTP IP address 0.0.0.0 Netmask 0.0.0.0 Default router 0.0.0.0 Name server 0.0.0.0 MAC address Unique PB21 and PB31 Mobile Receipt Printer User Guide...
- Page 90 Appendix B — Default Settings PB21 and PB31 Mobile Receipt Printer User Guide...
-
Page 91: Ipl And Fingerprint Setup Menus
IPL and Fingerprint Setup Menus... -
Page 92: Ipl Setup Menu
FORMAT ROUTER DOTS PROTOCOL NAME SERVER PAGE SENSITIVITY MAC ADDRESS DARKNESS FONT LBL REST POINT FORM ADJ DOTS DATA DUMP FORM ADJ DOTS MEMORY RESET LSS TEST ADVANCED THERMAL MGMT MIN SPEED PB21 and PB31 Mobile Receipt Printer User Guide... -
Page 93: Fingerprint Setup Menu
CLIP DEFAULT XON/XOFF CONTRAST DATA TO HOST TESTFEED LTS VALUE DATA FROM TESTFEED MODE LTS ADJUST HOST LEN (SLOW NEW LINE LTS TEST MODE) REC BUF ADVANCED THERMAL MGMT TRANS BUF MIN SPEED PB21 and PB31 Mobile Receipt Printer User Guide... - Page 94 Appendix C — IPL and Fingerprint Setup Menus PB21 and PB31 Mobile Receipt Printer User Guide...
-
Page 95: Index
Index... - Page 96 802.11 radio default settings communications setup commands setting up Bluetooth radio communications Fingerprint wireless printing with changing printer language Fingerprint configuring wireless printing wireless printing with IPL default settings setup menu PB21 and PB31 Mobile Receipt Printer User Guide...
- Page 97 Magnetic Stripe Reader media loading Ready mode recommended sensitivity and Ready-to-Work indicator states constant supported media specifications setup commands ESC/P Pause mode setup menu power specifications Fingerprint print speed and resolution PB21 and PB31 Mobile Receipt Printer User Guide...
- Page 98 WPA/WPA2 authentication temperature and humidity configuring with Fingerprint specifications configuring with IPL Test mode WPA-PSK/WPA2-PSK test page, printing authentication troubleshooting configuring with Fingerprint communication problems configuring with IPL contacting product support error messages PB21 and PB31 Mobile Receipt Printer User Guide...
- Page 100 Worldwide Headquarters 6001 36th Avenue West Everett, Washington 98203 U.S.A. tel 425.348.2600 fax 425.355.9551 www.intermec.com © 2013 Intermec Technologies Corporation. All rights reserved. PB21 and PB31 Mobile Receipt Printer User Guide *934-051-004* P/N 934-051-004...
Need help?
Do you have a question about the PB31 and is the answer not in the manual?
Questions and answers