ATEN CS-64U User Manual
Four port usb easy switch
Hide thumbs
Also See for CS-64U:
- User manual (2 pages) ,
- Quick start manual (39 pages) ,
- User manual (2 pages)
Table of Contents
Advertisement
User Manual
CS-64U
Read this guide thoroughly and follow the installation and operation
procedures carefully in order to prevent any damage to the units and/or
any devices that connect to them.
This package contains:
M 1 CS-64U USB KVM Switch with Attached Cables
M 1 User Manual
M 1 Quick Start Guide
If anything is damaged or missing, contact your dealer.
© Copyright 2004 ATEN ® International Co., Ltd.
Manual Part No. PAPE - 1248-100
Printed in China 06/2004
All brand names and trademarks are the registered property of their respective owners.
2004-06-10
Advertisement
Table of Contents

Related Manuals for ATEN CS-64U


Summary of Contents for ATEN CS-64U
-
Page 1: User Manual
This package contains: M 1 CS-64U USB KVM Switch with Attached Cables M 1 User Manual M 1 Quick Start Guide If anything is damaged or missing, contact your dealer. - Page 2 Note: This equipment has been tested and found to comply with the limits for a Class B digital device, pursuant to Part 15 of the FCC Rules. These limits are designed to provide reasonable protection against harmful interference in a residential installation.
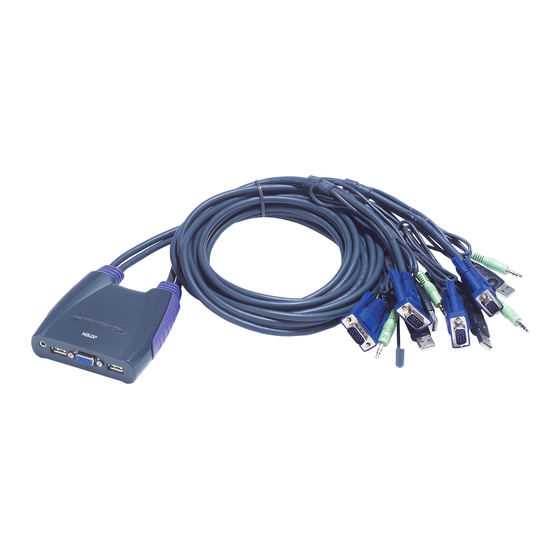
- Page 3 Overview The CS-64U Petite USB KVM Switch is a control unit that allows access to four computer systems from a single console (keyboard, monitor, mouse and audio). Before the development of the CS-64U, the only way to control multiple computer configurations from a single console was through a complex and costly network system.
- Page 4 Features M One console (VGA, SVGA or Multisync monitor, a USB keyboard, and a USB mouse) controls up to four computers M Compact and small footprint design features four molded-in KVM (Keyboard, Video, Mouse and audio) cables M Easy to install: no software required - connecting cables to the computers is all it takes M Easy to operate - computer selection via hotkeys - auto scan function to monitor computer operations...
-
Page 5: Hardware Requirements
Cables For optimal signal integrity and to simplify cable management, four high quality 3-in-1 CS Custom KVM cables have been designed into the CS-64U. There is no need for a separate cable purchase. System Requirements M OS: USB enabled OS M USB Host Controller installed on the system. -
Page 6: Top View
Top View 1. KVM Cables These 3-in-1 cables connect to the USB, video, and audio ports on the computers you are installing. The cable with a single dot at its base is the Port 1 cable; the cable with two dots at its base is the Port 2 cable, etc. 2. -
Page 7: Installation
Port 2 computer, etc. (see p. 7 for hotkey port selection). 4. Turn on the power to the computers. Note: The CS-64U’s Power On default is to link to the first computer you turn on. - 5 - 2004-06-10... - Page 8 - 6 - 2004-06-10...
-
Page 9: Hotkey Operation
Hotkey Operation The CS-64U provides an extensive, easy-to-use, hotkey function that makes it convenient to control and configure your KVM installation from the keyboard. Hotkeys provide asynchronous (independent) switching of the KVM console and the audio focus. If you wish, you can give one computer the KVM console focus and another computer the audio focus. -
Page 10: Going Directly To A Port
Going Directly to a Port Hotkey Action [Scroll Lock] [Scroll Lock] Brings the KVM and the audio focus to [n] [Enter] the computer attached to the port corresponding to the specified Port ID. Note that the KVM and audio focus both go to this port even if they were on different ports to begin with. -
Page 11: Auto Scanning
Note: 1. The n stands for the number of seconds that the CS-64U should dwell on a port before moving on to the next. Replace the n with a number between 1 and 99 when entering this hotkey combination. -
Page 12: Hotkey Setting Mode
Hotkey Setting Mode Hotkey Setting Mode is used to set up your CS-64U switch configuration. All operations begin with invoking Hotkey Setting Mode (HSM). Invoking HSM To invoke HSM do the following: 1. Press and hold down the Num Lock key 2. -
Page 13: Alternate Port Switching Keys
HSM, then press and release the T key again. Keyboard Operating Platform The CS-64U’s default port configuration is for a PC Compatible keyboard operating platform. If your requirements call for different port settings (you have a Mac or Sun attached to a port, e.g.), you can change a port’s keyboard operating platform configuration as... - Page 14 List Hotkey Settings To see a listing of the current hotkey settings, do the following: 1. Invoke HSM (see p. 10). 2. Press and release the F4 function key. 3. Open a text editor or word processor and use its Paste function to display the settings.
-
Page 15: Restore Default Settings
Restore Default Settings To reset the CS-64U to its default hotkey settings, do the following: 1. Invoke HSM (see p. 10). 2. Press [R] [Enter]. All hotkey settings return to the factory default settings. HSM Summary Table After invoking HSM (see p. 10), key in one of the following keys... -
Page 16: Sun Keyboard
Keyboard Emulation Mappings Sun Keyboard The PC compatible (101/104 key) keyboard can emulate the functions of the Sun keyboard when the Control key [Ctrl] is used in conjunction with other keys. The corresponding functions are shown in the table below. Note: When using [Ctrl] combinatons, press and release the Ctrl key, then press and release the activation key. -
Page 17: Mac Keyboard
Mac Keyboard The PC compatible (101/104 key) keyboard can emulate the functions of the Mac keyboard. The emulation mappings are listed in the table below. Note: When using key combinatons, press and release the first key, then press and release the second one. PC Keyboard Mac Keyboard [Shift]... -
Page 18: Specifications
Appendix Specifications Function Specification CPU Ports Port Selection Hotkeys 4 x Type-A (M) Connectors 4 x HDB-15 (M) Speaker 4 x Audio Jack (M) Console Keyboard 1 x Type-A (F) Connectors Mouse 1 x Type-A (F) 1 x HDB-15 (F) Speaker 1 x Audio Jack (F) LEDs... -
Page 19: Troubleshooting
Troubleshooting Symptom Cause Action Keyboard Loose cables. Check all cable connections to and/or make sure they are completely Mouse seated in their sockets. Responding Switch is in Auto Press either Port Selection switch Scan Mode. or the Spacebar to exit Auto Scan Mode. -
Page 20: Limited Warranty
LED Display Table Activity Indication Port is not selected. On (Steady) Port is connected to an active computer. Flashing (On and Off Port is connected to an active computer equal) and is being accessed in Auto Scan Mode. Limited Warranty IN NO EVENT SHALL THE DIRECT VENDOR’S LIABILITY EXCEED THE PRICE PAID FOR THE PRODUCT FROM THE DIRECT, INDIRECT, SPECIAL, INCIDENTAL OR CONSEQUENTIAL DAMAGES RESULTING FROM THE USE...
Need help?
Do you have a question about the CS-64U and is the answer not in the manual?
Questions and answers