ADTRAN IP 712 Quick Reference Manual
Telephone and voice mail
Hide thumbs
Also See for IP 712:
- User manual (55 pages) ,
- Quick reference manual (24 pages) ,
- Administrator's manual (85 pages)

Related Manuals for ADTRAN IP 712


Summary of Contents for ADTRAN IP 712
-
Page 1: Quick Reference Guide
Telephone and Voice Mail Quick Reference Guide ADTRAN IP 712 and IP 706 Phones ® ADTRAN – Polycom IP 650, IP 601, IP 501, and IP 430 Phones ®... -
Page 3: Table Of Contents
Table of Contents Voice Mail Quick Reference Guide Voice Mail Handling Quick Reference Guide Personal Phone Manager Quick Reference Guide IP 700 Series Quick Reference IP 712 Phone IP 706 Phone ADTRAN-Polycom Quick Reference IP 601 Phone IP 650 Phone... -
Page 4: Voice Mail
Voice Mail Log into Voice Mail Playback Options Main Menu Options 1 play message from beginning 1 listen to messages To log in from your own phone 3 record greetings 4 play previous message 1. Press the Messages button on your phone. 5 play envelope 4 access mailbox options 2. Select Connect from the graphic display. 6 play next message 3. Enter your extension, then press # (or simply press # 5 check a different mailbox 7 delete or restore message when accessing voice mail from your extension). * repeat these options 8 forward message 4. Enter your password (default password is 1234), Change Your Password then press #. - Page 5 Voice Mail Message Playback Options Forwarding Options Send Message Replay Current Message Mailbox Options Cancel/Return to Previous Message Press 1 to listen to messages. Playback Menu Play Envelope Press 3 to record greeting. Next Message Press 4 to access Mailbox Options. Delete/Restore Message Press 5 to check a different mailbox. Forward Message Press * to repeat these options. Call Sender Main Menu * Only the following Message Control options are available while a Greetings Menu Standard/Alternate Options Default Options message is playing: Rewind...
- Page 6 Personal Phone Manager Accessing the Personal Phone Manager Changing Your Account Settings Each user of the NetVanta 7100 System has access to the You can navigate through the Personal Phone Manager using ® Personal Phone Manager. This Web-based Graphical User the tabs at the top of the screen. Interface (GUI) provides access to your voice mail, lists of Home received and dialed calls, account information and View a list of all SPRE commands. This list does not indicate personal settings. whether or not the command is available to this station. 1. Open your Web browser. Enter the IP address or Directories DNS name of the NetVanta 7100: View entries in the User Directory, Speed Dial and Caller ID (___________________________________). List for a history of incoming calls. View the Dialed Number List for a history of outbound calls. Use the “Click to Dial” The default is used in the following example: button to place call. User Settings Specify Primary Email and Secondary Email addresses for system correspondence as well as change your Voice Mail...
- Page 7 Personal Phone Manager Phone Settings Voice Mail Enable Call Forwarding and enter an extension. The phone View Voice Mails View details for current voice mail messages such as date, issues a brief tone as an alert that the phone has been forwarded. Enable Do Not Disturb (DND) for your line. message author and the message length. When DND is enabled, all calls go directly to your Call Mailbox Settings Coverage list. Select Apply Changes. Step 1. Confirm Email Addresses/Message Playback Settings Specify a Primary Email and a Secondary Email (optional) address for notification when new voice mail messages are received. Enable Play Envelopes to playback the calling party and the date/time information preceding a message. Enable Auto-Play Messages to automatically begin playback upon logging into voice mail.
- Page 8 Personal Phone Manager Step 2. Notification Schedule 3. Select either the primary or secondary email address for the notification type (addresses are configured under the Selecting Quick Setup allows you to set your voice mail to notify User Settings tab). your primary or secondary email address upon receiving a voice message during weekdays or weekends. The email addresses 4. Select Apply to save changes. must first be set in Step 1. To edit a schedule, select the Start Day/Time text link in the detail table. To delete an existing schedule, select Delete next to the schedule in the detail schedule table. Selecting Advanced Setup allows you to specify precise schedules for voice mail notification. Schedules appear in both the graphic schedule display and the schedule detail table. To create a schedule, complete the following steps: 1. Select the Add Range button below the graphic schedule display. 2. Enter the start and end times for the range. (A “range” is a range of time during the week that will have the same notification type.)
- Page 9 Personal Phone Manager Helpful Hints: Ranges can be added in the middle of an existing schedule to break up the time. For example, to the existing schedule of 8:00 AM to 5:00 PM that notifies the primary address, you can add a second range between 12:00 PM and 1:00 PM that same day that notifies the secondary email address. To create a range that runs through the end of the week, set the End Day/Time to be Saturday at 11:59 PM. User Status View the status (Idle, Busy, or Ringing) of other system users. To add users to your User Status Monitor, choose Select Users, pick the names from the directory list, and choose Show Selected Users.
- Page 10 ADTRAN IP 700 Series ® Forwarding Calls Conferencing a Call To forward calls to another extension: To conference a third party into the active call: 1. Press the More soft key on the idel screen. 1. Press the Conference function key during an active call. The active call will be placed on 2. Press the Forward soft key. hold, and the exclusive hold icon appears. 3. Enter the extension to which calls will be forwarded. 2. The next available line displays the 4. Using the navigation arrows, highlight All and press the ringback icon. Enable soft key. Press Ok. 3. At the prompt, enter the phone number 5. To cancel call forwarding, select the Forward soft key of the third party to add. and then select Disable. 4. When the second call is connected, Enabling Do Not Disturb (DND) press the Conference key again to add the call to the conference. The...
- Page 11 ADTRAN IP 700 Series ® Making a Call Redialing a Number To make a call using the handset, headset, or speaker: To dial the last number called, press the Redial soft key on the idle screen. If the Redial soft key is not displayed, 1. Pick up the handset, or press the speaker key, or if press the More soft key. The redial history screen will using the headset, press the Headset key. display. Use the navigation arrows to scroll to a previously 2. Listen for the dial tone. dialed number, then press the Dial soft key. 3. Dial the desired number. Transferring a Call Answering a Call To use unattended transfer: To answer a call using the handset, headset, or speaker: 1. During an active call, select the Transfer function key. 1. Pick up the handset, or press the headset key, or 2. Dial the extension to which to transfer the call. press the Speaker key. 3. Press the Transfer key again when you hear the 2. If you have multiple incoming phone lines, press the...
- Page 12 ADTRAN IP 700 Series ® Adjusting LCD Contrast Directory and Call History Shortcuts 1. Press Menu. Use the arrows on the Navigation Bar to quickly access the Personal Contacts Directory, Placed Calls List, Missed Call 2. Press 2 for Phone Settings. List, or Incoming Calls List. 3. Press 5 for Contrast. 4. Press the + (plus) or - (minus) soft keys until the desired contrast is reached. 5. Press the Ok soft key or OK on the navigation bar. 6. Press the Exit soft key until the idle screen appears, or press CANCEL on the navigation bar to return directly to the idle screen. This is a basic quide to using your phone.
- Page 13 ADTRAN IP 700 Series Phone Icons ® Icon Icon Name Description On Hook/Idle The line has registered with the SIP server and is available for use. Not Registered The line has not registered with the SIP server and is not available for use. Alarm Bell The line is receiving an incoming call. In Use A call is active on the line. Speed Dial Entry The line is set to speed dial. DND The first icon indicates that the line key is dedicated to the Do Not Disturb (DND) feature, but is not activated. Once the icon appears with an X through it, DND is activated and incoming DND-Enabled lines will not ring. Hold A call is on hold. Calls Forwarded The line is forwarded to another extension or number. Call Conferenced A three-way conference call is in progress on the line. Speaker with Volume The plus (+) end of the volume control bar has been pressed to increase volume. Speaker with No Volume The minus (-) end of the volume control bar has been pressed to decrease volume. Voice Mail Indicates the user has voice mail. Line Seized The line has been seized by another member of a ring group. This icon only displays to the members that did not answer the call. This icon displays for approximately 5 seconds before...
- Page 14 ADTRAN IP 700 Series Phone Function Keys ® Function Key Icon Name Description Messages Messages LED illuminates The LED can be configured to illuminate solid, flash, or blink to indicate the Blue to indicate message count. It can be set to directly access voice mail by pressing the message waiting message indicator key. Contact your system administrator for more information. Hold Hold Press to place the current call on hold. Transfer Transfer Press to initiate a call transfer. Conference Conference A call is active on the line. Speed Dial Entry Press to add a third party to an active call. Directories Directories Press to access the System and Personal Contacts directories, as well as display placed, missed, and incoming call histories. Goodbye Goodbye Press to disconnect from the current call. Mute LED flashes Red Press to silence the speaker, handset, or headset microphone. Press the mute...
-
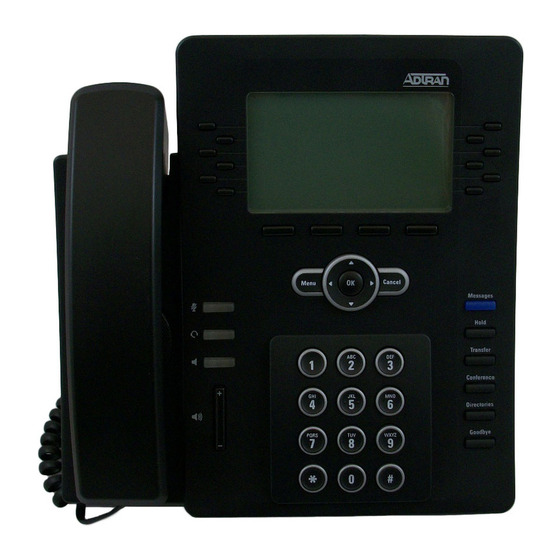
Page 15: Ip 712 Phone
IP 712 Phone Line/Speed Dial Keys Graphic Display Labels (for lines or speed dial) Shows information about calls, appear in the graphic display. messages, soft keys, time, date, and other relevant data. Soft Keys Labels for context-sensitive functions that appear in the Mute, Headset, graphic display screen above. -
Page 16: Ip 706 Phone
IP 706 Phone Line/Speed Dial Keys Graphic Display Labels (for lines or speed dial) Shows information about calls, appear in the graphic display. messages, soft keys, time, date, and other relevant data. Soft Keys Labels for context-sensitive functions that appear in the Mute, Headset, graphic display screen above. - Page 17 Phone Feature Quick Reference Place a Call Blind Transfer Pick up handset or press the Speakerphone Once a call is established, press the Transfer button. Enter the desired number or enter the number on key or Trnsfer soft key, then the Blind soft key and enter the the keypad. Then press the Dial soft key. target extension. Answer a Call Park Call Pick up the handset, press the Answer soft Once a call is established, press the More soft key, key, or the Speakerphone button. then press Park, enter a Park Zone number (0 to 9), then press the Park button again or use the Park Zone Busy Lamp Field (BLF). Hold Once a call is established, press the Hold button Retrieve Parked Call (or Hold soft key) to place the caller on hold. To retrieve Obtain dial tone. Press the Pickup a call on hold, press the Hold button, Resume soft key, or soft key, enter the Park Zone number (0-9), and then press the Line key. the Retrieve soft key to pickup the call. Mute Page While a call is active, press the Mute button to mute Obtain dial tone. Dial overhead paging extension or the audio you are sending to the other party. Press the Mute SPRE code (________). Page the party, then hang up.
- Page 18 Phone Feature Quick Reference Disable Forwarding System Speed Dial Press the Forward soft key, and Dial *25 plus the two digit system then select Disable. speed dial number (00 to 99). Do Not Disturb Speed Dial Programming Press the Do Not Disturb button to Press the Directories enable or disable Do-Not-Disturb mode. Disable by button. Select Contact Directory from Directories menu. pressing the Do Not Disturb button again. Press the More soft key, then press Add. Using the keypad, enter the First name, Last Name and Phone Number Hands-free Auto-Answer Intercom Dial ** in front (contact). Press the Save soft key to save. Press the of any IP phone extension number to invoke hands- Exit soft key to exit the directory. free auto-answer intercom. Speed Dialing Press the line key button that corresponds Hands-free Auto-Answer Intercom Do not Disturb...
-
Page 19: Ip 601 Phone
IP 601 Phone Line/Speed Dial Keys Labels (lines or Speed Dial Ids) appear in the graphic display. Graphic Display Shows information about calls, messages, soft keys, time, date, and other relevant data. Display Control Use to scroll through lists, select Feature Keys (check symbol) and delete (‘x’... -
Page 20: Ip 650 Phone
IP 650 Phone Line/Speed Dial Keys Labels (lines or Speed Dial Ids) appear in the graphic display. Graphic Display Shows information about calls, messages, soft keys, time, date, and other relevant data. Display Control Use to scroll through lists, select Feature Keys (check symbol) and delete (‘x’... -
Page 21: Ip 501 Phone
IP 501 Phone Line/Speed Dial Keys Labels (lines or Speed Dial Ids) appear in the graphic display. Graphic Display Speaker Phone Shows information about calls, messages, soft keys, time, date, and Microphone Mute other relevant data. Headset Display Control Use to scroll through lists, select (check symbol) and delete (‘x’... -
Page 22: Ip 430 Phone
IP 430 Phone Soft Keys Speaker Phone Labels (or context-sensitive functions) appear Microphone Mute in the graphic display screen above. Use the soft keys to select from various context- Headset Graphic Display sensitive options. Shows information about calls, messages, soft keys, time, date, and other relevant data. - Page 24 EN1028B Copyright © 2008 ADTRAN Inc. All rights reserved. ADTRAN believes the information in this publication to be accurate as of publication date, and is not responsible for error. Specifications subject to change without notice. ADTRAN and NetVanta are registered trademarks of ADTRAN, Inc. and its affiliates in the U.S. and certain other countries. All other trademarks mentioned in this document are the property of their respective owners. Five-year warranty applies only to products sold in North America. ADTRAN products may be subject to U.S. export controls and other trade restrictions. Any export, re-export, or transfer of the products contrary to law is prohibited. For more information regarding ADTRAN‘s export license, please visit www.adtran.com/exportlicense...
Need help?
Do you have a question about the IP 712 and is the answer not in the manual?
Questions and answers