Table of Contents
Advertisement
Advertisement
Table of Contents
Troubleshooting

Related Manuals for SMART Board Board 800 series


Summary of Contents for SMART Board Board 800 series
-
Page 1: Interactive Whiteboard
SMART Board® 800 series interactive whiteboard User’s guide... - Page 2 Product registration If you register your SMART product, we’ll notify you of new features and software upgrades. Register online at smarttech.com/registration. Keep the following information available in case you need to contact SMART Support. Serial number: Date of purchase: FCC warning This equipment has been tested and found to comply with the limits for a Class A digital device, pursuant to Part 15 of the FCC Rules.
-
Page 3: Important Information
Important information Before you install and use your SMART Board® 800 series interactive whiteboard, read and understand the safety warnings and precautions in this guide. These safety warnings and precautions describe the safe and correct operation of your interactive whiteboard and its accessories, helping you to prevent injuries and equipment damage. - Page 4 To prevent injury or product damage as a result of tipping, mount your interactive whiteboard only on a floor stand that is certified for use with SMART Board 800 series interactive whiteboards, such as the SMART FS670 Mobile Floor Stand or SMART HAWM FS-UX Mobile Height-Adjustable Floor Stand.
-
Page 5: Other Precautions
If your SMART Board interactive whiteboard requires replacement parts, make sure that the service technician uses replacement parts specified by SMART Technologies. Other precautions If you own a SMART product other than a SMART Board 800 series interactive whiteboard, refer to the installation manual for your product for relevant warnings and maintenance instructions. -
Page 7: Table Of Contents
Contents Important information Safety warnings and cautions Other precautions Chapter 1: About your SMART Board 800 series interactive whiteboard Identifying the components of your 800 series interactive whiteboard Highlights Understanding how your SMART Board interactive whiteboard works Included parts and accessories Chapter 2: Installing and securing your SMART Board interactive whiteboard... - Page 8 C O N T E N T S Contacting SMART Technical Support Transporting your interactive whiteboard Removing the pen tray Appendix A: Hardware environmental compliance Waste Electrical and Electronic Equipment regulations (WEEE directive) Restriction of Certain Hazardous Substances (RoHS directive) Packaging China’s Electronic Information Products regulations U.S.
-
Page 9: Chapter 1: About Your Smart Board 800 Series Interactive Whiteboard
Power supply Optional accessories The SMART Board 800 series interactive whiteboard is the most advanced and intuitive touch sensitive, front projection interactive whiteboard in the world, featuring SMART’s proprietary DViT® (Digital Vision Touch) technology. Its modular and expandable hardware and software architecture enables you to do everything you can do at your computer—open and close applications, meet with... -
Page 10: Identifying The Components Of Your 800 Series Interactive Whiteboard
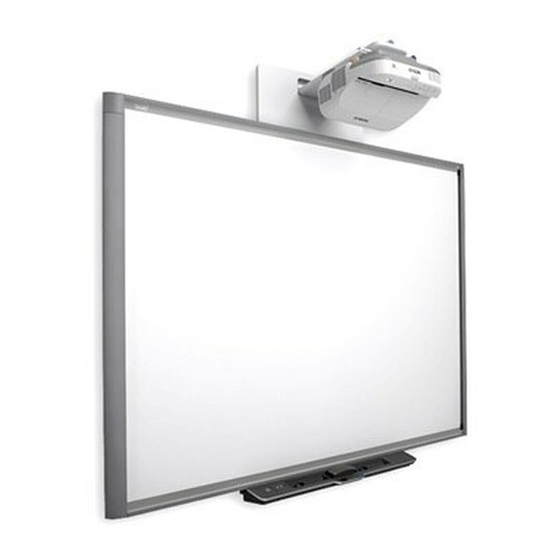
C H A P T E R 1 About your SMART Board 800 series interactive whiteboard Identifying the components of your 800 series interactive whiteboard Use the following illustration to familiarize yourself with the parts of your interactive whiteboard. Highlights Software To use all the features of your interactive whiteboard described in this guide, go to smarttech.com/downloads... -
Page 11: Smart Ink
Pen tray The SMART Board 800 series interactive whiteboard features a modular pen tray with an intuitive new design. As well as two pens and an eraser, pen tray buttons activate the pen’s color, the on- screen keyboard, right-click, Orientation and Help functions. -
Page 12: Understanding How Your Smart Board Interactive Whiteboard Works
C H A P T E R 1 About your SMART Board 800 series interactive whiteboard Understanding how your SMART Board interactive whiteboard works Your interactive whiteboard functions as an input device for your computer, just like a mouse, enabling you to work in any application on your computer from your interactive whiteboard. -
Page 13: Included Parts And Accessories
A 16' 5" (5 m) USB cable enables you to connect your SMART Board 800 series interactive whiteboard to a USB receptacle on your computer. Power supply The SMART Board 800 series interactive whiteboard receives power from a wall outlet through the included country-specific power supply and cable. Optional accessories You can add a variety of optional accessories to your SMART Board 800 series interactive... -
Page 15: Chapter 2: Installing And Securing Your Smart Board Interactive Whiteboard
Chapter 2 Installing and securing your SMART Board interactive whiteboard Environmental requirements Installing your SMART Board interactive whiteboard Installation tips Replacing an existing interactive whiteboard on drywall Securing the pen tray to your interactive whiteboard Securing the pen tray to the brackets Environmental requirements Before installing your interactive whiteboard, review the following environmental requirements. -
Page 16: Installing Your Smart Board Interactive Whiteboard
C H A P T E R 2 Installing and securing your SMART Board interactive whiteboard Installing your SMART Board interactive whiteboard Follow the procedure outlined in the installation document included in your interactive whiteboard’s box to install your interactive whiteboard. If you purchased a floor stand, wall-mount or an interactive whiteboard system that includes a projector or other components, refer to the installation documents included with these components. - Page 17 C H A P T E R 2 Installing and securing your SMART Board interactive whiteboard If you’re installing the interactive whiteboard on drywall, use all the toggle bolts supplied. Because one of the mounting bracket holes aligns with a wall stud, use appropriate hardware in that hole instead of a toggle bolt.
- Page 18 C H A P T E R 2 Installing and securing your SMART Board interactive whiteboard I M P O R T A N T Securing the pen tray can provide theft deterrence for your interactive whiteboard because the screws that secure your interactive whiteboard to the wall are located directly behind the pen tray, and cannot be removed without first detaching the pen tray.
-
Page 19: Chapter 3: Setting Up Your Interactive Whiteboard
Chapter 3 Setting up your interactive whiteboard Connecting your interactive whiteboard to your computer Installing SMART Product Drivers Configuring your computer settings Recommended settings Matching your computer’s resolution to your projector’s resolution Calibrating your interactive whiteboard Orienting your interactive whiteboard Connecting a guest laptop Your interactive whiteboard will be touch sensitive after you install SMART Product Drivers on your connected computer. -
Page 20: Connecting Your Interactive Whiteboard To Your Computer
C H A P T E R 3 Setting up your interactive whiteboard Connecting your interactive whiteboard to your computer Your interactive whiteboard has a USB 2.0 peripheral interface that runs at speeds of up to 12 Mbps. The unit works with full-speed USB 2.0- and USB 1.1-compliant interfaces. Your interactive whiteboard’s main USB connection, a USB Type-B receptacle, is located on the bottom of the pen tray. -
Page 21: Installing Smart Product Drivers
4. If SMART Board Tools doesn’t open: If you have a Windows computer, select Start > All Programs >SMART Technologies > SMART Product Drivers > SMART Board Tools If you have a Mac computer, open Mac HD, and then select Applications > SMART Product Drivers >... -
Page 22: Configuring Your Computer Settings
Ensure that the resolution settings for your projector and computer match. If your computer’s resolution doesn’t match the projector’s native resolution, the image won’t appear correctly or will be distorted. See Getting the Best Image Quality on Your SMART Board Interactive Whiteboard (smarttech.com/kb/127199) for more information. -
Page 23: Calibrating Your Interactive Whiteboard
C H A P T E R 3 Setting up your interactive whiteboard Calibrating your interactive whiteboard Digital cameras in the corners of the interactive whiteboard track the position of the pens, eraser and your finger on the interactive surface, and then send the information to the SMART software, which interprets this information as mouse clicks, digital ink or ink removal in the appropriate location. -
Page 24: Orienting Your Interactive Whiteboard
C H A P T E R 3 Setting up your interactive whiteboard 5. Use the tip of a pen tray pen to press the red targets as they appear. Move the tip to the center of each target until the target turns green, and then lift the pen. When you remove the pen, the target moves to the next calibration point. - Page 25 C H A P T E R 3 Setting up your interactive whiteboard 3. Beginning at the upper-left corner of the screen, touch the center of the target firmly with the tip of the pen. When you remove the pen, the target moves to the next orientation point. Try not to flick the pen when you lift it from the interactive surface, and make sure that you lift it from the screen at a 90°...
-
Page 26: Connecting A Guest Laptop
C H A P T E R 3 Setting up your interactive whiteboard Connecting a guest laptop If you want to connect a guest laptop without installing SMART Product Drivers on it, disconnect the USB cable from your resident computer, and then connect it to the laptop. You’ll immediately have touch control of the interactive whiteboard, but won’t be able to use digital ink. -
Page 27: Chapter 4: Using And Maintaining Your Interactive Whiteboard
Tips for trouble-free performance Getting started Once you install your SMART Board 800 series interactive whiteboard and software and complete the calibration and orientation, you can use the interactive whiteboard to write, erase and move objects, open applications, use Ink Aware programs and save your notes on your computer. - Page 28 C H A P T E R 4 Using and maintaining your interactive whiteboard Power module buttons and indicators The Power module at the pen tray’s left side has Power, Orientation and Help buttons, as well as the Ready light. Power button Press this button to put your interactive whiteboard into Standby mode when it isn’t in use, or to restore full power to it when you need to use it.
- Page 29 C H A P T E R 4 Using and maintaining your interactive whiteboard The following table shows the Ready light’s normal states. If the indicator’s behavior doesn’t match a state listed here, see Troubleshooting tips on page 33. Ready Light State Meaning Solid red Your interactive whiteboard is receiving power from the power cable, but...
-
Page 30: Using The Pen Tray
Using the pen tray In addition to providing a convenient place to hold the pens and the eraser, the pen tray on your SMART Board 800 series interactive whiteboard has several controls, sensors and indicators. Pen tray buttons In the center of the pen tray, there are six buttons. The middle four change the color of digital ink for the two pen tools. -
Page 31: Using Ink Aware
C H A P T E R 4 Using and maintaining your interactive whiteboard Customizing your pen tray buttons You can use the SMART control panel to customize your SMART hardware settings, including the pen, eraser and button settings. To customize the button settings 1. -
Page 32: Writing, Selecting And Erasing Using Object Awareness
Writing, selecting and erasing using object awareness Your SMART Board 800 series interactive whiteboard features object awareness, which means you can pick up a pen and write, select or erase without replacing the pen. SMART software interprets your intent when you press the interactive surface, based on both the type of tool you’re using and the size of the contact area. -
Page 33: Using Gestures
C H A P T E R 4 Using and maintaining your interactive whiteboard Using gestures Touch gestures enable you to use pre-determined commands without using the keyboard or mouse. With a series of touches on your interactive whiteboard screen, you can navigate pages, change the look of an object, erase digital ink and more. - Page 34 C H A P T E R 4 Using and maintaining your interactive whiteboard Single-finger gestures When you install SMART software, you can perform some gestures using one finger, including selecting objects and double-clicking. You can also enable “flicks” on Windows 7 or Windows Vista® operating systems. To perform a flick, press the screen, and then drag quickly in one direction before releasing your finger.
- Page 35 C H A P T E R 4 Using and maintaining your interactive whiteboard Double-clicking Quickly press and release the interactive surface twice in the same spot. This performs a standard double-click. N O T E This gesture starts programs if your operating system is set to start applications on a double click.
- Page 36 C H A P T E R 4 Using and maintaining your interactive whiteboard Multi-finger gestures You can perform some gestures using two or more fingers, including scaling, scrolling and manipulating objects. Multi-finger gestures include the following: Displaying menu options (right-clicking or control-clicking) Using two fingers on the same hand, press and hold the screen with your left finger and then to press the screen once with your right finger.
- Page 37 C H A P T E R 4 Using and maintaining your interactive whiteboard Swiping to a different page Press the screen with all four fingers on your hand, swipe your fingers to the right to display the previous page or to the left to display the next page, and then release your fingers.
-
Page 38: Erasing Digital Ink
C H A P T E R 4 Using and maintaining your interactive whiteboard Erasing digital ink Using your flattened hand, palm, or fist, press the interactive surface and move your hand across the area you want to erase. Use a scrubbing motion to erase entire areas of digital ink. Move your hand in a circle around the area you want to erase, and then swipe your hand across the middle of the circle to erase a large area of ink. - Page 39 C H A P T E R 4 Using and maintaining your interactive whiteboard Best practices for gestures and tools Follow these guidelines when you use gestures and tools with your interactive product. Hold your fingers perpendicular (90°) to the interactive surface at the contact point. 90°...
- Page 40 C H A P T E R 4 Using and maintaining your interactive whiteboard Keep your other hand, elbows and loose clothing away from the interactive surface. They can generate unintentional commands. For “click” commands, quickly tap your finger on the interactive surface. Also, make sure you lift your finger far enough away from the interactive surface between presses so that your finger is out of the interactive whiteboard cameras’...
- Page 41 C H A P T E R 4 Using and maintaining your interactive whiteboard For “erase” commands, use your flattened hand, palm or the bottom of your fist. When using the pen tray’s eraser, use the wide surface for large areas, and the smaller, angled surface for smaller areas.
-
Page 42: Tips For Trouble-Free Performance
C H A P T E R 4 Using and maintaining your interactive whiteboard Tips for trouble-free performance Connect your interactive whiteboard to a USB interface that’s recognized by the operating system. Don’t obstruct the cameras’ view of the interactive whiteboard’s surface or edges. For example, don’t place magnets, stickers or adhesive tape on the interactive surface, or rest any objects, including the pens, in the recess at the bottom of the interactive surface because this interferes with the corner cameras’... -
Page 43: Preventing Damage To Your Interactive Whiteboard
Using and maintaining your interactive whiteboard Preventing damage to your interactive whiteboard Although your SMART Board interactive whiteboard’s surface is very durable, take the following precautions to prevent damage to the interactive surface and other components. Don’t set up and use your interactive whiteboard in an area with high levels of dust, humidity or smoke. -
Page 44: Cleaning The Pen Tray
C H A P T E R 4 Using and maintaining your interactive whiteboard Cleaning the pen tray If the infrared sensors in the sides of the pen tools’ slots become obstructed by dirt, moisten a cotton swab with a household alcohol-free glass cleaner, such as Windex, and then carefully clean the infrared transmitter and receiver. -
Page 45: Chapter 5: Troubleshooting Your Smart Board 800 Series Interactive Whiteboard
Chapter 5 Troubleshooting your SMART Board 800 series interactive whiteboard Updating your SMART software Adjusting the projected image Resetting your interactive whiteboard Using the Connection Wizard Starting the troubleshooting process Troubleshooting using the Ready light Flowchart 1: Getting started Flowchart 2: The Ready light is off... -
Page 46: Updating Your Smart Software
C H A P T E R 5 Troubleshooting your SMART Board 800 series interactive whiteboard Updating your SMART software To update your SMART software, go to the SMART software download page or use SMART Product Update (SPU). To check for software updates 1. Click the SMART software icon in the Windows notification area or the Mac Dock, and then select Check for Updates and Activation. -
Page 47: Resetting Your Interactive Whiteboard
You can resolve many troubleshooting issues using the SMART Connection Wizard found in the SMART control panel. To start the SMART Connection wizard 1. Press the Help button on the pen tray. The Help and Support for Your SMART Board Interactive Whiteboard window opens. -
Page 48: Starting The Troubleshooting Process
Windows notification area or Mac Dock, selecting Control Panel, and then selecting Connection Wizard. 3. Select SMART Board 800 series interactive whiteboard, and then press Next. 4. Select the option that best describes the issue you’re encountering, and follow the on-screen instructions to troubleshoot your interactive whiteboard. - Page 49 C H A P T E R 5 Troubleshooting your SMART Board 800 series interactive whiteboard The following table shows the Ready light’s normal states. If the Ready light The interactive whiteboard... Actions is... Isn’t receiving power or is in Press the Power button on the pen Standby mode.
- Page 50 C H A P T E R 5 Troubleshooting your SMART Board 800 series interactive whiteboard Refer to this table for troubleshooting tips if the Ready light indicates that your interactive whiteboard is working properly, but you’re still experiencing problems. Symptoms...
- Page 51 C H A P T E R 5 Troubleshooting your SMART Board 800 series interactive whiteboard Symptoms Possible causes Actions There is a small red × SMART Product Drivers is Ensure that the USB cable is connected to on the SMART Board unable to detect your you computer and your interactive icon.
-
Page 52: Troubleshooting Using The Ready Light
C H A P T E R 5 Troubleshooting your SMART Board 800 series interactive whiteboard Troubleshooting using the Ready light You can troubleshoot your interactive whiteboard using the Ready light, together with other observable symptoms and behaviors. Before you start troubleshooting, see Starting the troubleshooting process on page 40 to locate the Ready light, and then familiarize yourself with its states during normal operation. -
Page 53: Flowchart 2: The Ready Light Is Off
C H A P T E R 5 Troubleshooting your SMART Board 800 series interactive whiteboard Flowchart 2: The Ready light is off When the Ready light is off, the interactive whiteboard isn’t receiving power. Press the Reset button on the bottom of the pen tray to reset the interactive whiteboard. -
Page 54: Flowchart 3: The Ready Light Is Solid Red
C H A P T E R 5 Troubleshooting your SMART Board 800 series interactive whiteboard Flowchart 3: The Ready light is solid red A red Ready light indicates that the interactive whiteboard is receiving power but isn’t communicating successfully with the computer. -
Page 55: Flowchart 4: The Ready Light Is Flashing Green
Before you can use SMART Board Tools or the pen tray pens and eraser, SMART Product Drivers must be installed and running. If the SMART software icon doesn’t appear in the Windows notification area or Mac Dock, you must start SMART Product Drivers. To use all the features of your SMART Board 800 series interactive whiteboard, go to smarttech.com/downloads to download and install SMART software. -
Page 56: Flowchart 5: The Ready Light Is Solid Green But Pen Tray Tools Behave Unexpectedly
C H A P T E R 5 Troubleshooting your SMART Board 800 series interactive whiteboard Flowchart 5: The Ready light is solid green but pen tray tools behave unexpectedly A solid green Ready light indicates that the interactive whiteboard is working properly. -
Page 57: Flowchart 6: The Ready Light Is Solid Green But The Interactive Whiteboard Isn't Responsive
C H A P T E R 5 Troubleshooting your SMART Board 800 series interactive whiteboard Flowchart 6: The Ready light is solid green but the interactive whiteboard isn’t responsive Press the Reset button on the bottom of the pen tray to reset the interactive whiteboard. -
Page 58: Troubleshooting Using Smart Board Diagnostics
If you touch the interactive whiteboard’s surface and nothing happens, or if there is no digital ink or the ink appears in some locations and not in others, use SMART Board Diagnostics to help identify and resolve these issues. -
Page 59: Checking The Interactive Whiteboard's Calibration
C H A P T E R 5 Troubleshooting your SMART Board 800 series interactive whiteboard 5. Click Update to show what each of the four cameras sees. This can take several moments. Each bar represents a picture from a camera, and the number beside the bar tells you which camera took the corresponding picture. - Page 60 C H A P T E R 5 Troubleshooting your SMART Board 800 series interactive whiteboard 4. Click Tracker. The screen becomes white. 5. Touch the interactive screen with a pen, finger or eraser. 6. Verify that the tracking rays overlap.
-
Page 61: Finding More Information
(if you printed it). To determine your interactive whiteboard’s serial number You can find the serial number in two places: on the back of your SMART Board interactive whiteboard, and on the bottom right-hand edge of your interactive whiteboard’s frame (the side). -
Page 62: Transporting Your Interactive Whiteboard
C H A P T E R 5 Troubleshooting your SMART Board 800 series interactive whiteboard The serial number on your SMART Board interactive whiteboard always begins with the letters SBX, followed by the interactive whiteboard’s model number, for example, SBX880-xx-xxxxxx. The serial number can include numbers, letters and hyphens. - Page 63 C H A P T E R 5 Troubleshooting your SMART Board 800 series interactive whiteboard 4. If you secured the pen tray to its brackets using two security screws, remove the screws, and then set them aside. 5. If you secured the pen tray using a Kensington lock or similar device, unlock and remove the lock.
-
Page 65: Appendix A: Hardware Environmental Compliance
Appendix A Hardware environmental compliance SMART Technologies supports global efforts to ensure that electronic equipment is manufactured, sold and disposed of in a safe and environmentally friendly manner. Waste Electrical and Electronic Equipment regulations (WEEE directive) Waste Electrical and Electronic Equipment regulations apply to all electrical and electronic equipment sold within the European Union. -
Page 66: China's Electronic Information Products Regulations
A P P E N D I X Hardware environmental compliance China’s Electronic Information Products regulations China regulates products that are classified as EIP (Electronic Information Products). SMART Technologies products fall under this classification and meet the requirements for China’s EIP regulations. U.S. -
Page 67: Index
Index environmental requirements erasing European Union regulations about your 800 series interactive whiteboard accessories flowchart 1 - getting started 2 - Ready light off 3 - Ready light red buttons 4 - Ready light flashing green customizing 5 - Ready light green, pen tray problems 48 flashing 6 - Ready light green, no response Keyboard... - Page 68 I N D E X installing installing and securing installing SMART Product Drivers interactive whiteboard tips cleaning cleaning pen tray installation Locked Ink mode preventing damage safety trouble-free performance troubleshooting transporting object awareness troubleshooting optional checking calibration orienting checking camera views diagnostics interactive whiteboard tips...
- Page 70 SMART Technologies smarttech.com/support smarttech.com/contactsupport...
Need help?
Do you have a question about the Board 800 series and is the answer not in the manual?
Questions and answers