Visonic PowerMaster-10 User Manual
Fully supervised wireless alarm control system
Hide thumbs
Also See for PowerMaster-10:
- Installer's manual (106 pages) ,
- Manual (86 pages) ,
- User manual (46 pages)
Advertisement
Quick Links
Download this manual
See also:
Manual
m Fully
upervised
wireless
s alarm
control
stem Fully
upervised
wireless
s alarm
control
ntrol
stem Fully
upervised
User Guide
PowerMaster-10/
PowerMaster-30
Fully supervised wireless alarm control system
Advertisement

Related Manuals for Visonic PowerMaster-10


Summary of Contents for Visonic PowerMaster-10
-
Page 1: User Guide
Fully upervised wireless User Guide s alarm control PowerMaster-10/ stem Fully upervised wireless PowerMaster-30 s alarm control ntrol Fully supervised wireless alarm control system stem Fully upervised... - Page 2 C.9 Enabling / Disabling Auto-Arming ..42 Disarming under Duress......14 C.10 Setting the Auto-Arming Time ..... 42 Using Keyfob Transmitters ......14 C.11 Programming Private Phone and SMS Initiating Alarms ........15 Reporting ............. 43 D-303223 PowerMaster-10 / PowerMaster-30 User's Guide...
- Page 3 9. Testing the System ........56 APPENDIX C. HOME FIRE ESCAPE PLANNING Periodic Test ..........56 ................ 67 10. Maintenance ..........59 FCC STATEMENT ..........68 Replacing the Backup Battery ..... 59 Replacing Wireless Devices Batteries ..59 D-303223 PowerMaster-10 / PowerMaster-30 User's Guide...
- Page 4 The PowerMaster-10 / PowerMaster-30 is a wireless alarm system for detecting and alerting in case of burglary, fire and a variety of other security and safety hazards. In addition, it can be used to monitor the activity of ∗...
- Page 5 Upon arrival, you can listen to verbal messages left by others for you. • Access from remote telephones: You may access the PowerMaster-10 / PowerMaster-30 from a remote telephone and Arm/Disarm it or receive system status information. (See Chapter 5).
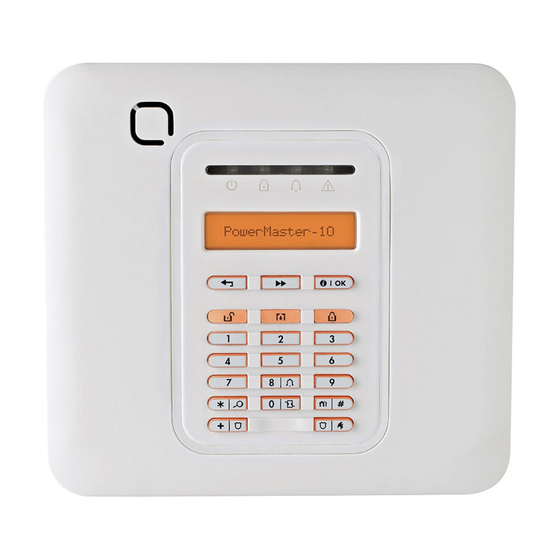
- Page 6 Figure 1a. PowerMaster-10 Controls and Indicators Indication Function Power (Green): Indicates that your system is properly connected to the power outlet. Arm (Red): Lights when the system is in the armed state. Chime (Green): Chime zones will chime when disturbed (see Chapter 2).
- Page 7 Indication Function NEXT: Advance from item to item within a given menu. BACK: Move one step back within a given menu. OK: Review status messages one by one and also select a displayed option. D-303223 PowerMaster-10 / PowerMaster-30 User's Guide...
- Page 8 ON - ON - ON - pause - ON - ON - ON - pause..– – – – – – – – – Test* –– (both external and internal sirens) ON for 2 seconds (once) Not included in all models D-303223 PowerMaster-10 / PowerMaster-30 User's Guide...
- Page 9 If the Screen Saver option is enabled by the installer, then if no key is pressed for more than 30 seconds, the display will read “PowerMaster-10 / PowerMaster-30” and the LEDs will stop indicating any status. Pressing any key will resume the normal status display. Pressing the Fire or Emergency keys will also initiate the Fire or Emergency alarm.
- Page 10 (see Chapters 2 and 6, C.6 Add / Delete Keyfob Transmitters). The Duress Code enables you to disarm the system using a special code that sends a silent alarm to the monitoring station (See chapter 2). D-303223 PowerMaster-10 / PowerMaster-30 User's Guide...
- Page 11 IMPORTANT! All arming procedures below are based on the assumption that quick arming has been enabled by the installer. If quick arming is disabled, the PowerMaster-10 / PowerMaster-30 will prompt you to enter your security code before arming as follows: ∗...
- Page 12 The MEMORY message will disappear only upon rearming the system. IMPORTANT! If the trouble beeps bother you, disarm the system again (even though it is already disarmed). This will cancel the trouble beeps for 4 hours. D-303223 PowerMaster-10 / PowerMaster-30 User's Guide...
- Page 13 Do not disarm the system - simply press . Since this operation reduces the security level, the PowerMaster-10 / PowerMaster-30 will ask you to key in your master user code or user code, thus making sure that you are an authorized user.
- Page 14 A special “latchkey” message will be sent out when the system is disarmed by a “latchkey user”. Latchkey users are holders of user codes 5 through 8 (PowerMaster-10) / user codes 23-32 (PowerMaster-30) or users of Keyfob transmitters 5 through 8 (PowerMaster-10) / 23-32 (PowerMaster-30). The latchkey message is considered an alert and not an alarm, and is therefore sent to the private telephones programmed by the user as targets for alert messages.
- Page 15 Controlling a gate or another electrical device (PGM): Pressing the AUX ( ) button opens/closes an electrically-controlled gate, or controls a chosen electrical device via PGM output of the system. (*) For further information - see Appendix B. D-303223 PowerMaster-10 / PowerMaster-30 User's Guide...
- Page 16 RESULTING DISPLAY FIRE ALARM for 2 seconds Then, if or when the system is in the disarmed READY HH:MM (alternating) READY MEMORY To stop the alarm, press and then key in your valid user code. D-303223 PowerMaster-10 / PowerMaster-30 User's Guide...
- Page 17 The following diagram shows how to increase the loudness of the beeps by clicking the <1> key (assuming that the volume was at minimum to begin with). PRESS RESULTING DISPLAY VOLUME+ VOLUME+ VOLUME+ (max) VOLUME+ D-303223 PowerMaster-10 / PowerMaster-30 User's Guide...
- Page 18 The following diagram shows how to decrease the loudness of the beeps with the <4> key (assuming that the volume was at maximum to begin with). PRESS RESULTING DISPLAY (max) VOLUME– VOLUME– VOLUME– VOLUME– D-303223 PowerMaster-10 / PowerMaster-30 User's Guide...
- Page 19 The following diagram shows how to decrease the loudness with the <4> key (assuming that the volume was at maximum to begin with). PRESS RESULTING DISPLAY VOLUME– (max) VOLUME– VOLUME– VOLUME– ∗ Refers to PowerMaster-30 with voice option only D-303223 PowerMaster-10 / PowerMaster-30 User's Guide...
- Page 20 PLAY will be displayed and the message will be played back over the built-in loudspeaker. When the playback ends, the display will revert to the normal status-displaying mode. If more than 1 minute elapsed after recording, the MSG indication will disappear. D-303223 PowerMaster-10 / PowerMaster-30 User's Guide...
- Page 21 BY TIMER ON (If this is the default) If not satisfied - BY TIMER OFF press If satisfied - press BY TIMER OFF BY TIMER OFF BY SENSOR ON (If this is the default) D-303223 PowerMaster-10 / PowerMaster-30 User's Guide...
- Page 22 If not satisfied - Press BY SENSOR OFF If satisfied - BY SENSOR OFF BY SENSOR OFF READY HH:MM D-303223 PowerMaster-10 / PowerMaster-30 User's Guide...
- Page 23 The PowerMaster-10 / PowerMaster-30 retains in its memory alarm and “tamper” events that occurred during the last arming period. Note: Alarm events are memorized only after the “abort period” (see Appendix B). This means that if you disarm the system immediately - before the abort period expires - there will be no memory indication A.
- Page 24 (alternating) Z09 CONTACT (alternating) KITCHEN ↓ Z15 MISSING (alternating) Z15 MOTION SENS. (alternating) LIVING ROOM ↓ COMM. FAILURE ↓ READY HH:MM ∗ When working from the PowerMaster-30 control panel, the display will read "PowerMaster-30". D-303223 PowerMaster-10 / PowerMaster-30 User's Guide...
- Page 25 A & B above. After all trouble messages have been reviewed and if a SIM card is installed in the control panel, the PowerMaster-10/PowerMaster-30 displays the GSM signal strength indication, as follows: "GSM RSSI STRONG" / "GSM RSSI GOOD" / "GSM RSSI POOR".
- Page 26 This chapter explains the user programming features of your PowerMaster-10 / PowerMaster-30 system and allows you to tailor the PowerMaster-10 / PowerMaster-30 system according to your specific needs. The chapter is divided into three sections, as follows: Part A – Provides you with a general description of available User Setting options.
- Page 27 Note: Except for specific reference to PowerMaster-30 functions, the buttons displayed throughout the User's Guide are of the PowerMaster-10 control panel. When using the PowerMaster-30 control panel, these buttons can be interchanged. A. To Enter the User Settings Menu...
- Page 28 For further details and programming procedure see section C.14. Use to exit from the “USER SETTINGS” menu back to Main Menu. For further <OK> TO EXIT details see section B.3. Returns to first option D-303223 PowerMaster-10 / PowerMaster-30 User's Guide...
- Page 29 AWAY Use to jump back to the [<OK> TO EXIT] screen to quit programming. Use to cancel, delete, clear or erase setting, data, etc. 0 - 9 Numerical keypad used to enter numerical data. D-303223 PowerMaster-10 / PowerMaster-30 User's Guide...
- Page 30 ♦ Here you can set the Zone Bypass Scheme i.e. to scroll through the list of registered (enrolled) sensors to your PowerMaster-10 / PowerMaster-30 system and to Bypass (deactivate) faulty or disturbed sensors (either READY or NOT-READY) or to Clear (reactivate) BYPASSED zones (sensors).
- Page 31 To recall the last used bypass scheme press A "Happy Tune" ☺ sounds. The display reads [ Bypass RECALLED ] and Bypass RECALLED then returns to “ USER SETTINGS " step 1. Return to step 1 ☺ D-303223 PowerMaster-10 / PowerMaster-30 User's Guide...
- Page 32 You can now repeat steps 2 - 5 to bypass or clear another zone. To end this session and to select other menu options or to quit programming - follow the instructions in section B.2. You can now select another option in the User Setting menu (see section B.1), or quit programming (see section B.2). D-303223 PowerMaster-10 / PowerMaster-30 User's Guide...
- Page 33 ♦ Here you can program (or edit) the 48 User Codes and thereby define which of these will be authorized to arm and disarm. 1. The default setting 1111 of Master User Code 1 is the same for all PowerMaster-10 / PowerMaster-30 systems and is known to many other people. Therefore, we highly recommend that you immediately replace it with a unique secret code.
- Page 34 U26: P1 P2 P3 with Partition 1 and 3 only, press to confirm. Return to step 3 ☺ A "Happy Tune" ☺ sounds. The display confirms the Partition setting. ∗ Refers to PowerMaster-30 only D-303223 PowerMaster-10 / PowerMaster-30 User's Guide...
- Page 35 For detailed instructions on how to select the setting options – refer to section B.1 and section B.2. The display shows the 1 User Code (Master User) in the list of 8 User Codes (in PowerMaster-10 system) / 48 User Codes (in PowerMaster-30). If you have not yet changed the default code 1111, we recommend that you change it now.
- Page 36 Each of the 8 PowerMaster-10 / PowerMaster-30 users may be provided with a proximity tag that can be used instead of the user codes to perform a variety of functions, for example, arming, disarming, reading the event log, etc. Whenever a user code is required you can simply present a valid proximity tag instead of entering the user code.
- Page 37 Tag (Tag No.1) of the 8 tags. To abort enrollment press the button. If the tag was previously enrolled in the system, the PowerMaster-10 / PowerMaster-30 display reads " ALREADY ENROLLED " and then switches to the name of the tag alternating with its ID number.
- Page 38 Each of the 8 PowerMaster-10 / PowerMaster-30 users may be provided with a portable keyfob transmitter to exercise better, quicker and safer arming/disarming and other control functions. Each keyfob should be assigned with a serial No. 1-8 (PowerMaster-10) / 1-32 (PowerMaster-30) and enrolled into the system correspondingly.
- Page 39 <OFF> TO DELETE To delete the keyfob press the button. Go to step 3 ☺ A "Happy Tune" ☺ sounds and the display reads [ DELETE KEYFOB ] and DELETE KEYFOB returns to step 3. D-303223 PowerMaster-10 / PowerMaster-30 User's Guide...
- Page 40 Keyfob (Keyfob No.1) of the 8 keyfobs. To abort enrollment press the button. If the keyfob was previously enrolled in the system, the PowerMaster-10 / PowerMaster-30 display reads " ALREADY ENROLLED " and then switches to the name of the keyfob alternating with its ID number.
- Page 41 The time saved is displayed without the cursor, for example, " " followed by the selected time format. You can now select another option in the User Setting menu (see section B.1 and section B.2), or quit programming (see section B.3). D-303223 PowerMaster-10 / PowerMaster-30 User's Guide...
- Page 42 You can now select another option in the User Setting menu (see section B.1 and section B.2), or quit programming (see section B.3). This setting can be performed only after completing steps 1 – 3 of section C.8A. D-303223 PowerMaster-10 / PowerMaster-30 User's Guide...
- Page 43 The PowerMaster-10 / PowerMaster-30 system can be programmed to automatically arm itself on a daily basis at a predetermined time. This feature is useful especially in commercial applications, such as in stores, to ensure that the system is always armed and without having to assign security codes to employees.
- Page 44 The PowerMaster-10 / PowerMaster-30 system can be programmed to send various event notification messages such as alarm, arming or trouble events, to 4 private telephone subscribers by audible signal and if a GSM option is installed, also to 4 SMS telephone numbers. These reports can be programmed either instead of or in addition to the reports transmitted to the monitoring company.
- Page 45 Return to step 15 ☺ E. To Program the Acknowledge Method Click the button until the display reads [Tel. - ->private ] and press to confirm. ∗ Refers to PowerMaster-30 with voice option only D-303223 PowerMaster-10 / PowerMaster-30 User's Guide...
- Page 46 ”, using the numerical 5, 6 keypad. When done, press to confirm. A "Happy Tune" sounds, the display confirms the SMS phone number ☺ 7, 12 and returns to step 8. Return to step 8 ☺ D-303223 PowerMaster-10 / PowerMaster-30 User's Guide...
- Page 47 “ ” means all events including the L. BAT and AC FAIL trouble messages (PowerMaster-30 only). When Voice Report is enabled, alarms and alerts only can be reported in the PowerMaster-10 control panel. symbol now appears next to the new selected option.
- Page 48 The PowerMaster-10 / PowerMaster-30 system (and its wireless sirens) can be set to produce a short "Squawk" of audible feedback to assist you when you use your keyfob to arm (1 beep) and disarm (2 beeps) the PowerMaster-10 / PowerMaster-30 system (operates in a similar manner to a car alarm).
- Page 49 The PowerMaster-10 / PowerMaster-30 system includes a PGM output that can be used to open and close an electrically-controlled gate, or to control a preferred electrical device via keyfobs (refer to "Using keyfob transmitters" in Chapter 2) or according to a programmable weekly time schedule.
- Page 50 For detailed explanation of how to set the time - refer to Section C.7 B. To end this session and return to the previous "operation" menu, press the button. To select other menu options or to quit programming, follow the instructions in sections B.2 and B.3. D-303223 PowerMaster-10 / PowerMaster-30 User's Guide...
- Page 51 _ _: _ _ _ _: _ _ _ _: _ _ _ _: _ _ Daily OFF: _ _: _ _ OFF: _ _: _ _ OFF: _ _: _ _ OFF: _ _: _ _ D-303223 PowerMaster-10 / PowerMaster-30 User's Guide...
- Page 52 If you have selected " ", make sure that the voice prompts can be heard over the loudspeaker by pressing the key on the control panel keypad. ∗ Refers to PowerMaster-30 with voice option only D-303223 PowerMaster-10 / PowerMaster-30 User's Guide...
- Page 53 The called party must acknowledge the message (as explained later on). However, if there is no response the message will be repeated as many times as possible within a 45-second time limit. When the 45 seconds are up, the PowerMaster-10 / PowerMaster-30 will disengage the line and call the next private telephone number on its list.
- Page 54 [Desired command, see next table] Notes: (1) Alternative to steps 2 – 4: The PowerMaster-10 / PowerMaster-30 responds in a similar way if you just dial once and wait until you hear telephone rings (in USA, for example, 11 rings).
- Page 55 <code>” “P# STATUS <code>” “ST <code>” “P# ST <code>” Note: The PowerMaster-10 / PowerMaster-30 may react with a delay to received SMS messages if a GPRS session is in progress at the same time. D-303223 PowerMaster-10 / PowerMaster-30 User's Guide...
- Page 56 In addition to acting as an alarm system, the PowerMaster-10 / PowerMaster-30 can also be used to monitor the movement of people at home when the system is in the disarmed state (or even when armed “HOME” with perimeter protection only), and report lack of motion in interior zones if there is no detection of motion within predetermined time limits.
- Page 57 SIREN N assigned to the siren that is currently being tested. First the panel siren sounds for 3 seconds after which the PowerMaster-10 / PowerMaster-30 system will automatically repeat the procedure for the next siren enrolled in the system until all sirens are tested.
- Page 58 FRONT DOOR Click to scroll through the list of all untested devices. When all devices have been activated, the display reads [DEVICE TESTS DEVICE TESTS END END] followed by [READY 00:00]. READY 00:00 D-303223 PowerMaster-10 / PowerMaster-30 User's Guide...
- Page 59 If the INSTALLER CODE is used to enter the Periodic Test instead of the USER CODE, the devices LED will also provide the link quality indication – see PowerMaster-10 / PowerMaster-30 Installer Manual. To skip the SIRENS TEST and select the other devices TEST, press If the panel's display reads "SIREN P", this indicates that the control panel's siren is currently being...
- Page 60 The PowerMaster-10 / PowerMaster-30 uses regular electrical supply, but incorporates rechargeable backup 4.8V battery pack to ensure its proper operation during a power failure (see sticker on battery cover). After power failure the battery is recharged to its full capacity.
- Page 61 When the PowerMaster-10 / PowerMaster-30 display reads [ENTER CODE CODE: _], enter the current master user code. The "Happy Tune" will sound and the PowerMaster-10 / PowerMaster-30 LIST OF EVENTS display will read [LIST OF EVENTS]. (see Important Note!) Click the button.
- Page 62 The show function is enabled during single/all partition(s) status and displays information that is relevant to the selected or all partitions. Show All Partitions In Ready mode press , the display will show information on all partitions. Press repeatedly to view memory / status content. ∗ Refers to PowerMaster-30 only D-303223 PowerMaster-10 / PowerMaster-30 User's Guide...
- Page 63 The wireless remote commander is used to control a partition. Arming/Disarming a Partition Note: Before using Partitioning, make sure it is enabled in the control panel (see PowerMaster-10 / PowerMaster-30 Installer Guide). To arm/disarm a partition, press the desired partition number (...
- Page 64 To arm/disarm partitions, press the desired partition number/s ( ) then perform the arming action by pressing the (HOME) / (AWAY) / (DISARM) button within a timeout period and then present the proximity tag. ∗ Refers to PowerMaster-30 only D-303223 PowerMaster-10 / PowerMaster-30 User's Guide...
- Page 65 Disturbed Zone: A zone in a state of alarm (this may be caused by an open window or door or by motion in the field of view of a motion detector). A disturbed zone is considered “not secured”. D-303223 PowerMaster-10 / PowerMaster-30 User's Guide...
- Page 66 To disarm the system without causing an alarm, use your control keypad (which is normally accessible without disturbing a perimeter zone) or use a keyfob transmitter. It's me: The PowerMaster-10 / PowerMaster-30 system includes a powerful device locator that helps you to identify the actual device displayed on the LCD, as follows: While the LCD displays a zone (device), the LED on the respective device flashes indicating "it's me".
- Page 67 Status: AC fail, low battery, trouble, system state etc User Codes: The PowerMaster-10 / PowerMaster-30 is designed to obey your commands, provided that they are preceded by a valid security access code. Unauthorized people do not know this code, so any attempt on their part to disarm or defeat the system is bound to fail.
- Page 68 Tell guests or visitors to your home about your family’s fire escape plan. When visiting other people’s home, ask about their escape plan. If they don’t have a plan in place, offer to help them make one. This is especially important when children are permitted to attend “sleepovers” at friends' homes. D-303223 PowerMaster-10 / PowerMaster-30 User's Guide...
- Page 69 If trouble is experienced with the “PowerMaster-10 / PowerMaster-30” for repair or warranty information please contact Visonic Inc USA., 65 West Dudley Town Road, Bloomfield, CT 06002, phone number: 8 602 430 833, URL: www.visonic.com. If the equipment is causing harm to the telephone network, the telephone company may request to disconnect the equipment until the problem is resolved W.E.E.E.
- Page 70 • Abort Fire Time This section is a new menu in the PowerMaster-10/30 G2 Installer's Guide - section 3.5.4 40:ABORT FIRE T. The PowerMaster is able to provide an “abort interval” that starts upon detection of a Fire event. During this interval, the buzzer sounds a warning but the siren remains inactive and the alarm is not reported.
-
Page 71: Record Speech
Record Speech This section is an update to the PowerMaster-10/30 G2 Installer's Guide – section 3.8.2 You can record short-duration speech messages for the house identity, user names and custom zone names. For the recording procedure follow the instructions below. Additional details and guidance are provided in section 5.2. -
Page 72: Bs8243 Setup
A tamper event is activated (not from the zone / device that initiated the panic alarm). Options: 4/8/12/20 (default)/24 hours and disabled Applies only when the keyfob is defined as "skip exit delay" (for further details, see the keyfob's User's Guide) D-304271 PowerMaster-10/30 G2 Addendum... -
Page 73: Dd243 Setup
Define the devices that cannot trigger a panic alarm. 04:FOB/KP PANIC DD243 – MCT-234. all - All devices can trigger a panic alarm Applies only when the keyfob is defined as "skip exit delay" (for further details, see the keyfob's User's Guide) D-304271 PowerMaster-10/30 G2 Addendum... - Page 74 Siren Test: Each siren of the system is automatically activated for 3 seconds (outdoor sirens with low volume). In addition, the system tests the siren of enrolled smoke sensors. Using the Installer Code This section is an update to the PowerMaster-10/30 G2 Installer's Guide – section 4.2. Option Instructions...
- Page 75 Using the User Code This section is an update to the PowerMaster-10/30 G2 User's Guide – Chapter 9 "Testing the System". A. To Enter the Periodic Test Menu Make sure the system is disarmed and then press the button repeatedly READY 00:00 until the display reads "PERIODIC TEST"...
- Page 76 Fully supervised wireless alarm control system Fully supervised wireless alarm Fully supervised wireless alarm control system Fully supervised wireless alarm cont upervised wireless alarm control system Fully supervised wireless alarm control sys ireless alarm control system Fully supervised wireless alarm control system Fully su www.visonic.com...
Need help?
Do you have a question about the PowerMaster-10 and is the answer not in the manual?
Questions and answers