Table of Contents
Advertisement
Quick Links
Advertisement
Table of Contents

Related Manuals for Boyo VTR107


Summary of Contents for Boyo VTR107
-
Page 2: Power Off
Battery Be sure to read carefully the following cautions. ▣ Strongly swelled battery is very dangerous. Please contact manufacturer or seller without hesitation. ▣ Do not close the heat of fire.( Do not insert in micro wave range.) ▣ In summer time, do not place inside car. ▣... - Page 3 Consist CD-ROM Main Body External GPS (PC Viewer, User Manual included) microSD card Car Cigar Adaptor Cable arrange clips Magnetic holder & metal Aux-to-RCA cable (optional) Rear camera (optional) plate (optional) Video-out cable (optional) 1. There is PC Viewer program and the user manual in CD-ROM. Please install PC Viewer program into the computer to see the recorded files by the device, as well as, install PDF reader to see the user manual.
- Page 4 Features ◈ 2.0 mega pixel (⅓” CMOS) lens ◈ 110° wide angle of camera ◈ High definition recording resolution ⇒ 1ch : 1280x720 pixel, Max 20 frames, H264 ⇒ 2ch : 640x480 pixel, Max 10frames, H264 (rear camera optional) ◈ Continuous recording function ⇒...
-
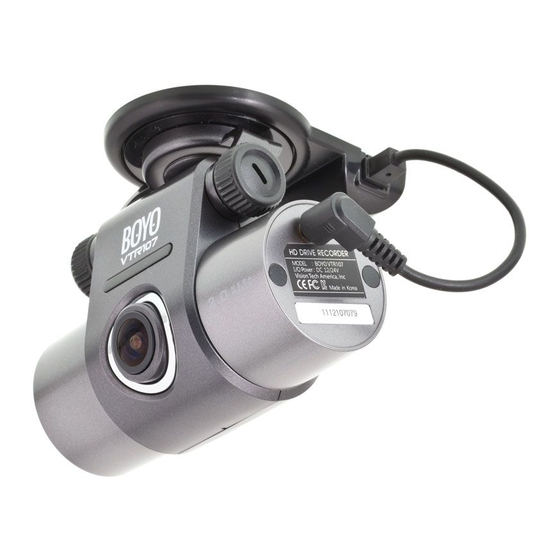
Page 5: Name Of Each Part
Name of each part Use to attach VTR107 on car glasses or attach metal Double side tape plate (optional) if it comes with magnetic holder in the package Fix the device after direction control ( Up, Down, Right, 4 Way cradle... -
Page 6: Installation
Installation Notice - How to use magnetic holder if it comes in the package. (optional) 1. Attach the magnetic holder on the windshield of your vehicle. 2. Attach the metal plate on the other side of external GPS. 3. Remove the double side tape of device and attach it with GPS. 4. - Page 7 Basic way of using 1. Power on and start ▷ Press Power button to turn on the device. ▷ During the booting, 2 LEDs are blinking repeatedly with BLUE, GREEN, RED colors. Normal recording begins with blue light after completing the booting. 2.
- Page 8 Security LED : ON/OFF Manual recording ( default : ON) SD card format 4) Impact sensor detection in “RECORD” mode ▷ Impact recording begins when sensing the impact during “RECORD”. ▷ Total 20 sec ( pre 10sec, post 10 sec) of Impact recording files saving in “EVENT” folder. ▷...
-
Page 9: Motion Recording
7) In case of Remove the micro SD card during “RECORD” ▷ It is impossible to save the recording present file normally. ▷ It may critical damage to micro SD card and goods. ▷ When remove the SD card from goods, automatically reboot the system 8) Power off during “RECORD”... -
Page 10: Manual Recording
capacity. In excess of Micro SD card capacity, new date/time folder and recording files is creating after deletion from the oldest file. 3) In case of Impact sensor sensing during “MOTION” mode working ▷ Buzzer beeps twice shortly, right LED light up to red color until stops event recording when impact detected in parking mode. -
Page 11: Event Recording
after deletion from the oldest file. 5. “EVENT” recording When the impact occurred, impact sensor detect the impact and saving the files to another separate folder. 1) start of “EVENT” ▷ Buzzer beeps twice shortly according to the setup sensitivity, LED-2 light up and starts “EVENT” recording. ▷... - Page 12 Voice Voice 6. Setting additional function recording ON Recording OFF 1) “Voice Record” ON/OFF setup ▷ Press “ “button shortly, Voice recording ON or OFF ( default : ON ) ▷ Voice recording ON : Left LED is light up Voice recording OFF : Left LED is blinking Set Voice Record is maintain the same status even the power off.
- Page 13 Working status of LED and Buzzer " " means LED ON, " " means LED blinking. GPS ON GPS OFF LED(Left) LED(Left) Buzzer Mode (BEEP) Voice Voice Voice Voice (right) (right) recording recording recording recording (ON) (OFF) (ON) (OFF) BOOTING Recording start RECORD 1 time beep...
-
Page 14: Pc Viewer Program
5. Now, install PC Viewer into the computer. 1. Install PC Viewer into the computer ▷ Insert CD into the computer and go to the model name of folder. (example, VTR107) ▷ Double click the installation file of PC Viewer and follow the instruction on the screen. -
Page 15: Main Screen
Main Screen Setting 1CH playback screen Picture capture 2CH playback screen GPS information window Present playback time Full screen Progressing playback status Channel screen turnover Total playback time Hidden program/exit Playback speed control “RECORD” folder Playback sound control “EVENT” folder Playback screen control menu “MANUAL”... - Page 16 5 Search backward each frame in Playback previous file playback Playback recoded file 6 Search forward each frame in playback Pause playback file 7 Fast playback Playback next file 8 Open microSD card 4. GPS Click the “GPS” to see information. ▷...
- Page 17 6. Setting ● ATTENTION To change [Setting], you should use the device at least once after inserting microSD card into the device, before changing [Setting] 1. Insert microSD card into the device and turn it on. After completing the booting, turn off the device.
- Page 18 2) Setting the “Voice Record” ▷ ON / OFF the Voice Record ( default : ON ) 3) Setting the “Security LED” ▷ ON / OFF the Security LED ( default : ON ) 4) Setting the “Buzzer” ▷ ON / OFF the Buzzer ( default : ON ) 5) Setting the “G-Sensor Sensitivity”...
-
Page 19: Memory Info
Memory Info Click the “Memory Info” to memory information of microSD card. You can see detail information of each recorded folder. i.e.) RECORD folder, EVENT folder, MANUAL folder, MOTION folder. Memory Format(Caution) - Click the “Format” to format microD card. ♦... -
Page 20: Specification
3 axis G-sensor (3D, ±4G) Security LED HIGH-INTENSITY LED status LED 3 colors LED ( 2ea ) Warning sound Built-in BEEP buzzer Battery Built-in RTC battery Dimension 91 x 63 x 44 mm Weight BOYO SENSORS BACK UP SENSOR SYSTEMS...
Need help?
Do you have a question about the VTR107 and is the answer not in the manual?
Questions and answers