LXE MX7 Reference Manual
Lxe mx7 handheld computer (microsoft windows ce 5.0 equipped)
Hide thumbs
Also See for MX7:
- Reference manual (388 pages) ,
- User manual (92 pages) ,
- Installation instructions (2 pages)

Subscribe to Our Youtube Channel
Related Manuals for LXE MX7


Summary of Contents for LXE MX7
- Page 1 MX7 Reference Guide ® ® (Microsoft Windows CE 5.0 Equipped) Copyright © August 2006 by LXE Inc. All Rights Reserved E-EQ-MX7RG-B...
- Page 2 While reasonable efforts have been made in the preparation of this document to assure its accuracy, LXE assumes no liability resulting from any errors or omissions in this document, or from the use of the information contained herein. Further, LXE Incorporated, reserves the right to revise this document and to make changes to it from time to time without any obligation to notify any person or organization of such revision or changes.
- Page 3 Moved Odyssey Client menu information and Summit Client menu information from “Start | Control Panel” section to Chapter 5 “Wireless Network Configuration”. Corrected Order statement for Utilities | LXE Login Install and LXE Login. Updated “LAUNCH.EXE” persist settings. Added new sections to Utilities: “Enabling GrabTime”, “Configuring CapsLock Behavior”, “Launch App / Launch Command”...
-
Page 5: Table Of Contents
Set Time Zone (Optional) ........................20 Enter Owner Information (Optional)....................20 Set the Display Backlight Timer ......................21 Set the MX7 Power Schemes Timers....................21 Set The Audio Speaker Volume......................22 Using the Keypad ..........................22 Using the Touchscreen ........................22 Applying the Protective Film to the Display.................. - Page 6 Table of Contents Copy the MX7 LXEbook to the MX7 (Optional)................23 Radio and Network Setup..................24 Terminal Emulation Setup..................24 Installing User Certificates and Private Keys ............25 User Certificate ........................... 26 Private Key............................27 Entering Data......................28 Using the Keypad..........................28 Using the Input Panel or Virtual Keyboard..................
- Page 7 Display Backlight Timer ........................55 Cleaning the Display/Scanner Aperture....................55 Power Supply ......................56 Checking Battery Status........................56 MX7 Status LED and the Batteries ....................56 Main Battery Pack..........................56 Battery Hotswapping........................... 57 Low Battery Warning.......................... 57 Backup Battery............................ 57 Discharging............................
- Page 8 Administration – For AppLock......................90 Battery..............................91 Certificates ............................92 Date/Time............................93 Dialing..............................94 Display ..............................95 Background ............................95 Appearance ............................96 Backlight ............................96 Input Panel ............................97 Internet Options........................... 98 Keyboard............................100 Keymaps and Fonts ........................100 MX7 Reference Guide E-EQ-MX7RG-B...
- Page 9 Introduction............................127 Initial Install ............................128 Install ActiveSync on Desktop/Laptop................... 128 Serial Connection......................... 128 USB Connection .......................... 128 Connect -- Initial Install Process....................129 Change Connection Parameters ......................129 Backup MX7 Files ..........................130 Prerequisites ........................... 130 E-EQ-MX7RG-B MX7 Reference Guide...
- Page 10 Table of Contents MX7 and PC Partnership ......................130 Serial Port Transfer ........................130 USB Transfer ..........................130 Radio (RF) Transfer........................131 Connect............................131 Explore .............................. 131 Disconnect............................132 Serial Connection ........................... 132 USB Connection..........................132 Radio Connection ........................... 132 Cold Boot and Loss of Host Re-connection..................
- Page 11 No Encryption..........................195 WEP Encryption .......................... 196 Set LEAP ............................198 WEP Authentication for LEAP....................199 Set WPA ............................201 PEAP/MS-CHAP Authentication Configuration ................203 Server Authentication ........................206 PEAP/GTC Authentication Configuration ..................207 Server Authentication ........................211 E-EQ-MX7RG-B MX7 Reference Guide...
- Page 12 ECHNICAL PECIFICATIONS Physical Specifications ..................279 Display Specifications ..................280 Environmental Specifications................281 MX7 ..............................281 AC Wall Adapter..........................281 Radio Specifications..................... 282 Odyssey Client ..........................282 Summit Client ........................... 282 List of Valid VK Codes for CE ................283 ASCII Control Codes.....................
- Page 13 Figure 1-11 USB – MX7 – Power Assembly ....................14 Figure 1-12 AC/DC 12V External Power Supply....................14 Figure 1-13 Connect the USB / Power Cable to the MX7 Port .................15 Figure 1-14 Connect the RS-232 / Power Cable to the MX7 Port..............15 Figure 1-15 Connect to a Printer Interface Cable ....................16...
- Page 14 Figure 3-39 System - Copyrights ........................124 Figure 3-40 Volume & Sounds ........................125 Figure 3-41 ActiveSync Connection Settings on a Windows PC ..............130 Figure 3-42 LXE Login Utility User Prompt....................143 Figure 3-43 Enter / Select Login Name ......................144 Figure 3-44 Odyssey Client Screen .........................144 Figure 3-45 Enter the Odyssey Client Username Password ................145...
- Page 15 Figure 5-61 Settings – Detailed Status Menu Option ..................219 Figure 5-62 Detailed Status is Displayed – Signal, Authentication, Encryption ..........219 Figure 5-63 Enable the “Validate server certificate” Checkbox ..............220 Figure 5-64 Enter Name of Network .......................221 E-EQ-MX7RG-B MX7 Reference Guide...
- Page 16 Figure 5-73 Download CA Certificate Screen ....................226 Figure 5-74 Certificate Stores ..........................227 Figure 5-75 Import the Certificate ........................227 Figure 5-76 Browse to the Certificate Location on the MX7 ................228 Figure 5-77 Logon to Certificate Authority.....................229 Figure 5-78 Certificate Services Welcome Screen ..................229 Figure 5-79 Request a Certificate Screen ......................230...
-
Page 17: Chapter 1 Introduction
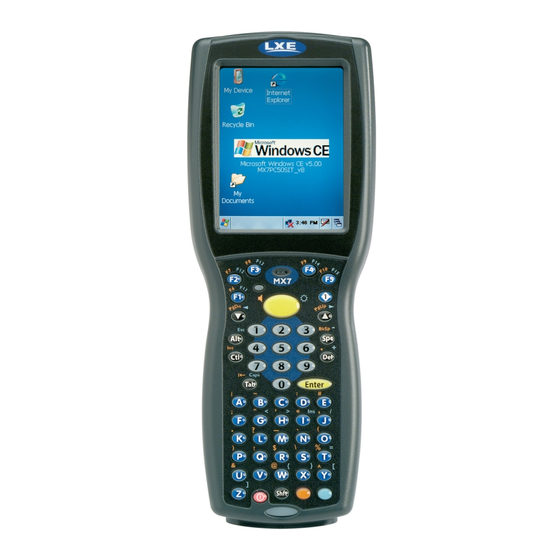
Chapter 1 Introduction Overview The LXE MX7 is a rugged, portable, hand-held Microsoft® Windows® CE 5.0 equipped mobile computer capable of wireless data communications. The mobile device can transmit information using an 802.11 radio and it can store information for later transmission through an RS-232 or USB port. -
Page 18: Features
New features affect user interaction and internal operation of the MX7. The appropriate radio utililty for your device configuration has been pre-installed by LXE. The desktop will display an Odyssey Client Utility icon or it will display a Summit Client Utility icon for 802.11 configuration and security. -
Page 19: Important Battery Information
• Whenever possible, use the AC power adapter with the MX7 to conserve the main battery and recharge the backup battery. • When a new battery is installed in the MX7 for the first time (or when the backup battery is completely depleted), the Time and Date reverts to its default values. -
Page 20: Document Conventions
Keyword that indicates a potentially hazardous situation which, if not avoided, could result in death or serious injury. DANGER Keyword that indicates a imminent hazardous situation which, if not avoided, will result in death or serious injury. MX7 Reference Guide E-EQ-MX7RG-B... -
Page 21: Components
Components Components Front Front – 55 Key Front – 32 Key Figure 1-1 Front of MX7 Scanner Aperture Speaker System Status LED Scan Button Orange Key (Sticky Key) Blue Key (Sticky Key) Scan Status LED Cable Port On / Off Button “Alpha”... -
Page 22: Back
Scanner / Imager Aperture Figure 1-3 Scanner Aperture Note: The Imager has clear plastic protecting the imager engine. The Scanner has red plastic protecting the scanner engine. The No-Scanner option has an opaque window protecting the MX7 internal components. MX7 Reference Guide E-EQ-MX7RG-B... -
Page 23: I/O Port And Cables
MX7A055MULTICBLDA9F Cable: Multipurpose USB and Power MX7A052MULTICBLUSB Adapter/Cable : Audio MX7A060ADPTCBLVOICE Adapter: RS-232 PC port to D9 male MX7A058ADPTCBLPER Note: There is no IR port on the MX7. Tethered scanners are not supported on the MX7. E-EQ-MX7RG-B MX7 Reference Guide... -
Page 24: Trigger Handle
Handstrap Handstrap Clip Note: Either the trigger handle is attached to the MX7 or the handstrap is attached, not both. LXE recommends that, in the absence of a trigger handle, the handstrap be used at all times. MX7 Reference Guide... -
Page 25: Quick Start
MX7, and components from electrostatic discharge. In general, the sequence of events is: 1. Insert a fully charged battery. (Always put a fully charged battery in the MX7 at the beginning of the shift or workday.) 2. -
Page 26: Troubleshooting
Chapter 4 “AppLock”. Hotkey If the mobile device uses LXE’s Multi AppLock to allow the user to switch between two applications, the default Activation key is Ctrl+Spc. The key sequence switches the focus between one application and another. Data entry affects the application running in the foreground only. -
Page 27: Hardware Setup
The handle is built of a durable and flexible plastic that will not detach from the MX7 if the unit is dropped. The trigger handle is a mechanical device. Battery or external A/C power is not required for operation of the trigger handle. -
Page 28: Inserting The Main Battery
Li-Ion batteries (like all batteries) gradually lose their capacity over time (in a linear fashion) and never just stop working. This is important to remember – the MX7 is always ‘on’ even when in the Suspend state and draws power from the batteries at all times. Tap the | Settings | Control Panel | Power tab to check the battery status and power reading. -
Page 29: Installing The Handstrap
An elastic hand strap is available for the MX7. Once installed, the hand strap provides a means for the user to secure the computer to their hand. It is adjustable to fit practically any size hand and is easily moved to allow installation or removal of the battery pack. -
Page 30: Connecting An External Power Supply (Optional)
The backup battery is always being trickle charged by the main battery pack.. Whenever possible, use the AC power adapter with the MX7 to conserve the main battery power and maintain a charge in the backup battery. -
Page 31: Connecting The Multipurpose Usb / Power Cable
Align the RS-232 serial cable end carefully to an appropriate serial port on a desktop/laptop computer for ActiveSync communication. Press the ends together and hand tighten the screws on either side of the serial cable until the MX7 is securely connected to the serial device. -
Page 32: Connecting To A Printer Interface Cable
The headset consists of an earpiece, a microphone and an attached cable. The headset attaches to the audio cable which attaches to the MX7. Use the control panel option “Mixer” to set up mono or stereo headphones. The Summit Client supports mono only. -
Page 33: Adjust Microphone And Secure The Cable
Do not wear the cable on the front of your body. It may get in your way or get caught on protruding objects. Entering Data Data is entered into the MX7 by speaking into the headset’s microphone when prompted. Please contact your System Administrator if assistance is needed with the voice software installed on your MX7. -
Page 34: Power Key
32 Key Figure 1-17 Power Key Location The Power key is located at the bottom of the keypad. When a battery is inserted in the MX7 for the first time press the Power key. Tapping the Power key places the MX7 immediately in Suspend mode. Tapping the Power key again immediately releases the MX7 from Suspend Mode. -
Page 35: Tapping The Touchscreen With A Stylus
Hold the stylus as if it were a pen or pencil. Touch an element on the screen with the tip of the stylus then remove the stylus from the screen. Place the stylus into the stylus holder on the MX7 when the stylus is not in use. -
Page 36: Software Setup
<Esc> to cancel or quit. Set Time Zone (Optional) Note: The first time it is used, or the device returns from a Cold Reset, the MX7 resets Date and Time to the factory default values. To set the Time Zone, tap the | Settings | Control Panel | Date/Time icon. -
Page 37: Set The Display Backlight Timer
| Settings | Control Panel | Display | Backlight tab. Change the parameter values and tap OK to save the changes. The first option affects the MX7 when it is running on battery power only. The second option affects the MX7 when it is running on external power (e.g. AC adapter, powered vehicle or desktop cradle). -
Page 38: Set The Audio Speaker Volume
Figure 1-19 Speaker Location The speaker is located on the front of the device above the MX7 logo. The audio volume can be adjusted to a comfortable level for the listener. The volume is increased or decreased one step each time the volume key sequence is pressed. -
Page 39: Applying The Protective Film To The Display
When the file copy process is finished, disconnect the MX7 from the synchronization equipment and close ActiveSync. To view the LXEbook on the MX7, select Start / Programs / Microsoft File Viewers / Microsoft PDF Viewer / File / Open. Locate the LXEbook on the MX7 and “open” the file. -
Page 40: Radio And Network Setup
The MX7 may use either the Funk Odyssey Client or the Summit Client Utility to configure the radio. When the MX7 boots up for the first time and all programs are loaded, the Wireless Information window may appear. The radio is attempting to connect to the local network. -
Page 41: Installing User Certificates And Private Keys
Access: | Settings | Control Panel | Certificates Prerequisites: • The MX7 has the correct Date and Time. See Chapter 3, section titled “Date/Time.” • A User Certificate file is available • A Private Key file is available First, using ActiveSync, copy the User Certificate file and the Private Key file to the mobile device’s persistent file location. -
Page 42: User Certificate
Tap the View button to view a highlighted digital certificate. Tap the Remove button to remove highlighted certificate files. Tap the “?” button and follow the instructions in the Help file when working with trusted authorities and digital certificates. Figure 1-21 Certificate | Stores MX7 Reference Guide E-EQ-MX7RG-B... -
Page 43: Private Key
Tap the View . . . button. Figure 1-22 View Certificate Details Set the Field to Private Key. Make sure the private key is “Present.” If it is not present, install the private key file. See Chapter 5 “Wireless Network Configuration”. E-EQ-MX7RG-B MX7 Reference Guide... -
Page 44: Entering Data
The keypad is used to manually input data that is not collected otherwise. Almost any function that a full sized computer keyboard can provide is duplicated on the MX7 keypads but it may take a few more keystrokes to accomplish a keyed task. Please refer to “Appendix A – Key Maps” for instruction on the specific keypresses to access all keypad functions. -
Page 45: Using The Stylus
Using the Stylus Note: This section is directed to the MX7 daily user. The assumption is that the mobile device has been configured and the touch panel calibrated by the System Administrator prior to releasing the MX7 for daily use. The touchscreen should be calibrated before initial use. -
Page 46: Using The Scanner
The Scan Status LED (oval shaped LED below keypad) turns red when the laser beam is on. Following a barcode scan and read the Scan Status LED turns green for two seconds and the MX7 beeps or vibrates, indicating a successful scan. If the scan was unsuccessful, the Scan Status LED turns off and a different beep sequence is heard. -
Page 47: Saving Changes To The Registry
Saving Changes to the Registry Saving Changes to the Registry The MX7 saves the registry when you: • Tap the | Run | then type Warmboot. Tap OK. • Perform a Suspend / Resume function (by pressing the Pwr key and then pressing it again). -
Page 48: Getting Help
Getting Help Getting Help All LXE user guides are now available on one CD and they can also be viewed/downloaded from the LXE ServicePass website. Contact your LXE representative to obtain the LXE Manuals CD. You can also get help from LXE by calling the telephone numbers listed on the LXE Manuals CD, in the file titled “Contacting LXE”. - Page 49 MX7 Charge/Comm Interface Cable, USB Client for ActiveSync MX7A052MULTICBLUSB MX7 Charge/Comm Interface Cable, RS-232 Serial ActiveSync, D9 MX7A055MULTICBLDA9F Female AC/DC power supply with US power cord for use with MX7 9000A319PSACUS Charge/Comm cables AC/DC power supply without power cord for use with MX7 9000A302PSACWW...
- Page 50 HX1A508WINDSCREEN10 Replacement windscreen for all headset microphones, 50 Pack HX1A509WINDSCREEN50 Replacement foam ear piece cover for 501 and 502 headsets, 10 pack HX1A510FOAMEAR10 Replacement foam ear piece cover for 501 and 502 headsets, 50 pack HX1A511FOAMEAR50 MX7 Reference Guide E-EQ-MX7RG-B...
-
Page 51: Chapter 2 Physical Description And Layout
Figure 2-1 System Hardware Central Processing Unit The LXE MX7 CPU is a 400MHz Intel Xscale PXA255 CPU. The operating system is Microsoft Windows CE 5.0. The OS image is stored on an internal SD flash card and is loaded into DRAM for execution. -
Page 52: System Memory
Internal SD Memory Card The MX7 has one SD card interface for storage of operating system and program code, as well as persistent storage. The SD slot is accessible from the battery compartment and ships with an LXE- qualified 128MB SD Flash card. -
Page 53: Power Supply
A new main battery pack can be fully charged in 6 hours when it is in an MX7 connected to AC power and 3.5 hours when it is in the MX7 multicharger. -
Page 54: Com Port
USB Client Port The MX7 has one USB Client port for ActiveSync applications. An accessory USB cable, “Cable, Multipurpose USB and Power” is available to connect the MX7 to a USB Type A plug on a PC for ActiveSync functions. -
Page 55: Audio Support
The speaker supplies audible verification signals normally used by the Window’s CE operating system. The speaker is located on the front of the MX7, above the MX7 logo. The mobile device emits a Sound Pressure Level (loudness) of at least 102 dB measured as follows: •... -
Page 56: Scanner/Imager Port
• SE 1524ER extended range Lorax scanner from Symbol The internal scanner activates when the scan button on the front of the MX7 is depressed or when the trigger on an installed trigger handle is depressed. A control panel applet (Start | Settings | Control Panel | Scanner) is available to set scan engine options. -
Page 57: Physical Controls
The power key is located next to the < Z > key on the 55-key keypad and next to the <Diamond 2> key on the 32-key keypad. When a main battery pack is inserted in the MX7 for the first time, the Power key must be pressed. -
Page 58: Flash Cards
Make sure the proper software is pre-loaded and radio cards are properly configured. The SD flash card under the main battery pack is intended to store program CAB files, MX7 utilities, the registry and the registry backup information. -
Page 59: Flash Card Installation / Removal
• Anti-static protection is required when installing/removing cards. (Not supplied by LXE) • If you anticipate keeping a card out of the MX7 for a long period of time place it in a static-free storage container. Store in an area that is protected from dirt, moisture, and electrostatic contact. -
Page 60: Power Modes
• the display backlight is on until the Backlight timer expires The MX7 After a new MX7 has been received, a charged main battery inserted, and the Power key tapped, the MX7 is always On until both batteries are drained completely of power. -
Page 61: Suspend Mode
Connecting the MX7 to AC power wakes the unit and resets the display backlight timers. When the unit wakes up, the Display Backlight and the Power Off timers begin the countdown again. -
Page 62: The Keypads
The Keypads The Keypads The keypad is installed and configured by LXE to your specifications. 32-key Keypad 55-key ANSI/CE Keypad 55-key IBM 5250 Keypad Figure 2-5 The 32-key and 55-key Keypads See also: Appendix A “Key Maps”. MX7 Reference Guide... -
Page 63: Using The 55 Key Ansi / Ce Keypad
• When the computer boots, the default condition of Caps (or CapsLock) is Off. The Caps (or CapsLock) condition can be toggled with Blue plus Tab key sequence. The keymaps (keypress sequences) are located in “Appendix A – Key Maps.” E-EQ-MX7RG-B MX7 Reference Guide... -
Page 64: Using The 32-Key Numeric-Alpha Keypad
• When using a sequence of keys that do not include the Alph key but does include a sticky key, press the sticky key first then the rest of the key sequence. The keymaps (keypress sequences) are located in “Appendix A – Key Maps.” MX7 Reference Guide E-EQ-MX7RG-B... -
Page 65: Mappable Diamond Keys
55 Key Keypad The user can program the following key combinations using the Diamond 1 key: e.g. ESC e.g. Home e.g. BackTab e.g. Insert (Blue+Alt) (Shft+Down Arrow) (Orange+Tab) (Blue+I) Any combination of “standard” keypresses can be used. E-EQ-MX7RG-B MX7 Reference Guide... -
Page 66: Key Keypad
The user can program the following key combinations using the Diamond keys: asterisk (*) user defined without using a sticky key open parenthesis equal sign (=) user defined without using a sticky key exclamation closed parenthesis mark (!) user defined without using a sticky key MX7 Reference Guide E-EQ-MX7RG-B... -
Page 67: Led Indicators
No user intervention required. No Color Good No user intervention required. Scan Status The Scan Status LED is located below the MX7 keypad. When the Scan Status LED is . . . The Status is . . . Steady Green Good Scan... -
Page 68: Standard Keys
– when CAPS is On alpha characters are capitalized. For example, when CAPS is On and the Shft key and the G key are pressed, a lower case g is displayed. MX7 Reference Guide E-EQ-MX7RG-B... -
Page 69: Orange And Blue Keys
Control function, you need to press the Ctl key before pressing the desired key. Note the green highlight on the Control key and the 5250 commands highlighted green on the 5250 keypad overlay. E-EQ-MX7RG-B MX7 Reference Guide... -
Page 70: Mode Key Functions
To enter a string of letters in a text field, tap the <Alph> key to toggle it On. It remains active until it is tapped again and toggled off. To enter a string of numbers in a text field, make sure the <Alph> key is toggled off. MX7 Reference Guide E-EQ-MX7RG-B... -
Page 71: Touchscreen
Use a clean, damp, lint-free cloth. Do not scrub optical surfaces. If possible, clean only those areas which are soiled. Lint/particulates can be removed with clean, filtered canned air. Static screen protectors for the MX7 are available from LXE. E-EQ-MX7RG-B MX7 Reference Guide... -
Page 72: Power Supply
A suspended MX7 maintains the date and time for a minimum of two days using a main battery that has reached the Low Warning point and a fully charged backup battery. The MX7 retains data, during a main battery hot swap, for at least 5 minutes. -
Page 73: Battery Hotswapping
Power | Battery tab) connect the AC adapter to the MX7 before replacing the main battery pack. When the main battery power level is low, the MX7 will signal the user with the low battery warning indicator (the Status LED remains a steady red) that continues until the main battery is replaced, the battery completely depletes, or external power is applied to the MX7 using an AC Adapter. -
Page 74: Handling Batteries Safely
Battery Maintenance Publication The LXE publication “Getting the Most from Your Batteries” is available on the LXE Manuals CD and is a single-source guide to battery management. The publication contains information about battery recharging, conditioning, and other pertinent issues. -
Page 75: Mx7 Multi-Charger (Optional)
The external AC power supply cable connection for the Multi-charger is shipped with the multi- charger. The main battery pack can be charged in either 1) a powered MX7 Multi-Charger or 2) by a powered AC Adapter connected by multipurpose cables to the mobile device. -
Page 76: Multi-Charger Indicators
MX7 Multi-Charger (Optional) Multi-Charger Indicators LED Functions Function LED Indicator Description No Battery/power Battery pack not plugged in or no power applied. Charged Green Battery pack fully charged. Charging Battery pack charging. Standby Yellow Battery pack temperature out of range. -
Page 77: Passive Vehicle Mount Cradle
MX7 main battery pack and a clear signal path. The cradle is lined with strips of hook-and-loop fabric to ensure a snug fit between the MX7 and the inside of the cradle. -
Page 78: Cradle Assembly Components
Not To Scale Figure 2-12 U-Bracket Mounting Footprint Note: LXE does not supply the bolts or washers needed when mounting the cradle assembly to the vehicle chassis. LXE recommends using bolts with a maximum 10/32” (0.3125) diameter. MX7 Reference Guide... -
Page 79: Ram Ball And Cylinder
Mount the cradle U-bracket to the upper RAM ball assembly with the bolts, washers and nuts supplied by LXE. Qty 4 – Hex Cap ¼-20 x ¾ bolts Qty 4 – ¼ flat washer Qty 4 – ¼-20 nylon insert lock nuts E-EQ-MX7RG-B MX7 Reference Guide... -
Page 80: Ram Assembly Footprint
Not To Scale Figure 2-15 RAM Assembly Footprint Note: LXE does not supply the bolts or washers needed when mounting the cradle assembly to the vehicle chassis. LXE recommends using bolts with a maximum 10/32” (0.3125) diameter. MX7 Reference Guide... -
Page 81: How To Install The Cradle U-Bracket
Attach the U-Bracket to the vehicle, making sure it does not impede safe operation of the vehicle. Attach the Passive Cradle to the U-Bracket using the Angle Adjust knobs. Use both knobs to loosen and tighten the cradle to the U-bracket while determining the best viewing angle. E-EQ-MX7RG-B MX7 Reference Guide... - Page 82 Passive Vehicle Mount Cradle The passive vehicle mounted cradle is ready for use. Periodically test the mounting device and retighten bolts and/or knob as needed. If the cradle becomes cracked or warped it must be replaced. MX7 Reference Guide E-EQ-MX7RG-B...
-
Page 83: How To Install The Ram Bracket
Attach the lower RAM ball assembly to the vehicle, making sure it does not impede safe operation of the vehicle. Fasten the upper RAM ball assembly to the base of the U-bracket using the supplied bolts, washers and screws. E-EQ-MX7RG-B MX7 Reference Guide... - Page 84 Attach the Passive Cradle to the U-Bracket using the Angle Adjust knobs. Use both knobs to loosen and tighten the cradle to the U-bracket while determining the best viewing angle. The passive vehicle mounted cradle is ready for use. MX7 Reference Guide E-EQ-MX7RG-B...
- Page 85 Passive Vehicle Mount Cradle Periodically test the mounting device and retighten bolts and/or knob as needed. If the cradle becomes cracked or warped it must be replaced. E-EQ-MX7RG-B MX7 Reference Guide...
- Page 86 Passive Vehicle Mount Cradle MX7 Reference Guide E-EQ-MX7RG-B...
-
Page 87: Chapter 3 System Configuration
Chapter 3 System Configuration Introduction There are several different aspects to the setup and configuration of the MX7. Many of the setup and configuration settings are dependent upon the optional features such as hardware and software installed on the mobile device. The examples found in this chapter are to be used as examples only, because the configuration of your specific MX7 may vary. -
Page 88: Installed Software
LXE nor supported by LXE. When you order an MX7 you receive the software files required by the separate programs needed for operation and radio communication. The files are loaded by LXE and stored in folders in the mobile device. -
Page 89: Software Applications
The MX7 has a unique 128-bit ID code as required by the CE 5.0 specification. This ID number is generated by the boot loader. This ID code is available in the control panel, and via a Win32 standard API. -
Page 90: Boot Loader
• Handle copying a new boot loader from SD card to internal flash The MX7 reloads the OS every time during warm boot or cold boot. In Warm Boot (i.e., the user executes a Warm Boot) the OS and the CAB files are reloaded from the internal SD card and the preserved registry is also reloaded. -
Page 91: Folders Copied At Startup
The AppLock program is accessed by the user or the AppLock Administrator at bootup or upon completion of a warm boot. Set parameters using the Administration option in the Control Panel. See Chapter 4 “AppLock” for instruction. E-EQ-MX7RG-B MX7 Reference Guide... -
Page 92: Desktop
The MX7 Desktop appearance is similar to that of a laptop/desktop PC running Windows 2000 or XP. At a minimum, it has the My Device, Internet Explorer, and the Recycle Bin icons that can be tapped with the stylus to access the contents . -
Page 93: My Device Folders
Data saved by running applications My Documents Storage for downloaded files / applications Network Mounted network drive Program Files Applications System Internal SD Flash Card Temp Location for temporary files Windows Operating System in Secure Storage E-EQ-MX7RG-B MX7 Reference Guide... -
Page 94: Start Menu Program Options
• If installed and enabled, AppLock runs automatically at the conclusion of each reboot. • The RF client runs automatically during each reboot. • If installed, with an Odyssey Client, LXE Login Utility runs automatically at the conclusion of each reboot. -
Page 95: Communication
After a relationship (partnership) has been established with the MX7 and a desktop computer, ActiveSync can synchronize using the radio link, serial port, or USB port on the MX7. Refer to “ActiveSync / Get Connected Process” later in this chapter for more information and instruction. -
Page 96: Start / Stop Ftp Server
| Programs | Command Prompt Figure 3-1 Pocket CMD Prompt Screen Type help at the command prompt for a list of available commands. Exit the Command Prompt by typing exit at the command prompt or select File | Close. MX7 Reference Guide E-EQ-MX7RG-B... -
Page 97: Inbox
Inbox as it relates to the general desktop Windows PC Microsoft Outlook Inbox options. Tap the “?” button to access Inbox Help. ActiveSync can be used to transfer messages between the MX7 inbox and a PC’s desktop inbox. Refer to “ActiveSync Processes” in this guide. -
Page 98: Odyssey Client
This utility has an icon in the toolbar that looks like networked computers with a red X through them, indicating the application is inactive at this time. Note: LXE recommends using the Funk Odyssey client to configure the Odyssey Client. Wireless Zero Config is not recommended for configuring the radio. MX7 Reference Guide... -
Page 99: Summit Client
3. A message appears that a Power Cycle is required to make settings activate properly. Tap OK to close the message window. 4. Tap the Power button to place the MX7 in Suspend, then tap the Power button to wake the MX7 from Suspend mode. -
Page 100: Transcriber
| Programs | Windows Explorer There are a few changes in the CE version of Windows Explorer as it relates to the general desktop PC Windows Explorer options. Tap the “?” button to access Windows Explorer Help. MX7 Reference Guide E-EQ-MX7RG-B... -
Page 101: Taskbar
There are a few changes in the CE version of Taskbar as it relates to the general desktop PC Windows Taskbar options. When the taskbar is auto hidden, press the Ctrl key then the Esc key sequence (Blue+Alt) to make the Start button appear. Figure 3-3 Taskbar General Tab E-EQ-MX7RG-B MX7 Reference Guide... -
Page 102: Advanced Tab
Figure 3-4 Advanced Tab The Result of “Expand Control Panel” One Result of “Expand Control Panel” checkbox enabled checkbox disabled Clear Contents of Document Folder Tap the Clear button to remove the contents of the “Recently Opened” Document folder. MX7 Reference Guide E-EQ-MX7RG-B... -
Page 103: Settings | Control Panel Options
Set the mobile device owner details (name, phone, etc). Enter notes. Enable / disable Owner display parameters. Enter Network ID for the device – user name, password, domain. Password Set MX7 access password properties for signon and/or screen saver. E-EQ-MX7RG-B MX7 Reference Guide... - Page 104 Settings | Control Panel Options Option Function PC Connection Control the connection between the MX7 and a local desktop or laptop computer. Power Set Power scheme properties. Review device status and properties.. Regional Settings Set appearance of numbers, currency, time and date based on country region and language settings.
-
Page 105: About
User application version information can be shown in the Version window. Version window information is retrieved from the registry. Modify the Registry using the Registry Editor (see section titled “Utilities”). LXE recommends caution when editing the Registry and also recommends making a backup copy of the registry before changes are made. -
Page 106: Accessibility
AppLock configuration by the Administrator are available to the end-user. LXE devices with the AppLock feature are shipped to start up in Administration mode with no default password, and when the device is started for the first time, the user has full access to the mobile device and no password prompt is displayed. -
Page 107: Battery
Discharge process. If the battery is Discharging, tap the Charge button to stop the Discharge process. Tap Charge a second time to begin the Charge process. LXE recommends Discharging and Recharging the backup battery twice a year. E-EQ-MX7RG-B... -
Page 108: Certificates
Manage digital certificates used for secure communication. Figure 3-7 System – Stored Certificates Lists the Stored certificates trusted by the MX7 user. These values may change based on the type of radio security resident in the client, access point or the host system. -
Page 109: Date/Time
There is very little functional change from general desktop PC Date/Time Properties options. Adjust the settings and tap the OK box or the Apply button to save the changes. The changes take effect immediately. Double-tapping the time displayed in the Taskbar causes the Date/Time Properties screen to appear. E-EQ-MX7RG-B MX7 Reference Guide... -
Page 110: Dialing
Settings | Control Panel Options Dialing Access: | Settings | Control Panel | Dialing Set dialup properties for internal modems (not supplied/supported by LXE). Factory Default Settings Location Work Area Code Tone Dialing Enabled Country/Region Disable Call Waiting Disabled Figure 3-9 Dialing Tap the Edit button to make changes to Dialing properties. -
Page 111: Display
Select an image from the dropdown list (or tap the Browse button to select an image from another folder) to display on the Desktop, then tap the OK box to save the change. The change takes effect immediately. E-EQ-MX7RG-B MX7 Reference Guide... -
Page 112: Appearance
Tap the Delete button to delete schemes. Tap the Apply button to apply the selected scheme to the MX7. Tap the OK box to exit, or “X” to escape without making any changes. Saved changes take effect immediately. -
Page 113: Input Panel
Tap the “OK” button to save any changes and exit, or tap the “X” button to exit without saving any changes. Tap the “?” button for Help. Note: Check with your LXE representative for language packs as they become available. E-EQ-MX7RG-B MX7 Reference Guide... -
Page 114: Internet Options
Tap the “X” box to ignore all changes. The changes take effect immediately. Tap the “?” button for Help. Factory Default Settings General Start Page http://www.lxe.com/ Search Page http://www.google.com Cache Size 512 Kb Connection Use LAN Disabled Autodial Name Blank MX7 Reference Guide E-EQ-MX7RG-B... - Page 115 First party cookies Accept Third party cookies Prompt Session cookies Always allow Advanced Stylesheets Enable Theming Support Enable Multimedia All options enabled Security All options enabled Popups Block popups Disabled Display notification Enabled Use same window Disabled E-EQ-MX7RG-B MX7 Reference Guide...
-
Page 116: Keyboard
Keyboard Properties panel. Only one font at a time can be selected. The fonts affect the screen display. These values do not affect virtual (onscreen) key taps. Keymaps and Fonts Please contact your LXE representative about the availability of these fonts for your MX7: Descriptive name Font filename Notes Simplified Chinese simsun.ttc... -
Page 117: Mappable Keys
Assign key sequence settings by selecting keys from the drop down boxes. Tap the OK box to save the changes. Tap the “X” box to ignore changes. Tap the “?” box for Help. The changes take effect immediately. E-EQ-MX7RG-B MX7 Reference Guide... -
Page 118: Mixer
Enable the Mic1 radio button and the Input Boost checkbox. Disable Microphone Enable the None radio button. Tap OK to save the settings or tap the “X” button to ignore changes. Tap the “?” box for Help. MX7 Reference Guide E-EQ-MX7RG-B... -
Page 119: Mouse
| Settings | Control Panel | Mouse Figure 3-18 Mouse Set the double-click sensitivity for stylus taps on the touchscreen. Tap OK to save the settings or tap the “X” button to ignore changes. Tap the “?” box for Help. E-EQ-MX7RG-B MX7 Reference Guide... -
Page 120: Network And Dialup Connections
Access: | Settings | Control Panel | Network and Dialup Connections Set network driver properties and network access properties. Select a connection to use, or create a new connection on the MX7. Odyssey Client Connection Panel Summit Client Connection Panel Figure 3-19 Network and Dialup Connections Tap OK to save the settings or tap the “X”... -
Page 121: Owner
Notes Blank Display at power-on Disabled Network ID User Name Blank Password Blank Domain Blank Figure 3-20 Owner Properties Enter the information and tap the OK box to save the changes. The changes take effect immediately. E-EQ-MX7RG-B MX7 Reference Guide... -
Page 122: Password
Password Access: | Settings | Control Panel | Password Icon Set MX7 user access/power up password properties. Password and password settings are saved during a warm boot and a cold boot. The screensaver password affects the Remote Desktop screensaver only. -
Page 123: Pc Connection
Unchecking the “Enable direct connections …..” disables ActiveSync. Change Connection …. Selecting Change Connection displays a list of configured ActiveSync connections. Figure 3-22 PC Connection Please refer to the “Backup MX7 Files” section later in this chapter for parameter setting recommendations. E-EQ-MX7RG-B MX7 Reference Guide... -
Page 124: Power
Figure 3-23 Power Adjust the settings and tap the OK box to save the changes. Changes are saved across tabs. Tap the “X” box to discard any changes. Tap the “?” for Help. The changes take effect immediately. MX7 Reference Guide E-EQ-MX7RG-B... -
Page 125: Regional Settings
Select a program and tap Remove. Follow the prompts on the screen to uninstall user-installed only programs. The change takes effect immediately. Files stored in the “My Documents” folder are not removed using this option. Note: Do not remove LXE-installed programs using this option. E-EQ-MX7RG-B MX7 Reference Guide... -
Page 126: Scanner
If “Send Key Messages …” is checked any data scan is converted to keystrokes and sent to the active window. When this box is not checked, the application will need to use the set of LXE Scanner APIs to retrieve the data from the scanner driver. Note that this latter method is significantly faster than using “Wedge”. -
Page 127: Main Tab
Bad Scan Vibration Disabled / Long Figure 3-26 Scanner Panel - Main Adjust the settings and tap the OK box to save the changes. The changes take effect immediately. Bluetooth is not supported by LXE. Parameter Function Port Port 1 – Internal. Radio button allows scanner input/output on Port 1 (scan key or trigger). -
Page 128: Com1 Tab
EV-15 scanner default values are 19200 Baud, 8 data bits, 1 stop bit and No parity. If these values are changed, the default values are restored after a cold boot or reflashing. Note: COM1 does not support 5V switchable power on Pin 9 for tethered scanners. MX7 Reference Guide E-EQ-MX7RG-B... -
Page 129: Barcode - Advanced - Prefix / Suffix
/ or trailing characters are stripped before the prefix or suffix is added. The mode for Prefix/Suffix feature is determined by the “Send Key Messages (WEDGE)” setting in the Main tab. When checked (enabled), the prefix/suffix feature is in Key Message mode. Key E-EQ-MX7RG-B MX7 Reference Guide... -
Page 130: Interaction Between Strip Leading/Trailing And Prefix/Suffix Settings
(prefix and suffix) are replaced with CTRL+Shift+J instead of CTRL+Shift+M keystrokes in Key Message mode. Since the assigned replacements are applied before the Translate All is performed, if a control character is set to ‘Ignore (drop)’ by the assigned replacements, it is discarded MX7 Reference Guide E-EQ-MX7RG-B... -
Page 131: Barcode - Advanced - Ctrl Char Mapping
The wedge provides a one-to-one mapping of control characters to their equivalent control+character sequence of keystrokes in Key Message mode. If a control character is replaced by another control character, the replacement is performed on the barcode data, prefix, and suffix before the keystrokes are simulated. E-EQ-MX7RG-B MX7 Reference Guide... - Page 132 Delete This button is grayed unless an entry in the list box is highlighted. When an entry (or entries) is highlighted, and Delete is selected, the highlighted material is deleted from the list box. MX7 Reference Guide E-EQ-MX7RG-B...
-
Page 133: Barcode - Advanced - Scancode Enable
This panel displays a list of all barcode symbologies supported by the integrated barcode scanner. Barcodes are sent to the application just as they are received from the scanner and before the ‘Strip Leading / Trailing’ or ‘Append Prefix / Suffix’ features. E-EQ-MX7RG-B MX7 Reference Guide... -
Page 134: Barcode - Advanced - Code Id
Figure 3-31 Barcode – Advanced Processing – No Code ID Options on this Barcode and Advanced panels are not available if there is no integrated scanner, or a non-Symbol scan engine, installed in the MX7. No Code ID Default. All symbology IDs are transmitted. This means that by default, all good scan barcodes are sent to the application just as they are received from the scanner, regardless of any possible symbology ID attached. -
Page 135: Strip Code Id
Scanned barcodes are not matched against the following parameters unless they are EAN128 barcodes. If the scan engine does not support EAN128 barcodes, or EAN128 barcodes have been disabled, the Strip Identifiers from EAN128 Barcodes function is not available. Figure 3-33 Barcode – Advanced Processing – EAN128 Barcodes E-EQ-MX7RG-B MX7 Reference Guide... -
Page 136: Adding Codes To The Match List For Ean128 Barcodes
Return. See “Hat Encoding” and “Decimal-Hexadecimal Chart” at the end of this chapter. • All keypad keys can be entered by typing the key. Note: No matching is done for barcodes using this option if they are not EAN128 barcodes. MX7 Reference Guide E-EQ-MX7RG-B... -
Page 137: Stylus
Calibration Figure 3-35 Stylus - Calibrate Press and hold the stylus on the center of the target as it moves around the screen. Press Enter to keep the new calibration settings or Esc to cancel. E-EQ-MX7RG-B MX7 Reference Guide... -
Page 138: System
Memory sizes given do not include memory used up by the operating system. Hence, a system with 128 MB may only report 99 MB memory, since 29 MB is used up by the Windows CE operating system. This is actual DRAM memory, and does not include internal flash used for storage. MX7 Reference Guide E-EQ-MX7RG-B... -
Page 139: Memory
Move the slider to allocate more memory for programs or storage. If there isn’t enough space for a file, increase the amount of storage memory. If the MX7 is running slowly, try increasing the amount of program memory. Adjust the settings and tap the OK box to save the changes. The changes take effect immediately. -
Page 140: Device Name
Input Panel and tap OK to save the changes. The changes take effect immediately. Copyrights Figure 3-39 System - Copyrights This screen is presented for information only. The Copyrights information cannot be changed by the user. MX7 Reference Guide E-EQ-MX7RG-B... -
Page 141: Volume And Sounds
SCANBAD.WAV. These are unprotected WAV files and can be replaced by a WAV file of the user’s choice. By default a good scan sound on the mobile device is a single 2700 Hz beep, and a bad scan sound is a double beep. E-EQ-MX7RG-B MX7 Reference Guide... -
Page 142: Sd Flash Cards, Cab Files And Programs
Tap the My Device icon on the Desktop then tap the System icon. Files A flash card is used for permanent storage of the LXE drivers and utilities. It is also used for registry content back up. The flash card is located in the socket under the main battery pack. -
Page 143: Activesync / Get Connected Process
(in the information types you select) identical on both your PC and your mobile device. If an information type is selected that does not exist on the MX7, the data appears to transfer, but it is ignored by the MX7 and not loaded. -
Page 144: Initial Install
The default is USB. LXE does not recommend using serial ActiveSync at 115 Kb/s. This will set up the MX7 to use COM 1. Tap OK and ensure the check box for "Enable direct connections to the desktop computer" is checked. -
Page 145: Connect -- Initial Install Process
This will set up the MX7 to use the USB port direct. COM1 @ 57600 This will set up the MX7 to use COM 1 direct at 57600 baud • Tap OK and ensure the check box for “Enable direct connections to the desktop computer”... -
Page 146: Backup Mx7 Files
“Connect”.. USB Transfer • A PC with an available USB port and an MX7 with a USB cable. The desktop or laptop PC must be running Windows 98 SR2, Windows 2000 or Windows XP. -
Page 147: Radio (Rf) Transfer
You can copy files to or from the MX7 using drag-and-drop. You will not be allowed to delete files or copy files out of the \Windows directory on the MX7. (Technically, the only files you cannot delete or copy are ones marked as system files in the original build of the Windows OS image. -
Page 148: Disconnect
An ActiveSync partnership for a unique client can be established to two hosts. If the MX7 is cold booted, the random number is deleted – and the partnership with the last one of the two hosts is also deleted. The host retains the random numbers and unique names of all devices having a partnership with it. -
Page 149: Activesync Troubleshooting
ActiveSync on the host returns to the Get Connected screen without connecting to the cabled device. If the MX7 is connected to a PC by a cable, disconnect the cable from the MX7 and reconnect it again. Check that the correct connection is selected (Serial or USB “Client” if this is the initial ActiveSync installation). - Page 150 "CLIENT", followed by "SERVER". After this point, the data stream becomes straight (binary) PPP. Drop down list is blank in the ActiveSync dialog box The radio link is broken. Make sure that the radio has a valid IP address. MX7 Reference Guide E-EQ-MX7RG-B...
-
Page 151: Utilities
The CAB file can update the registry as desired and cause the unpacked file(s) to be placed in the appropriate location. The registry information needed is under the key HKEY_LOCAL_MACHINE \ SOFTWARE \ LXE \ Persist, as follows. The main subkey is any text, and is a description of the file. Then 3 values... - Page 152 "PCMCIA"=dword:1 ;; ------- Symbol radio support [HKEY_LOCAL_MACHINE\SOFTWARE\LXE\Persist\Symbol Radio] "FileName"="\\System\\SYMBOL.CAB" "Installed"=dword:0 "FileCheck"="\\WINDOWS\\NICTT.EXE" "Order"=dword:2 "PCMCIA"=dword:1 ;; ------- LXE USB radio support [HKEY_LOCAL_MACHINE\SOFTWARE\LXE\Persist\LXE USB Radio] "FileName"="\\System\\LXECR1.CAB" "Installed"=dword:0 "FileCheck"="\\WINDOWS\\PRISMA02.DLL" "Order"=dword:2 "PCMCIA"=dword:2 [HKEY_LOCAL_MACHINE\SOFTWARE\LXE\Persist\Old LXE USB Radio] CAB files for options not purchased are not loaded e.g. JAVA or RFID. If a CAB file is missing, please contact your LXE Representative.
- Page 153 "FileName"="\\System\\SUMMIT.CAB" "Installed"=dword:0 "FileCheck"="\\WINDOWS\\SDCCF10G.DLL" "Order"=dword:2 "PCMCIA"=dword:1 ;; ------- Odyssey support [HKEY_LOCAL_MACHINE\SOFTWARE\LXE\Persist\Odyssey] "FileName"="\\System\\ODYSSEY.CAB" "Installed"=dword:0 "FileCheck"="\\WINDOWS\\odysseyIMCE.DLL" "Order"=dword:0E "Delay"=dword:0 [HKEY_LOCAL_MACHINE\SOFTWARE\LXE\Persist\Odyssey license] "FileName"="\\System\\LXECR1A.CAB" "Installed"=dword:0 "FileCheck"="\\WINDOWS\\odyssey.txt" "Order"=dword:0D "Delay"=dword:0 [HKEY_LOCAL_MACHINE\SOFTWARE\LXE\Persist\Odyssey install] "FileName"="\\System\\LXElogin.CAB" "Installed"=dword:0 "FileCheck"="\\WINDOWS\\lxelogin.exe" "Order"=dword:05 "Delay"=dword:0 [HKEY_LOCAL_MACHINE\SOFTWARE\LXE\Persist\Odyssey login] "FileName"="\\Windows\\LXElogin.exe" "Installed"=dword:0 "FileCheck"="ALWAYSEXEC" "Order"=dword:0F "Delay"=dword:0 E-EQ-MX7RG-B MX7 Reference Guide...
- Page 154 "FileCheck"="\\WINDOWS\\RFID_WDG.DLL" "Order"=dword:0C ;; ------- Avalanche support [HKEY_LOCAL_MACHINE\SOFTWARE\LXE\Persist\Avalanche] "FileCheck"="\\System\\avalanche\\model.dat" "Installed"=dword:0 "Order"=dword:4 "FileName"="\\System\\LXEAVA.CAB" [HKEY_LOCAL_MACHINE\SOFTWARE\LXE\Persist\AvaLaunch] "Order"=dword:5 "FileName"="\\System\\Avalanche\\Avainit.exe" "FileCheck"="ALWAYSEXEC" "Installed"=dword:0 ;; ------- Applock support [HKEY_LOCAL_MACHINE\SOFTWARE\LXE\Persist\AppLockInstall] "FileName"="\\System\\AppLock.CAB" "Installed"=dword:0 "FileCheck"="\\WINDOWS\\APPLOCK.EXE" "Order"=dword:0 [HKEY_LOCAL_MACHINE\SOFTWARE\LXE\Persist\AppLockPrep] "FileName"="\\windows\\AppLockPrep.exe" "Installed"=dword:0 "FileCheck"="ALWAYSEXEC" "Order"=dword:1 "Delay"=dword:2 [HKEY_LOCAL_MACHINE\SOFTWARE\LXE\Persist\AppLock] "FileName"="\\windows\\AppLock.exe" "Installed"=dword:0 "FileCheck"="ALWAYSEXEC" "Order"=dword:63 MX7 Reference Guide E-EQ-MX7RG-B...
-
Page 155: Regedit.exe
Registry as making incorrect changes can damage the mobile device operating system. LXE recommends making a backup copy of the registry before viewing or c a r e f u l l y making changes to the registry. -
Page 156: Enabling Grabtime
Utilities Enabling GrabTime The MX7 has a GrabTime utility which can automatically synchronize the MX7 with a time server (via an Internet connection) at boot up. By default, using GrabTime for time synchronization at boot up is Off. To enable GrabTime to run automatically at boot up, run \Windows\grabtime.reg and perform a warmboot. -
Page 157: Launch App / Launch Command
Note that executables and parameters are not checked for accuracy by the keyboard driver. If the launch fails, the mobile device emits a single beep, if the launch is successful, the mobile device is silent. The registry keys are: [HKEY_LOCAL_MACHINE\Software\LXE\Launch\App1] ..App2, App3, App4] “Exe”="" [name of executable file] “Opt”=""... -
Page 158: Lxe Login Utility
The login prompt is displayed at system boot and when resuming from suspend. MX7 focus remains on the login prompt until it is dismissed. Nothing else can be done on the MX7 until the user responds to the login prompt. -
Page 159: Using The Utility
Utilities Using the Utility If multiple Profiles are configured on the mobile device, LXE Login Utility changes the username for the active profile. Important: The profile must be changed before suspending the unit if the active profile username is to be changed when returning from Suspend. -
Page 160: Figure 3-43 Enter / Select Login Name
Utilities If the LXE Login Utility prompt is closed by pressing Esc or tapping the Cancel button on the screen, the username change is ignored and the previously configured username is used. User Name Typed User Name Cleared Figure 3-43 Enter / Select Login Name If the username is cleared, the OK button is disabled. -
Page 161: Figure 3-45 Enter The Odyssey Client Username Password
Suspend and resume the MX7 by pressing the power key twice. The LXE Login Utility screen is displayed to the user to enter a new username. Repeat the process described previously in this section to connect. -
Page 162: Uninstall The Lxe Login Utility
Odyssey Client to return to the desktop or last active application. Uninstall the LXE Login Utility After the LXE Login Utility has been installed using the instructions in the “Installation” section, it automatically loads anytime a cold or warm reset is performed on the mobile device. To stop the LXE Login Utility from loading, follow the instructions below to uninstall the CAB. -
Page 163: Api Calls
A full SDK (on the accessories CD) is now included for Microsoft Embedded Visual C++ 4.0 (which is available free on the Microsoft website). Clearing Registry Settings Cold reset puts all registry settings back to LXE factory defaults. No other clearing is available or necessary. E-EQ-MX7RG-B... -
Page 164: Reflash The Mobile Device
Files to be loaded on the Flash card are: MX7NK.BIN, MX7EBOOT.NB0, MX7.BIT The MX7 reloads the operating system upon every warm boot or cold boot. Anything not saved or preserved to the registry is lost. In warm boot, the OS and the CAB files are reloaded from the internal SD card and the preserved registry is also reloaded. -
Page 165: Chapter 4 Applock
Sections in this chapter that are not specifically Multi-Application or Single Application are used/changed in the same way by both versions. Note: LXE has made the assumption, in this chapter, that the first user to power up a new mobile device is the system administrator. Setup a New Device... -
Page 166: Multi-Application Version
In other words, only the application or feature specified in the AppLock configuration by the Administrator is available to the user. See section titled Single Application Configuration for information and instruction. Figure 4-2 Administrator Control Panels – Single Application MX7 Reference Guide E-EQ-MX7RG-B... -
Page 167: Administration Mode
If this type of application is being locked, the administrator should close all other applications before switching to end user mode to minimize the screen flicker. Windows accelerator keys such as Alt-F4 are disabled. E-EQ-MX7RG-B MX7 Reference Guide... -
Page 168: Passwords
To summarize, if an error occurs that prevents AppLock from switching to user mode, the password will not timeout and AppLock will wait until the correct password is entered. Troubleshooting Can’t locate the password that has been set by the administrator? Enter this LXE back door key sequence: Ctrl+L Ctrl+X Ctrl+E... -
Page 169: Multi-Application Configuration
Move the cursor to the Filename text box and either type the application path or tap the Browse button (the … button). The standard Windows CE Browse dialog is displayed. After selecting the application from the Browse dialog, tap OK. E-EQ-MX7RG-B MX7 Reference Guide... -
Page 170: End User Internet Explorer (Euie)
Internet. If the standard Internet Explorer that is shipped with the mobile device is desired, it should be treated like any other application. This means that IEXPLORER.EXE should be specified in the MX7 Reference Guide E-EQ-MX7RG-B... -
Page 171: Security Panel
SIP when configuring the key. However, when the hotkey is pressed to switch modes, the normal key must be entered from the keypad; it cannot be entered from the SIP. E-EQ-MX7RG-B MX7 Reference Guide... -
Page 172: Password
Process Processing status shows the flow control of AppLock components and is mainly intended for LXE Customer Service when helping users troubleshoot problems with their AppLock program. Extended Extended status provides more detailed information than that logged by Process Logging. - Page 173 When the 'Save As'… button is selected, a standard 'Save As' dialog screen is displayed. Specify the path and filename. If the filename exists, the user is prompted whether the file should be overwritten. If the file does not exist, it is created. See Also: Error Messages E-EQ-MX7RG-B MX7 Reference Guide...
-
Page 174: End-User Switching Technique
AppLock configuration is moved to the foreground and the previous application moves to the background. The previous application continues to run in the background but end- user key presses affect the application in focus only. MX7 Reference Guide E-EQ-MX7RG-B... -
Page 175: Troubleshooting Multi-Application Applock
When the Administrator is selecting a hotkey sequence to use when switching user modes, they are not allowed to enter key combinations that are reserved by installed software applications. LXE has validated RFTerm key combinations ONLY. When RFTerm is installed on the mobile device and an RFTerm restricted key sequence is... -
Page 176: Single Application Configuration
Enter the number of seconds the selected Application must wait before starting to run upon reboot. If no application is specified when the Administrator Control panel is closed, the device reboots into Administrator mode. If a password has been set, but the application has not been specified, MX7 Reference Guide E-EQ-MX7RG-B... -
Page 177: Security Panel
Shift state key followed by a normal key. The hotkey selected must be a key sequence that the application being locked does not use. The hotkey sequence is intercepted by AppLock and is not passed to the application. E-EQ-MX7RG-B MX7 Reference Guide... -
Page 178: Status Panel
AppLock operation. As the status information is stored in the registry and accumulates during AppLock configuration and operation, it is very important that the administrator periodically clear the status information MX7 Reference Guide E-EQ-MX7RG-B... - Page 179 Process Processing status shows the flow control of AppLock components and is mainly intended for LXE Customer Service when helping users troubleshoot problems with their AppLock program. Extended Extended status provides more detailed information than that logged by Process Logging.
-
Page 180: Applock Error Messages
AppLock system to reload. Address of keyboard hook AppLock successfully retrieved the address of the LOG_EX procedure OK keyboard filter initialization procedure. Alt pressed The Alt key has been pressed and trapped by the LOG_EX HotKey processing. MX7 Reference Guide E-EQ-MX7RG-B... - Page 181 Unable to decrypt password. LOG_ERROR Decrypt created hash OK Decryption process ok. LOG_EX Decrypt failure Unable to decrypt password. LOG_ERROR Decrypt import key failure Unable to decrypt password. LOG_ERROR Decrypt imported key OK Decryption process ok. LOG_EX E-EQ-MX7RG-B MX7 Reference Guide...
- Page 182 Enter DecryptPwd Entering the password decryption process. LOG_PROCESSING Enter EncryptPwd Entering the password encryption processing. LOG_PROCESSING Enter FullScreenMode Entering the function that switches the screen mode. In LOG_PROCESSING full screen mode, the taskbar is hidden and disabled. MX7 Reference Guide E-EQ-MX7RG-B...
- Page 183 Exiting password timeout processing. LOG_PROCESSING Exit restart app timer Processing is at the end of the timer function LOG_PROCESSING Exit TaskbarScreenMode Exiting the function that switches the screen mode back LOG_PROCESSING to normal operation for the administrator. E-EQ-MX7RG-B MX7 Reference Guide...
- Page 184 In addition to preventing the locked application from LOG_EX exiting, AppLock must also prevent the application from enabling the taskbar and resizing the application’s window. This message traps a change in the window size and corrects it. MX7 Reference Guide E-EQ-MX7RG-B...
- Page 185 Read registry failure-Internet The Internet registry entry is missing or empty. This is LOG_ERROR not considered an error since the Internet value is not necessary to launch and lock the application. E-EQ-MX7RG-B MX7 Reference Guide...
- Page 186 Switching to admin-kbdhook.dll not The keyboard hook load failed, so AppLock switches to LOG_PROCESSING found admin mode. If a password is specified, the password prompt is displayed and remains until a valid password is entered. MX7 Reference Guide E-EQ-MX7RG-B...
- Page 187 The taskbar is moved when switching into user mode. LOG_ERROR This prevents them from being visible if the application is exited and restarted by the timer. This error does not affect the screen mode switch; processing continues. E-EQ-MX7RG-B MX7 Reference Guide...
- Page 188 The window handle that is passed to the enumeration LOG_EX enumwindows=%x function. This message can be used by engineering with other development tools to trouble shoot application lock failures. WM_WINDOWPOSCHG Output the window size after it has been adjusted by LOG_EX adjusted=%x AppLock MX7 Reference Guide E-EQ-MX7RG-B...
-
Page 189: Applock Registry Settings
AppLock Registry Settings AppLock Registry Settings This system application runs at startup via the “launch” feature of LXE Windows CE devices. When the launch feature is installed on the device, the following registry settings are created. The launch feature registry settings are embedded in the mobile device OS image: HKEY_LOCAL_MACHINE\\Software\\LXE\\Persist\\Filename=AppLock.exe... - Page 190 AppLock Registry Settings MX7 Reference Guide E-EQ-MX7RG-B...
-
Page 191: Chapter 5 Wireless Network Configuration
Chapter 5 Wireless Network Configuration Introduction The MX7 mobile device uses the LXE 802.11b/g radio and either the Funk® Odyssey Client software on the mobile device or the Summit Client software. Both client software utilities support WEP, WPA, no authentication and all authentications listed below. -
Page 192: Summit Client Configuration
X through them, indicating that Wireless Zero Config application is enabled at this time and the MX7 is not connected to a network. LXE does not recommend use of the Wireless Zero Configuration Utility for configuring the radio as it cannot be used to configure all supported security protocols. -
Page 193: Main
Admin Login password. The password is case-sensitive. Once logged in, the button label changes to Admin Logout. To logout, either tap the Admin Logout button or exit the SCU without tapping the Admin Logout button. E-EQ-MX7RG-B MX7 Reference Guide... -
Page 194: Administrator Mode
Auto Radio Mode B+G rates Auth Type Open EAP type None Encryption None Figure 5-3 Summit Client Utility – Config tab When logged in as Administrator (see “Administrator Mode”), use the Config tab to manage profiles. MX7 Reference Guide E-EQ-MX7RG-B... -
Page 195: Buttons
Setting the rate to Auto will allow the Access Point to automatically negotiate the bit rate with the compact flash radio. Options are: Auto, 1 Mbit, 2, 5.5, 6, 9, 11, 12, 18, 24, 36, 48 or 54 Mbit. E-EQ-MX7RG-B MX7 Reference Guide... -
Page 196: Status
Access Point maintaining the connection to the network. • Signal strength (changes with network activity) • Channel currently being used for wireless traffic. • Current transmit power in mW. • Bit rate in mBit. Figure 5-4 Summit Client Utility – Status tab MX7 Reference Guide E-EQ-MX7RG-B... -
Page 197: Diags
The Diags panel can be used for troubleshooting network traffic and radio connectivity issues. It can also be used to update the radio driver on the MX7. Administrator login is required for the (Re)connect button function. Diagnostics, Update Driver and Site Survey functions are not available in this release. -
Page 198: Global Settings
Aux only (use the auxiliary antenna only), or On (use diversity or both antennas). Preamble Auto The type of radio header, or preamble, for packets. Options are: Auto, Short, or Long. G Shortslot Auto 802.1x short slot timing mode. Options are: Auto, On, or Off. MX7 Reference Guide E-EQ-MX7RG-B... - Page 199 Options are: Any number between 0 and 30000 ms. The LED on the radio card is not visible to the user when the radio card is installed in a sealed mobile device. Options are: On, Off. E-EQ-MX7RG-B MX7 Reference Guide...
- Page 200 A valid directory path, of up to 64 characters, where WPA Certificate Authority and User Certificates are stored on the mobile device. LXE suggests ensuring the directory path currently exists before assigning the path in this parameter. See sections titled “Root Certificates”...
-
Page 201: Wireless Security
Perform a Warm Reset function to connect using the new profile configuration. Figure 5-7 Configure a Summit Profile with No Security LXE recommends performing a warm reset or Suspend/Resume function each time the Commit button is tapped. E-EQ-MX7RG-B MX7 Reference Guide... -
Page 202: Wep Keys
Enter the WEP key. If there are more than one set of keys, tap the radio button in front of the Key to be used. Valid values are 10 characters (for 40 bit encryption) or 26 characters (for 128 bit encryption) hexadecimal characters. Tap OK. Tap the Commit button. Perform a Warm Reset function. MX7 Reference Guide E-EQ-MX7RG-B... -
Page 203: Leap W/O Wpa Authentication
Tap the Commit button to save the new profile configuration. Perform a Warm Reset function to connect using the new profile configuration. Please see “WPA/LEAP Authentication” later in this section to configure the radio for WPA LEAP. E-EQ-MX7RG-B MX7 Reference Guide... -
Page 204: Peap/Mschap Authentication
Once the certificate file is in the System directory, enter the filename in CA Certificate Filename on the popup Credentials data entry box. Tap OK. Tap Commit. Perform a Warm Reset function. The mobile device should be authenticating the server certificate and using PEAP/MSCHAP for the user authentication. MX7 Reference Guide E-EQ-MX7RG-B... -
Page 205: Wpa/Leap Authentication
Enter the Username or Domain \Username in the Credentials popup text entry box. Enter the Password. Tap OK. Tap the Commit button to save the new profile configuration. Perform a Warm Reset function to connect using the new profile configuration. E-EQ-MX7RG-B MX7 Reference Guide... -
Page 206: Wpa Psk Authentication
Enter the Passphrase in the PSK Entry popup text entry box. This value can be a 64 hex character or an 8-63 byte ASCII value. Tap OK Tap the Commit button to save the new profile configuration. Perform a Warm Reset function to connect using the new profile configuration. MX7 Reference Guide E-EQ-MX7RG-B... -
Page 207: Funk Odyssey Client Configuration
For additional information on the Odyssey client see the Funk web site at www funk com. Note: LXE recommends using the Funk Odyssey client to configure the radio. Wireless Zero Config is not recommended for configuring the radio, although it can be used to reveal the IP address. -
Page 208: Commands
Forget Temporary Trust Use this command to immediately discard the list of temporarily trusted servers. Forget Password Use this command to immediately discard any typed passwords. This will remove them from memory. MX7 Reference Guide E-EQ-MX7RG-B... -
Page 209: Tools
Displays a text sequence that represents the Odyssey Client software license. An option is available to enter a new license key. View Readme Files Readme.txt file is displayed. About Displays Odyssey Client version number and software license information. E-EQ-MX7RG-B MX7 Reference Guide... -
Page 210: Wireless Security
Figure 5-21 Funk Odyssey Client Settings Menu Start the Funk Odyssey client configuration by tapping the Odyssey Client icon. Tap Settings | Configure. Tap the Add button to configure a profile. The “Add Network Wizard” screen is displayed. MX7 Reference Guide E-EQ-MX7RG-B... -
Page 211: No Encryption
Set the Association Mode to Open. Set the Encryption Method to None. Disable the Authenticate using 802.1X checkbox. Disable the Keys will … checkbox if needed. Tap Next to continue. Status shows as “open”. Authentication is not in use. Encryption is not in use. E-EQ-MX7RG-B MX7 Reference Guide... -
Page 212: Wep Encryption
Figure 5-24 Set Encryption Mode to WEP Set the Association Mode to Open. Set the Encryption Method to WEP. Disable the Authenticate using 802.1X checkbox. Disable the Keys will … checkbox if needed. Tap Next to continue. MX7 Reference Guide E-EQ-MX7RG-B... -
Page 213: Figure 5-25 Setting Static Wep Keys
Enter the WEP key and tap Next to continue, Previous to return to the previous screen or Cancel to ignore changes made to this screen. After pressing Next, tap Finish to return to the Profile screen. Tap OK to end assigning WEP for security. E-EQ-MX7RG-B MX7 Reference Guide... -
Page 214: Set Leap
On the Add Network Wizard screen enter the SSID of the wireless network. If the SSID is being broadcast by the AP, tap Scan and choose the correct SSID. Choose Infrastructure for the network type. Tap the Next button to continue or the Cancel button to ignore changes made on this screen. MX7 Reference Guide E-EQ-MX7RG-B... -
Page 215: Wep Authentication For Leap
EAP-LEAP and/or LEAP in the method drop down list. EAP-LEAP protocol can be used for LEAP authentication. Use the remove and add buttons to choose EAP-LEAP authentication. EAP-LEAP does not use server side authentication so the Validate server box is dimmed. Tap Next. Figure 5-29 EAP-LEAP Method E-EQ-MX7RG-B MX7 Reference Guide... -
Page 216: Figure 5-30 Create Username And Password Method
For the username Password tap the radio button for either Prompt for password or Use the following password. Tap the OK button then Finish. Figure 5-31 Enter Password for LEAP When prompted for the password enter the valid password to authenticate. Once authenticated the Status shows as “open and authenticated”. MX7 Reference Guide E-EQ-MX7RG-B... -
Page 217: Figure 5-32 Funk Odyssey Client Settings Menu
Connect to: <APNorth> Figure 5-32 Funk Odyssey Client Settings Menu Tap Settings | Configure. Figure 5-33 Tap Add to Configure a Profile Tap the Add button to configure a profile. The “Add Network Wizard” screen is displayed. E-EQ-MX7RG-B MX7 Reference Guide... -
Page 218: Figure 5-34 Add Network Wizard Screen
The Keys will … box will be grayed out when the Encryption Method is set to TKIP. In the following sections each authentication method configuration is described. Tap Next to continue, Previous to return to the previous screen or Cancel to ignore changes made to this screen. MX7 Reference Guide E-EQ-MX7RG-B... -
Page 219: Peap/Ms-Chap Authentication Configuration
A screen appears asking for an anonymous sign-on name. This is for the outer (or Phase 1) authentication. Enter the correct outer authentication (this could be the Phase 2 authentication as well). Tap Next to continue, Previous to return to the previous screen or Cancel to ignore changes made to this screen. E-EQ-MX7RG-B MX7 Reference Guide... -
Page 220: Figure 5-38 Select Eap-Ms-Chap-V2
A screen appears asking for a user name. This is for the inner (or Phase 2) user name. Under Password, choose “Prompt for password” or “Use the following password” radio buttons. Tap the OK button. Then tap Finish on the “The configuration of the new network is complete.” screen. MX7 Reference Guide E-EQ-MX7RG-B... -
Page 221: Figure 5-40 Connect To New Profile
Once connected the status should change to open and authenticated as shown in the figure below. Figure 5-40 Connect to New Profile Now that the connection works change the configuration to authenticate the server. See “Server Authentication.” E-EQ-MX7RG-B MX7 Reference Guide... -
Page 222: Server Authentication
“Trusted Server Configuration”. Figure 5-41 Validate Server Certificate Navigate back to the authentication type screen and check the Validate server certificate box. Tap Next to the end then the Finish buttons. Tap OK to end the configuration process. MX7 Reference Guide E-EQ-MX7RG-B... -
Page 223: Peap/Gtc Authentication Configuration
A screen appears asking for an anonymous sign-on name. This is for the outer (or Phase 1) authentication. Enter the correct outer authentication (this could be the Phase 2 authentication as well). Tap Next to continue, Previous to return to the previous screen or Cancel to ignore changes made to this screen. E-EQ-MX7RG-B MX7 Reference Guide... -
Page 224: Figure 5-44 Choose Correct Version Of Peap
By choosing EAP-PEAP another configuration screen appears to chose the correct version of PEAP. For PEAP/GTC use the Add/Remove buttons to choose EAP-GenericTokenCard. Figure 5-45 EAP-PEAP Credential Choice Choose correct credential configuration. To be prompted for the token, tap the “Prompt for token information” radio button. MX7 Reference Guide E-EQ-MX7RG-B... -
Page 225: Figure 5-46 Prompt For Password
On the main configuration screen check the Connect to checkbox and choose the profile you just configured. When prompted for the password enter it into the password field. Figure 5-47 Enter the Profile Password Use the Unmask checkbox to see the password in clear text as you type. E-EQ-MX7RG-B MX7 Reference Guide... -
Page 226: Figure 5-48 Authentication Is Successful
Funk Odyssey Client Configuration Figure 5-48 Authentication is Successful When authentication is successful the Status on the main screen displays “open and authenticated.” MX7 Reference Guide E-EQ-MX7RG-B... -
Page 227: Server Authentication
Tap Next to the end then Finish buttons. Tap OK to end the configuration process. Figure 5-49 Validate Server Certificate for PEAP/GTC Navigate back to the authentication type screen and enable the Validate server certificate checkbox. Tap Next to the end then the Finish buttons. Tap OK to end configuration. E-EQ-MX7RG-B MX7 Reference Guide... -
Page 228: Eap-Leap Authentication
Tap Next. Figure 5-51 Create Username and Password Method Enter a Username. For the username Password tap the radio button for either Prompt for password or Use the following password. Tap the OK button then Finish. MX7 Reference Guide E-EQ-MX7RG-B... -
Page 229: Figure 5-52 Enter Password For Eap-Leap
Funk Odyssey Client Configuration Figure 5-52 Enter Password for EAP-LEAP When prompted for the password enter the valid password to authenticate. Once authenticated the Status shows as “open and authenticated”. E-EQ-MX7RG-B MX7 Reference Guide... -
Page 230: Eap/Tls Authentication Configuration
Certificates are date sensitive and if the date is not correct authentication will fail. Installing User Certificate Navigate to Start | Settings | Control Panel | Certificates. Choose My Certificates in the drop down list. Tap the Import button. Figure 5-53 Install User Certificate MX7 Reference Guide E-EQ-MX7RG-B... -
Page 231: Figure 5-54 Install Private Key For Certificate
Navigate to the location where the certificate file was copied. Choose the certificate then navigate to the same place and choose to install the private key for the certificate. Enter the password for the private key. Figure 5-55 Enter Password for Private Key E-EQ-MX7RG-B MX7 Reference Guide... -
Page 232: Figure 5-56 Verify User Certificate
To verify the user certificate navigate to Start | Settings | Control Panel | Certificates – My Certificates. Tap the certificate and choose View. Tap Private Key and look in the details pane to make sure the key is “Present.” Figure 5-56 Verify User Certificate MX7 Reference Guide E-EQ-MX7RG-B... -
Page 233: Setting Eap/Tls Parameters
Uncheck the “Validate server certificate” for now. Tap Next. Enter the username on the user certificate to be used for authentication. Tap Next. Figure 5-58 Completed Network Configuration Choose the user certificate for authentication. Tap Finish to complete the configuration. E-EQ-MX7RG-B MX7 Reference Guide... -
Page 234: Figure 5-59 Choose The New Profile
On the main configuration screen check the Connect to box and choose the profile just configured. Figure 5-60 Status is open and authenticated Once configured the status shows “authenticating” then once authenticated it shows “open and authenticated.” MX7 Reference Guide E-EQ-MX7RG-B... - Page 235 Funk Odyssey Client Configuration To check the EAP-TLS status tap Settings | Detailed Status. Figure 5-61 Settings – Detailed Status Menu Option Figure 5-62 Detailed Status is Displayed – Signal, Authentication, Encryption E-EQ-MX7RG-B MX7 Reference Guide...
-
Page 236: Validating The Server Certificate
Navigate back to the authentication type screen and check the “Validate server certificate” checkbox. Tap Next to the end then Finish buttons. Tap OK to end the configuration process. Figure 5-63 Enable the “Validate server certificate” Checkbox MX7 Reference Guide E-EQ-MX7RG-B... -
Page 237: Wpa/Psk Configuration
For WPA/PSK uncheck the “Authenticate using 802.1X” checkbox. “Keys will …” box is grayed out when the encryption method is set to TKIP. Enter the Pre-shared key as entered in the AP. Tap Next and Finish to complete the configuration. E-EQ-MX7RG-B MX7 Reference Guide... -
Page 238: Figure 5-66 Connect The Mx7 And The Ap
Funk Odyssey Client Configuration Now you are ready to connect the MX7 to the AP. Figure 5-66 Connect the MX7 and the AP Tap the “Connect to:” box and the MX7 then connects to the AP. MX7 Reference Guide E-EQ-MX7RG-B... -
Page 239: Trusted Server Configuration
Navigate to Settings | Trusted Servers. Figure 5-67 Settings – Trusted Servers Menu Option Tap the Add button. Figure 5-68 Select a Trusted Root CA Tap Browse. Tap the Trusted Root CAs tab. Choose the correct Root CA certificate. Tap OK. E-EQ-MX7RG-B MX7 Reference Guide... -
Page 240: Figure 5-69 Configuring A Trusted Server Certificate
Enter the name of the RADIUS certificate as shown in the screen titled “Trusted Servers.” Tap the OK button. The server name should be listed in the box. Tap the OK button. The trusted server certificate is configured for the MX7. MX7 Reference Guide... -
Page 241: Root Certificates
Downloading a Root CA Certificate to a PC Please refer to the “LXE Security Primer” for more information on obtaining and installing root certificates. The easiest way to get the root CA certificate is to use a browser on a desktop PC to navigate to the CA (Certificate Authority). -
Page 242: Figure 5-72 Select Encoding Method Before Downloading
Figure 5-73 Download CA Certificate Screen Tap the Save button and save the certificate to the desktop PC. Keep track of the name and location of the certificate as the certificate file name and file location is required in later steps. MX7 Reference Guide E-EQ-MX7RG-B... -
Page 243: Installing A Root Ca Certificate On The Mobile Device
Copy the certificate file from the desktop PC to the mobile device. Import the certificate by navigating to Start | Settings | Control Panel | Certificates. Figure 5-74 Certificate Stores Tap the “Import” button. Figure 5-75 Import the Certificate Make sure “From a File” is selected and tap OK. E-EQ-MX7RG-B MX7 Reference Guide... -
Page 244: Figure 5-76 Browse To The Certificate Location On The Mx7
Root Certificates Figure 5-76 Browse to the Certificate Location on the MX7 Using the Explorer buttons, browse to the location where you copied the certificate, select the certificate desired and tap OK. When the text box appears asking if you want to ADD the following certificate to the Root Store, tap Yes to import the certificate. -
Page 245: User Certificates
Important: This process saves a user certificate and a separate private key file. CE devices such as the MX7 require the private key to be saved as a separate file rather than including the private key in the user certificate. -
Page 246: Figure 5-79 Request A Certificate Screen
User Certificates Figure 5-79 Request a Certificate Screen Tap on the “advanced certificate request” link. Figure 5-80 Advanced Certificate Request Screen Tap on the “Create and submit a request to this CA” link. MX7 Reference Guide E-EQ-MX7RG-B... -
Page 247: Figure 5-81 Advanced Certificate Details
MX7USER.PVK. The certificate file created later in this process must be given the same name, for example, MX7USER.CER. DO NOT check “Enable strong private key protection”. Make any other desired changes and tap the “Submit” button. E-EQ-MX7RG-B MX7 Reference Guide... -
Page 248: Figure 5-82 Script Warnings
When prompted for the private key password: • Tap “None” if you do not wish to use a password, or • Enter and confirm your desired password then tap “OK”. Figure 5-84 Certificate Issued Tap the Download certificate link. MX7 Reference Guide E-EQ-MX7RG-B... -
Page 249: Figure 5-85 Certificate Download Security Warning
Be sure use the same name for the certificate file as was used for the private key file. For example, it the private key was saved as MX7USER.PVK then the certificate file created must be given the same name, for example, MX7USER.CER. E-EQ-MX7RG-B MX7 Reference Guide... -
Page 250: Installing A User Certificate On The Mobile Device (Wpa-Tls Only)
Start | Settings | Control Panel | Certificates. Select “My Certificates” from the pull down list. Figure 5-86 Certificates Tap the “Import” button. Figure 5-87 Import Certificate Make sure “From a File” is selected and tap OK. MX7 Reference Guide E-EQ-MX7RG-B... -
Page 251: Figure 5-88 Browsing To Certificate Location
Using the explorer buttons, browse to the location where you copied the certificate, select the certificate desired and tap OK. The certificate is now shown in the list. Figure 5-89 Certificate Listing Highlight the certificate you just imported and tap the View. . button. E-EQ-MX7RG-B MX7 Reference Guide... -
Page 252: Figure 5-90 Private Key Not Present
Using the explorer buttons, browse to the location where you copied the private key file, change the Type pull down list to “Private Keys”, select the certificate desired and tap OK. Enter the password for the certificate if appropriate. MX7 Reference Guide E-EQ-MX7RG-B... -
Page 253: Figure 5-92 Private Key Present
Make sure the certificate and private key file have the same name, for example mx7user.cer for the certificate and mx7user.pvk for the private key file. If the file names are not the same, rename the private key file and import it again. E-EQ-MX7RG-B MX7 Reference Guide... -
Page 254: Ieee 802.11G Wireless Lan Configuration Utility
RSSI threshold and signal strength. These values cannot be changed by the user. The CCX Support options are only populated when the MX7 is connected to a Cisco CCX compatible network or AP. Radio Measurement Threshold and Max Transmit Power values cannot be changed by the user. - Page 255 OK to save the changes. The WiFi icon minimizes to the taskbar. Tap the Exit button to close the WiFi utility and the WiFi icon is removed from the taskbar. LXE recommends the WiFi icon be visible in the taskbar at all times.
-
Page 256: Wireless Zero Config Utility
Note: LXE recommends using the Funk Odyssey client to configure the Odyssey Client radio. Wireless Zero Config icon is not recommended for configuring the radio as it cannot be used to configure all supported security protocols. -
Page 257: Summit Client
3. Tap the Disable Radio button to remove the connection to the Summit Client Utility. The text on the button changes to Enable Radio. 4. Tap the Power button to place the MX7 in Suspend, then tap the Power button to wake the MX7 from Suspend mode. - Page 258 Wireless Zero Config Utility MX7 Reference Guide E-EQ-MX7RG-B...
-
Page 259: Appendixa Key Maps
When the computer boots, the default condition of Caps (or CapsLock) is Off. The Caps (or CapsLock) condition can be toggled with Blue plus Tab key sequence. Press These Keys and Then … To Get This MX7 Key / Press This Key Caps... - Page 260 55-Key Alphanumeric Keymaps Press These Keys and Then … To Get This MX7 Key / Press This Key Caps Function Blue Orange Shft Lock Display Backlight Scan Key Brightness Adjust Mode Toggle Blue Mode Blue Toggle Orange Mode Orange Toggle Shift Mode...
- Page 261 55-Key Alphanumeric Keymaps Press These Keys and Then … To Get This MX7 Key / Press This Key Caps Function Blue Orange Shft Lock E-EQ-MX7RG-B MX7 Reference Guide...
- Page 262 55-Key Alphanumeric Keymaps Press These Keys and Then … To Get This MX7 Key / Press This Key Caps Function Blue Orange Shft Lock . period . (period) < MX7 Reference Guide E-EQ-MX7RG-B...
- Page 263 55-Key Alphanumeric Keymaps Press These Keys and Then … To Get This MX7 Key / Press This Key Caps Function Blue Orange Shft Lock > I (letter i) * (asterisk) : (colon) ; (semicolon) . (period) ` (accent) _ (underscore) , (comma) ‘...
-
Page 264: 5250 Key Map For The 55-Key Keypad
55-Key Alphanumeric Keymaps Press These Keys and Then … To Get This MX7 Key / Press This Key Caps Function Blue Orange Shft Lock & 0 (zero) 5250 Key Map for the 55-Key Keypad Legend.....Explanation..... Key Sequence Attn ......Attention ......Ctl + A Clr ........Clear ........ -
Page 265: 32-Key Numeric-Alpha Keypad
When using a sequence of keys that do not include the Alph key but does include a sticky key, press the sticky key first then the rest of the key sequence. Press These Keys and Then … To Get This MX7 Key / Press This Key Function... - Page 266 32-Key Numeric-Alpha Keypad Press These Keys and Then … To Get This MX7 Key / Press This Key Function Blue Orange Shft Alpha BackTab Up Arrow Up Arrow Down Arrow Down Arrow Right Arrow Up Arrow Left Arrow Down Arrow...
- Page 267 32-Key Numeric-Alpha Keypad Press These Keys and Then … To Get This MX7 Key / Press This Key Function Blue Orange Shft Alpha 7777 9999 7777 E-EQ-MX7RG-B MX7 Reference Guide...
- Page 268 32-Key Numeric-Alpha Keypad Press These Keys and Then … To Get This MX7 Key / Press This Key Function Blue Orange Shft Alpha 9999 . (period) < > Diamond#2 * (asterisk) Diamond#1 : (colon) ; (semicolon) . (period) ` (accent)
- Page 269 32-Key Numeric-Alpha Keypad Press These Keys and Then … To Get This MX7 Key / Press This Key Function Blue Orange Shft Alpha ~ (tilde) “ Alph Diamond#3 Ctrl & Diamond#2 Diamond#3 0 (zero) E-EQ-MX7RG-B MX7 Reference Guide...
-
Page 270: Creating Custom Key Maps
55-key keypad keys, key press or key press combinations. All keys, except the power key, can be re-mapped. IMPORTANT – The keycomp utility included with the MX7 SDK is not the same as the one included with the MX3X SDK. This one only generates maps for the MX7. -
Page 271: Keymap Source Format
ID code of this map, for use with the internal Win32 APIs (which require a numeric value). MAPCNT Gives the number of MAP sections (and hence keymap tables) in this source file. MAPCOLS Number of columns in each keymap table. This is defined by the hardware keyboard. E-EQ-MX7RG-B MX7 Reference Guide... -
Page 272: Special Section
ALGOR Defines the algorithm for converting row/column to internal scan code. Current values are: MX3X MX7 [ MX7 is scancode = ((column << 3) + row) ] Note: The field MAPDESC needs to be unique, but MAPNAME does not. SPECIAL Section... - Page 273 Creating Custom Key Maps MAP_NORMAL55 (MX7 only) no modifiers, 55-key map MAP_ORANGE55 (MX7 only) orange modifier, 55-key map MAP_BLUE55 (MX7 only) blue modifier, 55-key map MAP_SHIFT55 (MX7 only) shift modifier, 55-key map MAP_ORANGESHFT (MX7 only) orange and shift modifiers In addition, certain keymaps are used for special adjustment functions within the keyboard driver,...
-
Page 274: Keycomp Error Messages
The specified MAPCNT exceeds the limits of the KEYCOMP compiler. Invalid MAPCOLS (1-%d valid) The specified MAPCOLS exceeds the limits of the KEYCOMP compiler. Invalid MAPROWS (1-%d valid) The specified MAPROWS exceeds the limits of the KEYCOMP compiler. MX7 Reference Guide E-EQ-MX7RG-B... - Page 275 The VK code parsed is not recognized. See the VK Code Table (below) for valid values. Map ended without MAP value The MAP section must contain a MAP value, so the data fields can be parsed. E-EQ-MX7RG-B MX7 Reference Guide...
- Page 276 No definition for MapHead.keypower No power key definition was found. The keyboard driver requires this key to be defined somewhere in one of the keymaps. This message comes from the post-parse validation, so no line # is specified. MX7 Reference Guide E-EQ-MX7RG-B...
- Page 277 There are more MAP sections defined that the MAPCNT field specified. Unknown scan code algorithm The ALGOR algorithm specified is not one that KEYCOMP understands. Unrecognized scancode algorithm %s The ALGOR algorithm specified is not one that KEYCOMP understands. E-EQ-MX7RG-B MX7 Reference Guide...
-
Page 278: Sample Input File
ALGOR=MX3X ;;---------------------------------------------------- ;; ...still true for MX3X; not for MX7 ;; ...but the old MX3X maps are included in the MX7 map in case we ever merge... ;; special keys are accessed outside the map ;; this specifies the row and column ;;... - Page 279 ;; codes are defined in docs ;; this is the map for keys with only 2ND ;;---------------------------------------------------- [Map] MAP=MAP_2ND ;;;;;;;;;;;;;;;;;;;;;;;;;;; COL0ROW0=open COL0ROW1=VK_CAPITAL COL0ROW2=ACTION+POWER COL0ROW3=VK_PAUSE COL0ROW4=open COL0ROW5=open COL0ROW6=VK_HYPHEN COL0ROW7=ACTION+SCAN1 ;;;;;;;;;;;;;;;;;;;;;;;;;;; COL1ROW0=SHIFT+'1' COL1ROW1=SHIFT+VK_EQUAL COL1ROW2=ACTION+SCAN3 COL1ROW3=SHIFT+'5' COL1ROW4=SHIFT+'7' COL1ROW5=VK_EQUAL COL1ROW6=SHIFT+'9' COL1ROW7=ACTION+SCAN2 ;;;;;;;;;;;;;;;;;;;;;;;;;;; E-EQ-MX7RG-B MX7 Reference Guide...
- Page 280 ;; the important part is the MAP value ;; codes are defined in docs ;; this is the map for keys with 2ND and SHIFT ;;---------------------------------------------------- [Map] MAP=MAP_2NDSHIFT ;;;;;;;;;;;;;;;;;;;;;;;;;;; COL0ROW0=open COL0ROW1=VK_F11 COL0ROW2=ACTION+POWER COL0ROW3=VK_F12 COL0ROW4=open COL0ROW5=open COL0ROW6='8' COL0ROW7=ACTION+SCAN1 ;;;;;;;;;;;;;;;;;;;;;;;;;;; COL1ROW0=open COL1ROW1='9' COL1ROW2=ACTION+SCAN3 COL1ROW3=open MX7 Reference Guide E-EQ-MX7RG-B...
- Page 281 ;; the name of this key doesn't matter ;; the important part is the MAP value ;; codes are defined in docs ;; this is the map for keys with only SHIFT ;;---------------------------------------------------- [Map] MAP=MAP_SHIFT ;;;;;;;;;;;;;;;;;;;;;;;;;;; COL0ROW0=SHIFT+VK_ESCAPE COL0ROW1=SHIFT+VK_F1 COL0ROW2=ACTION+POWER COL0ROW3=SHIFT+VK_F2 COL0ROW4=SHIFT+VK_F5 COL0ROW5=SHIFT+VK_F7 COL0ROW6=SHIFT+'8' E-EQ-MX7RG-B MX7 Reference Guide...
- Page 282 ;;---------------------------------------------------- ;; the name of this key doesn't matter ;; the important part is the MAP value ;; codes are defined in docs ;; this is the map for unmodified keys on the MX7 ;; 32-key keypad ;;---------------------------------------------------- [Map] MAP=MAP_NORMAL32 ;;;;;;;;;;;;;;;;;;;;;;;;;;;...
- Page 283 COL7ROW5=KY_ORANGE COL7ROW6=KY_BLUE COL7ROW7=open ;;---------------------------------------------------- ;; the name of this key doesn't matter ;; the important part is the MAP value ;; codes are defined in docs ;; this is the map for keys modified with ORANGE E-EQ-MX7RG-B MX7 Reference Guide...
- Page 284 Creating Custom Key Maps ;; on the MX7 32-key keypad ;;---------------------------------------------------- [Map] MAP=MAP_ORANGE32 ;;;;;;;;;;;;;;;;;;;;;;;;;;; COL0ROW0=SHIFT+'8' COL0ROW1=VK_F6 COL0ROW2=ACTION+POWER COL0ROW3=VK_F7 COL0ROW4=VK_F10 COL0ROW5=open COL0ROW6=VK_LBRACKET COL0ROW7=CHANGE+MAP_VOLUME ;;;;;;;;;;;;;;;;;;;;;;;;;;; COL1ROW0=open COL1ROW1=open COL1ROW2=open COL1ROW3=VK_BACK COL1ROW4=open COL1ROW5=open COL1ROW6=open COL1ROW7=open ;;;;;;;;;;;;;;;;;;;;;;;;;;; COL2ROW0=SHIFT+'3' COL2ROW1=open COL2ROW2=open COL2ROW3=open COL2ROW4=SHIFT+'4' COL2ROW5=open COL2ROW6=open COL2ROW7=open ;;;;;;;;;;;;;;;;;;;;;;;;;;;...
- Page 285 ;; the name of this key doesn't matter ;; the important part is the MAP value ;; codes are defined in docs ;; this is the map for keys on the MX7 32-key keypad ;; modified with BLUE ;;---------------------------------------------------- [Map] MAP=MAP_BLUE32 ;;;;;;;;;;;;;;;;;;;;;;;;;;;...
- Page 286 ;; the name of this key doesn't matter ;; the important part is the MAP value ;; codes are defined in docs ;; this is the map for keys on the MX7 32-key keypad ;; modified with SHIFT ;;---------------------------------------------------- [Map] MAP=MAP_SHIFT32 ;;;;;;;;;;;;;;;;;;;;;;;;;;;...
- Page 287 ;; the name of this key doesn't matter ;; the important part is the MAP value ;; codes are defined in docs ;; this is the map for unmodified keys on the ;; MX7 55-key keypad ;;---------------------------------------------------- [Map] MAP=MAP_NORMAL55 ;;;;;;;;;;;;;;;;;;;;;;;;;;;...
- Page 288 COL1ROW3=SHIFT+'5' COL1ROW4=SHIFT+'7' COL1ROW5=open COL1ROW6=SHIFT+'9' COL1ROW7=open ;;;;;;;;;;;;;;;;;;;;;;;;;;; COL2ROW0=SHIFT+VK_BACKSLASH COL2ROW1=open COL2ROW2=SHIFT+VK_SEMICOLON COL2ROW3=SHIFT+VK_APOSTROPHE COL2ROW4=VK_COMMA COL2ROW5=open COL2ROW6=SHIFT+VK_SLASH COL2ROW7=open ;;;;;;;;;;;;;;;;;;;;;;;;;;; COL3ROW0=VK_BACK COL3ROW1=open COL3ROW2=open COL3ROW3=open COL3ROW4=VK_BACKQUOTE COL3ROW5=open COL3ROW6=open COL3ROW7=SHIFT+VK_TAB ;;;;;;;;;;;;;;;;;;;;;;;;;;; COL4ROW0=open COL4ROW1=VK_BACKSLASH COL4ROW2=VK_PERIOD COL4ROW3=VK_SEMICOLON COL4ROW4=VK_APOSTROPHE COL4ROW5=VK_PERIOD COL4ROW6=open COL4ROW7=VK_NEXT ;;;;;;;;;;;;;;;;;;;;;;;;;;; COL5ROW0=open COL5ROW1=open COL5ROW2=open MX7 Reference Guide E-EQ-MX7RG-B...
- Page 289 ;; the name of this key doesn't matter ;; the important part is the MAP value ;; codes are defined in docs ;; this is the map for keys on the MX7 55-key keypad ;; modified with BLUE ;;---------------------------------------------------- [Map] MAP=MAP_BLUE55 ;;;;;;;;;;;;;;;;;;;;;;;;;;;...
- Page 290 ;; the name of this key doesn't matter ;; the important part is the MAP value ;; codes are defined in docs ;; this is the map for keys on the MX7 55-key keypad ;; modified with SHIFT ;;---------------------------------------------------- [Map] MAP=MAP_SHIFT55 ;;;;;;;;;;;;;;;;;;;;;;;;;;;...
- Page 291 ;; this is the map for keys with only SHIFT ;;---------------------------------------------------- [Map] MAP=MAP_ORANGESHFT ;;;;;;;;;;;;;;;;;;;;;;;;;;; COL0ROW0=open COL0ROW1=VK_F21 COL0ROW2=ACTION+POWER COL0ROW3=VK_F22 COL0ROW4=open COL0ROW5=open COL0ROW6=open COL0ROW7=open ;;;;;;;;;;;;;;;;;;;;;;;;;;; COL1ROW0=open COL1ROW1=open COL1ROW2=open COL1ROW3=open COL1ROW4=open COL1ROW5=open COL1ROW6=open COL1ROW7=open ;;;;;;;;;;;;;;;;;;;;;;;;;;; COL2ROW0=open COL2ROW1=open COL2ROW2=open COL2ROW3=open COL2ROW4=open COL2ROW5=open COL2ROW6=open COL2ROW7=open ;;;;;;;;;;;;;;;;;;;;;;;;;;; COL3ROW0=open COL3ROW1=open COL3ROW2=open COL3ROW3=open E-EQ-MX7RG-B MX7 Reference Guide...
- Page 292 ;;;;;;;;;;;;;;;;;;;;;;;;;;; COL4ROW0=open COL4ROW1=open COL4ROW2=open COL4ROW3=open COL4ROW4=open COL4ROW5=open COL4ROW6=open COL4ROW7=open ;;;;;;;;;;;;;;;;;;;;;;;;;;; COL5ROW0=open COL5ROW1=open COL5ROW2=open COL5ROW3=open COL5ROW4=open COL5ROW5=open COL5ROW6=open COL5ROW7=open ;;;;;;;;;;;;;;;;;;;;;;;;;;; COL6ROW0=open COL6ROW1=open COL6ROW2=open COL6ROW3=open COL6ROW4=open COL6ROW5=open COL6ROW6=open COL6ROW7=open ;;;;;;;;;;;;;;;;;;;;;;;;;;; COL7ROW0=open COL7ROW1=open COL7ROW2=VK_F23 COL7ROW3=VK_F24 COL7ROW4=open COL7ROW5=open COL7ROW6=open COL7ROW7=open MX7 Reference Guide E-EQ-MX7RG-B...
-
Page 293: Sample Output File
79,57,0D,52,59,49,35,50,45,00,72,73,75,37,77,00 "Flag3"=hex:\ 10,10,A0,10,10,10,10,A0,10,10,A0,10,10,10,10,A0,\ 10,00,10,10,10,10,10,10,10,00,10,10,10,10,10,10,\ 10,10,10,10,10,10,10,10,10,10,10,10,10,10,10,10,\ 10,10,10,10,10,10,10,10,10,00,10,10,10,10,10,00 "Map4"=hex:\ E9,70,DF,71,74,0D,32,87,00,00,00,20,00,00,00,00,\ 34,00,00,00,39,00,00,00,10,00,2E,11,00,00,00,00,\ 31,00,00,37,38,00,00,28,00,ED,09,35,00,00,00,26,\ 33,F1,00,30,00,00,00,12,36,EF,72,73,00,F2,F3,00 "Flag4"=hex:\ 00,00,A0,00,00,00,00,A0,00,00,00,00,00,00,00,00,\ 00,00,00,00,00,00,00,00,00,00,00,00,00,00,00,00,\ 00,00,00,00,00,00,00,00,00,00,00,00,00,00,00,00,\ 00,A0,00,00,00,00,00,00,00,00,00,00,00,00,00,00 "Map5"=hex:\ 38,75,DF,76,79,00,DB,00,00,00,00,08,00,00,00,00,\ 33,00,00,00,34,00,00,00,10,00,BE,2D,00,00,00,00,\ DC,00,00,BD,BF,00,00,22,00,BB,09,32,00,00,00,21,\ DD,DE,00,BA,00,00,00,DC,BC,31,77,78,00,F2,F3,00 "Flag5"=hex:\ 10,00,A0,00,00,00,00,8D,00,00,00,00,00,00,00,00,\ 10,00,00,00,10,00,00,00,00,00,00,00,00,00,00,00,\ 00,00,00,10,10,00,00,00,00,00,10,10,00,00,00,00,\ 00,00,00,10,00,00,00,10,00,10,00,00,00,00,00,00 "Map6"=hex:\ EC,7A,DF,7B,7E,00,DB,00,00,00,00,BD,00,00,00,00,\ DB,00,00,00,C0,00,00,00,10,00,BB,36,00,00,00,00,\ BF,00,00,BC,BE,00,00,25,00,39,14,DD,00,00,00,27,\ DD,DE,00,BA,00,00,00,1B,C0,30,7C,7D,00,F2,F3,00 "Flag6"=hex:\ 00,00,A0,00,00,00,00,8F,00,00,00,00,00,00,00,00,\ 10,00,00,00,10,00,00,00,00,00,10,10,00,00,00,00,\ 00,00,00,10,10,00,00,00,00,10,00,10,00,00,00,00,\ 00,10,00,00,00,00,00,00,00,10,00,00,00,00,00,00 E-EQ-MX7RG-B MX7 Reference Guide... - Page 294 00,32,00,34,36,38,00,30,33,10,77,78,00,F2,F3,2D "Flag9"=hex:\ 00,00,A0,00,00,00,00,8D,10,00,00,10,10,00,10,00,\ 10,00,10,10,00,00,10,00,00,00,00,00,00,00,00,10,\ 00,00,00,00,00,00,00,00,00,00,00,00,10,10,00,00,\ 00,10,00,10,10,10,00,10,10,00,00,00,00,00,00,00 "Map10"=hex:\ EC,7A,DF,7B,7E,00,00,00,00,00,00,BB,00,00,00,00,\ 00,00,00,BC,BF,00,00,00,BD,00,DD,00,00,00,00,14,\ 00,00,BB,00,BE,00,00,25,00,DD,1B,00,00,00,00,27,\ 00,DB,00,00,DB,2D,00,BB,00,10,7C,7D,00,F2,F3,00 "Flag10"=hex:\ 00,00,A0,00,00,00,00,8F,00,00,00,00,00,00,00,00,\ 00,00,00,10,00,00,00,00,00,00,10,8D,00,00,00,00,\ 00,00,10,00,10,00,00,00,00,00,00,00,00,00,00,00,\ 00,10,00,00,00,00,00,10,00,00,00,00,00,00,00,00 "Map11"=hex:\ EA,7F,DF,80,83,00,38,87,51,39,00,54,55,34,4F,00,\ 41,00,44,47,4A,31,4C,33,00,00,58,56,4E,30,00,00,\ 00,53,00,46,48,4B,32,24,36,5A,00,43,42,4D,00,23,\ 00,57,00,52,59,49,35,50,45,10,81,82,37,F2,F3,11 "Flag11"=hex:\ 00,00,A0,00,00,00,10,A0,10,10,00,10,10,10,10,00,\ 10,00,10,10,10,10,10,10,00,00,10,10,10,10,00,00,\ 00,10,00,10,10,10,10,00,10,10,00,10,10,10,00,00,\ 00,10,00,10,10,10,10,10,10,00,00,00,10,00,00,00 "Map12"=hex:\ 00,84,DF,85,00,00,00,00,00,00,00,00,00,00,00,00,\ 00,00,00,00,00,00,00,00,00,00,00,00,00,00,00,00,\ 00,00,00,00,00,00,00,00,00,00,00,00,00,00,00,00,\ 00,00,00,00,00,00,00,00,00,00,86,87,00,00,00,00 "Flag12"=hex:\ 00,00,A0,00,00,00,00,00,00,00,00,00,00,00,00,00,\ 00,00,00,00,00,00,00,00,00,00,00,00,00,00,00,00,\ 00,00,00,00,00,00,00,00,00,00,00,00,00,00,00,00,\ 00,00,00,00,00,00,00,00,00,00,00,00,00,00,00,00 MX7 Reference Guide E-EQ-MX7RG-B...
-
Page 295: Appendixb Technical Specifications
Depth at Scanner 2” 5.1 cm Depth at Battery 1.7” 4.3 cm Scanner Integrated No Scanner Intermec EV-15 Linear Imager SE955 replaced SE824 in July 2006. Symbol SE824 Short Range Symbol SE1524ER Lorax Symbol SE955 Short Range E-EQ-MX7RG-B MX7 Reference Guide... -
Page 296: Display Specifications
LCD – Active Transmissive Color / LED Backlight Resolution 320 (Vertical) x 240 (Horizontal) pixels Size 1/4 VGA portrait Diagonal Viewing Area 3.5 in (8.9cm) Dot Pitch 0.22mm Dot Size 0.20mm x 0.20mm Color Scale Reflective – 256 colors MX7 Reference Guide E-EQ-MX7RG-B... -
Page 297: Environmental Specifications
0 Amps min, 1.25 Amps max Operating Temperature 32 F to 100° F / -0° C to 40° C The LXE-approved AC Power Adapter is only intended for use in a 25°C (77°F) maximum ambient temperature environment. Storage Temperature -40° F to 180° F / -40° C to 80° C... -
Page 298: Radio Specifications
1, 2, 5.5, 6, 9, 11, 12, 18, 24, 36, 48, 54 Mbps RF Power Level 50 mW max. Channels 1-11 FCC, 1-13 ETSI Operating Temperature see Environmental Specs Storage Temperature see Environmental Specs Connectivity TCP/IP, Ethernet, ODI Diversity Hotswapping MX7 Reference Guide E-EQ-MX7RG-B... -
Page 299: List Of Valid Vk Codes For Ce
VK_F1 VK_MEDIA_PREV_TRACK VK_VOLUME_UP VK_F10 VK_MEDIA_STOP VK_ZOOM VK_F11 VK_MENU VK_F12 VK_MULTIPLY VK_F13 VK_NEXT VK_F14 VK_NOCONVERT VK_F15 VK_NONAME VK_F16 VK_NUMLOCK VK_F17 VK_NUMPAD0 VK_F18 VK_NUMPAD1 VK_F19 VK_NUMPAD2 VK_F2 VK_NUMPAD3 VK_F20 VK_NUMPAD4 VK_F21 VK_NUMPAD5 VK_F22 VK_NUMPAD6 VK_F23 VK_NUMPAD7 VK_F24 VK_NUMPAD8 E-EQ-MX7RG-B MX7 Reference Guide... -
Page 300: Ascii Control Codes
Shift In Ctrl-o Data Link Escape Ctrl-p Device Control 1, normally XON Ctrl-q Device Control 2 Ctrl-r Device Control 3, normally XOFF Ctrl-s Device Control 4 Ctrl-t Negative AcKnowledge Ctrl-u SYNchronous idle Ctrl-v End Transmission Block Ctrl-w MX7 Reference Guide E-EQ-MX7RG-B... - Page 301 VK_SHIFT (0x10) down WM_CHAR 0x36 down Record Separator WM_CHAR 0x36 up VK_SHIFT up VK_CONTROL up VK_CONTROL (0x11) down VK_SHIFT (0x10) down VK_PACKET (0xe7) down Unit Separator WM_CHAR 0x1f VK_PACKET (0xe7) up VK_SHIFT (0x10) up VK_CONTROL (0x11) up E-EQ-MX7RG-B MX7 Reference Guide...
- Page 302 ASCII Control Codes MX7 Reference Guide E-EQ-MX7RG-B...
- Page 303 Alpha Mode LED ..........51 battery Alphanumeric 32-key keypad.......48 trickle charging ...........12 Alt key function ............52 Battery ANSI Keypad ............47 Backup, details............57 Antenna charge before using ..........12 Diversity............239 Charge or Discharge buttons for backup battery API calls .............147 maintenance ............91 E-EQ-MX7RG-B MX7 Reference Guide...
- Page 304 Time Required ............37 DEFAULT.KEY..........255 Check battery status..........56 Desktop..............76 Clean display and aperture........55 Device Name and description ......124 Clear Contents of Document Folder .....86 Diags tab Clear Internet cache ..........98 Summit..............181 Clear registry settings .........147 Dialing properties ..........94 MX7 Reference Guide E-EQ-MX7RG-B...
- Page 305 Idle Time...............96 Fonts and keymaps ..........100 IEC IP54 .............281 Footprint IEEE 802.11g Wireless LAN Configuration passive vehicle cradle, RAM assembly....64 Utility..............238 passive vehicle cradle, U-bracket......62 Imager Aperture, clear ..........6 Forms entry............28 Inbox Function Outlook ...............81 Key ..............53 E-EQ-MX7RG-B MX7 Reference Guide...
- Page 306 LXE Manuals CD ..........32 Single User AppLock........161 LXE Security Primer ..........175 Internet popup blocker..........98 LXE ServicePass ..........32 Internet privacy.............98 LXEbook – MX7 Users Guide ......23 Internet Security ...........98 IO Components.............35 IPv6 configuration ..........140 MAC address ............89 Main..............110 Main Battery Pack ..........37 Java Option ............72...
- Page 307 Client Icon..........191, 240 Single User AppLock........162 Commands ............192 Summit Admin mode ........178 Configured and authenticated ......218 Passwords lost at cold boot.........141 Connect the MX7 to the AP......222 PC Card EAP/TLS protocol ........214, 217 Storage ..............43 EAP-LEAP protocol .........212 PEAP-MSCHAP for WPA .........188 EAP-MS-CHAP-V2..........204...
- Page 308 Applications ............73 Downloading.............225 Folders copied at startup ........75 Installing on mobile device .......227 Load ..............72 RS-232 and Power port.........38 supported by the MX7 ........72 RSSI Reading Interval ........238 Sounds and Volume default values.....125 RSSI Threshold...........238 speaker ..............39 Speaker location ...........22 Special functions...........52...
- Page 309 USB Client and Power port ........38 How To .............176 User access Suspend power up password ...........106 and the LXE Login Utility ........143 user certificate and a separate private key file ..229 Suspend button .............76 User Certificate on the MX7.......234 Suspend mode............45 User Certificates Suspend mode and ActiveSync ......41...
- Page 310 Warmboot .............31 Summit Radio ...........176, 241 WARMBOOT.EXE........41, 139 WLAN Networks..........24 Warning WLAN Profiles.............24 Low Battery ............57 WordPad ...............81 Warnings and Labels Writing new bootloader ........148 Laser Scanner............30 WZC icon .......82, 83, 176, 240, 241 WAVPLAY.EXE ..........139 Wedge..............110 MX7 Reference Guide E-EQ-MX7RG-B...
Need help?
Do you have a question about the MX7 and is the answer not in the manual?
Questions and answers