IDS X64 User Manual
Lcd keypad
Hide thumbs
Also See for X64:
- Installer manual (96 pages) ,
- User manual (44 pages) ,
- Quick programming manual (37 pages)
Table of Contents
Advertisement
Advertisement
Table of Contents

Related Manuals for IDS X64


Summary of Contents for IDS X64
- Page 1 IDS X64 LCD Keypad User Manual 700-411-01C Issues August 2010...
- Page 2 IDS X64 LCD Keypad User Manual 700-411-01C Issued August 2010...
-
Page 3: Table Of Contents
Contents Introduction to the IDS X64 LCD Digital Keypad ............7 Viewing Violated Zones ....................7 Arming the Control Panel ....................8 Away Arming ..........................8 3.1.1 How to Away Arm ........................8 3.1.2 Quick Away Arm - Shortcut Key ....................8 Stay Arming .......................... - Page 4 Table 4: Output Actions Data ......................20 Table 5: Enable User Reporting Codes ..................21 Table 6: Specify which Telephone Module to use ................. 22 Table 7: Trouble Conditions ......................26 IDS X64 LCD Keypad User Manual 700-411-01C Issued August 2010...
- Page 5 IDS X64 LCD Keypad User Manual 700-411-01C Issued August 2010...
- Page 6 IDS X64 LCD Keypad User Manual 700-411-01C Issued August 2010...
-
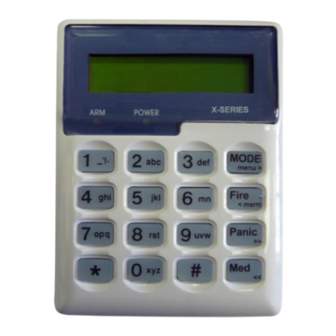
Page 7: Introduction To The Ids X64 Lcd Digital Keypad
The above figure shows that zones 2, 23, and 24 have been violated. The display options are [1] for LCD mode with the scrolling text, or [2] for LED mode. IDS X64 LCD Keypad User Manual 700-411-01C Issued August 2010... -
Page 8: Arming The Control Panel
30 seconds before sounding the siren. Entering a valid user code before the siren sounds, prevents an alarm condition from being registered and will silence the keypad buzzer and prevent the siren from sounding. IDS X64 LCD Keypad User Manual 700-411-01C Issues August 2010... -
Page 9: How To Stay Arm
A beep will sound to indicate successful selection of a profile. Program STAY and BUZZ zones for the profile (see sections 9 and 10), and/or ARM the profile (with the [5] key). IDS X64 LCD Keypad User Manual 700-411-01C Issued August 2010... -
Page 10: How To Stay Arm And Go
[USER CODE] entered during the pre-arm delay will terminate the arming sequence. The pre-arm delay is signalled by an exit beep. IDS X64 LCD Keypad User Manual 700-411-01C Issued August 2010... -
Page 11: Disarming The Control Panel
Ensure the panel is not armed. To enter bypass mode, hold down [9] until the beep. The LCD display reads „User Code + *‟. Enter the [USER CODE] followed by the [*] key. IDS X64 LCD Keypad User Manual 700-411-01C Issued August 2010... -
Page 12: Emergency Alarms
(Hold down the [M] key for two seconds until the keypad buzzer sounds) If the [M] key is pressed until the keypad beeps (approximately 2 seconds) a MEDICAL ALARM condition will be activated. IDS X64 LCD Keypad User Manual 700-411-01C Issued August 2010... -
Page 13: Duress Alarms
(with the [MED] key) but if the user decides to scroll forward (with the [PANIC] key) then just events up to and including this reference point will be viewable. IDS X64 LCD Keypad User Manual 700-411-01C Issued August 2010... -
Page 14: User Codes
The first number is the partition number within which the event occurred. The second number will either be the zone or user number associated with the event type. Below is an example of how an event will be displayed on the two-line IDS LCD keypad. “02:00 01/01/2010”... -
Page 15: How To Enter The User Program Mode
[*] [MASTER CODE] [*] [1] [*] [OLD CODE] [*] [NEW CODE] [*] [#] Enter the User Program Mode as per steps 1 - 4 of section 8.2. The LCD display reads „Option Menu‟, „Add User Code‟. IDS X64 LCD Keypad User Manual 700-411-01C Issued August 2010... -
Page 16: Option 2 - Delete User Code (Code Known)
[*] [MASTER CODE] [*] [4] [*] [SLOT NUMBER] [*] [#] Enter the User Program Mode as per steps 1 - 4 of section 8.2. The LCD display reads „Option Menu‟, „Add User Code‟. IDS X64 LCD Keypad User Manual 700-411-01C Issued August 2010... -
Page 17: Option 5 - View A User Code Slot Number
Press the [#] key twice to exit User Program Mode. EXAMPLE: To enable a User Code to function as a duress code, when prompted for the option press the [2] key followed by the [*] key. IDS X64 LCD Keypad User Manual 700-411-01C Issued August 2010... -
Page 18: Master User
This code will disarm the partitions assigned to the user depending on their status. If all partitions are armed, entering a group code will disarm all of the assigned partitions. In a case where some partitions IDS X64 LCD Keypad User Manual 700-411-01C Issued August 2010... -
Page 19: Global Arm / Disarm Code
To select menu option 13 –„User Outputs‟, press the [1] [3] keys or alternatively use the [PANIC] or [MED] keys to scroll through the list of programmable options until you reach the option you want. IDS X64 LCD Keypad User Manual 700-411-01C Issued August 2010... -
Page 20: Option 14 - User Reporting Codes Enable
[MASTER CODE] [*] [1] [4] [*] [USER CODE] [*] [BITMAP] [*] [#] Enter the User Program Mode as per steps 1 - 4 of section 8.2. The LCD display reads „Option Menu‟, „Add User Code‟. IDS X64 LCD Keypad User Manual 700-411-01C Issued August 2010... -
Page 21: Option 15 - User Reporting Code Telephone Modules
Enter the [BITMAP] that you want followed by the [*] key. Press the [*] key to toggle between ON and OFF. Press the [#] key to exit the User Program Mode. IDS X64 LCD Keypad User Manual 700-411-01C Issued August 2010... -
Page 22: Option 30 - Edit A Zone Name
If no character has been entered, then pressing [#] will exit zone name programming and return to the options menu. Repeat steps 5 - 7 if more zones are to be named. Press the [#] key to exit the User Program Mode. IDS X64 LCD Keypad User Manual 700-411-01C Issued August 2010... -
Page 23: Option 40 - Edit The Time
[0] [*] Copy All – this is used to update the zone names to all keypads connected to the X64 Alarm Panel. This is used when a keypad has been replaced or a new keypad is added to the panel. (This can be used when you replace a keypad and want it to display the existing zone names). -
Page 24: How To Select A Stay Profile
If it is not programmed as a buzz zone, the alarm will be triggered immediately. If the panel was armed using the [6] key (Stay Arm and Go) violation of the Entry/Exit zone will always start the Entry/Exit delay. IDS X64 LCD Keypad User Manual 700-411-01C Issued August 2010... -
Page 25: How To Program / Cancel Buzz Zones
Press the [*] key to toggle between YES and NO. Repeat steps 3 - 5 until all the required Chime zones are programmed/cancelled. Press the [#] key to exit the Chime zone programming mode. IDS X64 LCD Keypad User Manual 700-411-01C Issued August 2010... -
Page 26: Viewing Trouble Conditions
The LCD display reads „P(number)‟. The keypads may be partitioned to remain in the new partition. Any value outside of these constraints will result in a key entry error occurring. IDS X64 LCD Keypad User Manual 700-411-01C Issues August 2010... -
Page 27: Output Control Via A Keypad
Repeat steps 5 – 6 to program any other outputs. Press the [#] key to exit. Ensure that you have checked with your Installer which outputs are used for radio reporting to prevent the triggering of false alarms. IDS X64 LCD Keypad User Manual 700-411-01C Issued August 2010... - Page 28 IDS X64 LCD Keypad User Manual 700-411-01C Issued August 2010...
- Page 29 IDS X64 LCD Keypad User Manual 700-411-01C Issued August 2010...
- Page 30 IDS X64 LCD Keypad User Manual 700-411-01C Issued August 2010...
- Page 31 8 = Box Tamper View Trouble Conditions 9 = Tamper on Peripheral Device 10 = Comms Loss to Peripheral Device 11 = Loss of Power to Peripheral Device 12 = EEPROM Failure IDS X64 LCD Keypad User Manual 700-411-01C Issues August 2010...
- Page 32 IDS X64 LCD Keypad User Manual 700-411-01C Issued August 2010...
Need help?
Do you have a question about the X64 and is the answer not in the manual?
Questions and answers