Table of Contents
Advertisement
Advertisement
Table of Contents

Subscribe to Our Youtube Channel
Related Manuals for IDS LCD Digital Keypad


Summary of Contents for IDS LCD Digital Keypad
- Page 2 IDS LCD Keypad User Manual 700-292-01C Issued March 2009...
- Page 3 IDS LCD Keypad User Manual 700-292-01C Issued March 2009...
- Page 4 IDS LCD Keypad User Manual 700-292-01C Issued March 2009...
-
Page 5: Table Of Contents
8.3.5.3 Maid‟s Code......................19 8.3.5.4 Global Arm/Disarm....................19 8.3.5.5 Group Arm......................20 8.3.5.6 Group Disarm......................20 8.3.5.7 Report User Open/Close..................20 8.3.5.8 User Phone in Access....................20 8.3.5.9 Report User Access....................20 8.3.5.10 Enable Anti-Pass Back for User................20 IDS LCD Keypad User Manual 700-292-01C Issued March 2009... - Page 6 How to Cancel Buzz Zones..................26 Chime Zones....................26 11.1 How to Program Chime Zones................26 11.2 How to Cancel Chime Zones..................27 Viewing Trouble Conditions................27 Changing a Partition..................28 Remote Telephone Access................28 Output Control via a Keypad................30 IDS LCD Keypad User Manual 700-292-01C Issued March 2009...
- Page 7 Tables Table 1 Alarm Panel Zones..................13 Table 2 Alarm Panel Features..................14 Table 3 User Programming Options................15 Table 4 User Code Properties..................19 Table 5 Trouble Conditions..................27 Table 6 Remote Telephone Operation...............29 IDS LCD Keypad User Manual 700-292-01C Issued March 2009...
-
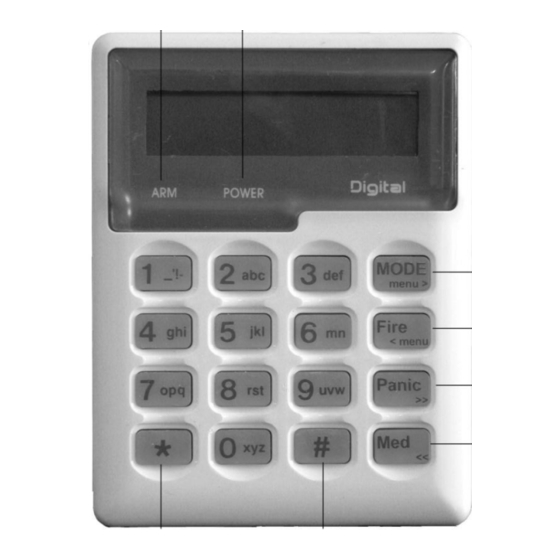
Page 8: Introduction To The Ids Lcd Digital Keypad
If this function is enabled, it is possible to AWAY arm by simply holding down the [1] key. The LCD display will read 'Exit delay' alongside the partition number being armed. The keypad buzzer sounds and the arming process begins. NOTE: IDS LCD Keypad User Manual 700-292-01C Issued March 2009... -
Page 9: Stay Arming
It is possible to STAY arm by holding down the [5] key until the keypad buzzer sounds. The panel will immediately arm into the stay mode without any exit delay. Holding the [5] key again will toggle between the 2 stay profiles. IDS LCD Keypad User Manual 700-292-01C Issued March 2009... -
Page 10: How To Stay Arm And Go
[#] + [USER CODE] To disarm the system, enter [#] followed by a valid [USER CODE]. Enter the premises through a designated entry route. Entering via any other route will cause an alarm. IDS LCD Keypad User Manual 700-292-01C Issued March 2009... -
Page 11: How To Disarm Using A Key-Switch Or Remote
[Y] indicates that the zone has been bypassed, whilst [N] indicates that the zone has not been bypassed. Repeat step 3 to bypass other zones. Press the [#] key to exit the bypass mode. NOTE: Panic zones cannot be bypassed. IDS LCD Keypad User Manual 700-292-01C Issued March 2009... -
Page 12: How To Un-Bypass A Zone
To silence the siren, enter a valid [USER CODE]. Press the [P] key only in an emergency situation which requires response by emergency personnel. IDS LCD Keypad User Manual 700-292-01C Issued March 2009... -
Page 13: Medical Alarms
The Alarm Memory is erased at the beginning of each arm cycle. Zone Options Changing a Zone Name Table 1 : Alarm Panel Zones Alarm Panel Zones Sub-location IDS 816 1 - 16 IDS LCD Keypad User Manual 700-292-01C Issued March 2009... -
Page 14: User Codes
User Codes Each of the IDS Alarm Panels has a certain number of programmable user codes as displayed in Table 2 below. By default User Code 1 is the Master User Code which contains a pre-programmed 4 digit code of 1234. -
Page 15: Adding, Deleting And Editing User Codes
Hold [*] + [MASTER USER CODE] + [*] + [PROGRAMMABLE OPTION] + [*] All IDS Alarm Panels utilise a user-friendly programmable interface which allows the user to add, modify, or delete user codes. See Table 3 for a summary of programmable options. The programmable interface is accessed by entering the USER PROGRAMMING MODE. -
Page 16: Explanation Of Programmable Options
IDS 816 when prompted to enter a 'Menu Option', enter a value of [0] (See table 1) followed by [*]. In the case of the IDS 1632 and the IDS 1224, Menu Option 0 will be displayed on the LCD screen by default. -
Page 17: Option 2 - Edit A Selected User Code
Alongside the Data prompt, enter the [NEW CODE]. To move the cursor within the [NEW CODE] use the [PANIC] or [MED] keys. To confirm your entry press the [*] key. The ARM indicator will flash. IDS LCD Keypad User Manual 700-292-01C Issued March 2009... -
Page 18: Option 3 - View A User Code Slot Number
In the case of the IDS 1632 and the IDS 1224, one may use the [PANIC] or [MED] keys to scroll through the User Options which can be assigned to a user. -
Page 19: Explanation Of User Code Properties - Master Code
8.3.5.4 Global Arm / Disarm Code (Not applicable to the IDS 1224 & IDS 1632) This code when entered will either arm or disarm the partitions assigned to that user depending on their status. If both partitions are disarmed, entering a global code will arm both partitions. If both partitions are armed, entering a global code will disarm them. -
Page 20: Group Arm
If the installer selects the full menu, the user will be able to bypass zones, open doors and toggle outputs. 8.3.5.9 Report User Access (Not applicable to the IDS 1224 & IDS 816) This option enables reporting of a pre-programmed reporting code when a user opens a door assigned to them. 8.3.5.10 Enable Anti-pass back for User (Not applicable to the IDS 1224 &... -
Page 21: Fire Code
The partitions to which the [USER CODE] is assigned are indicated by Options 1 or 2 in the case of the IDS 816, Options 1 - 4 in the case of the IDS 1224 or Options 1- 8 in the case of the IDS 1632. -
Page 22: Option 7 - Assign User Code To Schedule
Option 7 - Assign a User Code to a Schedule (Not applicable to the IDS 1224 & IDS 816) Hold [*] + [Master Code] + [*] + [7] + [*] + [User Code] + [*] + [Schedule Number] + [*] Enter the User Program Mode as per steps 1 - 4 of (8.2). -
Page 23: Option 9 - Delete User Code (Code Known)
Menu option 0 - 'Add User' is displayed on the LCD Screen by default. To select menu option 11 - 'Slot Name', press the [1] key followed by the [1] or alternatively use the [PANIC] or [MED] keys IDS LCD Keypad User Manual 700-292-01C Issued March 2009... -
Page 24: Option 12 - Add User Slot
Program STAY and BUZZ zones for the profile or ARM the profile (See sections 10 and 11). How to Program Stay Zones HOLD [3] + [ZONE NUMBER] + [*] + [#] IDS LCD Keypad User Manual 700-292-01C Issued March 2009... -
Page 25: How To Cancel Stay Zones
HOLD [4] + [ZONE NUMBER] + [*] + [#] Select the required Stay Profile. (See 9.1) Hold down the [4] key until the keypad buzzer sounds. The LCD Display will indicate that the keypad is in Buzz Mode. IDS LCD Keypad User Manual 700-292-01C Issued March 2009... -
Page 26: How To Cancel Buzz Zones
A [Y] next to the zone number indicates that the zone has been selected as a chime zone. Program any other zones you wish to select as chime zones as per step 3. Press the [#] key to exit the chime programming mode. IDS LCD Keypad User Manual 700-292-01C Issued March 2009... -
Page 27: How To Cancel Chime Zones
Loss of Clock Timer Engineer Reset Box tamper Keypad 12V trouble Tamper on peripheral device Communication loss to peripheral device Loss of power to peripheral devices Reserved SIM PIN Error GSM Modem Error IDS LCD Keypad User Manual 700-292-01C Issued March 2009... -
Page 28: Changing A Partition
Please note that this section is only relevant if programmed by your installer. The IDS Alarm Panels have a secure, remote telephone interface which allows a user to arm/disarm, to bypass/un-bypass zones and to set programmable outputs via a phone line. A user accesses the remote dial-in interface by dialling the Alarm Panel using a DTMF phone. -
Page 29: Table 6 Remote Telephone Operation
A Double Beep indicates that the door has not been opened Three Error Beeps indicates that a key / access reader entry error has occurred Hang-Up Telephone Line Released Three Error Beeps indicates that a key entry error has occurred IDS LCD Keypad User Manual 700-292-01C Issued March 2009... -
Page 30: Output Control Via A Keypad
'Output No. Set' any outputs that are set [OFF] will be displayed as 'Output No. Clear'. One is able to scroll through the Outputs by using the [PANIC] and [MED] keys. To toggle the output status, enter [OUTPUT NUMBER] followed by [*]. Press [#] to exit User Program Mode. IDS LCD Keypad User Manual 700-292-01C Issued March 2009... - Page 31 View Trouble Conditions 7 = Engineer Reset 8 = Box Tamper 10 = Tamper on Peripheral 11 = Comms. Failure to Peripheral Device 12 = Loss of Power to Peripheral Device IDS LCD Keypad User Manual 700-292-01C Issued March 2009...
- Page 32 IDS LCD Keypad User Manual 700-292-01C Issued March 2009...
Need help?
Do you have a question about the LCD Digital Keypad and is the answer not in the manual?
Questions and answers