Table of Contents
Advertisement
WIRED REMOTE
CONTROLLER
OPERATION MANUAL
Proper Use for Effective Energy Saving
●
Thank you for purchasing the wired remote controller.
●
This manual describes safety precautions required for the use of the
product.
Read this manual carefully and be sure you understand the
information provided before attempting to use the product.
Keep this manual where it is readily accessible after reading it through.
If another user operates the product in the future, be sure to hand over
this manual the new user.
MODEL BRC1E61
Advertisement
Table of Contents

Related Manuals for Daikin BRC1E61


Summary of Contents for Daikin BRC1E61
-
Page 1: Operation Manual
WIRED REMOTE CONTROLLER OPERATION MANUAL MODEL BRC1E61 Proper Use for Effective Energy Saving ● Thank you for purchasing the wired remote controller. ● This manual describes safety precautions required for the use of the product. Read this manual carefully and be sure you understand the information provided before attempting to use the product. -
Page 2: Table Of Contents
Contents Notices Safety Precautions ..2 Items to be Strictly Observed Names and Functions ..........8 Simple Settings in Direct Buttons for Basic Operation Items Basic Operation Method Cool/Heat/Auto/Fan Operation ......14 Program Dry Operation .......... 17 (Use of Direct Buttons) Home Leave ............ -
Page 3: Safety Precautions Items To Be Strictly Observed
● Do not install the remote controller by yourself. Improper installation may result in electric shocks or fi re. Consult your Daikin dealer. ● Do not modify or repair the remote controller. This may result in electric shocks or fi re. - Page 4 ● Never disassemble the remote controller. Touching the interior parts may result in electric shocks or fi re. Consult your Daikin dealer or authorized contractor for internal inspections and adjustments. ● To avoid electric shocks, do not operate with wet hands.
- Page 5 Safety Precautions WARNING ● Beware of fi re in case of refrigerant leakage. If the air conditioner is not operating correctly, i.e. not generating cool or warm air, refrigerant leakage could be the cause. Consult your dealer for assistance. The refrigerant within the air conditioner is safe and normally does not leak.
- Page 6 ― ―Items to be Strictly Observed― ― CAUTION ● After prolonged use, check the unit stand and its mounts for damage. If left in a damaged condition, the unit may fall and cause injury. ● Do not allow a child to mount on the outdoor unit or avoid placing any object on it.
- Page 7 ● Do not wash the interior of the indoor and outdoor units by yourself. Always consult your Daikin dealer. The use of an incorrect washing method or incorrect detergent may damage the resin parts of the indoor unit or cause water leakage.
- Page 8 English...
-
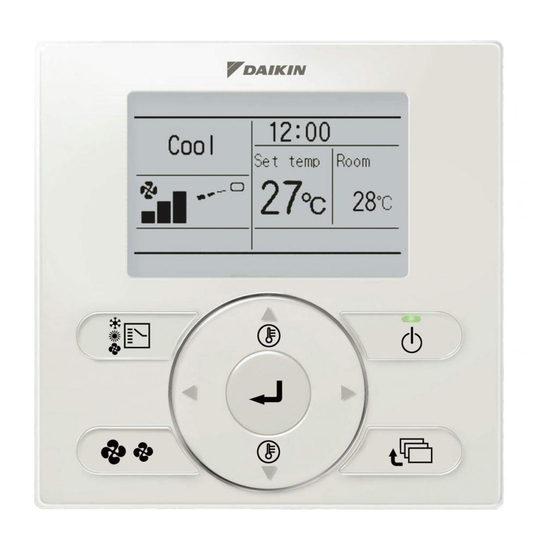
Page 9: Names And Functions
Names and Functions 1. Operation mode selector button 11. LCD (with backlight) 4. Up button 5. Down button 6. Right button 7. Left button 9. Operation lamp 8. On/Off button 3. Menu/Enter button 10. Cancel button 2. Fan speed control button Functions other than basic operation items (i.e., On/Off, Operation mode selector, Fan speed control, and temperature settings) are set... - Page 10 Operation mode selector button Left button (Be sure to press the part with the symbol ● Press this button to select the operation mode of your preference. (See page 14.) ● Used to highlight the next items on the Available modes vary with the connecting left-hand side.
- Page 11 Names and Functions Liquid Crystal Display ● Two types of liquid crystal display (LCD) are available. The standard display is by default set. ● To go to the detailed display, select the detailed display in the main menu. (See page 46.) ●...
-
Page 12: Operation Mode
Operation mode “Error: Press Menu Button.” “Warning: Press Menu Button.” ● Used to display the present operation ● Displayed if the error or warning is detected mode Cool, Heat, Vent, Fan, Dry or Auto (see page 53). mode. “Quick Cool/Heat” (SkyAir only) ●... - Page 13 Names and Functions Home leave “ ” (See page 19.) ● The home leave icon shows the status of the home leave function. Home leave is enabled FLASHING Home Leave is active Home Leave is disabled Airfl ow direction “ ”...
- Page 14 English...
-
Page 15: Basic Operation Method
Basic Operation Method (Use of Direct Buttons) Cool/Heat/Auto/Fan Operation (SkyAir and VRV) Operation procedure Operation button Remote Controller Functions display Explains a button operation procedure for the remote controller. Displays the positions of Operate the buttons according to buttons to be operated. the procedure. - Page 16 ● Press On/Off button. The Operation lamp (green) will be lit and the system will start operating. ● The set temperature will increase by 1°C when button is pressed and Cool Set temperature decrease by 1°C when button is °C pressed.
- Page 17 Basic Operation Method (Use of Direct Buttons) ● The Operation lamp will be turned OFF and the system will stop operating when On/Off button is pressed again. While the system is in heating operation, the system will be in fan operation for approximately one minute in order to eliminate the heat in the indoor unit after the heating operation comes to a stop.
-
Page 18: Program Dry Operation
● If the hot air stays around the ceiling and your feet feel cold, the use of a circulator is recommended. For details, consult your Daikin dealer. Program Dry Operation Preparation ●... - Page 19 Basic Operation Method (Use of Direct Buttons) ● Press On/Off button. The Operation lamp (green) will be lit and the system will start operating. The microcomputer is in automatic temperature and fan speed control. Therefore, temperature or fan speed settings cannot be made or changed while the air conditioner is in operation.
-
Page 20: Home Leave
Operation Contents Program Dry The Program dry function of the system repeats the weak cooling operation of the system intermittently to dehumidify the room without dropping the room temperature as much as possible for the prevention of excessive cooling. Program Dry Operation ●... -
Page 21: Ventilation Operation
Basic Operation Method (Use of Direct Buttons) Ventilation Operation When Air Conditioner Interlocked with Total Heat Exchanger Preparation ● For mechanical protection purposes, turn ON the system at least six hours before starting the operation of the system. ● Do not turn OFF the system in season in order to ensure the smooth starting of the system. Operation Method ●... -
Page 22: Setting Method Of The Cooling/Heating Selection Eligibility
Setting Method of the Cooling/Heating Selection Eligibility (VRV only) Setting Changes See page 22 for an explanation of the cooling/heating selection eligibility. ● Continue pressing Operation Mode Selector button of the remote controller for Cool Set temperature at least four seconds. (During backlight lit) °C A remote controller will not display Return... - Page 23 Basic Operation Method (Use of Direct Buttons) Operation Selection ● Press the remote controller that has the cooling/heating selection eligibility (or Cool Set temperature the remote controller without the display °C “ ” (Changeover under control)) Return Setting several times until the desired mode is selected.
-
Page 24: Key Lock
Precautions for Setting Cooling/Heating Selection Eligibility ● The cooling/heating selection eligibility needs to be set for a single remote controller in the following case. (Cooling/Heating selected operation system) (Cooling/Heating simultaneous operation system) BS unit: The BS unit is used for cooling or heating mode selection. -
Page 25: Quick Reference Of Main Menu Items
Quick Reference of Main Menu Items The main menu has the following items. Setting and display items Description Reference page Select normal set temperature or limit control. Set temp mode changeover Used to make airfl ow direction settings. Airfl ow direction setting ●... -
Page 26: Language Changeover
Setting and display items Description Reference page Used to make LCD contrast adjustment. Contrast adjustment Convenient functions Used to set to standard or detailed display Display changeover mode. Standard or detailed display ● Display Standard or detailed display ● Detailed display settings Selectable from the display room temperature, outdoor temperature, system, or without any display items. -
Page 27: Menu Manipulation
Menu Manipulation Manipulating the Main Menu Screen Display Method for Main Menu Operation Method ● Press Menu/Enter button. Cool Set temperature °C Return Setting Basic screen ● The main menu screen will appear. MainMenu Set temp mode changeover Airflow Direction Quick Cool/Heat On/Off Ventilation Timer setting... -
Page 28: Set Temp Mode Changeover
Set temp mode changeover Limit Operation Limit operation provides thermostat control within the range of the set minimum and maximum temperature. The minimum temperature setting will trigger heating. The maximum temperature setting will trigger cooling. Operation Method The limit operation can not be enabled when a centralized control is connected. ●... -
Page 29: Airfl Ow Direction Setting
Menu Manipulation Airfl ow Direction Setting Manipulating Airfl ow Direction Setting Operation Method ● Display the main menu screen. MainMenu Set temp mode changeover (See page 26.) Airflow Direction Quick Cool/Heat On/Off ● Press buttons to select Ventilation Timer setting Service Contact/Model Info Airfl... - Page 30 ● Pressing buttons changes the Airflow Direction setting to (in order) Swing Swing Position 0 Position 1 Return Setting Up/down direction Position 2 Position 3 , and Airflow Direction Position 4 Swing ● Selecting Swing will cause the airfl ow direction blades to swing Return Setting back and forth.
- Page 31 Menu Manipulation Operational Details and Functions There are two types of airfl ow direction setting. Airfl ow direction swing Airfl ow direction The airfl ow direction blades automatically You can select from one of fi ve fi xed swing up and down. directions.
-
Page 32: Quick Cooling/Heating On/Off
Quick Cooling/Heating On/Off Quick Cooling/Heating On Operation Method ● While operating in Cooling, Heating, or MainMenu Set temp mode changeover Auto mode, display the main menu Airflow Direction Quick Cool/Heat On/Off screen (see page 26) Ventilation Timer setting ● Press buttons to select Service Contact/Model Info Return... -
Page 33: Ventilation
Menu Manipulation Quick Cooling/Heating Quick Cooling/Heating The indoor unit is automatically controlled, increasing the power of the outdoor unit and quickly bringing the room to a comfortable temperature. ● Fan speed display goes off and fan speed can no longer be switched. ●... - Page 34 ● Pressing buttons changes the Ventilation Ventilation rate setting to in order High High Only modes that can be set are displayed. Return Setting High ● Selecting the desired ventilation rate and pressing Menu/Enter button selects the setting and takes you back to the basic screen.
-
Page 35: Timer Settings
Menu Manipulation ● Selecting the desired ventilation mode and pressing Menu/Enter button enters Cool Set temperature the settings and takes you back to the °C basic screen. Return Setting (Pressing the Cancel button takes you back to the previous screen without changing the ventilation mode. - Page 36 Setting the schedule timer Display method for the schedule timer settings screen Operation Method The schedule timer can not be enabled when a centralized control is connected. ● Bring up the timer settings screen. Timer setting Schedule timer Disable (See page 34.) Off reminder timer Disable ●...
-
Page 37: Schedule Timer
Menu Manipulation Schedule timer Condition setting Operation Method ● Display the schedule timer settings Schedule timer Enable/Disable setting screen. (See page 35.) Condition setting Holiday setting ● Press buttons to select Condition setting on the schedule timer Return Setting settings screen. Press Menu/Enter button to display the condition setting screen. - Page 38 ● Press buttons to move the Schedule timer Time Operation highlighted item and press buttons 06 : 00 Monday 22°C ––:–– – to select the desired operation. ––:–– – ––:–– – ––:–– – Return Setting The following three types of operations are available.
- Page 39 Menu Manipulation ● To make limit operation settings, press Schedule timer Time Operation buttons to move the highlighted 06 : 00 28°C Monday 12 : 30 20°C – 26°C item and press buttons to input the ––:–– – ––:–– – desired set time.
- Page 40 ● To make operation stop settings, press Schedule timer Time Operation buttons to move the highlighted 06 : 00 28°C Monday 12 : 30 22°C – 28°C item and press buttons to input the 15 : 00 ––:–– – desired operation stop time. ––:––...
- Page 41 Menu Manipulation Holiday setting (The schedule timer will be disabled for days that have been set as holiday.) Operation Method ● Bring up the schedule timer settings Schedule timer Enable/Disable setting screen. (See page 35.) Condition setting Holiday setting ● Press buttons to select Holiday setting...
- Page 42 ● Holiday that are set will be displayed on Schedule timer Time Operation the condition settings screen. ––:–– – Sunday ––:–– – Holiday ––:–– – ––:–– – ––:–– – Return Setting Enabling or disabling the schedule timer without changing the set day or time Operation Method ●...
- Page 43 Menu Manipulation Making and checking the off reminder timer settings Operation Method ● Bring up the timer settings screen. Timer setting Schedule timer Disable (See page 34.) Off reminder Timer Disable ● Press buttons to select the Off reminder timer on the timer settings Return Setting...
- Page 44 Enabling or disabling the off reminder timer without changing the set time Operation Method ● Bring up the off reminder timer settings Off reminder Timer Enable/ Disable setting screen. (See page 42.) Condition setting ● Press buttons to select Enable/Disable setting on the off Return Setting...
-
Page 45: Service Contact/Model Information
Menu Manipulation Service Contact/Model Information Display method for service contact and model information Operation Method ● Display the main menu screen. MainMenu Set temp mode changeover (See page 26.) Airflow Direction Quick Cool/Heat On/Off ● Press buttons to select Ventilation Timer setting Service Contact/Model Info on the... -
Page 46: Convenient Functions
Convenient Functions Contrast Adjustment Operation Method ● Display the main menu screen. MainMenu Convenient functions (See page 26.) Setting status list Clock setting ● Press buttons to select Language changeover Convenient functions on the main Return Setting menu screen. Press Menu/Enter button to display the convenient functions settings screen. - Page 47 Menu Manipulation Display chageover Display selection Operation Method ● Bring up the convenient functions Convenient functions Contrast adjustment settings screen. (See page 45.) Display changeover ● Press buttons to select Display chageover on the convenient Return Setting functions settings screen. Press Menu/Enter button to display the display selection settings screen.
- Page 48 Setting the detailed display selection Operation Method ● Bring up the display selection settings Display changeover Display Standard screen. (See page 46.) Desired disp select None ● Press buttons to select Desired disp select on the convenient Return Setting functions settings screen. Press Menu/Enter button to display the detailed display selection screen.
-
Page 49: Setting Status List
Menu Manipulation Setting Status List Manipulating the setting status list Operation Method ● Display the main menu screen. MainMenu Convenient functions (See page 26.) Setting status list Clock setting ● Press buttons to select Language changeover Setting status list on the main menu Return Setting screen and press Menu/Enter button. - Page 50 ● Select “Year” with buttons. Clock setting Year 2008 Input the year with buttons. Month 01 Tuesday Holding down the button causes the 00:00 number to change continuously. Return Setting ● Select “Month” with buttons. Clock setting Year 2008 Input the month with buttons.
-
Page 51: Language Changeover
Menu Manipulation ● Press button to select on the Clock setting Is it settled by setting? settings confi rmation screen. Press Menu/Enter button to set the clock and return to the basic screen. Return Setting When setting schedule timer, the display return to the settings screens. -
Page 52: Maintenance
Maintenance Filter Sign Resetting Operation Method ● When the time to clean the fi lter or element has come, one of the following messages will appear on Cool Set temperature the bottom of the basic screen. °C “Clean the fi lter” Clean the filter “Clean the fi... -
Page 53: Maintenance Of Unit And Lcd
Maintenance Caution ● Do not wash the remote ● Be sure to stop the operation of controller. the air conditioner and turn off Doing so may cause electric the power supply breaker at the leakage and result in electric shocks time of maintenance. -
Page 54: Useful Information
Useful Information Error code Display Contact your Daikin dealer in the following cases Warning ● When the air conditioner is malfunctioning (e.g., giving off a burning odor), stop the air conditioner and turn off power. Continued operation under such circumstances may result in failure, electric shocks, or fi re. -
Page 55: After-Sale Service
● Your address, name, and telephone number Relocation The relocation of the remote controller requires special technology. Consult your Daikin dealer. Actual expenses required for the relocation of the remote controller will be charged. Repairs after Warranty Period Consult your Daikin dealer. - Page 56 3P243520-1B EM08A100A (0906) HT...
Need help?
Do you have a question about the BRC1E61 and is the answer not in the manual?
Questions and answers
I need to clean the filter but I **** not sure how to open vent. The filters upstairs are bigger and the have a leaver to use whilst the filter I **** trying to clean appears to have a screw which is not opening