
Related Manuals for Smooth Fitness 6.17 MOTORIZED TREADMILL


Summary of Contents for Smooth Fitness 6.17 MOTORIZED TREADMILL
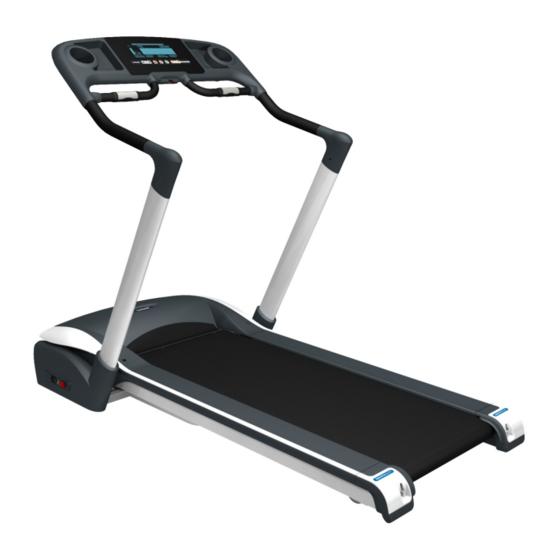
- Page 1 USER’S MANUAL 6.17 MOTORIZED TREADMILL USER WEIGHT LIMITATION: 350LBS (150KGS) SERIAL NUMBER (Found on Frame):...
- Page 2 6.17 MOTORIZD TREADMILL PRECAUTIONS For Future Service or Related Questions: Please staple your receipt and/or write in the name and phone number of the retail store where you purchased your treadmill. Name: ______________________________ Phone Number: ___________________ Receipt: ______________________ WARNING: To reduce the risk of burns, fire, electric shock, or injury to persons, read the following important precautions and information before operating the treadmill.
- Page 3 6.17 MOTORIZD TREADMILL POWER REQUIREMENT POWER REQUIREMENT IMPROPER CONNECTION OF THE EQUIPMENT GROUNDING CONNECTOR CAN RESULT IN A RISK OF AN ELECTRIC SHOCK. CHECK WITH A QUALIFIED ELECTRICIAN OR SERVICE MAN IF YOU ARE IN DOUBT AS TO WHETHER THE PRODUCT IS PROPERLY GROUNDED. DO NOT MODIFY THE PLUG PROVIDED WITH THE PRODUCT, IF IT WILL NOT FIT THE OUTLET;...
-
Page 4: Pre-Assembly
6.17 MOTORIZD TREADMILL PREASSEMBLY Open The Boxes: You are now ready to open the boxes of your new equipment. Make sure to inventory all of the parts that are included in the boxes. Check the Hardware Comparison Chart for a full count of the number of parts included for this product to be assembled properly. -
Page 5: Hardware Comparison Chart
6.17 MOTORIZD TREADMILL HARDWARE COMPARISON CHART Hardware Chart: For your convenience, we have identified the hardware used in the assembly of this product. This chart is provided to help you identify those items that may be unfamiliar to you. Description Qty. Screw Cover Φ8 Washer M8x45mm Allen Head Cap Bolt... -
Page 6: Parts List
6.17 MOTORIZD TREADMILL PARTS LIST Part No. Description Qty. Order No. Computer Button Cover 6.17- 101 Console Housing -Upper 6.17- 102 Computer 6.17- 103 Safety Key 6.17- 104 Safety Key Base 6.17- 105 Button Board 6.17- 106 Console Housing-Bottom 6.17- 107 Overlay 6.17- 108... - Page 7 6.17 MOTORIZD TREADMILL PARTS LIST Part No. Description Qty. Order No. Motor Hood -Upper 6.17- 501 Motor Hood Decorative Cover- Left 6.17- 502 Motor Hood Decorative Cover- Right 6.17- 503 Motor Hood-Bottom 6.17- 504 Driving Motor 6.17- 505 Driving Motor Base 6.17- 506 Transportation Wheel-Front 6.17- 507...
- Page 8 6.17 MOTORIZD TREADMILL PARTS LIST Part No. Description Qty. Order No. Left Rear End Cap-Decorative Cover 6.17- 709 Running Deck 6.17- 710 Running Deck Rubber Cushion 6.17- 711 Side Rail Guider 6.17- 712 Φ 2x6mm Screw 6.17- 801 Φ 8 Washer 6.17- 802 Φ...
-
Page 9: Parts Diagram
6.17 MOTORIZD TREADMILL PARTS DIAGRAM A MAJORITY OF THE PARTS SHOWN HERE HAVE BEEN PRE-ASSEMBLED AT THE FACTORY. WWW.SMOOTHFITNESS.COM ... - Page 10 6.17 MOTORIZD TREADMILL PARTS DIAGRAM A MAJORITY OF THE PARTS SHOWN HERE HAVE BEEN PRE-ASSEMBLED AT THE FACTORY. WWW.SMOOTHFITNESS.COM ...
- Page 11 6.17 MOTORIZD TREADMILL PARTS DIAGRAM A MAJORITY OF THE PARTS SHOWN HERE HAVE BEEN PRE-ASSEMBLED AT THE FACTORY. WWW.SMOOTHFITNESS.COM ...
- Page 12 6.17 MOTORIZD TREADMILL PARTS DIAGRAM A MAJORITY OF THE PARTS SHOWN HERE HAVE BEEN PRE-ASSEMBLED AT THE FACTORY. WWW.SMOOTHFITNESS.COM ...
- Page 13 6.17 MOTORIZD TREADMILL PARTS DIAGRAM A MAJORITY OF THE PARTS SHOWN HERE HAVE BEEN PRE-ASSEMBLED AT THE FACTORY. WWW.SMOOTHFITNESS.COM ...
- Page 14 6.17 MOTORIZD TREADMILL PARTS DIAGRAM A MAJORITY OF THE PARTS SHOWN HERE HAVE BEEN PRE-ASSEMBLED AT THE FACTORY. WWW.SMOOTHFITNESS.COM ...
- Page 15 6.17 MOTORIZD TREADMILL PARTS DIAGRAM A MAJORITY OF THE PARTS SHOWN HERE HAVE BEEN PRE-ASSEMBLED AT THE FACTORY. WWW.SMOOTHFITNESS.COM ...
- Page 16 6.17 MOTORIZD TREADMILL ASSEMBLY STEP 1: A. Remove the carton and all packing material from the treadmill and place the treadmill on the floor in an open area. B. Raise up the Upright (301), and secure the Left Upright using two M8x18mm Allen Head Cap Bolt (830), two Φ8 Washer (802), one M8x51mm Bolt (805) and one Φ8 Washer (802).
- Page 17 6.17 MOTORIZD TREADMILL ASSEMBLY STEP 2: A. Rotate the Console Assembly (203) up and hold while the bolts are inserted. B. Secure the Right Handbar with two M8x45mm Allen Head Cap Bolt (804) and two Φ 8 Washer (802) . C. Secure the Left Handbar with two M8x45mm Allen Head Cap Bolt (804) and two Φ...
- Page 18 6.17 MOTORIZD TREADMILL ASSEMBLY STEP 3: NOTE: Refer to FOLDING INSTRUCTION on the page 22. A. Fold up the running deck until it locks in correct position. B. Attach Right Upright base cover- back (604) to the right upright, secure with one 4 x 14mm screw (806).
- Page 19 6.17 MOTORIZD TREADMILL ASSEMBLY STEP 4: A. Attach the Handbar Cover-LL (304) then attach the Handbar Cover-LR (305), secure with one 4 x 14mm screw. B. Attach the Handbar Cover-RR (308) then attach the Handbar Cover-RL (307), secure with one 4 x 14mm screw. WWW.SMOOTHFITNESS.COM ...
- Page 20 6.17 MOTORIZD TREADMILL ASSEMBLY STEP 5: A. Loosen Handlebar securing bolts using the 6mm Allen key and push the Handlebar down until the handlebar covers are fully seated in the uprights. B. Tighten the Handlebar securing bolts. C. Insert the Screw covers (310) to the uprights as shown the Close-up 3. WWW.SMOOTHFITNESS.COM ...
-
Page 21: Location Of Serial Number
6.17 MOTORIZD TREADMILL ASSEMBLY COMPLETE Congratulations your 6.17 TREADMILL is fully assembled. Check that all the components are secure and all the hardware is tight. By this step all bolts and screw should be wrench tight. If any hardware is not wrench tight go back and tighten. You can find the Serial Number as shown in the photo. -
Page 22: Folding Instruction
6.17 MOTORIZD TREADMILL FOLDING INSTRUCTION How To Fold Up The Treadmill: Your treadmill can be folded up for space saving storage. Lift the deck from the rear so that the treadmill rests on the front transportation wheels. Roll to a desired location. WWW.SMOOTHFITNESS.COM ... - Page 23 6.17 MOTORIZD TREADMILL UNFOLDING INSTRUCTION How To Unfold The Treadmill: Deck release lever Push the deck release lever and gently pull on the deck. Once the deck begin to lower, let it fall by itself. WWW.SMOOTHFITNESS.COM ...
- Page 24 6.17 MOTORIZD TREADMILL TRANSPORT INSTRUCTION TRANSPORT INSTRUCTION: To roll away for storage simply grab the rear deck, lift slightly and roll to desired location. When the rear of the frame is rotated high enough, The rear wheel will automatically move into position for transport. WWW.SMOOTHFITNESS.COM ...
-
Page 25: Belt Adjustment
6.17 MOTORIZD TREADMILL MAINTENANCE HOW TO MAINTAIN YOUR SMOOTH 6.17 TREADMILL: Proper maintenance is very important to ensure your treadmill is always in top working condition. Improper maintenance could cause damage or shorten the life of your treadmill and exceed the LIMITED WARRANTY coverage. -
Page 26: Deck Lubrication
6.17 MOTORIZD TREADMILL MAINTENANCE CLEANING: Routine cleaning of your treadmill will extend the product's life. • Warning: To prevent electrical shock, be sure the power to the treadmill is OFF and the power cord is unplugged from the wall electrical outlet before attempting any cleaning or maintenance. •... -
Page 27: Before Beginning
6.17 MOTORIZD TREADMILL IMPORTANT STEP WARNING: Before using this product, please consult your personal physician for a complete physical examination. Frequent and strenuous exercise should be approved by your doctor first. If any discomfort should result from your use of this product, stop exercising and consult your doctor. Proper usage of this product is essential. Please read your manual carefully before exercising. -
Page 28: Troubleshooting
6.17 MOTORIZD TREADMILL TROUBLE SHOOTING TROUBLE SHOOTING NOTE: Do not touch any internal electric wires without consulting the manufacturer. Treadmill will not start: 1. Make sure the power cord is plugged into a surge protector, the surge protector is plugged into a properly grounded outlet and the surge protector is turned on (refer to the Power Requirements section in this manual). -
Page 29: Computer Instruction
6.17 MOTORIZD TREADMILL COMPUTER INSTRUCTION DISPLAY (1) User Code / Distance Display The range of User Code is from U 1 to U9. Initial User Code is U1. The range of distance is from 00.00 to 99.99 km /mi. (2) km /mi. display The distance display in km /mi. - Page 30 6.17 MOTORIZD TREADMILL COMPUTER INSTRUCTION BUTTON and FUNCTION: START button Press START to begin any selected program. STOP/BACK button a. Press this button to pause the program. b. Press this button twice to return to the POWER ON MODE. c.
- Page 31 6.17 MOTORIZD TREADMILL COMPUTER INSTRUCTION POWER ON MODE When the unit is switched on, “PRESS START TO QUICK START OR ENTER TO SELECT PROGRAM” will display on the LCD. Press START to begin training in QUICK START MODE or ENTER to go into PROGRAM MODE. UNIT CONVERSION MODE –...
- Page 32 6.17 MOTORIZD TREADMILL COMPUTER INSTRUCTION PROGRAM MODE Press ENTER button to enter PROGRAM MODE and begin setting user preferences, at the time of first use of the treadmill. SET UP USER CODE At firs, the LCD will show a blinking U1, and will also display only factory default setting values for user Weight, Height, Age and Target Heart Rate.
-
Page 33: Program Mode
6.17 MOTORIZD TREADMILL COMPUTER INSTRUCTION PROGRAM MODE After setting the user Height, The LCD will display a Blinking P -, indicating that the user is now free to select from Programs 1-11. Press the INPUT-UP and INPUT-DOWN buttons to select the program and press the ENTER button to set up that program. -
Page 34: Power On Mode
6.17 MOTORIZD TREADMILL COMPUTER INSTRUCTION The user may press INCLINE-UP or INCLINE-DOWN button to adjust the treadmill angle. Press the STOP to pause the program, START to restart, or press the STOP button again to return to POWER ON MODE. COOL DOWN When the target time counts down to 0, the program will run the COOL DOWN program signaled by a BEEP sound. - Page 35 6.17 MOTORIZD TREADMILL COMPUTER INSTRUCTION P2 - TARGET DISTANCE PROGRAM If the user selects P2 and presses ENTER, the LCD will blink 0.0 (km/mi.), the user must next use INPUT-UP and INPUT-DOWN to setup the Target Distance, and then press ENTER to confirm the setting. The user must then Press START to begin the program P2 –...
-
Page 36: Performance Level
6.17 MOTORIZD TREADMILL COMPUTER INSTRUCTION P4 - INCLINE INTERVAL PROGRAM If user selects the P4 program, and presses ENTER, Level and Duration Time need to be setup to start the program. After selecting the P4 program, L1 will first be blinking, and the user must use INPUT-UP and INPUT-DOWN to select a Performance Level between L1 and L12, and then press ENTER to confirm the setting. - Page 37 6.17 MOTORIZD TREADMILL COMPUTER INSTRUCTION P5 - SPEED INTERVAL PROGRAM If the user selects P5 and presses ENTER, L1 will first be blinking and the user must select a Performance Level between L1 and L12 using INPUT-UP and INPUT-DOWN to set the min. and max. speed setting as per the intervals shown in the table below.
- Page 38 6.17 MOTORIZD TREADMILL COMPUTER INSTRUCTION As previously described in Program P1, the user may the alter speed with SPEED-UP / SPEED-DOWN, angle with INCLINE-UP / INCLINE-DOWN, and Pause, COOL DOWN or STOP as described. Note: During the workout Users can override the Speed and Incline settings by pressing the SPEED-UP/SPEED-DOWN and INCLINE-UP/INCLINE-DOWN buttons.
- Page 39 6.17 MOTORIZD TREADMILL COMPUTER INSTRUCTION After setting the preferred Performance level, the LCD will display a blinking 30:00 (min.) workout time. The user must then use INCLINE-UP and INCLINE-DOWN buttons to adjust the total workout time in intervals of 5:00 (min.) and then press ENTER to confirm the setting.
- Page 40 6.17 MOTORIZD TREADMILL COMPUTER INSTRUCTION P7- 5K SELF LEARNING PROGRAM If the user selects the P5 and presses ENTER, the display shows the preset distance 5 km / 3mi. The user may then press START to initiate the program, P7 – 5K SELF LEARNING. The Speed starts from 3.2 km/h / 2.0 mph, and Time and Calories begin to count up from 0.
- Page 41 6.17 MOTORIZD TREADMILL COMPUTER INSTRUCTION P8 - HEART RATE CONTROL PROGRAM If the user selects P8 and presses ENTER, The Time display will show the preset Target Heart Rate of 153 (bpm). The user must now set the Target Heart Rate using INPUT-UP and INPUT-DOWN, and then pressing START to confirm the setting.
- Page 42 6.17 MOTORIZD TREADMILL COMPUTER INSTRUCTION HEART RATE CONTROL MODE When the program enters into the HEART RATE CONTROL Program, The total time continues to count down, Calories spent and Distance traversed increase, and the treadmill will run with the same Speed and Incline level determined by the warm-up phases (Incline, Speed, Extended Monitoring).
- Page 43 6.17 MOTORIZD TREADMILL COMPUTER INSTRUCTION Reduced Mode Toggling with START to Reduced Mode and then pressing STOP to end the workout and delete all subsequent speed and incline settings that may have been previously been stored in that program. As previously described in Program P1, the user may alter speed with SPEED-UP / SPEED-DOWN, angle with INCLINE-UP / INCLINE-DOWN, and Pause, COOL DOWN or STOP as described.
-
Page 44: Warranty
Warranty applying to the original product. Any technical advice furnished before or after delivery in regard to the use or application of Smooth Fitness products is furnished without charge and on the basis that it represents Smooth Fitness' best judgment under the circumstances but that the advice is used at your sole risk. -
Page 45: Target Heart Rate
6.17 MOTORIZD TREADMILL TARGET HEART RATE Finding Your Pulse: To make sure your heart is beating in its target zone, you’ll need to know how to monitor your heart rate. The easiest way is to feel the pulse in the carotid artery on either side of your neck, between the windpipe and the large neck muscles. Count the number of beats in ten seconds, and then multiply that number by six. -
Page 46: Muscle Chart
6.17 MOTORIZD TREADMILL MUSCLE CHART Targeted Muscle Groups: The exercise routine that is performed on this product will develop the upper and lower body muscle groups. These muscle groups are shown in gray color on the chart below. Shoulder muscles Pectoral muscles Bicep muscles Abdominal muscles... -
Page 47: Stretching Routine
6.17 MOTORIZD TREADMILL STRETCHING ROUTINE Warm up and Cool down: A successful exercise program consists of a warm-up, aerobic exercise, and a cool-down. Do the entire program at least two and preferably three times a week, resting for a day between workouts. After several months, you can increase your workouts to four or five times per week. -
Page 48: Hamstring Stretch
6.17 MOTORIZD TREADMILL STRETCHING ROUTINE Hamstring Stretch: Sit with your right leg extended. Rest the sole of your left foot against your right inner thigh. Stretch toward your toe as far as possible. Hold for 15 counts. Relax and then repeat with left leg extended. Inner Thigh Stretch: Sit with the soles of your feet together with your knees pointing outward. - Page 49 6.17 MOTORIZD TREADMILL Smooth Fitness 780 Fifth Avenue, Suite 200 King of Prussia, PA 19406 Toll Free Customer Service: 1.888.800.1167 Website: www.smoothfitness.com WWW.SMOOTHFITNESS.COM ...
Need help?
Do you have a question about the 6.17 MOTORIZED TREADMILL and is the answer not in the manual?
Questions and answers